How to Verify a New-Home Rainwater and Nonpotable Plumbing System Before Covering
Use a source-linked register to verify rainwater collection, treatment, storage, separation, testing and handoff before a new home's system is concealed.
The short answer
Before covering, freeze the approved end uses and local authority having jurisdiction, then reconcile the roof, first flush, tank, treatment train, pipe materials, overflow, makeup-water separation, labels and access against the drawings and exact model documents. Have the responsible professionals perform code-required pressure, functional and water-quality checks, record results, and approve, correct or defer concealment. Washington and California examples are jurisdiction-specific.How to Verify a New-Home Rainwater and Nonpotable Plumbing System Before Covering
Before covering, freeze the approved end uses and local authority having jurisdiction (AHJ), then reconcile the roof, first flush, tank, treatment train, pipe materials, overflow, makeup-water separation, labels and access against the drawings and exact model documents. Have the responsible professionals perform code-required pressure, functional and water-quality checks, record results, and approve, correct or defer concealment. Washington and California examples are jurisdiction-specific.
Decide whether the package is ready before anything disappears #
The package is ready to cover only when the approved use, jurisdictional path, installed components, required tests and future handoff records agree; if any safety-critical item is unknown, the correct decision is to defer concealment. A homeowner can coordinate and observe the evidence, but the designer, licensed plumber, engineer, water supplier, treatment specialist and AHJ retain responsibility for the decisions assigned to them.
This guide addresses a new United States house with roof-collected rainwater routed to nonpotable uses such as toilet flushing, irrigation or another use approved by the local authority. It does not authorize drinking-water reuse, bathing, food preparation, potable treatment, confined-space entry, excavation, structural support, electrical work or a particular product. “Nonpotable” is a use classification, not a statement that the water is harmless. EPA describes onsite non-potable water reuse as capturing and treating roof-collected rainwater and other sources for non-drinking uses, while its research focuses on pathogen-removal targets, risk and monitoring of treatment performance. EPA’s onsite non-potable reuse research is useful context, not a permit or a complete residential design.
The three possible decisions
Use the following decision surface at the pre-cover meeting. It is deliberately stricter than “the pipes hold pressure.” A pressure-tight installation can still have the wrong roof coating, an unapproved end use, a hidden cross-connection, no safe overflow, an inaccessible filter or a treatment unit that does not match the actual demand.
| Decision | Minimum evidence | What happens next |
|---|---|---|
| Approve for covering | The signed or otherwise accepted plan identifies the end uses and AHJ; every visible component matches the approved package; separation, overflow, access, labels and supports are observable; code and manufacturer tests pass; results, photographs and model records are filed. | The builder may cover only the areas released by the responsible inspector or professional. Keep a marked-up as-built record and schedule commissioning and maintenance. |
| Correct before covering | A component, route, material, test, label, access point or document is wrong or incomplete, but the correction is defined and can be inspected while open. | Issue a written correction with an owner, exact location, acceptance criterion and re-test. Do not cover the corrected area until the record is closed. |
| Defer | The end use, approval path, treatment basis, cross-connection protection, structural support, hazardous access or test method is unresolved; or a failed test has no diagnosed cause. | Stop the handoff. Ask the licensed designer, plumber, engineer, water supplier or AHJ for a decision. Preserve access and reschedule the inspection after the package is revised. |
“Looks complete” is not a fourth outcome. If the tank is buried, the roof is finished, or the wall is about to receive insulation, the cost of uncertainty is about to rise. The homeowner’s leverage is greatest while the system is visible and isolated. Ask the builder to identify the exact release boundary: for example, “north wall nonpotable branch may be covered after pressure test and photographs,” rather than “plumbing approved.”
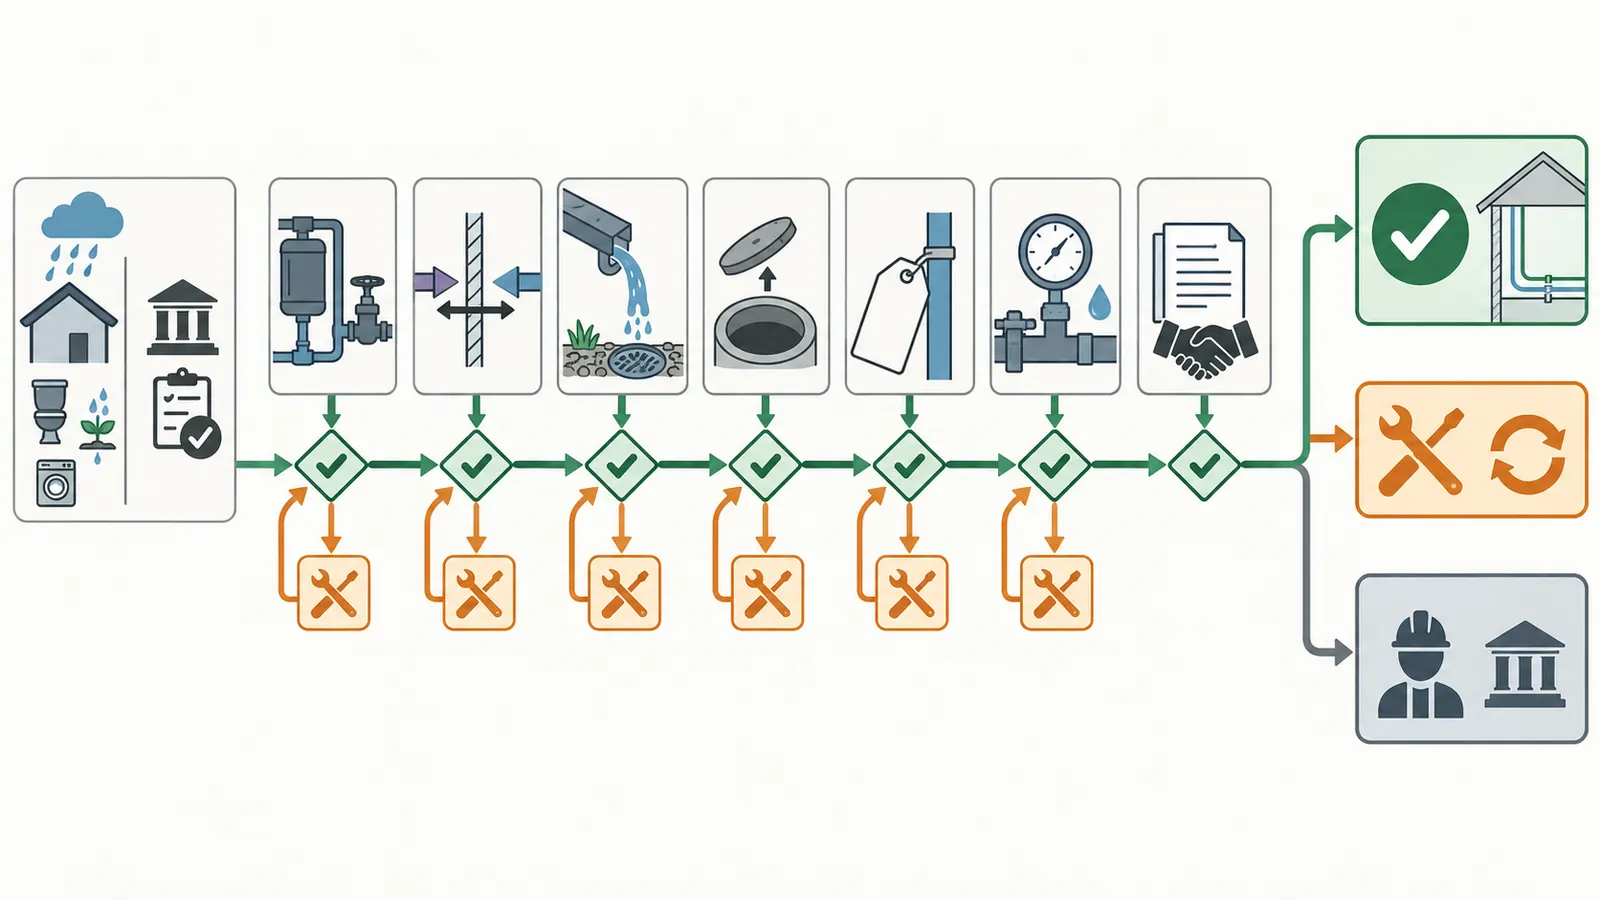
The assigned people and their handoffs
Responsibility must be named by role and person or company. A generic line saying “plumbing by contractor” is not a handoff record. The table below is a coordination model; the contract, permit and local rules may assign duties differently.
| Work product | Homeowner can collect or verify | Responsible professional or authority | Handoff record |
|---|---|---|---|
| Intended end use | Confirm that the fixtures, irrigation zones or equipment are the uses the household actually wants. | Designer and AHJ determine whether each use is allowed and what treatment or protection it needs. | End-use schedule with fixture count, flow or demand, location and approval reference. |
| Jurisdiction | Record the city, county, water supplier and state, permit number and inspection contact. | AHJ, water supplier and state agencies interpret the adopted code, reuse program and backflow requirements. | Written approval, permit set, inspection notes or email from the authority. |
| Collection and storage | Compare roof areas, downspouts, tank location, hatch, overflow and visible labels with the plan. | Designer, engineer and plumber resolve drainage, tank support, freeze, access and structural questions. | Marked-up plan, tank model, support or foundation detail, overflow discharge detail. |
| Treatment | Check that the installed model numbers are recorded and that manuals, ratings and alarms are present. | Qualified treatment designer or engineer selects and commissions the train for the end use. | Model-specific submittals, design basis, commissioning record and maintenance schedule. |
| Distribution | Trace every nonpotable branch and locate makeup water, valves, drains, labels and test points. | Licensed plumber and backflow tester install and test the separation required by the jurisdiction. | Pressure and cross-connection test results, photographs and valve schedule. |
| Covering | Attend the open-wall review, ask what is being released and retain photographs. | Inspector or designated professional accepts the work within their authority. | Inspection approval and dated pre-cover photo set. |
| Ownership | Request the as-built diagram, shutoff map, serial numbers, consumables and emergency steps. | Builder and system installer provide handover; homeowner operates only within the manual. | Owner’s manual, maintenance log template, warranties and contacts. |
Originality brief: what this guide adds
Current answers from EPA, state summaries, university or extension guidance, certification listings and installation manuals explain what rainwater harvesting is, how risk and treatment are considered, selected state rules, or how one product is installed. They generally do not give a homeowner one pre-cover decision surface that reconciles the end use, AHJ, collection surface, storage, treatment, materials, makeup water, overflow, labels, tests and final record.
The missing decision is whether the complete new-build package is ready to approve, correct or defer before concealment and handover. The original contribution in this article is the Rainwater Pre-Cover Verification Register and Yield/Storage Worksheet. Its method is to place one prerequisite or handoff in each row, attach a source or project record, state who owns the decision, and calculate a clearly illustrative supply and storage screen from explicit inputs. Its limitations are important: it is not an inspection form issued by an AHJ, a plumbing code, an engineering design, a laboratory result, a certification, or proof of field performance. Check it by comparing each row with the latest permitted drawings, the exact product manual and listing, the installer’s test records, and the local authority’s written requirements.
For completeness, the contribution’s manifest method is: “Translate the assigned decision into one row per prerequisite or handoff, link each row to the exact plan, model document, test record or local approval, and use an illustrative roof-yield and dry-period calculation with sensitivity to expose assumptions.” Its manifest limitations are: “The worksheet is a homeowner coordination aid, not a plumbing code, engineering design, laboratory result, certification, inspection, or approval. Local authorities, licensed trades, engineers and the exact component manufacturers control site-specific requirements and performance.” These statements are part of the check: the register is useful only when its rows are reconciled with project records, and its modeled numbers must not be treated as field performance.
High-safety boundaries
Do not climb onto a roof to inspect a catchment surface, open a tank, enter a confined space, energize an exposed pump or UV unit, excavate around a buried tank, modify structural supports, make a potable connection or perform a pressure test without the qualified person assigned to the work. Ask for photographs or a supervised walk-through when a safe observation is possible. A tank opening can be a confined-space hazard even when the tank appears empty; a wet test can create electrical hazards; a pressurized test can release stored energy; and treatment chemicals can harm skin, eyes or lungs.
Remote review has a hard limit. A photograph cannot prove an unseen fitting, a hidden cross-connection, a treatment dose, a pipe pressure history, a tank foundation, an overflow discharge path or a laboratory water-quality result. Use remote records to identify questions, then obtain the appropriate professional inspection and test.
This guide belongs to Brictale’s materials and systems journey. Use the design and layout journey when the end use or equipment room is still being planned, the managing the build journey when you need to hold a concealment milestone, and the handover and ownership journey when the system moves from commissioning to routine care.
Freeze the end use, authority and design inputs #
The first verification step is to freeze the intended nonpotable use and identify the exact authority having jurisdiction before checking equipment, because treatment, materials, separation, inspection and maintenance depend on the source, use, code and local program. Do not approve a system merely because it can collect water or because a tank and pump are installed.
Write the end-use schedule
Put each use on its own line. “Nonpotable house water” is too broad to design or inspect. A useful schedule includes:
| End use | Location | Demand input | Human contact or aerosol concern | Makeup water? | Proposed treatment and acceptance basis |
|---|---|---|---|---|---|
| Toilet flushing | Bathrooms | Flushes/day × gallons/flush | Accidental contact possible; no drinking | Maybe | State or local requirement plus product design basis |
| Urinal flushing, if any | Bathroom | Uses/day × gallons/use | Accidental contact possible | Maybe | Same, with exact local approval |
| Drip irrigation | Yard | Zone flow × run time | Lower direct contact than spray | Usually no | Local irrigation and backflow requirements |
| Aboveground spray irrigation | Yard | Zone flow × run time | Aerosol and contact exposure | Usually no | End-use-specific treatment and setback rules |
| Clothes washing | Laundry | Loads/day × gallons/load | Skin and accidental ingestion exposure | Possibly | Do not infer approval from toilet-flush approval |
| Decorative feature | Interior or exterior | Recirculation and makeup | Aerosol and splash | Possibly | Confirm local approval and treatment basis |
EPA lists toilet flushing, clothes washing and ornamental plant irrigation as examples of non-drinking uses, but that does not mean a particular state or local authority approves all three for a particular home. EPA’s research description distinguishes the broad source-and-use concept from the treatment and monitoring questions that must be resolved for safe adoption.
For each line, record whether the water is untreated rainwater, filtered rainwater, disinfected treated rainwater, or another category defined by the local rule. Do not use “treated” without saying treated by what process, to what target, at what sampling point and for what use. A first-flush diverter and leaf screen are pretreatment; they are not automatically disinfection. A filter removes some particles; it is not automatically a pathogen barrier. A UV unit may require a specified flow, transmittance, lamp status and electrical installation; it is not a universal replacement for a complete treatment train.
Name the actual jurisdiction
At the project start, create a jurisdiction line with:
- property address and state;
- city or county building and plumbing department;
- water supplier or public water system, if connected;
- health or environmental agency, if the local program involves one;
- permit number and approved drawing revision;
- inspection type and release point before concealment;
- local backflow testing and certification contact;
- any HOA, watershed, stormwater or utility conditions that affect discharge.
The authority may be the city, county, state, water supplier or more than one of them. The person who sells or installs the tank is not automatically the authority. Ask one written question that makes the boundary explicit: “For this address, roof-collected rainwater used for [listed uses], with [listed potable makeup arrangement], which department approves the plumbing, treatment, backflow protection, overflow and final inspection, and what must be visible before covering?” Save the response with the plan.
Washington is a useful example of why this step matters. The EPA summary of Washington’s rules lists specified rooftop rainwater uses such as aboveground and subsurface irrigation, water closets, urinals, tap primers, ornamental features, cooling-tower makeup and car washing. It also says additional treated-rainwater applications are not specified in the summary. Read the Washington-specific summary as a boundary prompt, not as a national list. The summary itself says it is informational and that the state or federal law governs if there is a conflict.
California demonstrates a different reason to verify current state and local status. The California Department of Housing and Community Development says Senate Bill 597 requires recommendations about building standards for rainwater catchment for nonpotable uses in newly constructed residential dwellings, and its current page shows a 2026 draft-report comment period and a final report due January 1, 2027. California HCD’s rainwater-catchment report page is evidence that the policy work is active; it is not a permit, an installation approval or a reason to copy Washington requirements into California. For a California house, check the current California Plumbing Code, the building department, the water supplier and any applicable local program for the address and permit date.
Assemble the design baseline
Do not review an installation against a sales brochure alone. Gather the latest approved or submitted set, then mark the revision date on every document:
- site plan showing roof drainage, tank, overflow and discharge;
- roof plan identifying the actual catchment area and roof material or coating;
- plumbing isometric or schematic showing untreated and treated paths;
- end-use and fixture schedule with estimated demand;
- tank cut sheet, capacity, access, vents, drains, overflow and foundation or support detail;
- first-flush, screen, filter, pump, UV, chlorination, controls and alarm documents;
- pipe, fitting, valve, seal and adhesive submittals with compatibility and listing information;
- potable makeup-water and backflow or air-gap detail;
- drainage and overflow discharge detail;
- electrical plan for pumps, controls, sensors, UV and chemical equipment;
- inspection and test plan identifying hold points before burial, drywall, insulation, ceilings or finishes;
- owner’s operation, maintenance, shutdown and emergency instructions.
If the field installation was changed, do not silently update an old PDF or redraw the system from memory. Write a proposed change, show affected loads and controls, identify the responsible designer, and obtain the approval needed before closing the work. A small route change can move a valve out of reach, eliminate an air gap, alter a pump head, change an overflow elevation or make a test port inaccessible.
Define acceptance before looking at results
Every test or observation needs an acceptance criterion before it is performed. Examples include “no visible leak during the code-required pressure test,” “model number matches the approved submittal,” “overflow reaches the approved stormwater discharge without a shutoff,” “all nonpotable outlets are permanently identified,” or “water-quality sample meets the local target at the specified point.” Do not use a vague criterion such as “works properly.”
The homeowner’s question is not “Did the contractor say it passed?” It is “What was tested, at what location, under what conditions, against which authority or manufacturer criterion, by whom, and where is the dated record?”
Verify the roof, collection path, first flush and tank #
The collection and storage side is ready only when the actual roof surface, gutters, debris controls, first-flush behavior, tank capacity, tank support, access, overflow, drain and labels match the design basis and can be safely inspected and maintained. Collection volume alone does not establish water quality or legal approval.
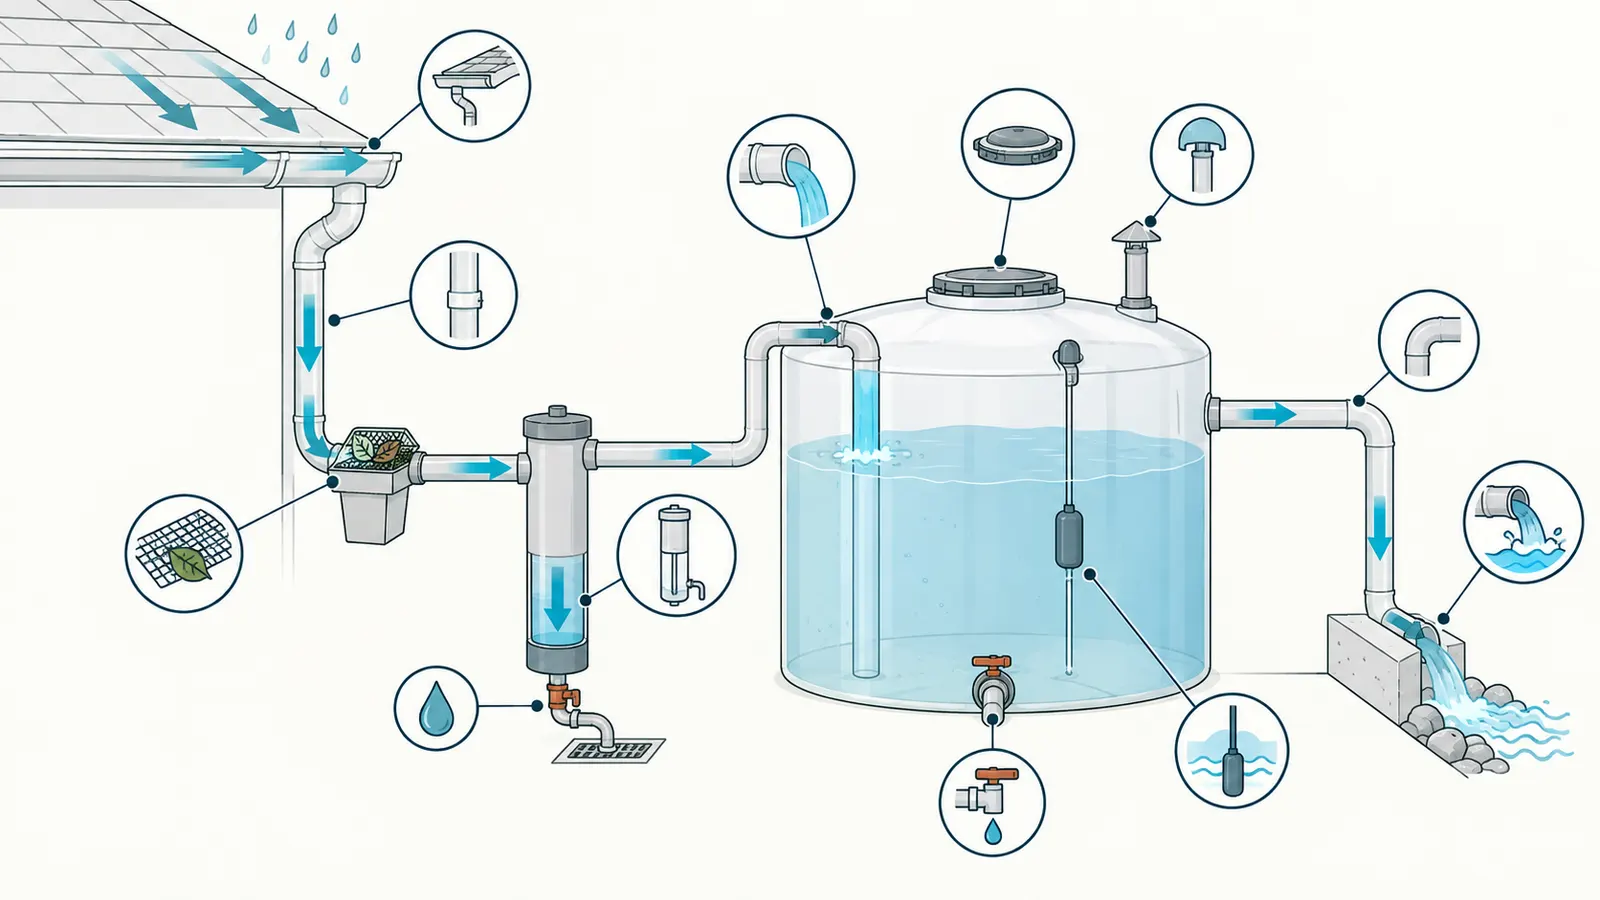
Trace water from the roof to the untreated tank
Start at each catchment plane and follow the water in the direction of flow. On the plan and in the field, identify:
- which roof planes are included and which are intentionally excluded;
- the measured or documented horizontal footprint used for the calculation;
- roof membrane, metal, tile, coating, sealant and any treatment applied to the surface;
- gutters, downspouts, screens, leaf guards and cleanouts;
- each first-flush or roof-washer device and its reset or drain behavior;
- points where stagnant water could pool;
- untreated-water tank inlet, strainer, diffuser or calming inlet;
- tank hatch, vent, drain, overflow and level sensor;
- overflow route and final discharge point;
- isolation valves that are labeled and reachable.
TCEQ’s rainwater guidance explains that roof-collected water generally has lower contaminant levels than land-based collection but remains subject to contamination. It recommends smooth, nonporous materials for efficiency and reduced collection of debris in pores and seams, and warns against biocide-treated roofing when potable use is contemplated. The GI-366 guidance is not a national roof-material rule and its potable cautions should not be misrepresented as a universal nonpotable approval. For a nonpotable project, still ask the designer and AHJ whether the actual roof, coating, flashing, preservative, bird-control treatment or cleaning chemical is compatible with the intended use and treatment train.
The roof submittal should say more than “metal roof” or “roof by others.” Record manufacturer, product, finish, coating, installation date and any post-installation treatment. If the roof changed after the rainwater design, stop and ask for a compatibility review. A surface that is acceptable for storm drainage is not automatically acceptable for a reuse system, and a surface acceptable for irrigation is not automatically acceptable for an indoor end use.
Verify debris exclusion and first flush
Large debris exclusion protects the conveyance and tank; first flush addresses the initial contaminant load after a dry period. Confirm which device does which job, because a leaf screen is not a first-flush diverter and a first-flush chamber does not necessarily filter fine sediment or disinfect water.
For a fixed-volume first-flush diverter, TCEQ gives a recommendation of at least 1 to 2 gallons diverted for each 100 square feet of roof surface in its educational guidance. It explains that roof slope, porosity, contaminant type, dry-period length and rainfall intensity affect the amount needed. See the first-flush section of GI-366. Treat the figure as one documented design input, not as a national code minimum or a test proving that the tank water is safe.
Use this worksheet:
| Input | Symbol | Illustrative value | Project value |
|---|---|---|---|
| Catchment footprint | A | 2,400 ft² | ___ ft² |
| Lower first-flush factor | fL | 1 gal/100 ft² | ___ gal/100 ft² |
| Upper first-flush factor | fH | 2 gal/100 ft² | ___ gal/100 ft² |
| Calculated lower diversion | A ÷ 100 × fL | 24 gal | ___ gal |
| Calculated upper diversion | A ÷ 100 × fH | 48 gal | ___ gal |
Then verify the physical behavior. Ask the installer to demonstrate, without anyone entering the tank or climbing onto the roof, where the diverted water goes, how the chamber drains or resets, what happens during a slow drizzle, and how the owner will clean or inspect it. Check whether the diverter’s capacity and discharge can handle the expected rainfall rate without backing up into the roof or overflowing into an unintended area. If the device depends on a ball, valve, float, siphon or sensor, record the model and maintenance instruction.
TCEQ notes that rainfall may begin as a slow drizzle and that a fixed-volume device may fill before the roof is fully rinsed; it also notes that a fixed-rate device may waste water during a low-intensity event. That tradeoff belongs in the design record. Do not call a device defective merely because it behaves differently from a simple “first X gallons” diagram; compare its operation with its own instructions and the approved design.
Run the illustrative yield calculation
A yield screen answers one question: “Is the proposed roof and rainfall assumption in the same order of magnitude as the proposed demand?” It does not size the system by itself. TCEQ gives an approximate screening method of 0.5 gallon per inch of rain per square foot of roof footprint, then multiplies by roof area. Its worked yield example shows that annual rainfall and roof footprint can still be insufficient for total household demand.
For a more transparent worksheet, write the formula as:
Annual captured gallons ≈ annual rainfall (in) × roof footprint (ft²) × 0.5 gal/(in·ft²)
The 0.5 factor is an approximate net-yield factor from the TCEQ example. It implicitly absorbs collection losses; it is not a measured efficiency for the house. If the designer uses a different coefficient, record its source and why it applies.
Illustrative example—not field performance: assume a 2,400 ft² roof footprint, 32 inches of annual rainfall, 0.5 gallons per inch per square foot, and 100 gallons/day of nonpotable demand.
32 in × 2,400 ft² × 0.5 gal/(in·ft²) = 38,400 gal/year
100 gal/day × 365 days = 36,500 gal/year
The annual screening balance is positive by 1,900 gallons, but that does not prove reliability. Rainfall can arrive when demand is low, the tank can overflow before a dry season, a filter can clog, treatment can be offline, and the household may use more than 100 gallons/day. A system can have enough annual water yet fail the actual dry-season or peak-day decision.
Test sensitivity instead of presenting one number
Change one input at a time and show the result. The following is illustrative only:
| Roof footprint | Annual rainfall | Net factor | Annual captured volume | Average daily equivalent |
|---|---|---|---|---|
| 2,400 ft² | 24 in | 0.40 gal/(in·ft²) | 23,040 gal | 63 gal/day |
| 2,400 ft² | 32 in | 0.50 gal/(in·ft²) | 38,400 gal | 105 gal/day |
| 2,400 ft² | 40 in | 0.50 gal/(in·ft²) | 48,000 gal | 132 gal/day |
| 3,000 ft² | 32 in | 0.50 gal/(in·ft²) | 48,000 gal | 132 gal/day |
| 2,400 ft² | 32 in | 0.60 gal/(in·ft²) | 46,080 gal | 126 gal/day |
The calculation method is multiplication; the judgment is deciding which rainfall dataset, area, loss factor and demand scenario the designer is allowed to use. A homeowner can ask for monthly or daily time-series modeling where seasonal reliability matters. Do not substitute annual average rainfall for a dry-period design without asking how the system handles the longest relevant gap.
Size storage against demand and dry days
Storage must be checked against the no-rain period, available makeup water, minimum operating level, first-flush loss, treatment equipment volume and overflow behavior. TCEQ illustrates a simple dry-period method by multiplying daily demand by dry days; its example uses 200 gallons/day and 50 dry days to reach 10,000 gallons. The storage discussion in GI-366 also notes that a supplemental source can change the required untreated-water storage.
Illustrative example—not a recommendation: with 100 gallons/day of nonpotable demand, 14 dry days, a 10% reserve that cannot be drawn down, and 50 gallons of first-flush water unavailable to demand, the screening volume is:
Base dry-period demand = 100 gal/day × 14 days = 1,400 gal
Reserve = 1,400 gal × 10% = 140 gal
Screening storage = 1,400 + 140 + 50 = 1,590 gal
That value is not the tank nameplate. The designer may need a larger tank because of geometry, unusable bottom volume, pump intake elevation, treatment minimums, fire or structural requirements, local rainfall patterns, or the decision to carry a longer dry period. Record both nominal capacity and usable capacity. Ask where the low-level cutoff occurs and how many gallons remain when the pump alarm activates.
Verify tank, support, drainage and access
For a tank above grade, inspect the prepared support and restraint without altering it. For a buried tank, the homeowner should not enter the excavation or tank; request the engineer’s or installer’s record for soil, buoyancy, traffic loading, bedding, backfill, groundwater and access. Confirm that the tank location does not rely on a future finish, deck, planting bed or retaining wall that would make inspection impossible.
Washington’s state-specific summary describes watertight, durable storage materials, access for draining and cleaning, protection against animals, a secured opening, drainage and overflow, and a vent where drainage or overflow piping does not provide sufficient venting. It also calls for an overflow without a shutoff valve and identification of nonpotable rainwater tanks. Review the Washington tank and overflow provisions, but have the local authority determine whether they apply at your address.
Before covering, confirm:
- hatch or cleanout is reachable without unsafe improvisation;
- hatch cover is secured and any warning is visible;
- vent terminates where the design requires and has animal/insect protection if specified;
- tank drain can be operated safely and does not discharge where it can undermine the foundation;
- overflow cannot be closed by a valve, blocked by a screen or routed into a space that can flood;
- overflow discharge has the required air-break, backflow or stormwater treatment;
- tank level sensor is installed at the elevation shown on the control diagram;
- tank has a permanent nonpotable identification in the required wording or local equivalent;
- photographs show connections before insulation, backfill or finishes hide them.
Do not infer that an overflow is acceptable because it ends near a floor drain. Verify the receiving system, capacity, slope, trap or air break, backwater protection and local stormwater rule with the responsible professional. An overflow that is too small, too low, submerged, valved off or routed against the tank’s operating head can turn a rain event into a structural or contamination problem.
Verify treatment, capacity and model evidence #
Treatment is verified by matching the complete train to the approved end use and actual operating conditions, then proving that every component is installed, powered, monitored, maintained and documented as the design assumes. A certification mark, a filter micron rating or a UV label by itself is not evidence that the complete house system meets its local treatment requirement.
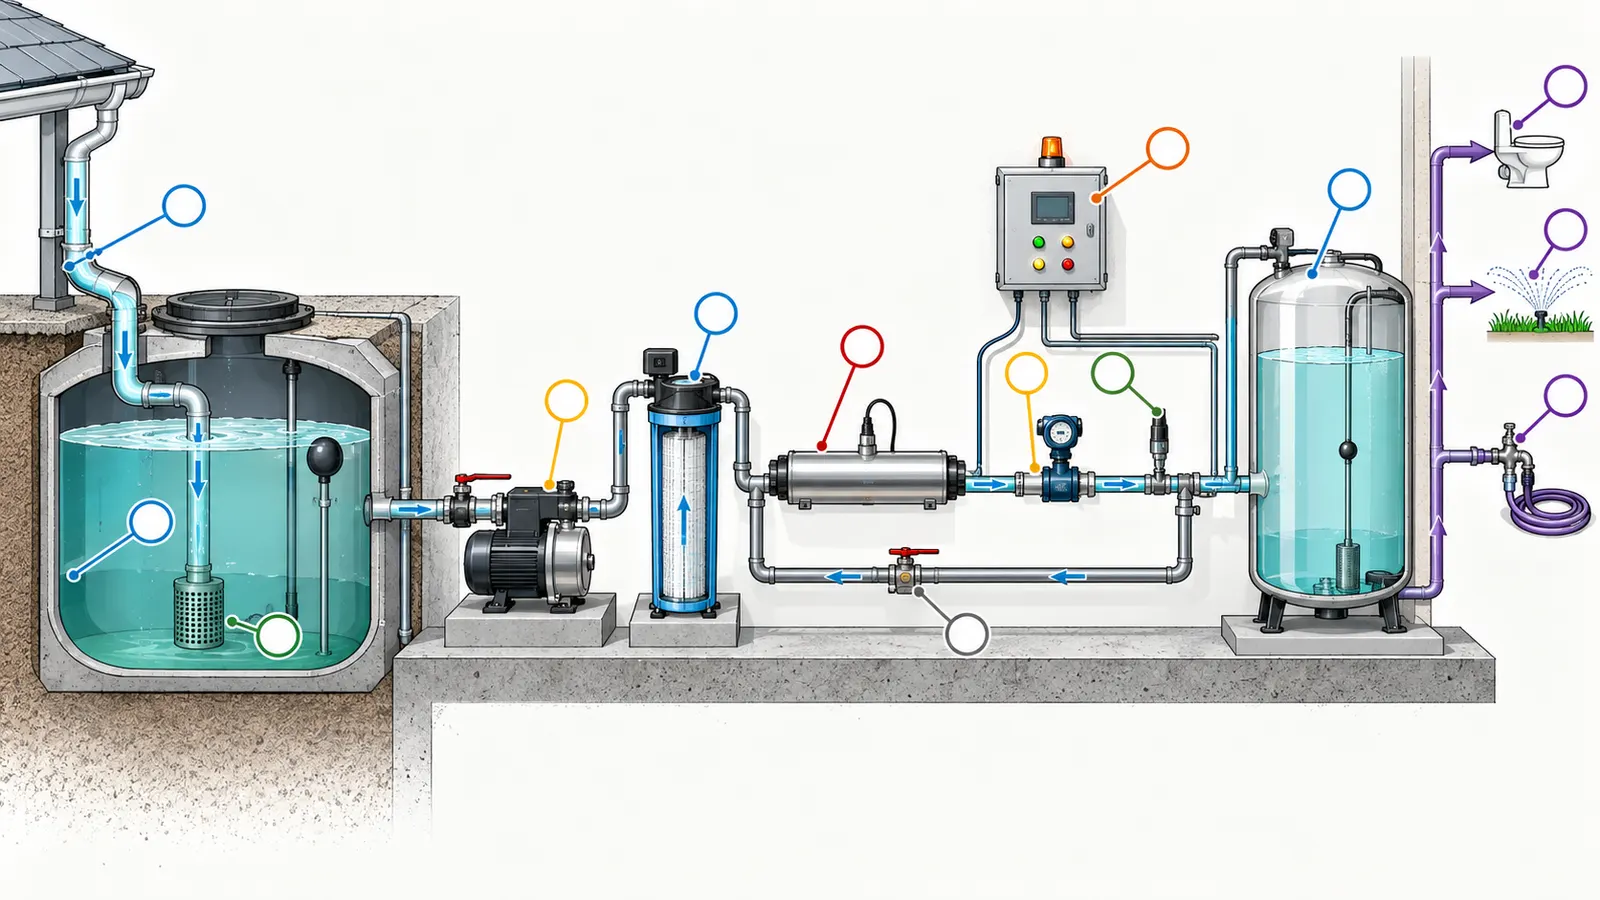
Describe the train in the direction of flow
Draw the system from roof to outlet, with each stage named. A generic diagram might contain:
roof → debris exclusion → first flush → untreated tank → pump → sediment or cartridge filtration → disinfection → treated tank or pressure set → nonpotable branches → end use
The actual system may differ. It may use one tank, two tanks, gravity distribution, a pressure pump, a storage-and-repressurization arrangement, UV, chlorine, ozone, membrane treatment or an approved combination. The homeowner’s task is not to choose a treatment technology from a list. It is to make sure the design record says what the installed train is intended to do and what evidence confirms it.
For each stage, write:
- source water entering;
- target or function;
- model number and revision;
- rated flow range and pressure range;
- required preconditions, such as turbidity, UV transmittance, temperature or contact time;
- power, controls, sensor and alarm;
- bypass or fail-safe position;
- sample or test point;
- consumable and maintenance interval;
- consequence of failure and automatic response;
- person who commissions it;
- record that closes the handoff.
Do not confuse screening, filtration and disinfection
Do not treat the treatment-stage names as proof that a system performs its intended function. Use the following as non-diagnostic prompts for the qualified designer and installer. TCEQ’s guidance discusses debris exclusion and first-flush as collection controls, but its discussion is educational and does not establish a complete treatment train for this house. Read the collection-stage discussion in GI-366.
For filtration, ask what particle or water-quality target the approved design assigns to the stage, where it is measured, how loading or bypass is detected and what record proves the result. EPA’s reuse guidance treats screening, filtration and disinfection as distinct treatment functions and describes filtration as a possible step before disinfection. EPA’s Guidelines for Water Reuse is technical context, not a required filter size or residential code rule. If activated carbon, ozone or a membrane is proposed, ask the designer to identify the target, operating limits, monitoring point, maintenance trigger and failure response in the exact model documentation; this guide does not select or diagnose those technologies.
For UV, ask the installer to demonstrate the model’s required flow, water-quality or UV-transmittance condition, lamp/intensity status, sleeve and power controls, alarm and fail-safe response. EPA explains that UV transmittance, suspended material, intensity, lamp and sleeve condition, power input, lamp age and exposure time affect UV dose, and that filtration before UV can improve performance. EPA’s 2017 Potable Reuse Compendium supports those verification questions but does not set this unit’s dose or commissioning criterion. For chlorine, ask the treatment professional to show how concentration, temperature, pH, mixing, contact time, interfering substances and the target organisms are addressed; EPA identifies those as variables affecting chlorine disinfection efficiency. EPA’s 2004 Guidelines for Water Reuse is not permission to choose a dose for this home. The correct question is “What target and exposure scenario does the approved design require, and how is it verified?”
EPA states that monitoring treatment processes is necessary so recycled water is treated appropriately for safe application, and its research explores non-pathogenic indicators that can help verify treatment performance. EPA’s monitoring discussion supports the need for a performance-monitoring plan; it does not specify the correct filter, chemical dose or test interval for every home.
If Washington is the jurisdiction, the EPA summary says the treatment equipment must be designed, sized and documented by a Washington State registered professional engineer. The summary identifies a debris excluder, end-use-dependent further filtration, acceptable disinfection methods and testing provisions; for the listed indoor and some irrigation uses it reports a 100-micron filter, disinfection and annual water-quality testing, with testing after renovation or repair. See the Washington treatment provisions. Those details are prompts for Washington coordination, not national defaults.
Check the exact certification record
If a proposal relies on NSF/ANSI 350, search the exact manufacturer and model in the current NSF database, save the listing page or a dated PDF, and compare the listed capacity, classification and type with the design. The NSF Official Listings page for NSF/ANSI 350 identifies the standard as “Onsite Residential and Commercial Water Reuse Treatment,” displays model numbers, rated gallons per day, classification and type, and tells users to confirm current listing status. The listing is not a universal approval for your end use, state, flow, source water or complete system.
Record the following from the live listing and product submittal:
| Evidence item | What to compare | If it does not match |
|---|---|---|
| Manufacturer | Name on listing, submittal and installed label | Stop approval; request corrected submittal or proof of an equivalent listed product. |
| Exact model | Full suffix, options and revision | Do not accept a family name when capacity or treatment changes by suffix. |
| Rated capacity | Gallons/day or other listed unit | Compare with design peak and expected operating range, not only annual average demand. |
| Classification and type | Listing category, source or type | Do not infer that wastewater or another source classification proves suitability for roof rainwater. |
| Conditions and footnotes | Pretreatment, tank, loading, accessories or restrictions | Include the conditions in the installation and maintenance record. |
| Current status | Date checked and listing status | Recheck with NSF or the manufacturer before commissioning if the status is unclear. |
The live page is evidence of a certification listing record, not field performance. A system with a listed treatment unit can fail because water bypasses it, flow exceeds its rating, filters are loaded, UV alarms are ignored, a tank is contaminated, controls are miswired or the wrong end use is connected.
Verify component limits and compatibility
Use the installation manual for every component, not just the treatment skid. Collect the pipe and fitting material, pressure and temperature rating, joint method, support and sleeve requirements, chemical compatibility, UV exposure limits and concealment instructions. Verify that adhesives, primers, sealants, thread compounds, pipe dope, disinfectants and roof or tank coatings do not attack the material or contaminate the water.
TCEQ’s guidance notes that rainwater can be soft and somewhat acidic and recommends certified plastic pipe for corrosion resistance in the described rainwater application; it also warns that exposed plastic can be susceptible to ultraviolet damage. The GI-366 piping discussion is an educational recommendation, not a blanket approval of every plastic product. The installed pipe must be acceptable to the local code, the design and the manufacturer for the actual use.
The manufacturer’s instructions can be narrower than a general trade assumption. For example, the Sioux Chief PowerPEX installation guide says local code controls testing, gives product-specific pressure-test procedures, and states that its recommendations vary by joint, material, location and exposure. If the installed system is not PowerPEX, do not transfer those permissions or pressures to it.
Verify controls and failure response
Treatment equipment is part of the plumbing decision because a control failure can change water quality without producing a visible leak. Before covering, ask the installer to demonstrate the normal sequence and each safe failure response:
- low untreated-tank level prevents a dry-running pump;
- high tank level or overflow alarm appears where the owner can hear or see it;
- filter differential pressure or service indication is functional if provided;
- UV lamp, intensity, flow and alarm status behave as the manual describes;
- chlorine or chemical feed has the specified interlock and storage controls;
- power interruption leaves valves and outlets in the safe state;
- treatment bypass is locked, labeled or otherwise controlled;
- makeup water cannot silently supply an unapproved path;
- the system can be isolated and drained without entering a tank;
- a failed treatment stage prevents or clearly warns against nonpotable use.
Do not create a failure by disconnecting a live wire, closing an unknown valve or defeating an alarm. The qualified installer can use the manufacturer’s commissioning procedure, a simulator, a safe test mode or a documented controlled observation. Record the observed state, not merely “alarm tested.”
Verify separate plumbing, makeup water and materials #
The distribution system is ready only when nonpotable water is physically or code-approvedly separated from potable water, every branch is traceable, pipe and fittings are compatible with the water and treatment, all required labels are installed, and makeup water and backflow protection are accepted by the local authority and water supplier.
Trace both systems, not just the rainwater line
Start at the municipal or well-fed potable entry and trace every branch. Then start at the rainwater tank or treated-water outlet and trace every nonpotable branch. Use the approved schematic and field labels together. The two traces should identify every valve, tee, drain, fixture, hose connection, bypass, pump, tank and test point.
Mark a red line for potable and a separate color for nonpotable on the drawing. At each intersection, write “crosses,” “connects,” “air gap,” “approved backflow assembly,” “drain,” or “no connection.” A pipe that passes near another pipe is not a cross-connection; a valve, jumper, hose, temporary fill connection or control arrangement can create one. A temporary construction hose is especially easy to overlook during commissioning.
TCEQ’s guidance describes a dual distribution design in which a separate plumbing system supplies nonpotable outlets and emphasizes complete separation. Its dual-distribution discussion is useful for tracing the design, but local plumbing code and the water supplier’s requirements control the accepted arrangement.
Verify potable makeup water at the point of connection
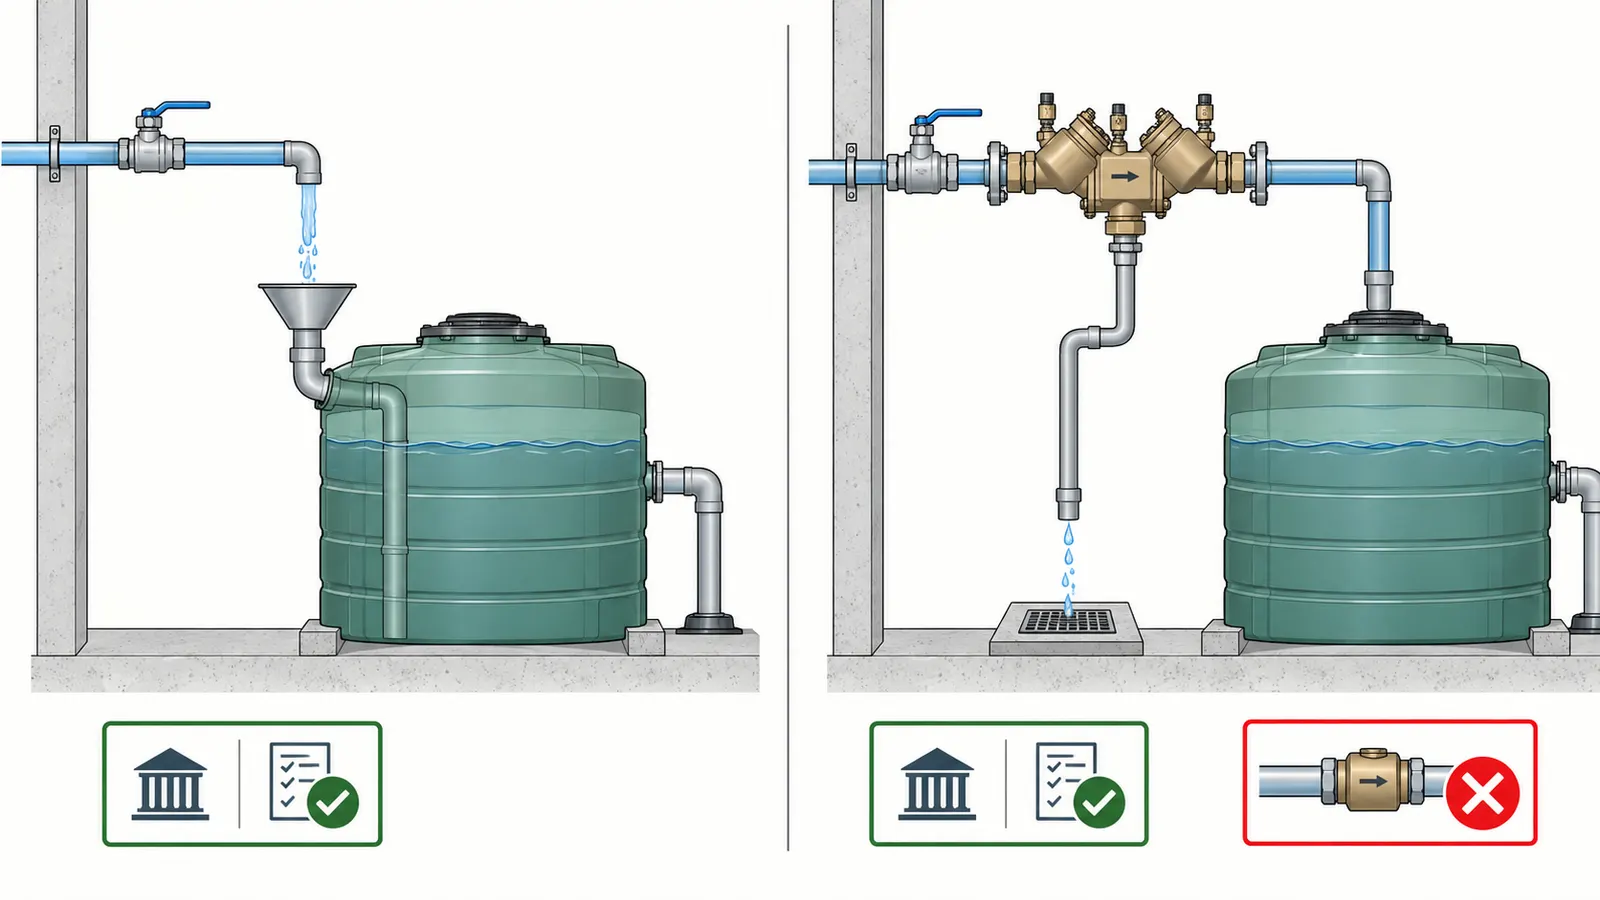
Makeup water is a design decision, not an afterthought. Ask which tank receives it, whether that tank is pressurized, whether the water is untreated or treated when it receives makeup, what happens when the rainwater side is offline, and whether the makeup connection could allow nonpotable water to reach the potable system under backpressure, backsiphonage, valve failure or a blocked overflow.
An air gap is a physical separation: the potable outlet discharges into a receptor or tank with an atmospheric space above the maximum water level. TCEQ’s guidance describes an air gap between the outlet and maximum tank water level, discusses it as the safest method in its example, and notes that pressure is lost across the gap and may need to be restored downstream. Read the TCEQ air-gap discussion. Its example of a 1.5-times-fill-line-diameter vertical distance is guidance context, not permission to ignore the locally adopted code.
If the design uses a reduced-pressure principle backflow assembly instead, the device must be the exact approved assembly, installed in the correct orientation and discharge arrangement, with a test port and access. TCEQ explains that the device relies on check valves and a drainable central chamber and says, in the described context, that it must be tested by a certified backflow assembly tester at installation and annually thereafter. The same TCEQ section does not establish the rule for every state or every water supplier. Obtain the water supplier’s written acceptance and the certified tester’s record.
Never accept “there is a check valve” as a complete cross-connection analysis. A check valve can fail, be installed backward, lack required test access or be insufficient for the hazard classification. Never connect potable makeup to a pressurized nonpotable line unless the AHJ and water supplier accept the exact assembly and installation.
Verify pipe identity and labels
At minimum, the field record should identify the material and size of each visible pipe section, the joint or fitting system, the service it carries, and where it is allowed to be concealed. Photograph labels before insulation and drywall. Mark any pipe that changes service at a tank, treatment stage or valve.
Washington’s summary requires permanent identification of nonpotable rainwater tanks and describes warning signs for equipment rooms and confined-space openings. It also states that nonpotable water and distribution materials must be compatible with treatment and water conditions. Use the Washington materials and labeling provisions only within Washington’s scope or as questions for another AHJ.
The exact manufacturer manual controls joint permissions. The PowerPEX guide permits certain PowerPEX joints to be buried or concealed but recommends that threaded connections never be buried or concealed because they must remain accessible for periodic inspection under building codes. This is not a national rule for all PEX, PVC, CPVC, HDPE, copper, stainless steel or treatment equipment. Identify the installed product and follow its manual and local code.
Check penetrations, support and service access
Before walls close, inspect pipe supports, hangers, protection at framing holes, sleeves at foundations, expansion or contraction allowance, separation from fasteners, insulation where specified and protection from chemicals. Pay special attention to transitions between tank, pump, treatment equipment and building piping. A fitting can be leak-free but stressed by settlement, thermal movement, vibration or an unsupported valve.
Do not treat “accessible” as “I can technically reach it with a tool.” A filter that requires removing a finished ceiling, a backflow device behind a fixed cabinet, a drain terminating in a crawlspace, or a hatch blocked by stored materials is not maintainable in the practical sense. Ask the installer to demonstrate the service path with the intended tools and replacement cartridge, without removing permanent work.
Test the open system at the correct handoff #
Testing must happen before concealment and in the sequence required by the adopted code, permit, manufacturer and commissioning plan; a homeowner should witness and record the test but should not invent a pressure, chemical, electrical or water-quality procedure. A passed pressure test is one part of release, not the whole release.
Hold the pre-cover meeting
Schedule the walk-through before the builder’s deadline for insulation, drywall, backfill, tank burial, ceilings or landscape restoration. Invite the homeowner, general contractor, plumbing contractor, treatment designer or engineer, and the inspector or backflow tester when required. Bring the latest drawing revision and the register.
At the beginning, state what is being released and what is not. Examples:
- “Release the underground nonpotable supply from tank room to bathroom wall for backfill after pressure test, photos and inspector observation.”
- “Do not release treatment controls, tank hatch, overflow or makeup-water assembly; commissioning remains open.”
- “Do not release any area containing an unresolved model substitution.”
Walk in a fixed sequence: documents, roof and collection, untreated storage, treatment, treated storage or pressure set, nonpotable distribution, potable interface, overflow and drains, controls, labels, test points and handoff records. The sequence matters because it prevents a finished wall from distracting everyone from the unresolved tank overflow or makeup connection.
Perform the plumbing pressure test under the governing rule
Ask the licensed plumber to name the governing code section or manufacturer instruction, the test medium, test pressure, duration, isolated components and acceptance criterion before the test begins. Confirm that fixtures, filters, sensors, pumps, valves and treatment components that could be damaged or give a misleading result are removed, isolated or protected as the procedure requires.
The Sioux Chief PowerPEX guide says to test as code dictates and, where code is absent, gives a PowerPEX-specific example of 100 psi for at least 12 hours before covering underground or behind-wall connections or tubing. It also says to remove fixtures or appurtenances that could be harmed and to protect water tests from freezing. Do not apply “100 psi for 12 hours” to an unlisted pipe, another fitting system, a tank, a filter housing or a local code that specifies something else.
The record should include:
| Field | Record |
|---|---|
| Test section boundaries | From ___ to ___; valves closed at ___ |
| Pipe and fitting system | Manufacturer, material, size, lot or model if available |
| Governing criterion | Code section, permit condition or exact manual section |
| Test medium | Water / air / other, with freeze and safety controls |
| Test pressure | Start ___; stabilized ___; units ___ |
| Test duration | Start date/time ___; end date/time ___ |
| Temperature or relevant conditions | ___ |
| Isolated or removed items | ___ |
| Observations | Leaks, movement, gauge changes, repairs ___ |
| Result and sign-off | Pass / correction / retest; tester, company, date ___ |
If the gauge falls, do not simply add pressure and declare success. First determine whether the procedure allows temperature equalization or tubing conditioning, whether the gauge is reliable, whether a component was isolated, and whether there is a leak. A failed test can also reveal a valve that was not in the intended position. Record the failure and repair location before repeating the test.
Verify flow, valves, drains and overflow
After the pressure test, use the commissioning sequence to prove the operating path. The qualified installer should demonstrate that:
- water can enter the collection path without bypassing the debris and first-flush stage;
- untreated storage receives water at the intended inlet and does not create damaging turbulence or sediment disturbance;
- the transfer pump starts and stops at the specified level or demand;
- filters have the correct flow direction and service access;
- disinfection equipment sees the required flow and has a functioning alarm;
- treated water reaches only approved nonpotable outlets;
- each isolation valve can be identified and operated;
- drains discharge safely and do not siphon or cross-connect;
- overflow occurs at the designed elevation and reaches the approved discharge;
- low-level, high-level, treatment-failure and power-loss responses match the manual;
- makeup water enters only the approved receptor or assembly;
- no outlet can be mistaken for potable water.
Do not use a fixture as a substitute for a flow test if the fixture’s valve, flush volume or aerator masks the system behavior. Record flow where the design requires it, such as at the treatment skid or a representative branch. If demand is used in the sizing worksheet, document how the design flow was obtained rather than assuming one simultaneous fixture flow.
Verify water quality at the right stage
Water-quality testing must identify the sample point, container, preservation, laboratory or field method, analyte, result, unit, detection limit, date and acceptance criterion. A sample from the source tank cannot prove treated outlet water; a sample after a temporary hose cannot prove the permanent path; and a result for turbidity cannot prove microbial safety.
The designer or local authority must specify the analytes and frequency. Washington’s summary reports annual water-quality testing and testing after renovation or repair for the described nonpotable rainwater applications, along with stated targets for certain applications. The Washington monitoring table is not a nationwide laboratory protocol. For other states, ask the AHJ, water supplier or health authority for the required sample locations and targets.
If a treatment unit is not yet commissioned, do not use an early construction sample to label the system “safe.” If a result fails, isolate the system and ask the treatment professional to diagnose whether the issue is source contamination, stagnant water, filter loading, disinfection failure, sampling error, a bypass or a plumbing cross-connection. Do not solve an unexplained result by changing the acceptance limit.
Photograph what future walls would hide
Use a consistent photo set with a project identifier, room or grid location, date, direction and drawing revision. Photograph wide context and close detail for:
- every pipe route and branch before insulation;
- every joint, sleeve, support and penetration;
- tank inlets, outlets, hatch, vent, drain, overflow and level sensor;
- filters, UV or chemical equipment, flow direction and model labels;
- makeup-water air gap or backflow assembly and test ports;
- valves and cleanouts with permanent location references;
- labels and warning signs;
- pressure gauges at the start and end of the test;
- any correction before and after repair.
Photos do not replace inspection or a test record. They preserve evidence of location and condition and help the future owner avoid drilling or cutting into a concealed line. Store them with the as-built, not only in a phone gallery.
Resolve common failures before release #
The safest response to a pre-cover failure is to stop the affected release, write the exact discrepancy, assign the person who can correct it, define the retest and obtain a new handoff; covering a known uncertainty converts a relatively cheap correction into a destructive investigation later.
| What you observe | What it may mean | What you must not infer | Safest next step |
|---|---|---|---|
| Tank volume on the label differs from plan | Substitution, wrong tank or nominal-versus-usable confusion | That a larger nominal tank automatically solves the design | Stop; compare model, usable volume, foundation, overflow and permit; obtain designer approval. |
| Roof coating is absent from the submittal | Material compatibility and contaminant basis are unknown | That all roof coatings are interchangeable | Ask the designer and AHJ for a written compatibility decision before collection. |
| First-flush device is shown but not installed | Initial roof contamination may enter storage | That a leaf screen performs first flush | Correct the installation or revise the approved design and recalculate losses. |
| First-flush chamber never drains | Stagnant water, lost volume or no reset | That “some water is diverted” means the device works | Have the installer inspect the slope, valve, drain and manual procedure. |
| Filter is behind a finished panel | Future maintenance may be skipped or unsafe | That an access hatch can be cut later without consequence | Defer covering or create an approved service opening and record its dimensions. |
| Treatment model suffix differs | Flow, capacity, certification or controls may differ | That the product family is equivalent | Request exact model evidence and design review. |
| NSF listing shows a different type or class | The listing may not cover the proposed source or use | That any NSF/ANSI 350 listing covers rainwater at this home | Verify scope with NSF, manufacturer, designer and AHJ. |
| UV or chemical alarm is bypassed | Treatment may be offline while outlets remain open | That the system still treats water normally | Isolate nonpotable use and commission the fail-safe response. |
| Potable makeup line enters a pressurized pipe | Cross-connection hazard | That a check valve alone is adequate | Stop; obtain water-supplier and AHJ approval for the exact separation or assembly. |
| Air gap is submerged or too low | Physical separation may be lost at high level | That the tank will never reach that level | Correct the elevation, overflow or control and retest. |
| Overflow has a shutoff valve | A closed valve can defeat pressure relief or drainage | That the valve is just a convenient isolation | Ask the designer/AHJ to resolve it; do not leave a critical overflow valved off. |
| Nonpotable branch has no durable label | Future workers or occupants may mistake service | That colored pipe alone is enough | Install required permanent labels and update the valve schedule. |
| Pressure test loses pressure | Leak, temperature effect, gauge issue or test setup problem | That adding air or water proves tightness | Diagnose, repair, repeat under the governing procedure. |
| Pipe route changed in the field | Head loss, support, access or separation may have changed | That a shorter route is always better | Mark up the drawing and obtain responsible-professional review. |
| Tank hatch is blocked by framing or finishes | Cleaning, inspection or rescue access may be compromised | That the tank can be maintained with a remote camera | Stop; resolve access and confined-space controls before closure. |
| Water-quality result is missing | Commissioning is incomplete or sample plan is unclear | That clear water is acceptable water | Ask for the required sample plan and professional interpretation. |
| Installer says “the inspector saw it” but no record exists | Handoff evidence is incomplete | That a verbal statement survives ownership | Request the inspection number, date, scope and signed or official record. |
Classify a correction rather than arguing about blame
Use four correction classes:
- Documentation correction: the work may be physically acceptable, but the model, drawing, photo or test record is missing. The responsible person supplies the record and the authority confirms whether reinspection is needed.
- Accessible installation correction: the component exists but cannot be safely inspected, cleaned, isolated or replaced. The builder and designer resolve the opening or route before finish work.
- Performance correction: a pressure, flow, alarm, overflow or water-quality test fails. The qualified installer diagnoses and repairs; the same test is repeated under the same or revised criterion.
- Design or jurisdiction correction: the end use, treatment basis, material, backflow method, discharge or permit path is wrong. Stop the work and obtain an approved design or authority decision. Do not “field fix” a legal or health requirement.
This classification helps the homeowner communicate without directing an unqualified repair. It also prevents a common failure in which a missing document is treated as a minor paperwork issue even though the document would reveal that the exact installed product has a different capacity or use classification.
Know when the next decision belongs elsewhere
Defer to a licensed plumber for pipe work, pressure testing, cross-connection protection and code-required plumbing inspection. Defer to the treatment designer or engineer for treatment targets, flow, dose, contact time, alarms and water-quality interpretation. Defer to a structural engineer for tank support, roof loads, buried tanks, buoyancy or settlement. Defer to the AHJ and water supplier for permits, end-use approval, backflow and final acceptance. Defer to a qualified electrician for power, grounding, disconnects and wet-location equipment.
The homeowner can still be the information owner. Keep the question narrow: “The installed treatment model is X, the plan says Y, and the listing shows Z. Please tell us whether it is accepted, what needs to change, and what test closes the item.” That is more useful than asking a trade to “make it code.”
Use the verification register at the pre-cover handoff
The verification register is complete when every required row has a project-specific value, responsible person, evidence record, status and next action; it is not complete merely because the table is filled with “yes.” The register below is the reusable worksheet contribution of this guide and should be copied into the project’s own document system, then edited to match the permit and contract.
Register instructions and status rules
Use one row per decision. Attach a source or project record to each row. A source link explains a general claim; it does not prove the house complies. The project record might be a plan sheet, product submittal, photo filename, test report, lab result, official inspection record or written AHJ response.
Use these status codes:
- Open: not yet checked or evidence missing.
- Pass: checked against the stated criterion and evidence is attached.
- Correct: a defined correction is required before release.
- Defer: a professional or authority decision is needed before work continues.
- N/A: not applicable only after the responsible professional states why.
Do not mark “Pass” because an item is not visible. Mark it Open or Defer. Do not mark “N/A” because a feature is inconvenient. State the reason and who accepted the exclusion.
The source-linked register
| ID | Verification question | Project input or observation | External evidence mapping (scope; check evidence.json) | Project acceptance record (keep separate) | Responsible role | Status / next action |
|---|---|---|---|---|---|---|
| R01 | What address, state, city/county, water supplier and permit govern the system? | ___ | No universal external claim; exact local AHJ, water-supplier and permit path is a project record. | AHJ contact, permit, inspection type and written scope ___ | Homeowner / builder | ___ |
| R02 | What exact end uses are supplied? | ___ | epa-washington-approved-uses — Washington-specific use list only; current local approval controls elsewhere. | End-use schedule and exact AHJ response ___ | Designer / AHJ | ___ |
| R03 | Is any use potable, bathing, food-related or otherwise outside this guide? | ___ | epa-onws-risk-and-monitoring — U.S. EPA risk context only; it does not approve an end use. | Written exclusion or separate professional design/approval ___ | Homeowner / designer | ___ |
| R04 | Which roof planes collect water? | ___ ft² footprint; plan sheet ___ | tceq-yield-and-storage-method — TCEQ screening method only; project roof plan and local design control. | Roof plan, revision and field measurement ___ | Designer / roofer | ___ |
| R05 | What roof material, coating, sealant or preservative is present? | Manufacturer/model ___ | tceq-roof-contamination-and-first-flush — TCEQ educational roof guidance; exact product compatibility and AHJ decision remain project-specific. | Product literature and signed compatibility decision ___ | Designer / roofer | ___ |
| R06 | Where are gutters, downspouts, screens and cleanouts? | ___ | tceq-roof-contamination-and-first-flush — TCEQ collection guidance; installed route and local approval control. | Marked plan and dated photos ___ | Plumber / roofer | ___ |
| R07 | How is the first flush sized and discharged? | ___ gallons; ___ per 100 ft² | tceq-roof-contamination-and-first-flush — 1–2 gal/100 ft² is TCEQ guidance, not a national code minimum. | Design calculation, model manual, discharge detail and photo ___ | Designer / plumber | ___ |
| R08 | Can the collection route drain or avoid stagnant pockets? | ___ | tceq-roof-contamination-and-first-flush — collection guidance context only; installer must verify the approved route. | Slope/route observation and installer record ___ | Plumber | ___ |
| R09 | What is tank nominal and usable capacity? | ___ / ___ gallons | tceq-yield-and-storage-method — illustrative yield/storage method; designer determines usable volume and local requirements. | Tank model, level calculation and support detail ___ | Designer / tank installer | ___ |
| R10 | Is the tank support or burial design approved? | Above/below grade ___ | No universal external claim; structural/installation detail and exact local approval are required. | Engineer or installer support/burial record ___ | Engineer / installer | ___ |
| R11 | Are hatch, vent, drain, level sensor and animal protection accessible? | ___ | epa-washington-tank-overflow-labels — Washington-specific access, vent and protection prompts; local rule controls elsewhere. | Photos and safe service demonstration ___ | Installer | ___ |
| R12 | Where does overflow discharge, and is the path protected and never shut off? | ___ | epa-washington-tank-overflow-labels — Washington-specific overflow prompt; drainage, stormwater and AHJ requirements control at the project. | Drainage detail, photo and written authority requirement ___ | Designer / plumber / AHJ | ___ |
| R13 | What is the untreated-to-treated treatment train? | ___ | epa-onws-risk-and-monitoring — U.S. EPA risk/monitoring context, not a treatment design or approval. | Flow schematic and signed design basis ___ | Treatment designer | ___ |
| R14 | What are the exact filter, disinfection and control models? | ___ | epa-water-reuse-treatment-functions, epa-uv-performance-conditions, epa-chlorine-disinfection-factors — general EPA technical context; exact model manuals and AHJ control. | Submittals, nameplate photos and manuals ___ | Installer / designer | ___ |
| R15 | Does any certification listing match the exact model and scope? | ___ | nsf-ansi-350-live-listing — live listing scope only; it is not local end-use or installation approval. | Dated NSF or other accepted listing record ___ | Designer / AHJ | ___ |
| R16 | Do rated flow, pressure and capacity match demand? | ___ | nsf-ansi-350-live-listing, epa-onws-risk-and-monitoring — listing and monitoring context; designer must reconcile actual conditions. | Calculation, manual and commissioning data ___ | Treatment designer | ___ |
| R17 | What happens on low level, high level, power loss, high turbidity or treatment alarm? | ___ | epa-onws-risk-and-monitoring, epa-uv-performance-conditions, epa-chlorine-disinfection-factors — performance-monitoring and technology-condition context; exact fail-safe is model/design specific. | Controlled commissioning record ___ | Treatment installer | ___ |
| R18 | What is the treatment sample point and target? | ___ | epa-onws-risk-and-monitoring, epa-washington-treatment-maintenance — EPA monitoring context; Washington frequency/targets are Washington-specific. | AHJ/design basis and lab or field plan ___ | Treatment designer / AHJ | ___ |
| R19 | What materials, sizes, joints, sealants and supports are installed? | ___ | tceq-roof-contamination-and-first-flush, sioux-chief-concealed-joint-scope — TCEQ material guidance plus PowerPEX-only concealment guidance; exact product/code control. | Material submittals and photos ___ | Plumber | ___ |
| R20 | Which pipe is potable and which is nonpotable? | ___ | epa-washington-tank-overflow-labels — Washington labeling/material prompt only; local wording and code control elsewhere. | Color/labels, schematic and trace ___ | Plumber / inspector | ___ |
| R21 | Is there any direct or temporary cross-connection? | ___ | tceq-air-gap-and-rpba — TCEQ dual-distribution/backflow context; water supplier and AHJ determine the accepted arrangement. | Trace, test record and removal confirmation ___ | Plumber / backflow tester | ___ |
| R22 | How is potable makeup water separated? | Air gap / assembly ___ | tceq-air-gap-and-rpba — described TCEQ air-gap/RPBA context only; local plumbing and water-supplier requirements control. | Detail, written supplier acceptance and test record ___ | Plumber / water supplier | ___ |
| R23 | Are all valves, filters, drains, sensors and test ports serviceable? | ___ | epa-washington-tank-overflow-labels, epa-washington-treatment-maintenance — Washington access/O&M prompts; exact manual and local rule control elsewhere. | Tool-access demonstration and photos ___ | Installer / homeowner | ___ |
| R24 | What pressure test governs each concealed section? | ___ psi, ___ hours, medium ___ | sioux-chief-precover-pressure-test — PowerPEX-specific example; adopted code and exact installed product control. | Code/manual citation and signed result ___ | Plumber / inspector | ___ |
| R25 | Were vulnerable fixtures and treatment components isolated during testing? | ___ | sioux-chief-precover-pressure-test — PowerPEX guidance on protecting vulnerable components; exact test procedure controls. | Test method and component list ___ | Plumber | ___ |
| R26 | Did the test pass without an unexplained pressure loss or visible leak? | ___ | sioux-chief-precover-pressure-test — product-specific test record context; local code and test boundaries control. | Gauge readings and report ___ | Plumber / inspector | ___ |
| R27 | Did flow, valves, overflow and alarms operate in sequence? | ___ | epa-onws-risk-and-monitoring, epa-uv-performance-conditions, epa-washington-tank-overflow-labels — monitoring, UV and Washington overflow prompts; exact commissioning plan controls. | Commissioning checklist/video/report ___ | Installer | ___ |
| R28 | Are tank, pipe, equipment and outlet labels durable and visible? | ___ | epa-washington-tank-overflow-labels — Washington-specific label/warning prompt; local wording and inspection control elsewhere. | Dated photos and local wording ___ | Builder / inspector | ___ |
| R29 | Are confined-space warnings and access controls present where required? | ___ | epa-washington-tank-overflow-labels — Washington-specific warning prompt; applicable safety authority and AHJ control. | Photo and safety plan ___ | Builder / AHJ | ___ |
| R30 | Are as-built drawings, serials, warranties and contacts assembled? | ___ | epa-washington-treatment-maintenance — Washington O&M documentation principle; contract, manual and local handoff requirements control. | Handover folder index ___ | Builder / installer | ___ |
| R31 | Does the maintenance plan name tasks, intervals, consumables and logs? | ___ | epa-washington-treatment-maintenance, epa-washington-tank-overflow-labels — Washington-specific maintenance/O&M prompts; exact manual and local requirements control. | Owner’s manual and schedule ___ | Installer / homeowner | ___ |
| R32 | Is the release boundary approved for covering or burial? | ___ area/revision | No universal external claim; exact AHJ inspection record and responsible-professional release are required for this project. | Inspection record, sign-off, area and drawing revision ___ | AHJ / builder / responsible professional | ___ |
Record evidence without overstating it
For each row, attach evidence with a filename and date. A useful reference might read “P-17 pressure test, 2026-09-08, nonpotable branch from NPT-01 to bath chase, 60 psi stabilized after manufacturer conditioning, no visible leak, plumber signature.” A weak reference says “tested OK.”
For a model record, include the full suffix, not only the brand. For a drawing, include revision and sheet. For a photograph, include location and direction. For a laboratory result, include sample point and chain of custody if required. For an authority response, include the name of the department and the date; a salesperson’s statement is not an AHJ approval.
The register should also contain a “not inferred” note for any high-consequence claim. Examples:
- “NSF/ANSI 350 listing verified; local end-use approval still open.”
- “Pressure passed on the isolated branch; no conclusion about treatment performance.”
- “Air gap visible at tank fill; water-supplier acceptance pending.”
- “Annual rainfall screen is positive; dry-season reliability not modeled.”
- “Washington summary reviewed for a Washington property only; not applied to California.”
Those notes keep a partial success from being misread as complete approval.
Work the yield and storage worksheet into the next decision
The worksheet is useful when it changes a decision, not when it produces a reassuring number. Complete the inputs with the designer, compare at least three scenarios, then ask whether the result changes the tank, makeup-water, end-use or handoff decision.
Input sheet
| Quantity | Unit | Source or project record | Value |
|---|---|---|---|
| Roof footprint included in collection | ft² | Roof plan / measured drawing | ___ |
| Annual rainfall used for screening | in/year | Named dataset and period | ___ |
| Net yield factor | gal/(in·ft²) | TCEQ screen or designer’s source | ___ |
| Daily nonpotable demand | gal/day | Fixture/use schedule | ___ |
| Longest design dry period | days | Local climate/design basis | ___ |
| First-flush loss per event | gallons | Diverter calculation | ___ |
| Reserve fraction | % | Designer’s assumption | ___ |
| Tank nominal capacity | gallons | Exact tank model | ___ |
| Tank usable capacity | gallons | Level cutoffs and geometry | ___ |
| Makeup source and limit | gallons/day or event | AHJ/water supplier/design | ___ |
| Treatment rated capacity | gallons/day | Exact model listing/manual | ___ |
| Collection or treatment downtime | days or events | Maintenance plan | ___ |
Formulas
Annual captured volume ≈ roof footprint × annual rainfall × net yield factor
Annual demand = daily demand × 365
Dry-period base volume = daily demand × dry days
Reserve volume = dry-period base volume × reserve fraction
Screening storage = dry-period base volume + reserve volume + first-flush allowance − approved reliable makeup volume
The formulas deliberately expose what is missing. If the site has separate roof planes or different roof materials, calculate them separately rather than using one average area. If demand varies by season, calculate the high-demand season separately. If makeup water is allowed only through an air gap or approved backflow assembly, subtract it only after that arrangement is designed, accepted and available during the relevant operating condition.
Illustrative scenario set
Use the same illustrative baseline as earlier: 2,400 ft² roof footprint, 32 inches/year, 0.5 gal/(in·ft²), 100 gallons/day nonpotable demand, 14 dry days, 10% reserve and 50 gallons of first-flush allowance. The annual screen is 38,400 gallons and annual demand is 36,500 gallons. The dry-period screen is 1,590 gallons before subtracting any approved makeup water.
Now vary the decision-driving inputs:
| Scenario | Roof | Rain | Net factor | Demand | Dry days | Annual capture | Dry-period storage before makeup |
|---|---|---|---|---|---|---|---|
| Baseline illustrative | 2,400 ft² | 32 in | 0.50 | 100 gal/day | 14 | 38,400 gal | 1,590 gal |
| Drier year screen | 2,400 ft² | 24 in | 0.40 | 100 gal/day | 30 | 23,040 gal | 3,350 gal |
| Higher demand | 2,400 ft² | 32 in | 0.50 | 140 gal/day | 14 | 38,400 gal | 2,206 gal |
| Larger roof, same use | 3,000 ft² | 32 in | 0.50 | 100 gal/day | 14 | 48,000 gal | 1,590 gal |
| Seasonal long gap | 2,400 ft² | 32 in | 0.50 | 100 gal/day | 45 | 38,400 gal | 5,000 gal |
With 45 dry days, the base is 4,500 gallons, the 10% reserve is 450 gallons, and the 50-gallon allowance produces 5,000 gallons before makeup. This is an intentional example of why a homeowner should inspect the inputs and arithmetic rather than trust a polished table.
The sensitivity result may lead to a different decision:
- If the drier-year screen cannot serve the proposed end uses, reduce the end use, add approved makeup water, increase storage or commission a time-series study.
- If higher demand exceeds treatment capacity, the answer is not simply “install a bigger tank”; review treatment flow, peak demand, pump sizing and control sequence.
- If the tank required for a long dry period creates structural, access or cost problems, compare a smaller nonpotable scope with a reliable supplemental supply.
- If a larger roof adds collection volume but the tank and treatment are unchanged, check overflow and peak inflow rather than claiming the extra roof solves reliability.
The worksheet cannot tell you which option is legal or prudent. It makes the choice visible for the designer, plumber, engineer, AHJ and homeowner to resolve.
Hand over a defensible system or keep the release open #
The final decision is defensible when the homeowner can show what was intended, what was installed, what was tested, what remains limited, who accepted each item and how the owner will keep the system in the approved condition. If those records are incomplete, keep the release open even if the finishes are scheduled.
Assemble the handoff folder
Request one indexed folder, physical or digital, with:
- approved drawings and all field revisions;
- jurisdiction, permit and inspection records;
- end-use schedule and treatment design basis;
- roof, coating, tank, pipe, fitting, valve and equipment submittals;
- exact treatment model listing or certification evidence where relied upon;
- tank capacity, usable-volume and support or burial records;
- first-flush and overflow calculations or details;
- pressure-test records by section;
- flow, alarm, valve and commissioning records;
- cross-connection, air-gap or backflow test records;
- water-quality sample results and interpretation where required;
- dated pre-cover photographs and final as-built diagram;
- serial numbers, warranties and manufacturer contacts;
- operating, shutdown, winterization, cleaning and maintenance instructions;
- replacement filter, lamp, chemical or seal information;
- emergency instruction for suspected contamination, leak, alarm or cross-connection.
Washington’s summary expressly describes an operation-and-maintenance manual containing a detailed system diagram, operation and maintenance instructions, water-quality details, deactivation instructions, testing/inspection/maintenance frequencies and manufacturer contact information. The Washington O&M provision is state-specific, but the documentation principle is useful for any owner handoff.
Make maintenance part of the approval
Maintenance is not a future owner’s problem separate from pre-cover verification. If a screen, filter, alarm, hatch, drain or sample port cannot be maintained, the design is not operationally complete. Write the maintenance schedule in the same units the owner can observe:
| Task | Trigger or interval | Owner observation | Qualified work or record |
|---|---|---|---|
| Inspect roof and gutters | After major storms and at the designer’s interval | Leaves, sediment, damage, animal activity | Roof work and repairs by qualified personnel. |
| Clear debris excluder | Per design/AHJ; Washington summary reports six-month inspection | Screen blocked, overflow or standing debris | Safe access and repair by installer if needed. |
| Service filter | Per pressure drop, flow or manual; Washington summary reports three-month inspection/cleaning/replacement for described uses | Alarm, reduced flow, dirty cartridge | Replace with exact approved consumable. |
| Inspect first flush | Each operating season and after unusual contamination | Chamber drains and resets | Repair valve, float, drain or seal by installer. |
| Inspect tank and overflow | Per manual and local requirement | Hatch, vent, insect/animal protection, overflow clear | No tank entry without confined-space program. |
| Test water quality | Per AHJ/design; Washington summary reports annual and post-repair testing for described uses | Result attached to log | Qualified sampler/lab or responsible professional. |
| Test backflow assembly | Per water supplier/AHJ; TCEQ describes annual testing in its context | Test tag and report present | Certified backflow assembly tester. |
| Verify alarms and controls | Per manual and after power or component work | Alarm, interlock and safe state observed | Qualified treatment/electrical professional. |
| Update as-built and log | After any repair or renovation | Change entered before reuse | Installer/designer/AHJ review when required. |
Intervals in this table are not a universal maintenance code. The Washington figures are reported only for the scope of the Washington summary; TCEQ’s backflow discussion is also context-specific. Use the exact local requirement and manual. If renovation changes a pipe, filter, pump, sensor, roof surface, tank or control, treat it as a possible design change and ask whether water-quality testing, cross-connection testing, inspection or professional re-approval is required.
Handover questions that expose a weak package
Before signing final acceptance, ask the installer to answer these questions in the owner’s manual:
- Which outlets are nonpotable, and how are they identified?
- What must be closed or isolated first if there is a suspected contamination event?
- What happens when the tank is empty, the filter is blocked, the UV is offline, the chemical supply is empty or power fails?
- How does the system switch to approved makeup water, and who may adjust that setting?
- Where are the tank hatch, filter, drain, sampling port and backflow assembly?
- What is the maximum rated flow and pressure of each treatment component?
- What is nominal tank volume, usable tank volume and low-level cutoff volume?
- How do first flush and overflow discharge, and what must never be valved closed?
- Which parts can the homeowner inspect, and which tasks require a licensed or qualified professional?
- What records must be kept after a repair, renovation, filter change or alarm?
- Who is the service contact, and what exact model and serial numbers should be quoted?
If the answer is “call the installer” for every question, the handoff is not finished. A premium homeowner system should make routine ownership legible while keeping hazardous or regulated work with qualified professionals.
Choose the next action explicitly
Close the meeting with one of four next actions:
- Release a defined area: list the room, wall, trench or tank zone, test record and date.
- Correct and retest: list the discrepancy, responsible role, due date, acceptance criterion and inspection hold point.
- Revise and reapprove: list the design change, affected drawings, authority or professional review and new test plan.
- Suspend the system: isolate nonpotable use, label the condition, preserve access and schedule a qualified diagnosis.
Do not let “final inspection passed” erase unresolved owner documentation, treatment commissioning or maintenance access. An AHJ inspection has a defined scope; it is not necessarily a warranty that every future operating condition has been tested. Conversely, do not treat a missing homeowner document as proof that the installation is unsafe. Record the precise gap and ask the right responsible party to close it.
Final approve-correct-defer check
Use this short closing check only after the full register is reviewed:
- Approve: exact use and AHJ are known; the installed system matches the accepted design; separation, overflow, access and labels are visible; required code, manufacturer, functional, water-quality and backflow records pass; handoff documents are complete.
- Correct: the issue is physically identifiable, the correction owner and acceptance criterion are written, and the affected area remains open for inspection and retest.
- Defer: the issue could affect public health, legality, structural safety, pressure, treatment performance, confined-space access or cross-connection protection, and no qualified person or authority has accepted the proposed path.
The answer is not “rainwater systems are good” or “rainwater systems are risky.” The answer is a documented decision about this address, this roof, this tank, this treatment train, these pipes, these uses and this handoff. That is the point of verifying before covering: the evidence is still visible, the responsible people can still act, and the next decision can be made without guessing what the wall contains.
Cite this guide
Brictale. “How to Verify a New-Home Rainwater and Nonpotable Plumbing System Before Covering.” Published 2026-10-04; updated 2026-10-04.
https://brictale.com/build/materials/verify-new-home-rainwater-catchment-nonpotable-plumbing-before-covering · Read the Markdown version
Original contribution: Rainwater Pre-Cover Verification Register and Yield/Storage Worksheet. A source-linked register that lets a homeowner reconcile end use, jurisdiction, collection, treatment, storage, separation, tests and handoff records before the system is concealed.
Sources and scope
Evidence behind this page
- The U.S. Environmental Protection Agency describes onsite non-potable water reuse as capturing and treating sources including stormwater and roof-collected rainwater for non-drinking uses, and says risk-based research develops pathogen-removal targets and treatment-performance monitoring approaches.
Onsite Non-Potable Water Reuse Research
U.S. EPA research and explanatory material; it supports risk and monitoring context, not a universal residential design, code approval or model-specific performance guarantee.
Accessed · Link to this claim - EPA's Guidelines for Water Reuse treats screening, filtration and disinfection as distinct treatment functions and explains that filtration can be part of a treatment train used before disinfection; it presents these as reuse guidance rather than a universal residential rainwater specification.
U.S. EPA technical guidance for water reuse; supports the distinction between treatment functions, not a required process, performance target or code rule for a new home rainwater system.
Accessed · Link to this claim - EPA's 2017 Potable Reuse Compendium explains that UV transmittance, suspended material, UV intensity, lamp and sleeve condition, power input, lamp age and exposure time affect UV dose and that filtration before UV can improve performance; the discussion is technical context, not a model-specific commissioning criterion.
2017 Potable Reuse Compendium, Chapter 1
U.S. EPA technical compendium for potable-reuse treatment; used only to frame questions for the qualified designer and exact equipment manual, not to establish a household rainwater dose or local approval.
Accessed · Link to this claim - EPA's Guidelines for Water Reuse says chlorine disinfection efficiency depends on factors including concentration, temperature, pH, mixing, contact time, interfering substances and the type and concentration of organisms; those variables must be tied to the approved design and its acceptance method.
2004 Guidelines for Water Reuse
U.S. EPA technical water-reuse guidance; supports a design-and-monitoring question, not a chlorine dose, contact-time requirement or residential approval for every jurisdiction.
Accessed · Link to this claim - The EPA summary of Washington requirements says Washington approves rooftop-collected rainwater for specified onsite non-potable uses including irrigation, water closets, urinals, tap primers, water features, cooling-tower makeup and car washing, while other applications are not specified in that summary.
Washington state-specific summary of the Washington Plumbing Code and related authorities; informational only and not a national rule or a substitute for the current Washington code and AHJ.
Accessed · Link to this claim - The Washington summary says treatment devices and equipment must be designed, sized and documented by a Washington State registered professional engineer; it identifies end-use-dependent filtration and disinfection, and says water quality should be tested every 12 months and after renovation or repair.
Washington-specific summary, including its stated exceptions and end-use conditions; not a claim that the same engineer, filter, disinfection or testing rule applies in every U.S. jurisdiction.
Accessed · Link to this claim - The Washington summary describes durable watertight tanks, protected access, overflow and drainage provisions, permanent nonpotable-rainwater identification, confined-space warnings at entry openings, equipment-room warnings and an operation-and-maintenance manual with a system diagram and maintenance/testing instructions.
Washington-specific summary of requirements and terminology; use as a verification prompt outside Washington only after checking the applicable local authority and current adopted code.
Accessed · Link to this claim - Texas Commission on Environmental Quality guidance explains that roof-collected rainwater remains subject to contamination, recommends smooth nonporous roof materials and avoiding biocide-treated roofing for potable collection, and gives a first-flush sizing recommendation of at least 1 to 2 gallons per 100 square feet for a fixed-volume diverter.
GI-366: Harvesting, Storing, and Treating Rainwater for Domestic Use
TCEQ educational guidance hosted by Texas A&M AgriLife Extension; the first-flush figure is a recommendation in that guidance, not a national code requirement or proof that a specific diverter achieves a health target.
Accessed · Link to this claim - TCEQ guidance gives an approximate collection method of 0.5 gallon per inch of rain per square foot of roof footprint, and illustrates storage sizing by multiplying daily demand by a dry-period duration; actual design must account for efficiency, rainfall pattern, demand, overflow and local requirements.
GI-366: Harvesting, Storing, and Treating Rainwater for Domestic Use
TCEQ educational calculation examples; used here only for an illustrative screening worksheet, not as a site-specific sizing design or guarantee of annual supply.
Accessed · Link to this claim - TCEQ guidance describes an air gap as physical separation between a potable fill outlet and maximum tank water level, identifies it as the safest method in its discussion, and says a reduced-pressure principle backflow assembly requires testing by a certified backflow assembly tester at installation and annually thereafter in the described setup.
GI-366: Harvesting, Storing, and Treating Rainwater for Domestic Use
TCEQ guidance and its described public-water/makeup-water context; local plumbing, water supplier and AHJ requirements control the approved backflow method and test frequency.
Accessed · Link to this claim - NSF's live Official Listings page identifies NSF/ANSI 350 as Onsite Residential and Commercial Water Reuse Treatment and displays listed manufacturers, model numbers, rated gallons-per-day capacity, classification and type; NSF instructs users to confirm current listing status.
NSF Product and Service Listings: NSF/ANSI 350
NSF live listing lookup accessed on the stated date; a listing is not by itself approval for a particular end use, jurisdiction, installation, water source or complete treatment train.
Accessed · Link to this claim - The Sioux Chief PowerPEX installation guide says to test the system as code dictates and, where code is absent, gives a product-specific example of testing to 100 psi for at least 12 hours before covering underground or behind-wall connections or tubing; it also instructs installers to remove components that could be harmed by the test.
PowerPEX Tubing Installation Requirements & Limitations
Sioux Chief's PowerPEX product literature; not a universal pressure-test rule and not evidence that another pipe, fitting, treatment unit or local code permits the same pressure or duration.
Accessed · Link to this claim - The Sioux Chief guide permits specified PowerPEX joints to be buried or concealed but recommends that threaded connections never be buried or concealed because they must remain accessible for periodic inspection under building codes; it also states that local conditions affect joint protection.
PowerPEX Tubing Installation Requirements & Limitations
PowerPEX-specific manufacturer guidance; do not transfer its joint permissions or accessibility interpretation to unlisted products or another jurisdiction.
Accessed · Link to this claim - California's Department of Housing and Community Development says Senate Bill 597 requires recommendations regarding building standards for rainwater catchment systems for nonpotable uses in newly constructed residential dwellings, with a final report due January 1, 2027 and a 2026 draft-report comment period shown on the page.
Rainwater Catchment Systems Report (SB 597, Chapter 861, Statutes of 2024)
California HCD legislative/reporting process page as accessed September 8, 2026; it does not establish a universal California installation approval or replace the current California Plumbing Code and local AHJ review.
Accessed · Link to this claim