Prepare a New-Home Sewer Backflow Protection Plan Before Under-Slab Plumbing
Compare drainage branches, backwater-valve families, access, approvals, maintenance and handoffs before a new-home slab or finishes conceal sewer-backflow protection.
The short answer
Before under-slab DWV work, map every fixture branch against the next upstream public-sewer manhole cover or the applicable septic and flood design datum, confirm the adopted rule with the local AHJ, and choose a listed valve whose manual matches the pipe, flow direction, orientation, slope and access plan. Release concrete only after the valve, sleeve, cleanout, inspection record, operating rule and maintenance owner are documented.How to Prepare a New-Home Sewer Backflow Protection Plan Before Under-Slab Plumbing
Before under-slab DWV work, map every fixture branch against the next upstream public-sewer manhole cover or applicable septic or flood datum, and ask the authority having jurisdiction (AHJ) to confirm the adopted rule. Choose a valve only after checking its listing, size, flow direction, orientation, slope and access limits. Release concrete only when the valve, sleeve, cleanout, operating rule, inspection evidence and maintenance owner are recorded.
This guide is for a United States homeowner planning a new house with a basement, low fixture, sewer-surcharge concern, flood exposure, or septic-backup concern. It is a planning and handoff surface, not a plumbing design, floodplain determination, septic permit, inspection certificate or local-code opinion. The actual state, county, city, tribal jurisdiction, utility, sanitary district, health department and AHJ control wherever their rules differ from model-code background.
Keep the material and systems decision with Brictale’s Materials & systems journey; when the rough-in reaches inspection and concealment, carry the packet into Managing the build and later Handover & ownership. The Brictale Blog is the single homeowner feed for the wider build sequence, not a separate water or valve library.
1. Establish the jurisdiction and backflow trigger before drawing branches #
The first decision is not “Which valve should I buy?” It is “Which drainage branches are exposed under the rule adopted for this address, and what datum does that rule use?” The 2021 International Residential Code (IRC) model text compares fixture flood-level-rim elevation with the elevation of the next upstream manhole cover in the public sewer, while the 2021 International Plumbing Code (IPC) model text uses a similar public-sewer manhole comparison for fixtures below that elevation. Both are model-code references, not automatically the law in every US location. Start with the AHJ, the utility or sanitary district, and the permitted drainage design.
Model code is a starting question, not permission to install
The 2021 IRC Section P3008.1 model text says that plumbing fixtures whose flood-level rims are below the next upstream public-sewer manhole-cover elevation are to be protected by a backwater valve in the building drain, a branch of the building drain, or a horizontal branch serving those fixtures. Read the full provision in the 2021 IRC Chapter 30 sanitary-drainage text. That sentence gives a useful planning trigger, but it does not answer whether your jurisdiction has adopted the 2021 IRC, a later or earlier IRC, the IPC, the Uniform Plumbing Code, a local supplement, or an amended rule.
The 2021 IPC Section 714.1 model text says that fixtures on a floor with a finished floor elevation below the next upstream public-sewer manhole-cover elevation are to be protected by a backwater valve installed in the building drain or the horizontal branch serving those fixtures. The 2021 IPC Chapter 7 sanitary-drainage text also contains model provisions on valve material and access. Treat this as an issue list for the permit conversation, not as a substitute for reading the adopted plumbing code.
Do not silently convert “below the manhole cover” into “below the street,” “below the curb,” “below the sewer crown,” or “in a flood zone.” Those can be related but different facts. The comparison may use a finished floor, a fixture flood-level rim, a manhole cover, an elevation datum in a floodplain rule, or a local engineering criterion. Your worksheet should name the actual comparison used by the authority, identify its jurisdiction, and preserve the source or written confirmation.
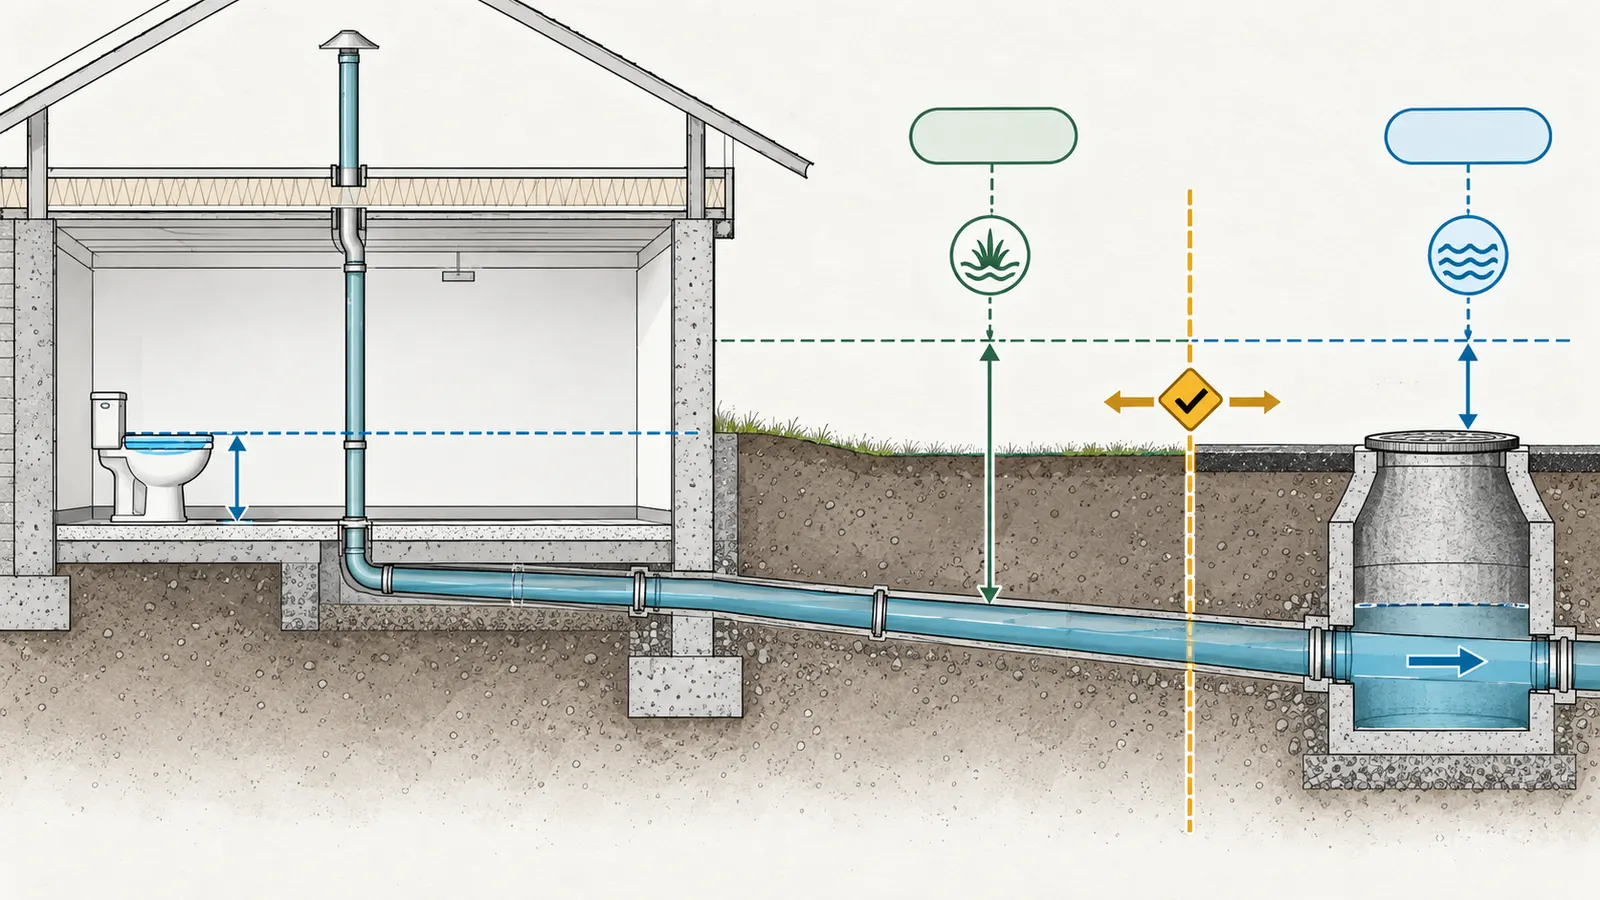
Make the jurisdiction record before the plumber prices the rough-in
The homeowner or owner’s representative should open a project record with these fields:
| Field | Record before rough-in | Why it changes the decision |
|---|---|---|
| Project address | Street address, parcel and jurisdiction | The permitting authority may not match the mailing city or county. |
| Building-code authority | State, county, city, tribal or other AHJ; named department and contact | The adopted code and amendments control the permit and inspection. |
| Plumbing-code edition | Adopted code, edition, effective date and local amendments | Model-code language can differ by edition or amendment. |
| Sewer authority | Utility, sanitary district or private system owner | The upstream manhole, connection rules and sewer lateral requirements may come from the utility. |
| Wastewater path | Public gravity sewer, private sewer, septic gravity, septic pump or other | A public-man-hole trigger does not answer a private septic design. |
| Elevation datum | Survey datum, finished floor, flood-level rim and comparison point | A number without a datum can make a correct-looking comparison meaningless. |
| Permit path | Plumbing permit, building permit, septic permit, floodplain review and inspection sequence | A valve can be technically suitable yet not released for concealment. |
| Written answer | Name, date, question and response from the AHJ or utility | It records what was actually confirmed and what remains open. |
Ask the AHJ questions in writing. A useful question is: “For this new single-family house at [address], which adopted provision controls sanitary backwater protection, what is the required elevation comparison, which branches must be protected, are normally closed or manual arrangements allowed, and what access and inspection evidence must be visible before the slab is poured?” Ask the utility whether a valve on the building drain or building sewer affects the service connection, cleanout, maintenance responsibility, or sewer-lateral approval. Ask the septic authority whether any proposed valve would interfere with the permitted tank, pump, alarm, effluent filter, dosing cycle or emergency use instructions.
A verbal statement at a counter is not a design record. If a local official gives a verbal answer, the homeowner can send a short confirmation email: “This note records my understanding that your department requires [scope] under [adopted provision], with [access/inspection condition]. Please correct any misunderstanding.” Keep the response with the plan set. The record does not make an interpretation binding, but it gives the plumber and inspector a common starting point.
Separate three risks that are often blended together
Sewer surcharge, surface flooding and septic malfunction can all appear as “backflow,” but they are not the same design problem.
- A public sanitary sewer surcharge can push wastewater toward a low building connection. A normally open backwater valve may close automatically when reverse flow begins.
- Surface floodwater can enter through doors, floor drains, foundation leaks, cleanouts, roof or yard drainage, or a combined sewer system. A sanitary backwater valve does not dry-flood-proof the building.
- A septic system can fail because of hydraulic overload, poor maintenance, an obstructed effluent path, high groundwater, a failed pump or a drainfield problem. A valve may change the path of sewage but cannot restore a failing treatment system.
The distinction affects who must answer the next question. The AHJ and sewer utility address adopted plumbing rules and connections. The floodplain administrator or engineer addresses flood elevations, openings, backflow pathways and local flood requirements. The health or environmental department and a qualified septic designer or service provider address the permitted onsite wastewater system. Do not ask one professional to certify another authority’s subject.
The precondition for a branch decision
Do not ask for a valve submittal until the plumber has drawn the sanitary and storm paths separately and marked every low fixture, cleanout, floor drain, sump, ejector, condensate drain and branch connection. A basement toilet and a basement floor drain may be connected to different branches. A garage drain may be storm-connected, sanitary-connected, trapped, pumped or prohibited by local rules. A downspout may be required to disconnect from a combined sewer or may never have been permitted to connect. The plan needs a branch identity, not just a circle labeled “backwater valve.”
The next decision is whether the risk is public-sewer backwater, septic-system malfunction, surface flood, or a combination. If the datum, wastewater path or adopted rule is unknown, the correct status is “hold for design confirmation,” not “install the valve that looks right.”
2. Map every drainage branch to the actual risk and responsible party #
The protection scope should be decided branch by branch. A single valve on the main may protect a group of low fixtures, but it can also close the exit for fixtures above it or leave an unprotected branch connected downstream. A branch valve may protect only the intended fixtures while preserving other drainage paths, but it adds locations to inspect and document. The right choice depends on the drainage topology, the code path, the operating rule and future maintenance—not on the number of valves shown in a product catalog.
Draw the drainage tree in the direction of normal flow
Start at each fixture and follow the sanitary line downstream toward the building sewer, sewer lateral, tank, pump or treatment system. Label each junction, transition, vertical stack and cleanout. Then mark the proposed valve on the drawing and shade the area upstream of the valve. Everything in that shaded area is the proposed protection scope for reverse flow, subject to the AHJ and the valve’s installation limits.
For each branch, record:
- fixture or drain name, room and finished floor;
- fixture flood-level rim elevation or the local comparison elevation;
- pipe invert at the fixture, branch junction and valve;
- nominal pipe size and material;
- normal flow direction and proposed valve flow arrow;
- downstream destination and who owns or maintains it;
- whether the branch is gravity, pumped, ejector discharge, septic gravity or septic pressure;
- whether the branch includes a sump, pump, alarm, vent, trap primer or cleanout;
- whether any fixture above the comparison datum would drain through the valve;
- whether a valve closure would strand wastewater from the protected fixtures;
- proposed access opening, cover, finished-floor elevation and load rating;
- responsibility for selection, installation, inspection, maintenance and emergency operation.
The last two entries are easy to omit. The homeowner needs to know not only what the valve protects but also what the valve prevents from leaving the house when it closes. FEMA’s flood-resistant utility handbook explains the physical distinction: a check valve allows one-way flow, while a gate valve operated closed prevents flow in either direction. The operating plan must therefore tell occupants when to stop using toilets, sinks, showers, washers, dishwashers and other water-using appliances. That stop-use instruction is a planning inference from a closed discharge path; the AHJ, utility, flood authority and selected system’s instructions control the actual local rule.
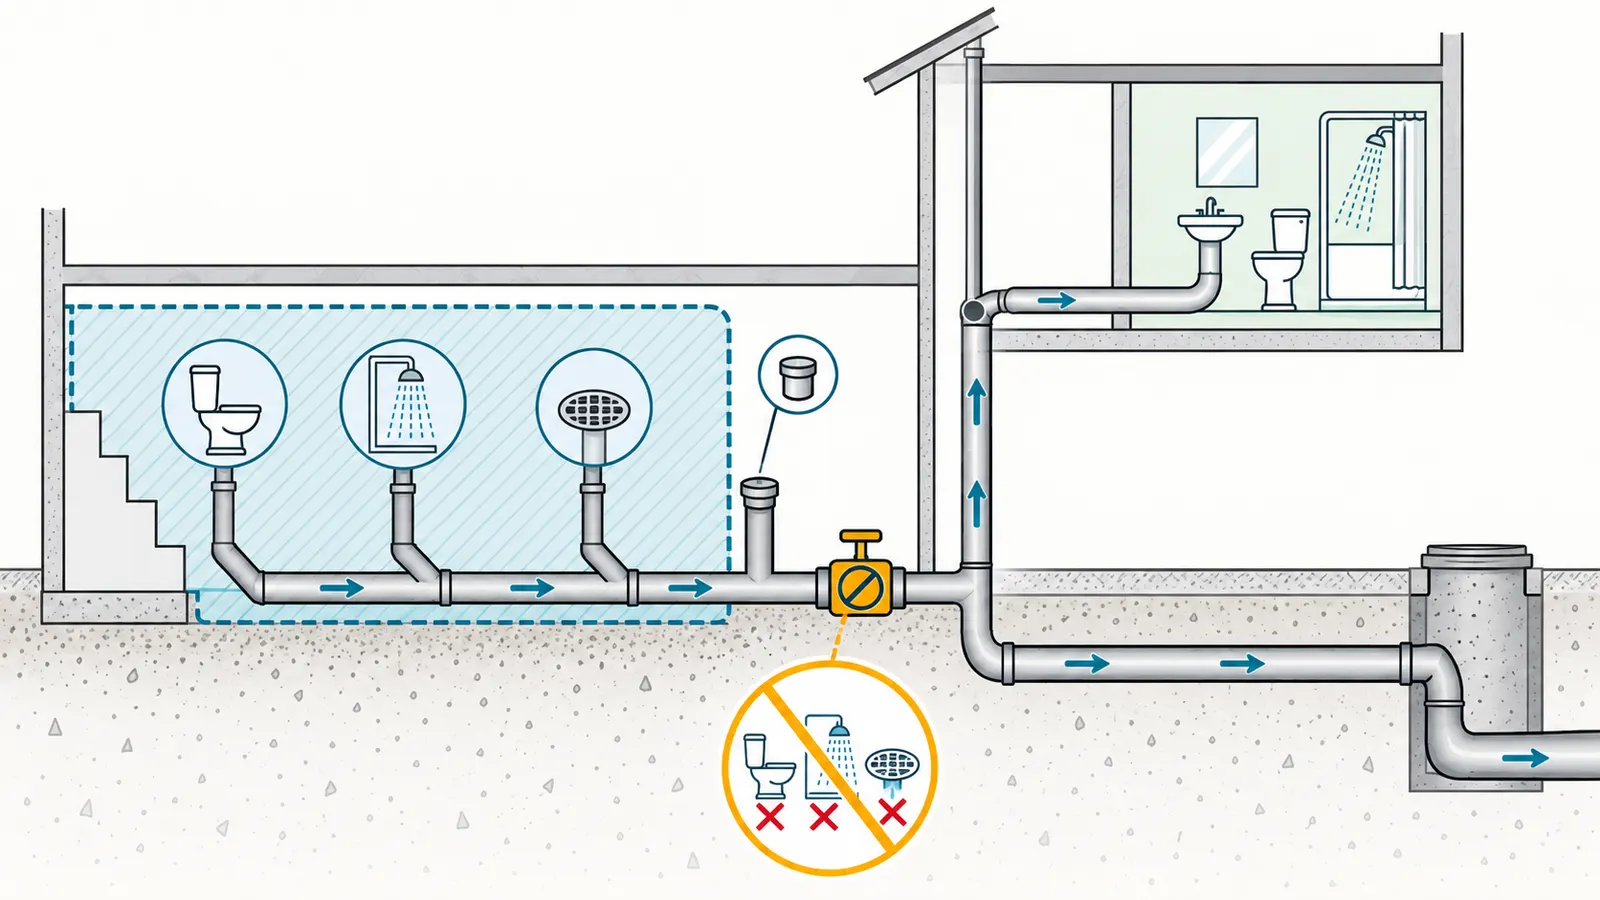
Use the elevation comparison as a measured input
For a modeled public-sewer comparison, define:
clearance = elevation of the comparison manhole cover − elevation of the fixture flood-level rim
Use one unit system. If the survey gives the manhole cover at 112.40 feet NAVD88 and a basement toilet flood-level rim at 109.85 feet NAVD88, then:
clearance = 112.40 ft − 109.85 ft = 2.55 ft
The positive 2.55-foot result means the fixture rim is lower than the manhole cover under this modeled comparison. It does not, by itself, prove that protection is required in your jurisdiction, that the upstream manhole is the correct one, or that a valve is the correct remedy. A surveyor, civil engineer, plumber or AHJ may use different points, a different datum, a different wastewater path or an approved alternative such as a sump and ejector.
Record uncertainty rather than hiding it. Suppose the surveyor’s vertical uncertainty is ±0.10 ft and the rim elevation is estimated from an architectural section with ±0.05 ft. A simple planning margin is:
combined planning uncertainty ≈ 0.10 ft + 0.05 ft = ±0.15 ft
The result is not a statistical confidence interval; it is a conservative worksheet flag. If the measured clearance is only 0.08 ft, the result is too close to use as a casual yes-or-no. Ask the surveyor and AHJ what control points and tolerances apply. If the clearance is 2.55 ft, the magnitude is less sensitive to those assumed errors, but the branch scope and adopted rule still require confirmation.
For a public sewer, name the “next upstream manhole” from the utility map or an official utility confirmation. Do not select the closest cover visible from the lot. A service line may tie directly to a manhole, a private sewer may alter the path, or the lot may sit within a combined or unusual network. Record the manhole identification, not just “upstream manhole.”
Identify branches that must not pass through a normally closed valve
The 2021 IRC model text uses the finished floor elevation when addressing fixtures above the next upstream public-sewer manhole-cover elevation: where a backwater valve is installed in the building drain or horizontal branch serving those fixtures, the valve is to be normally open. Its exception for a normally closed installation is framed for existing buildings, so it is not a basis for selecting a normally closed arrangement in this new-home plan. Read the 2021 IRC P3008 provisions in the edition and amendments adopted for the project. This is a strong design warning: putting a normally closed device in a shared building drain can interrupt normal drainage and can make higher fixtures dependent on the valve’s operating state.
The practical mapping question is: “If this valve closes, where does every fixture connected upstream discharge?” If the answer is “into the house through the next lowest fixture,” the plan is not complete. The branch must be redrawn, a different valve arrangement evaluated, or the operating plan and code path changed by the qualified design team. Never rely on a homeowner’s assumption that a toilet on an upper floor is “far enough away” to be unaffected.
Assign ownership before the branch is buried
Use role names, not vague phrases such as “contractor to handle.” A typical assignment might look like this:
| Decision or record | Homeowner / owner’s representative | Plumber or plumbing designer | Surveyor, engineer or septic designer | AHJ, utility or health department |
|---|---|---|---|---|
| Confirm the actual risk | Provides site history and intended fixtures | Maps the DWV branches | Confirms elevations or septic design inputs | Confirms jurisdictional trigger where applicable |
| Select the branch scope | Approves serviceability and budget | Designs the branch and valve location | Reviews unusual hydraulic, flood or septic constraints | Reviews permit submittal if required |
| Select the model | Requires manual, listing and access record | Matches model to pipe and flow | Flags design limits | Confirms accepted listing or alternate path |
| Release under slab | Reviews photos and records | Installs and tests | Observes only within scope | Inspects or records approval as required |
| Own future maintenance | Keeps map, manual and schedule | Teaches service procedure | Advises on flood or septic limits | Provides local emergency or inspection requirements |
The owner does not need to perform the plumbing work to own the decision record. The owner does need to know which professional made the hydraulic or code judgment, which facts were provided, and what must happen during a surcharge. If a builder delegates the design to a plumber, name the plumbing firm and the individual responsible for the submittal. If a septic designer is involved, do not let a municipal sewer assumption survive in the septic plan.
Common mapping failures and the next decision
Failure: the plan protects only the basement toilet. A floor drain, shower, laundry standpipe or utility sink may still be connected to an exposed branch. Next step: trace every sanitary branch and explicitly mark protected, unprotected and not-connected fixtures.
Failure: the plan places one valve upstream of an upper-floor stack. A closure can block normal discharge from fixtures that were not part of the intended risk. Next step: calculate the closure consequence for every upstream fixture and ask the plumber to separate the branches or document a permitted normally open arrangement.
Failure: the homeowner compares the finished basement floor with the street. Code triggers often use a fixture rim and an identified manhole or another authority-specific datum. Next step: request the controlling comparison in writing and put the actual elevations on the plan.
Failure: the homeowner treats a septic tank like a municipal manhole. The tank, pump tank, effluent filter, drainfield and alarm are a permitted treatment system. Next step: give the septic designer the branch plan and ask whether a valve is allowed, where it belongs, and what the emergency operating rule is.
The next decision is whether each row can advance to valve selection. A row with an unknown destination, uncertain elevation or unresolved branch ownership is a design hold.
3. Choose the valve family by behavior, listing and installation limits #
Choose the valve family only after the branch and operating behavior are known. A normally open check-style valve is generally the candidate for a gravity branch that must drain during ordinary use and close automatically against reverse flow, subject to the adopted code and product instructions. A manual gate arrangement requires a deliberate closure before the hazard and a reliable way to know when it is safe to reopen. A normally closed or manually operated arrangement may be relevant to an existing or special installation, but it changes drainage, venting, access and occupant duties. The product label alone cannot resolve those tradeoffs.
Start with standard scope, then inspect the actual model
ASME describes A112.14.1-2003 (R2022) Backwater Valves as covering dimensions, performance requirements, connections, materials and finishes, testing and marking. Its listed types include horizontal valves, manual gate valves, terminal backwater valves, combination floor drains with backwater valves, and vertical or 90-degree products. This tells you what a standard may address; it does not mean every valve type is interchangeable or suitable for every under-slab branch.
Use a three-document stack for the selected product:
- The adopted code or written AHJ approval tells you whether the arrangement is allowed and where protection belongs.
- The standard or certification record tells you which performance and marking path the product claims.
- The manufacturer’s current installation and maintenance manual tells you how that model must be oriented, connected, supported, accessed, cleaned and operated.
ICC-ES’s approved-criteria directory identifies LC1006 as criteria for extendable backwater valves within its PMG program. That directory is useful when a submittal cites an ICC-ES listing, but it is not a universal product approval and it does not replace checking the actual product report, scope and current model. If a product relies on another listing body or certification, record that body and report number. If the submittal only says “meets code” without a model, standard, listing or installation manual, it is not ready for release.
Compare normally open, automatic check and manual arrangements
The following is a planning matrix. It does not override the adopted code or a product’s instructions.
| Arrangement | Normal condition | Reverse-flow behavior | Occupant action | Main design advantage | Main failure or tradeoff |
|---|---|---|---|---|---|
| Normally open automatic check or flapper | Open for normal gravity drainage | Reverse pressure or flow moves the closure toward its seat | Usually monitor, inspect and follow the alarm or utility rule | Preserves ordinary gravity drainage without a manual pre-storm step | Debris, buildup, damaged sealing surfaces or wrong orientation can prevent sealing; closure stops discharge from upstream fixtures |
| Manual gate or manually operated valve | Open or closed by a person | Protection depends on closing before or during the hazard | Recognize warning, close in time, stop water use, reopen only when safe | Positive manual isolation can be clear when the operator is trained | FEMA identifies manual closure before inundation as a limitation; late closure, forgotten operation or inaccessible hardware defeats the plan |
| Normally closed arrangement | Closed during ordinary state unless opened by a control or person | Blocks reverse flow while closed | Operate according to design; often stop or reroute discharge | Can isolate a defined branch under a special design | Ordinary drainage, venting, pump operation and code acceptability need explicit design; a shared building-drain location can create an unacceptable blockage |
| Pumped or ejector discharge check plus isolation | Pump and controls establish normal discharge | Check valve resists reverse flow; isolation may be separate | Follow pump alarm and emergency instructions | Can serve fixtures that cannot drain by gravity | It is not the same as a gravity backwater valve; pump sizing, power, alarm, venting and access are separate design decisions |
The word “check” is not enough. Ask whether the device is a gravity sanitary backwater valve, an ejector discharge check, a stormwater flap, a potable-water backflow preventer, or another product. These devices can look similar while having different flow, pressure, venting, listing and maintenance requirements.
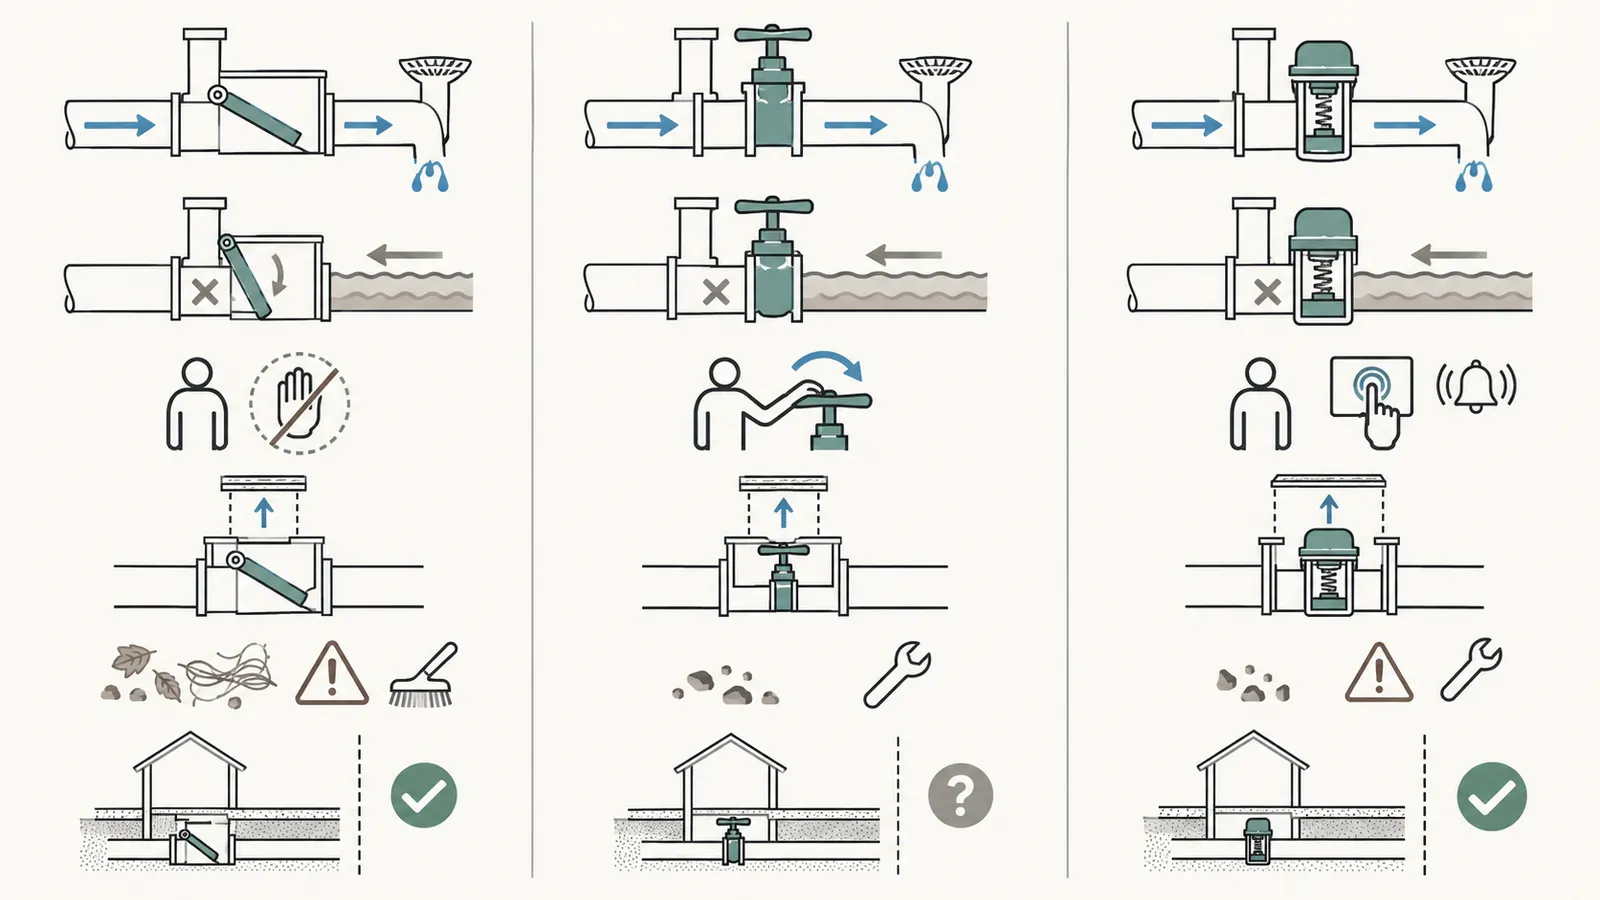
Match the model to flow direction, orientation and slope
Sioux Chief’s 869 series guidance is a good example of why model-specific review matters. It states that the product is for gravity-flow applications, should be installed level on nominally horizontal lines, should not be installed vertically, needs the access opening at the top, requires arrows to point in the direction of flow, and limits the slope of the drain line on which the valve is installed to 1/4 inch per foot for that guidance. The current Sioux Chief 869 installation instruction sheet also recommends an access sleeve under concrete and says the flapper should move freely and seal cleanly before use.
The product page for Sioux Chief 869-2PS separately identifies a horizontal, gravity-flow installation, threaded access for maintenance and inspection, and no vertical installation. The page also shows that an extension sleeve is an accessory for a particular size. Do not infer that a different diameter, extension, body material or series has the same limits.
For a rough-in plan, draw a section through the valve. Show the invert at both hubs, the flow arrow, the valve body, lid, sleeve, finished floor, structural slab, floor finish and any furniture or equipment that could obstruct service. If the valve must be level but the branch needs continuous fall, show how the plumber will transition into and out of the body without violating the manual. If the line is sloped more steeply than a particular manual allows, the answer is not to rotate the valve until it looks level; the installer must select a compatible product or revise the layout.
Check capacity and connections, not only nominal diameter
A 3-inch pipe label does not prove that a valve has the required open-flow capacity, internal clear opening, connection type or transition detail. Review the adopted code and the exact product submittal as a combined question, including any manufacturer capacity data and the connection, access and installation limits that apply to that model.
The submittal should state:
- nominal pipe size and actual connection type;
- compatible pipe material and solvent, gasket or no-hub connection method;
- open-position flow path and any manufacturer capacity data;
- whether the model is for gravity or pumped service;
- allowable orientation and line slope;
- accessible lid, cover and internal parts;
- access sleeve, extension and cover requirements;
- load rating for the finished floor location;
- temperature, corrosion, chemical or wastewater limitations;
- replacement flapper, gasket and carrier part numbers;
- listing or certification record and scope;
- installation, inspection, cleaning and operating instructions.
Jay R. Smith’s 7012 sewer backwater-valve page illustrates the level of model detail a submittal can contain: the page describes low-area wastewater-backflow protection, cover options that fully open for maintenance access, connection variations, and ASME A112.14.1 compliance for the listed configuration. That does not make the 7012 a recommendation for every home. It shows why the homeowner should record the exact model and cover or connection variant rather than writing “Smith backwater valve” on a plan.
Make certification inspectable
A useful certification check has four parts:
- Identity: manufacturer, product family, exact model, diameter, connection, cover and accessories.
- Claim: standard, listing, evaluation report or certification number and current date.
- Scope: gravity or pumped service, orientation, pipe material, location, size and any extension limits covered by the claim.
- Acceptance: the AHJ or permit reviewer’s response if the local code requires a particular listing or an alternate approval.
An online product page is not a complete submittal. Save the actual manual or PDF version used for selection, because a future replacement may have a similar name but a different body, lid, flapper or slope limit. Put a printed copy with the closeout binder and note the URL and access date in the worksheet.
Failure cases at the selection stage
Catalog substitution: the supplier substitutes a model that fits the pipe but lacks the planned access sleeve or has a different orientation. Hold delivery acceptance until the replacement manual and listing are reviewed.
Potable-water terminology: someone orders a “backflow preventer” intended for the water service. Stop and distinguish sanitary backwater from potable-water backflow; ask the plumber for the sanitary DWV product data.
Mixed gravity and pumped branches: a valve described for gravity flow is placed on an ejector discharge. Stop and have the pump designer or plumber specify the check and isolation arrangement for that discharge.
Normally closed by convenience: a valve is selected because it is compact, even though ordinary drainage would be blocked. Stop until the AHJ and designer confirm the arrangement, venting and operating rule.
The next decision is a written model release: no valve is released for purchase until the branch row, exact model, manual, listing, connection, orientation, slope, access and responsible reviewer are all complete.
4. Freeze the rough-in, access and concrete interfaces before concealment #
The under-slab release is a geometric and serviceability decision. The valve must be installed where it can work in the intended flow direction, where its working parts can be reached without breaking the slab or finished floor, and where cleanout and drain-service tools can be used without damaging the closure. A valve that is technically listed but buried beneath a fixed cabinet, structural footing, thick finish or inaccessible equipment is not a maintainable plan.
Design access from the finished floor backward
Start with the finished floor, not the excavation. Draw the cover at its final elevation and identify the finish thickness, slab thickness, reinforcing, vapor barrier, insulation, structural penetrations, cabinets, partitions and equipment. Then show the sleeve or access opening down to the valve lid and the clearance needed to remove the lid, flapper, carrier, gasket or cleanout plug. Confirm whether the cover must be flush, recessed, load-rated, gas-tight, watertight or otherwise specified by the product and local rule.
The 2021 IPC model text says backwater valves are to be installed so that access is provided to the working parts. The IPC Section 714 provision is concise, but “access” is not a photograph of a lid before the slab. It means the maintenance person can reach the parts, remove the necessary components and perform the intended service after construction. The 2021 IRC model text carries the same access concept. Put the access dimensions and removal path on the plan.
Sioux Chief’s under-concrete example describes an access sleeve installed before the slab is poured, cut to the intended finished height after the slab hardens, and closed with a sleeve lid. Its current installation instruction sheet also describes removing the flapper during construction to protect it and installing it before final inspection. Treat those as Sioux Chief instructions, not a universal sleeve detail. Another product may require a different sleeve, cover, body support or clearance.
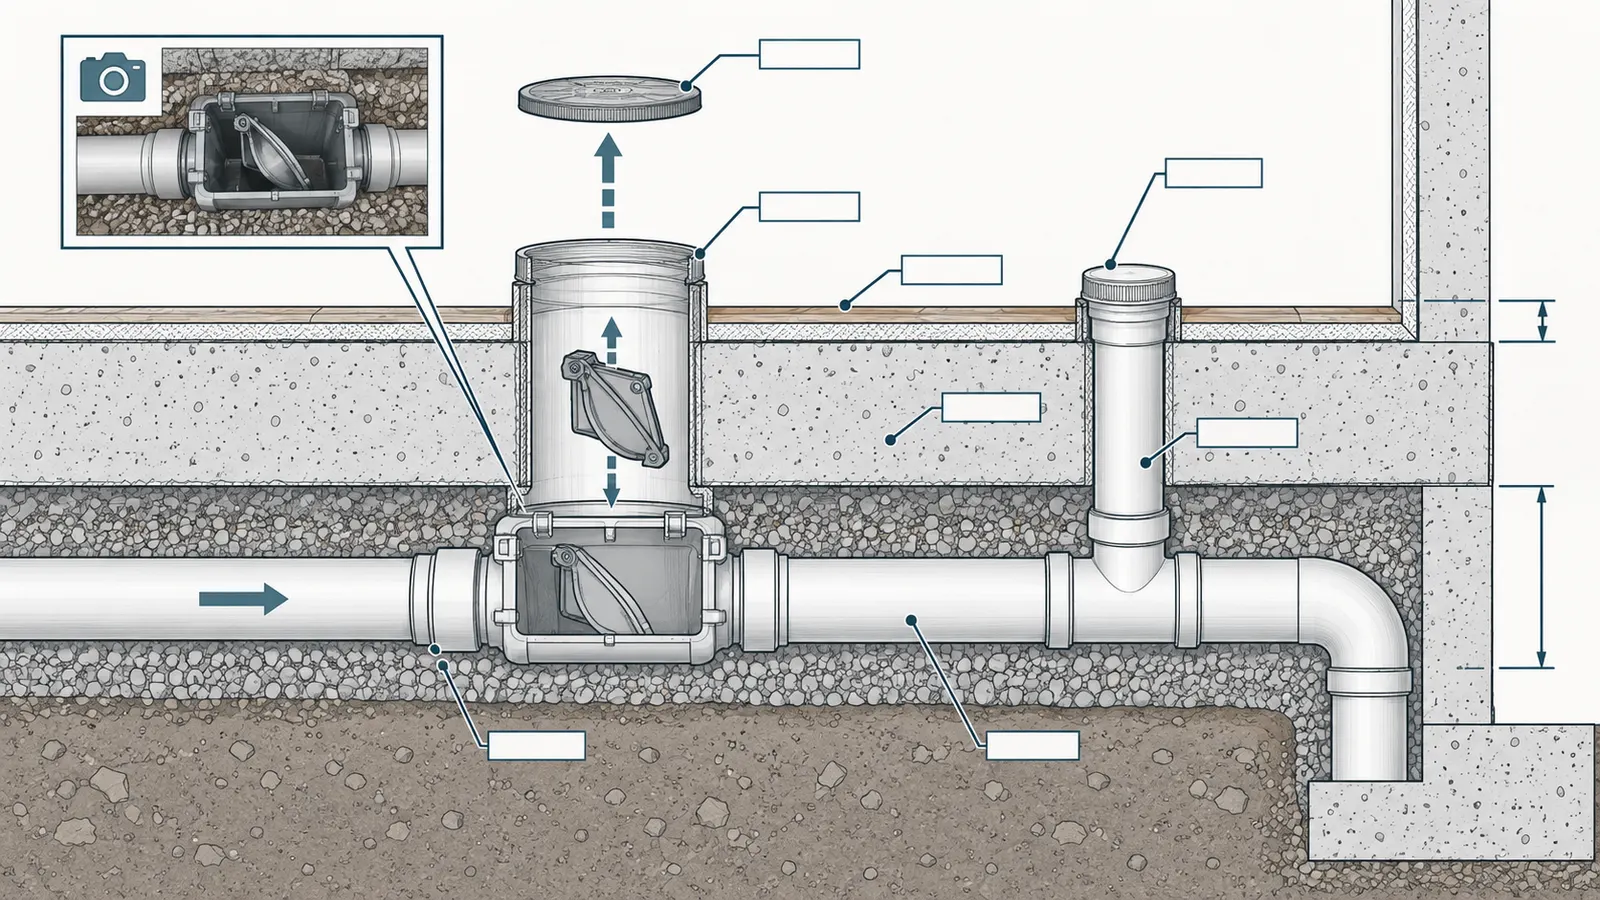
Protect the valve while other trades work
Under-slab plumbing is exposed to foot traffic, aggregate, concrete, solvent, debris, survey stakes, trench collapse, backfill movement and later mechanical work. The installation sequence should state:
- Verify the branch and valve station against the latest coordinated plan.
- Set the pipe bedding and support so the valve is not carrying unintended soil or slab loads.
- Orient the body and flow arrow as specified by the manual.
- Install the access sleeve, collar, cover or extension required by the exact model.
- Keep construction debris and solvent out of the working parts.
- Protect the opening from concrete and prevent the sleeve from moving while the slab is placed.
- Photograph the valve, flow arrow, pipe connections, sleeve, elevations and nearby fixed references before concealment.
- Reinstall the flapper, lid or internal assembly according to the manual before the applicable inspection.
- Record the inspection or test result and obtain the responsible sign-off before concrete or finish covers the work.
Do not let a concrete crew “make the sleeve work” in the field without an approved detail. A sleeve that is too short can disappear under finish flooring; a sleeve that is too long can interfere with flooring or become a trip hazard; a sleeve offset from the valve may not provide a removal path; and a cover set at an unverified elevation may end up below water or inside a cabinet. The owner should require a coordinated detail before placement, not rely on a post-pour patch.
Coordinate cleanouts with valve access
A valve opening and a cleanout are not automatically the same service point. A plumber may need to remove the flapper or carrier before using a mechanical cable or jetting tool. Sioux Chief’s installation guidance specifically says the flapper should be removed before using mechanical tools to service the drain line. Put the valve lid, cleanout plug, access sleeve and tool path on the plan. Ask which parts are intended for routine inspection, which are removable only by a plumber, and whether a cable can pass through the body without damaging the seat.
If the valve is placed immediately downstream of a branch junction, the access opening may be convenient for the flapper but poor for cleaning the upstream branch. If it is placed too far downstream, it may protect fixtures that were not meant to share the closure consequence. The plumber should show both hydraulic scope and maintenance reach. The homeowner’s acceptance record should include a photo with a tape or scale only if the professional uses it as a record; do not mistake a photo for a measurement or approval.
Keep structural and waterproofing responsibilities visible
Cutting or coring a slab, footing, foundation wall, or structural element is not a homeowner maintenance action. The plumber must coordinate sleeves and penetrations with the builder and structural designer. A foundation waterproofing system may have its own boot, seal, drainage plane and inspection requirement. A vapor barrier or radon-mitigation detail may be compromised by an unplanned access opening. The builder should identify who owns each penetration detail and who restores the water, air and vapor control layers.
Falls, excavation collapse, contaminated water, concrete work, electrical equipment near wet areas and confined spaces can all be present during this work. The homeowner can review plans, observe from a safe location and preserve records. A qualified plumber or other qualified professional should perform excavation, pipe cutting, solvent welding, structural penetrations, electrical work, confined-space entry, sewage cleanup, testing that requires specialized equipment and any work governed by a license or permit. Keep occupants and children away from open trenches, access pits and contaminated drainage.
Model the finished access, not the rough opening
Use an access-release table:
| Check | Rough-in evidence | Finished-condition question | Owner of answer |
|---|---|---|---|
| Opening location | Plan dimension from two fixed walls or grid lines | Can a future service person find it after cabinets and flooring? | Builder and plumber |
| Opening size | Sleeve or lid model and dimensions | Can the specified working parts be removed through it? | Plumber and manufacturer manual |
| Finished elevation | Slab, finish and cover elevations | Is the lid flush, safe and compatible with the floor finish? | Builder and flooring trade |
| Load and moisture | Cover rating and seal detail | Will traffic, water, cleaning or furniture damage the cover or access? | Builder, plumber and AHJ if required |
| Tool clearance | Lid and upstream/downstream service path | Can the branch be inspected or cleaned without demolition? | Plumber |
| Record | Photos and as-built coordinates | Can the owner identify the part and replacement path years later? | Builder and homeowner |
The next decision is a concrete hold point: if the working parts, lid-removal path, cleanout path or as-built location cannot be demonstrated, the trench is not ready to cover.
5. Assign permits, inspection, testing and handoffs in sequence #
Backwater protection is ready for concealment only after the people who design, install, inspect and maintain it agree on the same branch, model and operating rule. A homeowner should make the sequence explicit in the project schedule because the plumbing inspection, slab placement, floor finish and occupancy inspection often involve different parties.
Use a staged release sequence
Stage 1 — Owner brief. The homeowner records the intended low fixtures, future basement use, flood or surcharge history, public sewer or septic path, and any constraints such as an accessible finished floor. The owner does not diagnose a sewer or septic failure from symptoms alone.
Stage 2 — Civil, survey or septic inputs. Obtain the relevant manhole, flood, finished-floor, pipe-invert or septic-design information. A surveyor, civil engineer or septic designer provides professional inputs where the numbers affect design. For a public sewer, identify the next upstream manhole as the utility or AHJ defines it. For septic, identify the tank, pump, effluent path, alarm and permitted design rather than borrowing the municipal-man-hole test.
Stage 3 — Branch plan. The plumbing designer or qualified plumber traces each fixture to its downstream destination, labels the proposed protected scope, and records what happens if the valve closes. The plan distinguishes sanitary, storm, condensate and sump paths.
Stage 4 — Code and permit gate. The owner or designer confirms the adopted code, local amendments, required listing, permit submission, access condition, inspection point and any utility or health-department review. A model-code link can support the question but cannot stand in for local approval.
Stage 5 — Model submittal. The plumber submits the exact manufacturer, model, size, connection, listing, manual, access sleeve, cover and replacement parts. The designer checks gravity versus pumped service, orientation, slope, flow arrow, open capacity and access.
Stage 6 — Coordination meeting. Builder, plumber, structural or waterproofing trade, surveyor or septic designer, and owner’s representative resolve the sleeve, finish, reinforcement, penetrations, cleanout, photographs and inspection timing. The latest drawing is marked “for under-slab release.”
Stage 7 — Installation and pre-cover inspection. The plumber installs the branch and valve according to the approved detail and manual. The inspector or other responsible party verifies the visible requirements, and the plumber records the valve position, flow direction, access, connections, test and any deviation.
Stage 8 — Concrete and finish release. The builder covers the work only after the owner receives the record package and the responsible sign-off. A change in valve, sleeve, pipe route, fixture scope or finished elevation restarts the relevant review.
Stage 9 — Closeout and occupancy handoff. The owner receives the as-built route, model and manual, access location, inspection or test evidence, maintenance method, emergency operating rule, and names of the plumber, utility, AHJ and septic or flood contacts.
Ask what “test” means before accepting a test box
A backwater valve may be visually inspected, functionally operated, tested as part of a drainage test, or accepted under a local inspection checklist. Those are not interchangeable. The owner should ask:
- What exact test or observation does the adopted code or AHJ require?
- Was the valve installed in its final orientation and with the correct internal parts?
- Was the branch tested before the valve, through the valve, or with the valve isolated?
- Was the flapper or closure removed during construction and reinstalled before testing?
- Was the access sleeve protected and left accessible?
- Was the valve opened, closed or cycled only in the manner allowed by the manual?
- Who witnessed or recorded the test, on what date, and with what result?
- Did a change order alter the branch after the test?
Do not ask the homeowner to flood a sanitary branch or force a closure to “see if it works.” A qualified plumber or inspector should choose a safe test method. Testing does not prove future performance against every debris load, surcharge height, flood velocity, septic malfunction or maintenance condition.
Build the handoff packet while the work is visible
The closeout packet should contain a one-page branch map, the exact model and size, product manual, listing or certification record, installation photos, access dimensions, finished-floor reference, cleanout and sleeve details, inspection record, test record, deviations, maintenance instructions and emergency rule. Add a note stating which professional owns future inspection and which party owns the sewer, septic or flood notification.
Save both the original manual used at installation and the supplier invoice or packing label. A replacement part can require the model and series, not merely “3-inch backwater valve.” If the product is discontinued, the owner can give the model and connection record to a plumber rather than opening the slab to identify it. Do not store the only copy behind a finished utility-room wall.
Make the approval hierarchy explicit
When documents conflict, use this order for resolution:
- Applicable law, permit condition and AHJ determination for the project jurisdiction.
- Utility, sanitary district, floodplain or health-department requirements within their authority.
- Approved drawings and professional design decisions for the project.
- The exact product listing and current manufacturer manual.
- General model-code background, older manuals, product-page summaries and homeowner examples.
This is not a legal ranking for every dispute; it is a practical escalation order for a homeowner who finds a conflict. If a manual allows a configuration that the local inspector rejects, stop and ask the designer or AHJ for the acceptable path. If a model-code summary appears to allow a configuration that the selected product manual prohibits, select another product or revise the layout. If the septic permit prohibits the proposed valve, the septic authority controls the permitted system.
Handoffs that commonly fail
The permit set says “backwater valve,” but the purchase order has no model. The installer chooses a compact valve that cannot use the planned sleeve. Corrective action: issue a model-specific submittal before delivery.
The plumber installs before the finished elevation is frozen. The floor finish hides the lid or leaves it proud. Corrective action: coordinate the access section with the builder and flooring trade before the slab or finish release.
The builder photographs the rough pipe but not the valve internals. The owner cannot tell whether the flapper was reinstalled or which way the arrow points. Corrective action: request photographs of the complete assembly and the final access condition, with the plumber’s record.
The inspection passes, then a branch is moved. The passed inspection applies to the observed arrangement, not an unrecorded reroute. Corrective action: reopen the branch review and obtain the required reinspection.
The septic designer never sees the plumbing change. The valve or access pit changes the permitted flow, service or emergency procedure. Corrective action: issue the as-built and model documents to the health or environmental authority and septic professional.
The next decision is a documented release date. If any handoff depends on an assumption—especially the elevation datum, branch scope, listing, valve behavior or service access—the status remains “not released.”
6. Plan closure, maintenance, flooding and septic limitations before occupancy #
The protection plan is incomplete until the occupants know what the valve does when it closes, how to inspect it, who may service it, and how the rule changes for a septic or flood event. Automatic protection is not maintenance-free, and a closed valve can protect the building from incoming sewage while creating an immediate need to stop discharging water inside.
Write the closed-valve operating rule in plain language
FEMA’s flood-resistant utility handbook explains that a closed gate valve prevents flow in either direction. Your closeout sheet should therefore say, in large plain language:
If the backwater valve is closed, or if the responsible authority says the sewer is overloaded, stop using toilets, sinks, showers, tubs, washing machines, dishwashers and other water-using fixtures until the responsible professional or utility gives a safe restart instruction. Do not remove or defeat the valve closure to restore drainage.
Customize that wording to the exact valve and local emergency plan. The owner should know whether an alarm, utility alert, flood warning, building automation signal or visual inspection establishes the closure state. If there is a manual gate, identify who is authorized to close it, how early the decision must be made, where the handle is, and what confirms that it is fully closed. FEMA’s flood-resistant utility handbook notes two limitations that belong in the risk discussion: one-way valves can be impaired by debris, and manually operated backflow valves should be closed well before flooding is expected.
Do not tell occupants to keep using water because the valve is “automatic.” An automatic closure can stop downstream discharge just as effectively as a manual closure. If the house has a sump pump, ejector, condensate pump, water softener, dehumidifier, boiler discharge, or other automatic discharge, the designer must say what happens during a closure. A backwater valve does not create storage capacity inside the home.
Set the inspection and cleaning responsibility
The owner’s packet should name an inspection interval recommended by the manufacturer and local professional, the person who performs it, the access location, the parts inspected, the cleaning method, the replacement parts and the record form. A reasonable schedule may be seasonal or annual depending on debris, use, flood exposure, local direction and the manual; do not invent a universal interval when the selected product gives a different one.
An inspection record can include:
| Date | Valve open/closed before inspection | Debris or buildup | Flapper or closure movement | Seat, gasket and body condition | Cleaning or part replaced | Test or restart result | Person and company |
|---|---|---|---|---|---|---|---|
| [date] | [state] | [none/describe] | [free/limited] | [clean/damaged] | [work] | [result] | [name] |
The homeowner can keep the log and observe an accessible inspection. The plumber should perform disassembly, cleaning, replacement, sanitary work and any test that requires tools or exposes the worker to sewage. Do not reach into a contaminated valve, remove a cover in a confined pit, or use a mechanical cable near a flapper without the product procedure and appropriate protection.
Understand what the valve cannot protect
A sanitary backwater valve does not block water entering through an open door, foundation crack, window well, floor-wall joint, roof leader, yard drain or failed flood barrier. It does not stop a private sewer from surcharging upstream of the valve if another opening exists. It does not prevent groundwater from entering a foundation drainage system. It does not correct a blocked building sewer, an undersized or damaged lateral, a failed pump, an overloaded septic drainfield, a missing vent, or a floor drain that is on a different branch.
For a flood-prone site, the owner should ask the floodplain administrator, engineer and plumber how sanitary backflow protection coordinates with elevation, flood openings, utilities, foundation drainage, sump discharge, emergency power and local floodplain rules. Do not assume that a valve is a complete floodproofing system. A flood datum used by the plumbing plan may not be the same as the Base Flood Elevation or another floodplain datum.
Treat septic systems as a different operating system
EPA says that septic inspections should generally occur every 1 to 3 years, pumping generally every 3 to 5 years or as needed, and that local health or environmental authorities and septic professionals should be involved in system-specific problems. See EPA’s Resolving Septic System Malfunctions guidance. Those intervals are national homeowner guidance, not a substitute for the permit, state rule, county rule, tribal requirement, manufacturer’s treatment-system instructions or a designer’s maintenance schedule.
If the proposed house uses septic, record the tank and pump-tank elevations, outlet and effluent-filter arrangement, drainfield or dispersal area, pump controls, alarm, emergency storage, permitted fixture count and design flow. Ask the septic designer:
- Is the proposed valve part of the permitted system or outside it?
- Could a closed valve force wastewater into a tank, pump basin or branch not designed for that condition?
- Does the system have a pump or alarm that must remain active during a storm or power outage?
- Where is the safe shutdown point, and who is allowed to open a tank or pump basin?
- What water-use restriction applies if the system backs up?
- What record must be given to the local health or environmental department?
EPA’s septic-malfunction guidance lists backups, slow drains, gurgling, wet or spongy soil, odors and standing water among signs associated with septic problems and says the exact cause of an odor cannot be diagnosed remotely. Do not use a backwater valve as a homeowner experiment to distinguish a septic problem from a plumbing problem. Stop water use if the qualified professional or health authority instructs you to do so, keep people away from sewage, and use qualified cleanup personnel. Sewage can contain pathogens.
Plan for power, alarms and automatic discharges
Gravity drainage and pumped drainage fail differently. A gravity branch may stop draining when a valve closes. A sewage ejector may continue receiving fixtures while its discharge check or isolation arrangement is closed. A septic pump may alarm while an owner is also being told to reduce water use. A sump pump may discharge to a separate route, or it may be improperly tied into a sanitary branch. Document each automatic discharge and the rule for a closure or outage.
The homeowner should not change pump wiring, alarm settings, generator connections or control logic as part of a valve plan. A licensed electrician, plumber, pump professional or septic professional should coordinate those systems under the applicable jurisdiction. The closeout packet should state who receives an alarm, who can reset it, what not to silence, and where the emergency contact is stored.
Maintenance failure cases
Debris holds the flapper open. The home may appear to drain normally while reverse flow remains possible. The safe next step is a qualified inspection and cleaning according to the manual, not a test by pouring sewage or floodwater into the branch.
Buildup prevents a clean seal. The valve may close but leak. Record the condition, replace damaged parts with the model-approved parts, and verify the seat and gasket before return to service.
The valve is inaccessible after flooring. Do not cut the floor casually. Give the builder and plumber the original access photos and ask for a repair plan that preserves structure, waterproofing, vapor control and finish.
The homeowner closes the valve but keeps using fixtures. The protection may simply move the backup into the house. Follow the written operating rule and call the responsible professional or utility.
A storm triggers both surface flooding and sewer surcharge. The valve may address only reverse wastewater. Keep occupants away from contaminated water and use the flood response plan, not a valve-only assumption.
A septic pump alarm occurs after a valve closure. Reduce or stop water use as directed, keep people away from the tank or wet area, and contact the septic professional or local health authority. Do not open a tank or enter a pit.
The next decision is an ownership sign-off: the homeowner or future property manager must accept the maintenance interval, the access location, the closed-valve rule, the septic or flood limitations, and the emergency contacts before occupancy.
7. Branch-by-branch Backflow Protection Worksheet and release gate #
The worksheet is the original contribution of this guide. It turns a general concern about sewer backup into a branch-level record that another person can inspect before the slab, floor finish or cabinet conceals the work. It is a planning synthesis, not an official inspection form.
Originality brief
Current answers: Existing material commonly explains that low fixtures can experience sewer surcharge, that check, gate and dual backwater valves exist, and that model-code provisions call for protection and access. Manufacturer pages generally explain one product family at a time. FEMA explains the flow and operating limitations of closed or manually operated protection, while EPA explains septic maintenance and professional contacts.
Missing decision: The missing decision is the new-home preparation sequence that maps each drainage branch to the actual risk datum, distinguishes public sewer from septic and surface flooding, selects a valve family by ordinary-flow behavior and manual limits, preserves service access before concealment, assigns owner-builder-plumber-AHJ handoffs, and records what happens when the valve closes.
Original contribution: The Branch-by-branch Backflow Protection Worksheet is a reusable release record and decision matrix. It does not rank brands. It makes the synthesis inspectable by requiring a branch identity, comparison datum, wastewater path, exact model, listing, orientation, slope, access, maintenance owner, operating rule, approval evidence and next handoff.
How it can be checked: A homeowner, plumber, designer or inspector can compare each worksheet row with the stamped or submitted plumbing plan, survey or septic design, AHJ or utility response, exact manufacturer manual, product listing, pre-cover photographs, inspection record and closeout packet. Any row that cannot be checked against those records remains unreleased.
Method: For each branch, record the finished fixture elevation and next upstream manhole or applicable flood datum, classify the sewer or septic path, compare normally open and normally closed arrangements, then check the selected model manual for flow direction, orientation, slope, size, access, and service limits before marking the slab-cover release.
Limitations: This is a planning synthesis and an illustrative decision aid, not an adopted code interpretation, hydraulic design, flood certification, septic permit, inspection report, or product approval; the authority having jurisdiction, utility or health department, design professional, and installing plumber control site-specific decisions.
Worksheet A: project and jurisdiction gate
Complete this page before the plumber finalizes the under-slab route.
| Question | Record | Status |
|---|---|---|
| What is the project address, parcel and actual permitting jurisdiction? | [address / parcel / city or county / state / tribal jurisdiction if applicable] | ☐ confirmed |
| Which authority issues the plumbing permit and performs the relevant inspection? | [department, contact, permit number] | ☐ confirmed |
| Which plumbing-code edition and local amendments are adopted? | [edition, section, amendment, effective date] | ☐ documented |
| Is the building connected to a public sewer, private sewer, septic gravity, septic pump or another system? | [path and owner] | ☐ documented |
| What authority identifies the next upstream public-sewer manhole, if that test applies? | [utility / map / manhole ID / written response] | ☐ documented ☐ n/a |
| What elevation datum and comparison points are used? | [datum / fixture flood-level rim or floor / manhole cover or other point] | ☐ documented |
| Is a floodplain, special flood-hazard, combined-sewer or surface-flood review required? | [authority, map, datum, result] | ☐ confirmed ☐ n/a |
| Is a septic permit or health-department review involved? | [permit, authority, designer] | ☐ confirmed ☐ n/a |
| Are normally closed, manual or alternate arrangements permitted for this project? | [written answer and citation] | ☐ confirmed ☐ open |
| What access, cover, load and inspection evidence are required before concealment? | [written answer / checklist] | ☐ documented |
Do not fill a blank with “standard.” Write “not applicable” only after a responsible person confirms why it is not applicable. For example, a septic home may mark the public-manhole question “not applicable to this permitted path,” but it still needs the septic designer’s elevation, tank, pump and emergency operating inputs.
Worksheet B: branch-by-branch decision matrix
Make one row for every fixture or branch that could discharge through the proposed protection. Add rows for floor drains, area drains, laundry, condensate or equipment drains when they are connected to the sanitary system. A row should be specific enough that a future plumber can identify it without opening the slab.
| Field | Branch 1 | Branch 2 | Branch 3 |
|---|---|---|---|
| Branch ID and room | [e.g., B-01 basement bath] | [ ] | [ ] |
| Fixture or drain | [toilet / shower / floor drain / laundry] | [ ] | [ ] |
| Finished fixture flood-level rim or applicable elevation | [ft or m; datum] | [ ] | [ ] |
| Next upstream manhole cover or applicable flood/septic datum | [ft or m; ID; datum] | [ ] | [ ] |
| Clearance formula and result | [datum − rim = result] | [ ] | [ ] |
| Uncertainty or unresolved survey issue | [ ] | [ ] | [ ] |
| Normal destination | [public sewer / tank / pump / drainfield] | [ ] | [ ] |
| Branch pipe size and material | [ ] | [ ] | [ ] |
| Gravity or pumped | [ ] | [ ] | [ ] |
| Proposed protection scope | [individual drain / branch / building drain / none] | [ ] | [ ] |
| Fixtures upstream that would be blocked when closed | [ ] | [ ] | [ ] |
| Model-code or local trigger | [jurisdiction, provision or written answer] | [ ] | [ ] |
| AHJ / utility / health authority confirmation | [name, date, record] | [ ] | [ ] |
| Proposed valve family | [normally open check / manual / other] | [ ] | [ ] |
| Exact manufacturer and model | [ ] | [ ] | [ ] |
| Standard or listing and report | [ ] | [ ] | [ ] |
| Flow direction and allowed orientation | [ ] | [ ] | [ ] |
| Allowed slope at valve | [manual limit] | [ ] | [ ] |
| Access sleeve, lid and finished elevation | [ ] | [ ] | [ ] |
| Cleanout and service-tool path | [ ] | [ ] | [ ] |
| Inspection or test required | [ ] | [ ] | [ ] |
| Maintenance owner and interval | [ ] | [ ] | [ ] |
| Closed-valve water-use rule | [ ] | [ ] | [ ] |
| Next trade handoff | [builder / slab / flooring / owner] | [ ] | [ ] |
| Release status | ☐ hold ☐ ready for review ☐ released | ☐ | ☐ |
The worksheet deliberately asks for “fixtures upstream that would be blocked when closed.” That field is where a main-line shortcut often fails. If the answer is unknown, the branch topology is not sufficiently documented. If the branch is pumped, do not mark it compatible with a gravity valve merely because the diameter matches.
Worksheet C: valve-family comparison
Use the following comparison only after the local rule and branch map are complete. Fill the source and manual fields for the chosen model.
| Criterion | Normally open automatic check | Manual gate or manual isolation | Normally closed or special arrangement |
|---|---|---|---|
| Ordinary gravity drainage | Usually intended to remain open, if the exact product allows it | Depends on being left open and maintained | May block drainage unless opened or controlled |
| Reverse flow response | Automatic closure if the closure and seat work | Requires timely human action unless another control exists | Closed by default or control logic |
| Occupant rule | Stop water use after closure or utility warning | Close before the hazard and stop water use | Follow the design’s opening and shutdown procedure |
| Debris sensitivity | Inspect and clean closure and seat | Inspect gate, stem and seals | Inspect closure, control and venting consequences |
| Access | Must reach working parts and lid | Must reach handle and working parts | Must reach mechanism and any controls |
| Best fit to verify | Gravity branch with automatic reverse-flow protection | A design with a reliable trained operator and permitted manual procedure | Special or existing arrangement with explicit design and AHJ confirmation |
| Do not infer | “Automatic” means maintenance-free | “Closed” means the house can keep using water | “Compact” means code-compliant or vented |
For a new-home gravity branch, normally open automatic protection is often the first family to investigate because ordinary discharge must continue. It is not a universal recommendation. The adopted code may require a different location, an ejector, a special listing or an alternate design. The exact manual may limit the line slope, access sleeve, size or orientation.
Worked example: illustrative, not tested
The following scenario is a modeled example to demonstrate the worksheet method. It is not a measurement, test, site visit or professional opinion.
Inputs: A proposed basement bathroom has a toilet flood-level rim at 109.85 ft NAVD88. The utility identifies the next upstream public-sewer manhole cover at 112.40 ft NAVD88. The branch is a 3-inch gravity sanitary line, the design shows normal flow toward the street, and the selected valve manual permits a horizontal installation at the planned slope. The builder’s section shows 6 inches of slab and 1/2 inch of finished flooring above the pipe zone. The access sleeve is planned at a finished-floor reference of 110.38 ft NAVD88.
Formula:
clearance = manhole-cover elevation − fixture flood-level-rim elevation
clearance = 112.40 ft − 109.85 ft = 2.55 ft
The positive result flags the branch for the model-code question under the stated public-sewer comparison. The homeowner still needs the adopted code and AHJ confirmation, because the model-code text is background and the plan may contain other branches or an alternate drainage solution.
Branch scope check: The basement shower and floor drain join the bathroom branch upstream of the proposed valve. The first-floor bathroom stack joins downstream of the proposed valve. The worksheet therefore records the basement toilet, shower and floor drain as protected scope and the first-floor bathroom as outside the proposed closure scope. The plumber must confirm that the drawing really has that topology and that the first-floor branch cannot discharge through the valve.
Valve check: The product submittal identifies a normally open gravity backwater valve, 3-inch connection, the exact listing or standard, a manual-approved orientation, the direction arrow and an access sleeve. The plumber records the manufacturer’s slope limit. A different product with the same nominal connection would require a new check.
Access check: The sleeve is shown flush with the finished floor, clear of the vanity and toilet footprint, and large enough for the product’s lid and working parts. The cleanout is shown separately, with the manual’s warning about removing the flapper before mechanical drain service in the plumber’s closeout instructions. The slab-pour photo records the sleeve relative to two fixed walls.
Sensitivity: If the manhole elevation were 112.30 ft instead of 112.40 ft, the clearance would be:
112.30 ft − 109.85 ft = 2.45 ft
If the fixture rim were 109.90 ft instead of 109.85 ft, the clearance would be:
112.40 ft − 109.90 ft = 2.50 ft
If both stated unfavorable changes occurred together, the modeled clearance would be 2.40 ft, which is the original 2.55 ft less the survey assumption of 0.10 ft and the rim assumption of 0.05 ft. Those changes do not erase the fact that the fixture is below the manhole in this illustration, but they do not establish a legal trigger, hydraulic performance or flood protection. If the original result had been 0.08 ft, the same ±0.15-ft planning uncertainty would make the decision sensitive enough to require a survey or AHJ clarification before selecting a valve.
Operating consequence: When the automatic valve closes, the household must stop using the protected basement fixtures and any other fixtures upstream of the closure. The closeout record names the plumber and utility contact, identifies the access sleeve, and says that the owner must not remove the lid or defeat the closure during a surcharge.
Release gate: do not cover until every required answer is checked
Use this checklist at the pre-cover meeting. A checked box means evidence exists in the project record, not that someone said “it should be fine.”
- Actual jurisdiction, AHJ and adopted plumbing rule are identified.
- Public-sewer, private-sewer, septic, pumped and storm paths are distinguished.
- The comparison datum and fixture flood-level rim or applicable elevation are recorded with units and datum.
- The next upstream public-sewer manhole is identified by the responsible utility or the septic/flood alternative is documented.
- Every fixture, floor drain, equipment drain and branch is mapped upstream or downstream of the proposed valve.
- The effect of valve closure on every upstream fixture is written in the operating plan.
- The exact manufacturer, model, size, connection and accessory list is approved.
- The standard, listing or certification record is saved and its scope matches the installation.
- The current manufacturer manual is saved and its flow, orientation, slope, access and service limits are checked.
- The access sleeve, lid, cover, finished elevation and service-removal path are coordinated with the builder and finish trades.
- The cleanout location and mechanical-service procedure are recorded.
- The valve and sleeve are protected from debris, concrete, traffic and movement during construction.
- The required plumbing, building, floodplain, utility or septic inspection is scheduled.
- The pre-cover photo set and as-built measurements are stored.
- The applicable test or inspection result is recorded by the responsible professional.
- The homeowner receives the branch map, manual, model, access location, maintenance instructions and emergency contacts.
- The closed-valve rule says when to stop using water and who authorizes restart.
- Any change in valve, pipe route, finished elevation, fixture scope or access reopens the review.
If a box is “not applicable,” write the reason and the person who confirmed it. If a box is “open,” the release status is hold. The most expensive time to discover missing access is after the slab and flooring are complete; the most dangerous time to discover an unclear operating rule is during a surcharge.
What to hand to the next trade
The plumber should hand the builder a marked under-slab release containing the exact valve and sleeve detail, approved branch map, finished-floor elevation, access and cover information, and the required photo and inspection points. The builder should hand the flooring and finish trades the finished access elevation, cover limitations and “do not cover” location. The builder should hand the homeowner the final map, photos, model, manual, listing and maintenance record. The homeowner should hand a future plumber the same packet before any drain cleaning, flooring replacement or basement remodel.
The next decision after release is not another product comparison. It is whether the house’s future occupants can find, understand, inspect and safely operate the protection without guessing. If the answer is no, keep the work visible long enough to repair the record or the installation.
Decision summary: the safe next move before rough-in #
Ask the AHJ and wastewater authority to confirm the jurisdictional trigger and datum; ask the plumber to map every branch and model the closure consequence; ask the design team to reconcile public sewer, septic, flood and pump conditions; ask for an exact listed valve and current manual; and require a finished-floor access detail, pre-cover photos, inspection evidence, maintenance owner and closed-valve operating rule. Do not pour concrete over a valve whose scope, orientation, access or responsibility is still an assumption.
The plan is ready when every branch row is inspectable, every material claim in the design has a source or responsible professional, and the next trade can act without reopening a concealed decision. That is the point of the worksheet: not to choose a brand from a catalog, but to preserve the chain from risk datum to branch, branch to valve, valve to access, access to maintenance, and maintenance to a safe household response.
Cite this guide
Brictale. “Prepare a New-Home Sewer Backflow Protection Plan Before Under-Slab Plumbing.” Published 2026-09-25; updated 2026-09-25.
https://brictale.com/build/materials/prepare-new-home-sewer-backflow-protection-plan-before-rough-in · Read the Markdown version
Original contribution: Branch-by-branch Backflow Protection Worksheet. A reusable release worksheet that maps each drainage branch to its risk datum, valve family, listing, access, maintenance owner, operating rule, approval record, inspection evidence, and next trade handoff.
Sources and scope
Evidence behind this page
- The 2021 International Residential Code model text in Section P3008.1 uses the elevation of the next upstream public-sewer manhole cover as the comparison datum and requires protection for plumbing fixtures whose flood-level rims are below that elevation.
2021 International Residential Code, Chapter 30 Sanitary Drainage, Section P3008 Backwater Valves
2021 IRC model-code text; not a statement of the adopted code in any particular state, county, city, tribal jurisdiction, utility service area, or AHJ.
Accessed · Link to this claim - The 2021 IRC model text uses finished floor elevation when addressing fixtures on a floor above the next upstream public-sewer manhole-cover elevation, directs a backwater valve in the building drain or horizontal branch serving those fixtures to be normally open, includes an existing-buildings exception for normally closed installations, and requires access to working parts and compliance with listed standards.
2021 International Residential Code, Chapter 30 Sanitary Drainage, Section P3008 Backwater Valves
2021 IRC model-code provisions used as background only; local amendments, an alternate adopted plumbing code, and AHJ interpretations may control.
Accessed · Link to this claim - The 2021 International Plumbing Code model text in Sections 714.1 through 714.3 addresses sewage backflow, lists ASME A112.14.1 and CSA B181.1 or B181.2 as compliance paths, and requires access to backwater-valve working parts.
2021 International Plumbing Code, Chapter 7 Sanitary Drainage, Section 714 Backwater Valves
2021 IPC model-code text; it does not establish the plumbing law or permit process for a specific project jurisdiction.
Accessed · Link to this claim - ASME A112.14.1-2003 (R2022) covers backwater-valve dimensions, performance, connections, materials and finishes, testing, and marking, including horizontal, manual gate, terminal, combination floor-drain, and vertical or 90-degree valve types.
ASME A112.14.1 - Backwater Valves
ASME's description of the standard's scope; a standard reference does not by itself prove that a particular model is listed, approved, correctly installed, or accepted by the local AHJ.
Accessed · Link to this claim - Sioux Chief's 869 installation guidance specifies gravity-flow use, level installation on nominally horizontal lines, no vertical installation, an access opening at the top, arrows in the direction of flow, a maximum drain-line slope of 1/4 inch per foot for that guidance, and an access sleeve when installed in ground or under concrete.
Sioux Chief 869 Series Backwater Valve Installation Instructions
Sioux Chief 869 series installation guidance only; do not transfer these limits to another product family without checking that manufacturer's current manual.
Accessed · Link to this claim - Sioux Chief's 869-2PS product page identifies the valve as a horizontal, gravity-flow DWV backwater valve with threaded access for maintenance and inspection and states that it is not for vertical installation.
Sioux Chief 869-2PS DWV Backwater Valve
A specific Sioux Chief product family; product-page information is not a national code requirement and model availability or instructions can change.
Accessed · Link to this claim - Jay R. Smith describes its 7012 sewer backwater valves as protecting low areas against wastewater backflow, with cover options that fully open for access to the bronze valve assembly for cleaning or maintenance; the page identifies ASME A112.14.1 compliance for the listed configuration.
Jay R. Smith Model 7012 Sewer Backwater Valves
Jay R. Smith 7012/7022 product-family page and listed configuration; it is not a selection recommendation or a substitute for the selected model's submittal and installation instructions.
Accessed · Link to this claim - FEMA's flood-resistant utility handbook explains that a check valve permits flow in only one direction and automatically shuts against opposite flow, while a gate valve must be operated manually or electrically and, when closed, prevents flow in either direction. The instruction to stop using fixtures when a selected discharge path is closed is a planning inference from that physical constraint, not a universal local operating rule.
FEMA P-348 flood-resistant building-utility guidance, including sewage-management mitigation; it does not set the operating rule for every utility, valve, floodplain, or septic system.
Accessed · Link to this claim - FEMA's flood-resistant utility handbook warns that check-valve operation can be impaired by debris and says manually operated backflow valves should be closed well before flooding is expected; it presents a check-and-gate combination as a mitigation arrangement.
FEMA P-348 mitigation guidance, including sewage-management measures for building utilities; used here to explain operating limitations, not to prescribe a residential design or local code requirement.
Accessed · Link to this claim - EPA says septic inspections should generally occur every 1 to 3 years, pumping generally every 3 to 5 years or as needed, and that homeowners should contact the local health department or onsite-wastewater regulatory agency and a local septic professional for system-specific help.
Resolving Septic System Malfunctions
EPA national homeowner guidance; state, county, tribal, and local health or environmental requirements and the permitted septic design control a specific site.
Accessed · Link to this claim - EPA lists sewage or water backing up into the home, slow fixture drainage, gurgling, standing water or damp spots near the tank or drainfield, and sewage odors around the tank or drainfield among common signs of a failing septic system; it says the exact cause of an odor cannot be diagnosed remotely and recommends contacting a local septic service provider or plumber.
Resolving Septic System Malfunctions
EPA national homeowner guidance, including its common-signs and odor-diagnosis FAQ; it does not diagnose a specific property or replace the applicable state, county, tribal, local health or environmental authority or septic professional.
Accessed · Link to this claim - ICC-ES's approved-criteria directory lists LC1006 as PMG listing criteria for extendable backwater valves.
ICC-ES Approved Criteria Directory, LC1006 Extendable Backwater Valves
ICC-ES approved-criteria directory; it identifies LC1006 as criteria for extendable backwater valves but is not a product approval, and a homeowner must verify the actual product listing, current report, scope, and AHJ acceptance.
Accessed · Link to this claim