How to Prepare a New-Home Framing Moisture-Release Plan Before Insulation
Use a zone-by-zone moisture worksheet to decide when framed walls can receive insulation, when to keep drying, and when to call a qualified reviewer.
The short answer
Before insulation, divide the home into wall zones, confirm the building is substantially dry-in, identify the wood and insulation product limits, and record repeat moisture readings with the meter setting and conditions. Release a zone only when its documented threshold, drying evidence, water-control details and rough-in checks are satisfied. Hold rising, wet, damaged or uncertain zones for more drying or qualified local review.How to Prepare a New-Home Framing Moisture-Release Plan Before Insulation
Before insulation, divide the house into observable zones and give each zone a documented status: release, hold for more drying, or qualified review. Confirm the roof and exterior water-control work are substantially in place, identify the actual wood and insulation products, repeat moisture readings at marked locations, and record meter settings and conditions. A reading is evidence; it is not the release decision. The builder, designer and local inspector must resolve code, assembly, damage and concealed-condition questions.
Start with a zone-specific release decision, not a national cutoff #
A framed wall zone is ready for insulation only when its documented project threshold, repeat-reading evidence, water-control details, rough-in status and responsible review are all complete. If the latest reading is above the applicable product limit, rising, explained by an active leak, associated with swelling or decay, or too uncertain to repeat, the correct status is hold or qualified review—not “probably dry enough.”
What this page decides
The decision is deliberately narrower than “is the house dry?” You are deciding whether each defined piece of the wood-framed enclosure can move to the next handoff before the insulation installer and drywall crew make the cavity harder to inspect. A zone might be:
- an exterior wall between two corners;
- one side of a window or door opening;
- a wall under a roof valley or plumbing penetration;
- the rim-joist band at one room or foundation segment;
- a garage separation, knee wall, porch wall or bump-out.
Do not make a single house-wide declaration from one convenient stud. Rain reaches elevations differently. A north wall may have a different exposure history from a wall below an unflashed roof intersection. End grain, plates, headers, sheathing edges and lower corners can dry differently from the middle of a cavity. A zone boundary makes responsibility and evidence visible.
The default market for this guide is the United States. The scope is a new wood-framed home after the roof and exterior water-control work is substantially in place and before insulation or drywall. “Substantially in place” is a project observation, not a legal phrase: the roof covering, drainage paths, window and door openings, flashing sequence and water-resistive barrier (WRB) should be far enough along that the builder can explain how rain is kept out and how incidental moisture can drain or dry. The adopted code and inspection requirements of the actual permitting jurisdiction control. A county, city, state or other authority may adopt a different code edition, amendment or inspection sequence than the examples in a national guide.
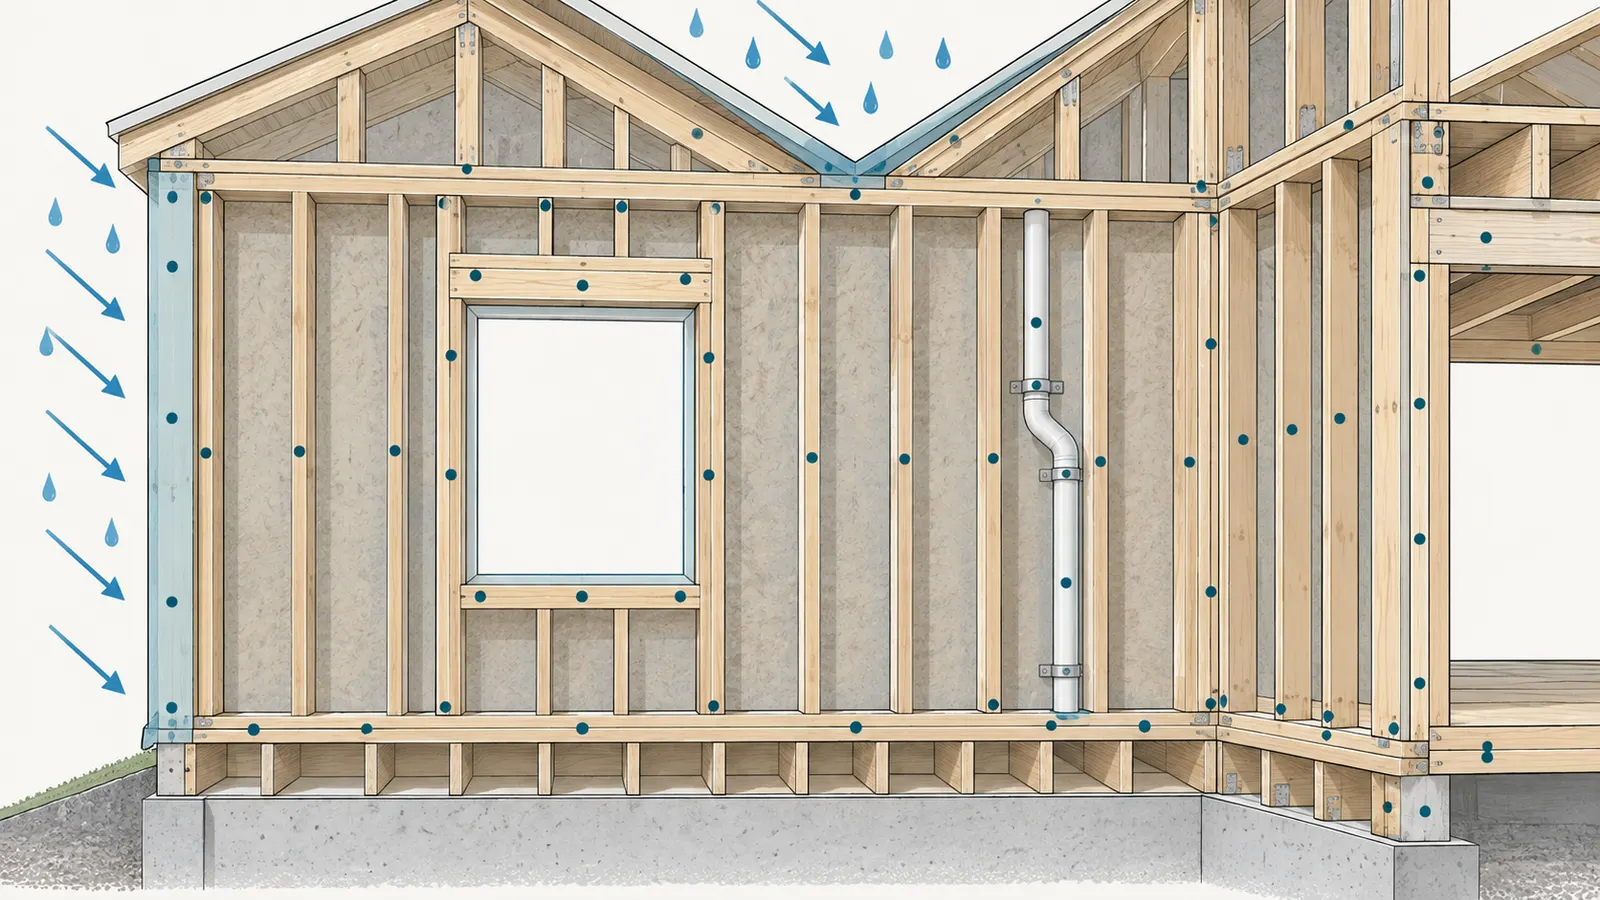
The scope excludes mold remediation, structural engineering, spray-foam installation, destructive testing, concealed-condition sign-off and a promise that an assembly will never experience moisture. If you see suspected mold over a meaningful area, persistent odor, soft wood, decay, delamination, structural movement, a roof or window leak, or a condition you cannot safely access, stop at observation and bring in the appropriate qualified professional. A homeowner can organize the record; a homeowner should not turn the record into an engineering opinion.
Why one moisture number cannot answer the question
Wood moisture content is affected by direct wetting, accumulated moisture, temperature, relative humidity and the drying potential of the assembly. APA specifically says that acceptable moisture exposure cannot be defined for every construction delay without considering geography, seasonal weather, weather history and the conditions that add or dissipate moisture. That is why a generic instruction such as “wait until the wood reads X” can be unsafe when it hides the product, meter, location, exposure history and wall design. Read the APA discussion of jobsite wetting and drying variables as a reason to document context, not as permission to ignore a high reading.
APA also describes normal in-service stabilization around 6% to 14% and warns that prolonged high moisture around 20% to 25% or higher can support decay and mold. Those figures describe wood-product behavior and risk conditions; they are not a national pre-insulation pass/fail rule. APA separately flags wood above 19% as particularly vulnerable in its general moisture-mitigation guidance. The difference matters: a risk signal from a wood-products association and a maximum stated by an insulation manufacturer are not interchangeable with local code or an assembly-specific design review.
If the selected insulation is Knauf EcoBatt, its installation instructions require clean cavities and lumber in contact with the insulation at 19% moisture content or less, verified with a calibrated moisture meter. That is a product instruction for the named EcoBatt product family, not permission to apply 19% to every batt, spray foam, cellulose product, structural panel or wall design. Locate the exact product page, technical data and warranty terms in the project file before choosing the worksheet threshold.
Originality brief: what is missing and how to check it
Current answers from EPA, APA, DOE and insulation manufacturers explain why construction materials should be protected, how exposure and wall controls affect moisture, how climate changes vapor management, and how a particular insulation product should be installed. They do not give a homeowner one bounded release surface that joins dated readings, repeat locations, drying trend, exposure, WRB and air-control readiness, product limits, responsible people and the next handoff.
The missing decision is therefore: “For this wall zone, what evidence lets the owner and builder move from open framing to insulation, and what evidence says to wait or ask for qualified review?” The original contribution is the Moisture Release Worksheet and Zone Gate below. It can be checked by reproducing every calculation from the recorded inputs, opening the linked source claims, comparing the threshold with the exact product instructions and adopted jurisdiction, and asking the named builder, designer, inspector or specialist to sign only the parts within that person’s responsibility.
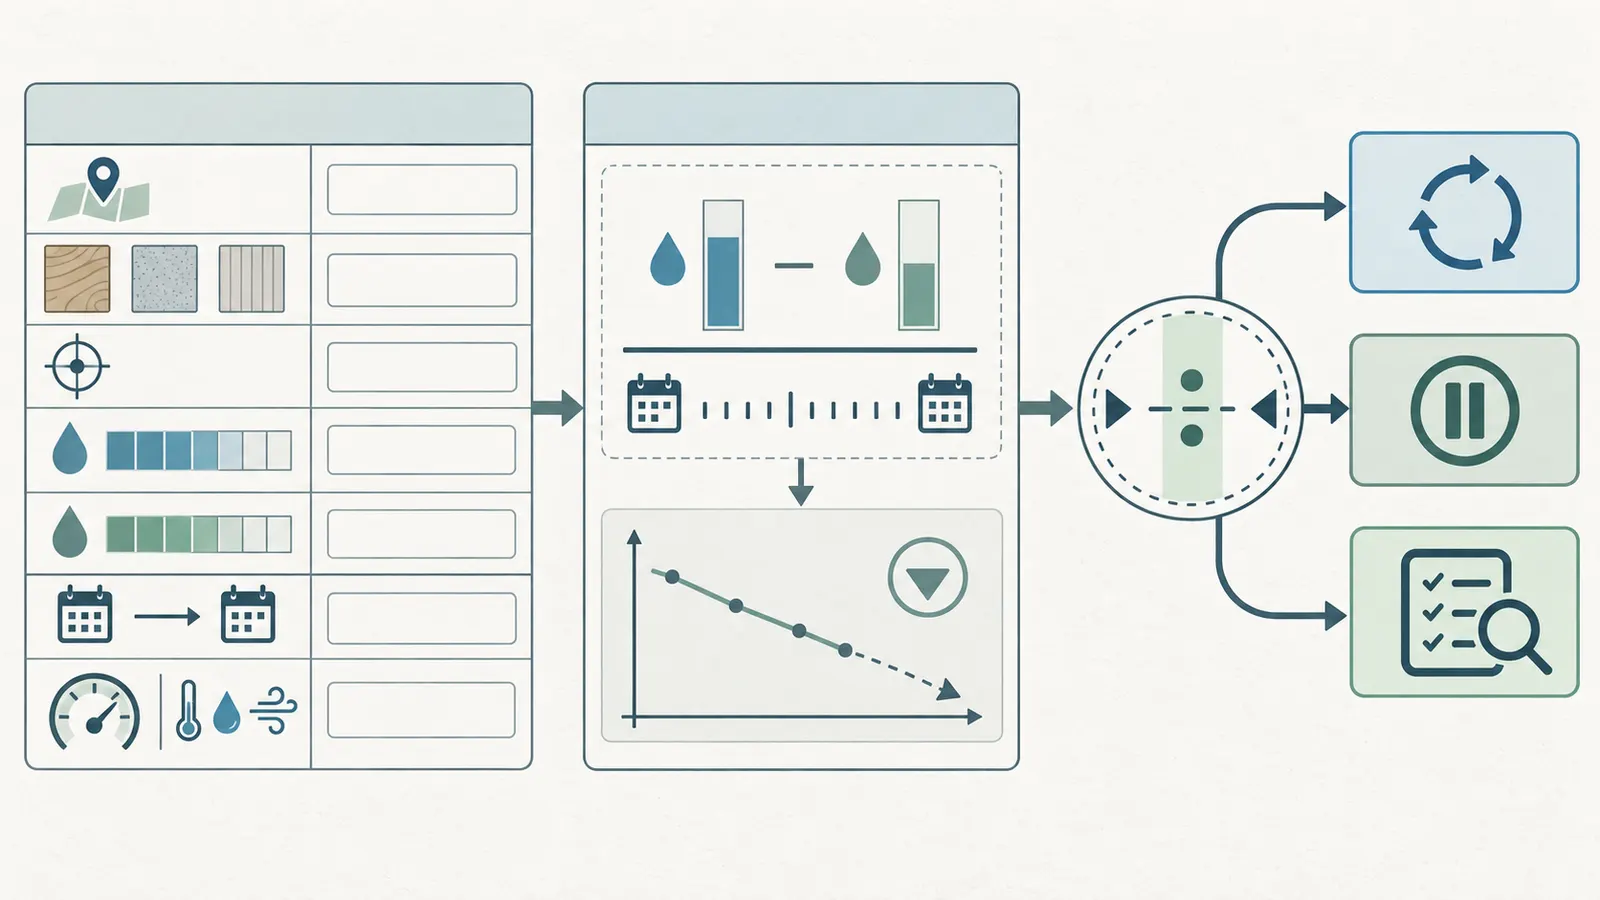
The method is explicit: record the material, zone, dates, meter setting, repeat locations, weather exposure, indoor temperature and relative humidity, WRB and rough-in status, climate zone, product limits and responsible reviewer; calculate (earlier reading − later reading) ÷ elapsed days; then branch release, hold or professional review. The limitations are equally explicit: this is an illustrative documentation method, not a code sign-off, engineering analysis, laboratory protocol, mold-remediation plan, spray-foam specification or proof that concealed conditions are dry or sound. These title, method and limitations are part of the record because a worksheet that conceals its assumptions creates false confidence.
Method: Record the material, location, dated readings, meter setting, repeat points, exposure, indoor conditions, WRB and rough-in status, climate zone, product limit and reviewer; calculate (earlier reading minus later reading) divided by elapsed days, then branch release, hold or professional review. Apply a two-percentage-point sensitivity check to the modeled readings.
Limitations: This is an illustrative documentation method, not a code sign-off, engineering analysis, laboratory protocol, mold-remediation plan, spray-foam specification or proof that concealed conditions are dry or sound. The adopted jurisdiction, project specifications, exact product instructions and qualified reviewers control.
These title, method and limitations are part of the record because a worksheet that conceals its assumptions creates false confidence.
The zone gate
Use the following gate for each zone. “Release” requires all applicable rows to be yes. A “no,” “unknown” or “not applicable” must be explained rather than silently treated as complete.
| Gate | Evidence to record | Release condition | If not satisfied |
|---|---|---|---|
| G1: Dry-in | Roof, openings, WRB, flashing and drainage status; photos or builder log | Builder identifies the water-control path and no active leak is present | Stop the clock; repair the source and reassess wet materials |
| G2: Material identity | Stud, plate, header, rim, sheathing and insulation product | The record distinguishes solid wood, engineered wood, sheathing and insulation instructions | Ask builder/designer to identify the assembly and exact manual |
| G3: Repeat readings | Dated readings, meter setting, points and conditions | Readings are repeatable at comparable locations and are at or below the documented product/project limit | Hold for another controlled reading or qualified review |
| G4: Drying evidence | Earlier and later readings, elapsed days and exposure notes | Trend is falling or stable within the project decision rule; no active wetting explains it | Improve protection/ventilation/dehumidification under builder direction and remeasure |
| G5: Wall controls | WRB, flashing, air barrier, penetrations, rim and vapor strategy status | Responsible trade has completed or accepted visible details before insulation hides them | Keep open; issue a detail list to builder/designer |
| G6: Rough-in | Electrical, plumbing, HVAC, blocking, firestopping and inspection dependencies | The responsible trades and inspector have cleared the pre-cover sequence | Do not cover a cavity that still needs access or inspection |
| G7: Handoff | Named recorder, builder reviewer, designer/inspector where needed, date and next step | Builder authorizes the insulation handoff with the record attached | Set a new owner and date; status remains hold |
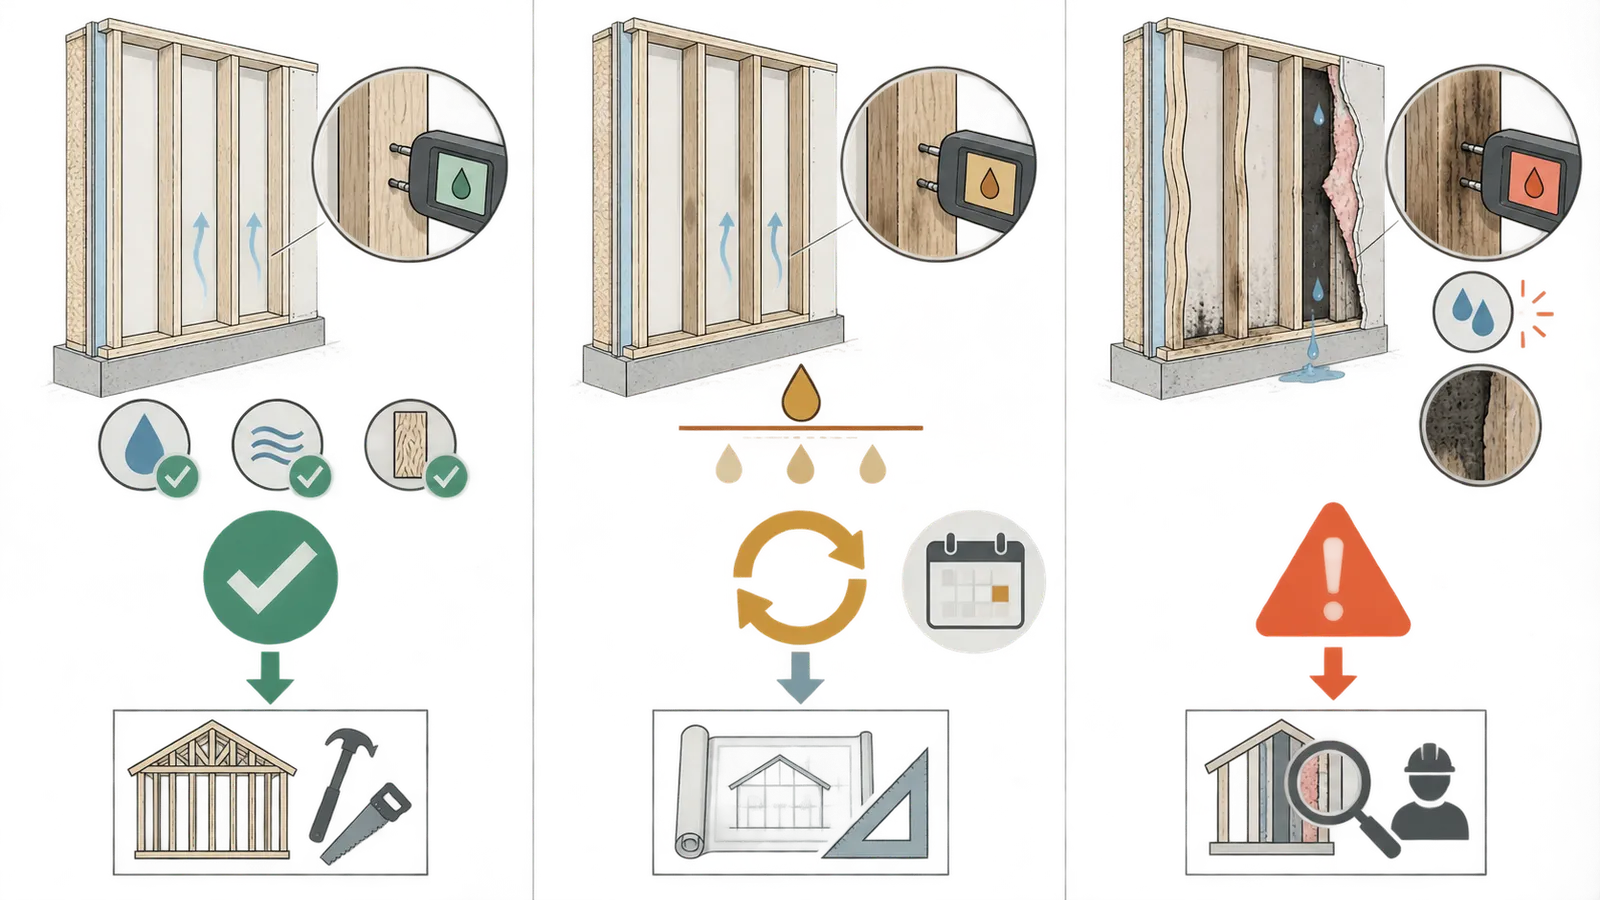
This gate intentionally produces three outcomes:
- Release: the zone meets the documented limit, readings support a stable or falling condition, water-control and rough-in checks are complete, and the responsible builder accepts the handoff.
- Hold for more drying: the zone is plausibly recoverable, there is no unresolved active source or material damage, and the builder documents protection and a next measurement date.
- Qualified review: the condition is damaged, unusual, persistent, concealed, structurally relevant, outside the product instructions, or too uncertain for a homeowner-and-builder observation. The reviewer may be the designer, building enclosure consultant, structural engineer, industrial hygienist or other professional appropriate to the observed problem.
The gate is not a vote. One strong-looking row cannot cancel a failed row. For example, a low stud reading does not release a wall with an unflashed window, missing WRB transition or wet rim joist. Conversely, a completed WRB does not release a zone whose lumber exceeds the selected insulation's stated limit.
Confirm the prerequisites and assign the handoff #
Begin the plan only after the builder can show that the house has a credible temporary or permanent water-control path and that the pre-insulation sequence is known. Moisture readings taken while rain is still entering through an unfinished roof-to-wall intersection are useful incident records, but they are not a release test.
Prerequisite 1: identify the contractual moment
Ask the builder, in writing or in the project log:
- What work is complete before the insulation crew arrives?
- Which cavities will be insulated first, and which remain open for inspection or rough-in?
- Who owns moisture protection overnight and during rain?
- Who can authorize a hold, and who can release it?
- Which inspections or tests must occur before insulation or drywall?
- Which wall assembly and insulation product are currently approved?
- What happens if a zone misses the date: drying, replacement, redesign or professional review?
The homeowner should own the question and preserve the record, but the builder usually controls the sequence, site protection, trade coordination and physical work. The designer or architect should resolve design intent and unusual wall details. The insulation installer is responsible for installing the selected product according to its instructions, not for deciding whether a wet wall is structurally acceptable. The inspector verifies only the matters within the adopted jurisdiction's inspection authority and inspection scope; an inspection card is not proof of every concealed condition.
Put these roles in the worksheet:
| Responsibility | Person or company | Evidence they provide | Decision they do not own by default |
|---|---|---|---|
| Homeowner / owner representative | Name and contact | Zone list, questions, dated observations, requested documents | Code approval, structural judgment or product warranty interpretation |
| General builder / construction manager | Name and license or company record if applicable | Dry-in status, protection plan, trade sequence, corrective work, release authorization | Design changes outside the builder's authority |
| Designer / architect | Name and project role | Assembly intent, climate response, details at openings and transitions | Field acceptance of unrelated workmanship unless contracted |
| Insulation installer | Name and product | Product, facing, thickness, fit, penetrations and installation record | Releasing a wet or damaged substrate unless specifically contracted and qualified |
| Building official / inspector | Actual permitting jurisdiction and office | Required inspection results or correction notices | A general moisture survey of all hidden materials |
| Specialty reviewer | Appropriate credential and scope | Opinion or remediation/design recommendation within their discipline | A blanket approval beyond the reviewed areas |
Do not fill a name with a role label such as “builder” after the fact. If no one is named, the handoff is not ready. Ask the builder to assign one person who can stop insulation in a zone and one person who can confirm corrective work is complete. If your contract gives the homeowner a third-party inspection right, schedule it before access disappears and verify that the inspector’s service includes the question you need answered.
Prerequisite 2: establish jurisdiction and climate inputs
Record the project address, permitting city or county, state, adopted residential and energy-code editions if the building official or project documents identify them, and the climate zone used in the design. Do not write “the U.S. requires…” when the actual rule comes from a city amendment, state code, energy program, product listing or project specification.
DOE says its climate-specific Building America resource can look up climate zones by county or ZIP code and show assemblies intended to meet 2021 IECC and IRC thermal-efficiency and condensation-control requirements. Use the DOE climate-specific guidance page as a starting point for climate orientation, then confirm the project's adopted code and design documents with the building official or designer. The tool does not prove that a particular house complies, and it does not choose a vapor retarder for a wall that differs from its examples.
Climate changes the question because the direction and opportunity for drying are assembly-specific. The DOE-hosted wall guide says vapor-retarder selection varies with climate zone, insulation type and cladding, and that vapor management should balance limiting vapor entry with allowing incidental moisture to dry. It also describes vented cladding as giving sheathing more opportunity to dry outward, partially vented cladding as restricting that path, and non-vented cladding as providing limited or no air flow behind the cladding. Review the DOE-hosted wall guide for climate zones 3–5 examples, but do not transplant its figures into Climate Zones 1, 2 or 6–8 without design review.
The worksheet should therefore contain a climate-and-assembly row, not just a climate-zone number:
- climate zone and moisture regime used by the design;
- heating and cooling direction relevant to the proposed vapor retarder;
- exterior cladding and whether the design creates a vented or drained space;
- exterior insulation, if any;
- cavity insulation type and facing;
- interior finish and proposed vapor-retarder class, if specified;
- air-barrier location and continuity path; and
- source of each decision: drawing detail, specification, adopted code, product instruction or qualified reviewer.
Prerequisite 3: define the release boundary before measuring
Draw or mark the zones on the floor plan and elevation photographs before taking readings. Give each a stable ID such as E-01 North bedroom wall, W-03 Window-to-corner, or R-02 Rim at kitchen. Include orientation, floor, room, cavity range and any special exposure. A vague label such as “back wall” makes the second visit hard to reproduce.
Mark repeat points with a removable label or a sketch. Good points represent different risks: one mid-stud, one lower plate or corner, one header or sill, one sheathing edge if the meter is appropriate for that material, and one visibly affected point. Do not drill, pierce, pry, remove WRB, cut sheathing or enter a confined space simply to improve the dataset. Destructive sampling and concealed-condition investigation belong to qualified professionals with the builder's authorization.
The prerequisite handoff is complete when the builder has acknowledged the zone map, supplied the assembly and product information, named the recorder and reviewer, and identified the next cover event. Only then does the moisture log answer a real scheduling question.
Build the input record before anyone takes a reading #
The worksheet is useful only when another person can understand what was measured, under what conditions, with what instrument and against which limit. Record inputs first; a number copied from a phone message without context is not a usable release record.
The minimum record for each zone
Create one row per measurement point, not one row per room. The minimum fields are:
| Field | What to enter | Why it changes the decision |
|---|---|---|
| Zone ID | Stable code, orientation, room and cavity | Makes the later reading comparable |
| Component | Stud, plate, header, rim, sill, OSB, plywood or other | Meters and limits may differ by material |
| Point ID | Height, distance from opening, corner or sketch reference | Avoids comparing different pieces of wood |
| Material and grade | Solid-sawn species if known, engineered member, panel product | Product manuals may exclude or limit some materials |
| Reading date and time | Local date, time and sequence | Shows elapsed drying time and weather relationship |
| Moisture reading | Percent moisture content as displayed, or the instrument's unit | Supplies the raw input; do not round away a boundary value |
| Meter make/model and setting | Exact setting or mode required by the instrument manual | A reading without the setting cannot be reproduced |
| Instrument check | Calibration check or manufacturer procedure and result | Supports confidence in the instrument, not hidden-condition proof |
| Repeat count | Same point repeated, adjacent point, and reason for any difference | Exposes a bad contact or a local wet spot |
| Weather exposure | Rain, snow, direct sun, wind, roof/opening status and wetting history | Exposure severity and drying potential matter |
| Indoor conditions | Temperature and relative humidity, with instrument location | Helps interpret a changing environment |
| WRB/flashing status | Complete, partial, damaged, unknown, with detail IDs | Water control must be reviewed before covering |
| Rough-in status | Electrical, plumbing, HVAC, blocking, firestopping and inspections | Insulation can hide work that still needs access |
| Product and limit | Exact insulation product, manual section, stated limit or project rule | Prevents applying a generic number to a different product |
| Responsible recorder/reviewer | Names, roles and date | Converts data into an accountable handoff |
| Next action and date | Release, dry, repair, remeasure, escalate or inspect | Keeps a hold from becoming an indefinite delay |
Use percent moisture content only when the exact meter manual says that display and procedure apply to the named material. Follow the manual for the instrument and material; record its model, setting, calibration or reference-check procedure, measurement conditions and stated limitations. If the manual does not identify the material or environment, record that limitation and ask the builder or qualified reviewer how to proceed.
Separate wood, sheathing and insulation questions
“The framing reads 18%” does not establish that the sheathing is dry, that the insulation is compatible, or that the wall will dry after it is closed. Keep separate component rows. A stud may be dry while a lower sheathing edge retains water. A plate may have been exposed to concrete or a leak that the middle of a cavity did not experience. A thick header, rim board or engineered member may have a different response from a nominal stud.
For the insulation handoff, record at least the lumber that will contact the product, because the exact product instruction may make that the limiting substrate. Knauf's EcoBatt page also directs the installer to clean wood waste, trash and scraps from cavities before filling them. That is not a moisture reading, but it is a practical release prerequisite because debris can prevent fit, conceal leaks or create voids. Cite the EcoBatt site-preparation and moisture instruction next to the product row in the worksheet.
Record conditions that can make readings misleading
Take the indoor temperature and relative humidity near the zone, not at a distant office desk. Note whether the house is heated, cooled, mechanically ventilated, dehumidified or open to outdoor air. Do not interpret EPA's indoor relative-humidity guidance as a wood-release threshold: EPA's checklist is written for schools and recommends below 60%, ideally 30%–50%, as an indoor-air-quality moisture-control range. It is a useful construction-condition signal, not proof that a wall cavity is ready.
Record the weather for the preceding days, not only the sky at the moment of measurement. A falling reading after three dry, windy days may reflect genuine drying; a low reading after a warm sunny morning on a shaded, wet substrate may be less representative. Note direct wetting, pooled water, tarp contact, temporary heat, dehumidifier operation and whether doors or windows were open. Never use temporary heat to create a low surface reading while the source of water remains unresolved.
Record any visual condition without diagnosing it: darkened wood, staining, swelling, lifted OSB strands, flaking, open panel joints, corrosion, soft spots, fungal-looking growth, condensation, dripping, wet insulation or a musty odor. APA says extended moisture exposure can produce rough or uneven OSB and plywood surfaces, lifting or flaking of OSB strands and thickness swelling; it also explains that those surface observations alone do not answer every structural-capacity question. See the APA framing-error guidance on wet jobsites, then escalate damaged or questionable panels instead of using the meter to “clear” them.
What the homeowner can safely collect
The homeowner can photograph the zone map, read the meter display without touching live electrical parts, copy the product manual, observe the weather-control path from a safe location, record dates and ask for the builder's sequence. Wear normal site PPE required by the builder. Stay on safe walking surfaces; do not climb unprotected ladders or roof surfaces, enter crawlspaces or other confined spaces, approach exposed wiring, move temporary supports, remove guards or operate dehumidifiers and heaters without the site's direction.
The homeowner should not remove a panel to investigate, scrape suspected mold, clean contamination, cut framing, drill a structural member, reconnect temporary electrical service or make an air-sealing repair that changes the design. Falls, electrical hazards, sharp fasteners, unstable framing, dust, heat sources and contaminated materials can all be present before drywall. If a meter reading requires unsafe access, write “not safely accessible,” photograph from the safe limit and assign the observation to the builder or qualified specialist.
Measure repeatably and turn readings into a drying trend #
Use the same instrument, settings, point IDs and approximate conditions for a repeat reading, then calculate a transparent trend in percentage points of moisture content per day. A falling trend supports a drying story; it does not override a product limit, active leak, material damage or unresolved wall-control detail.
A field-safe measurement sequence
- Review the zone record. Confirm the point ID, material, product limit, previous reading, weather and the builder's permission to enter the area. Do not measure a different component and call it a repeat.
- Check the instrument. Follow the meter maker's calibration or reference-check procedure. Record the result, battery status and every setting the manual requires for this measurement. “Calibrated” means checked by the specified method; it does not mean the meter knows the condition behind a wall.
- Let the instrument and location settle. Keep the meter within the site's safe measurement environment long enough for its own instructions. Record indoor temperature and relative humidity at the time. Do not place a wet instrument against wood or use a reading immediately after moving it from a different climate.
- Inspect before contact. Look for active water, condensation, wet insulation, damaged edges, swelling, staining or unsafe access. If an active source is present, status is hold. The next step is source control, not a more precise number.
- Use the same point. Follow the exact placement and contact or scanning procedure in the meter manual, and return to the same documented point for a repeat. Do not damage members to create a better-looking dataset.
- Take repeats. Record at least two readings at the point or two defined adjacent readings, with the displayed values. If they differ materially, do not average away the difference; note it as a local variation and investigate through the builder or reviewer.
- Check representative exceptions. Add a lower corner, plate, opening, rim, valley or visibly affected point where accessible. The purpose is not statistical coverage; it is to avoid using the driest, easiest stud as a proxy for the riskier detail.
- Photograph and close the record. Photograph the meter display if allowed, the point label, the wall-control detail and the zone. Add the next action, responsible person and date before leaving.
The procedure above produces evidence for a handoff, not a laboratory result. If the measurement protocol matters to a warranty, dispute or structural decision, ask the product manufacturer, building enclosure professional or other qualified reviewer for the applicable protocol. Do not claim laboratory precision from a consumer meter.
The drying-trend formula
Use the assigned original worksheet formula:
drying trend = (earlier reading − later reading) ÷ elapsed days
Use moisture-content percentage points as the reading unit and days as the time unit. If an earlier reading is 24% and a later reading is 20% four days later, the illustrative trend is (24 − 20) ÷ 4 = 1 percentage point per day. A positive number means the displayed reading fell. A zero means no change. A negative number means the later reading is higher.
The formula is a descriptive slope between two observations, not a drying law and not a forecast. It does not tell you how long the next four points will take. Drying can slow as the material approaches equilibrium, weather can change, and a new leak can reverse the trend. For that reason, compare the slope with a documented project threshold only if the builder, designer or product instruction actually supplies one. Do not invent a universal “acceptable drying rate.” If no threshold exists, the trend remains context for a qualified decision, not a release criterion by itself.
Illustrative worked example with sensitivity
The following is a modeled example, not a site measurement or Brictale test. Assume a project uses a fiberglass batt product whose instructions state a 19% maximum for lumber contacting the insulation, and the project team chooses a release rule of: latest comparable reading at or below 19%, no active wetting, stable or falling trend, no visible damage requiring review, and all wall-control and rough-in checks complete. The 19% number belongs to the named product in this example; it is not a national rule.
| Zone | Earlier / later readings | Elapsed days | Formula and trend | Other evidence | Illustrative status |
|---|---|---|---|---|---|
| E-01 dry stud field | 20% / 18% | 4 | (20−18)/4 = +0.50 pp/day | No active wetting; controls complete | Release if repeats agree and builder accepts |
| E-02 lower plate | 21% / 20% | 4 | (21−20)/4 = +0.25 pp/day | Latest is above 19% | Hold and remeasure after drying |
| E-03 window corner | 19% / 20% | 4 | (19−20)/4 = −0.25 pp/day | Later reading rose near opening | Hold; inspect flashing/source and seek review if unexplained |
| E-04 wall header below roof valley | 24% / 19% | 4 | (24−19)/4 = +1.25 pp/day | Prior direct wetting and surface stain | Qualified review before cover; trend alone is not enough |
The table shows why a reading and a release decision are different. E-01 has the latest number and trend needed for the modeled rule, subject to the other gates. E-02 is drying but still misses the example limit. E-03 is numerically close to the limit but moving in the wrong direction, so it stays open. E-04 has a favorable slope but a severe exposure history and a stain; the record needs a qualified assessment rather than a simple pass.
Now apply the required two-percentage-point sensitivity check. Suppose E-01's earlier 20% and later 18% readings each have an illustrative uncertainty band of ±2 percentage points. The earlier range is 18%–22%; the later range is 16%–20%. At four days, the trend range is (18−20)/4 = −0.50 to (22−16)/4 = +1.50 pp/day, and the later value could be as high as 20%. Under the modeled ≤19% rule, the point is not robustly below the limit; the safe worksheet result is “repeat with the specified protocol or obtain qualified review,” not “round down to release.”
For E-02, the same ±2 exercise gives a later range of 18%–22%, so the measurement uncertainty overlaps the example threshold in both directions. That does not turn a 20% display into an automatic pass. The product instruction still controls the recorded reading, and the disagreement tells you to improve repeatability or escalate. For E-03, uncertainty can make the slope less negative or positive, but the observed rise and window location already justify a hold. For E-04, even a later range below 19% would not erase the wetting history and stain.
Write sensitivity in the record as a decision aid, not a made-up accuracy specification. “±2 percentage points” here is the assignment's illustrative test of how a borderline decision can flip; it is not a claim about the accuracy of a particular meter. Ask the instrument manufacturer or qualified reviewer for the relevant accuracy, material correction and verification requirements.
How many readings are enough?
There is no universal count that releases a whole house. The appropriate coverage depends on the number of zones, materials, exposure history, wall complexity, instrument and contract. A useful minimum is a defined repeat at every risk-representative point plus additional points for wetting, openings, low areas, end grain, plates, headers, rims and transitions. If one point is high, do not hide it in an average; either expand the zone, identify it as a local hold or have the reviewer define the boundary.
Consistency is more valuable than volume. Ten readings on the same easy-to-access stud do not compensate for no reading at a leaking window corner. Conversely, a homeowner should not create dozens of unrepeatable readings merely to look thorough. Have the builder and reviewer agree on the point plan, then preserve the raw values and the reason for the selected locations.
Check the wall controls that make drying possible #
Moisture release is not only a wood-reading exercise: before insulation, verify the visible water, air and vapor-control path that the design expects. A dry-looking stud behind an incomplete or incorrectly detailed enclosure can still face future wetting or condensation.
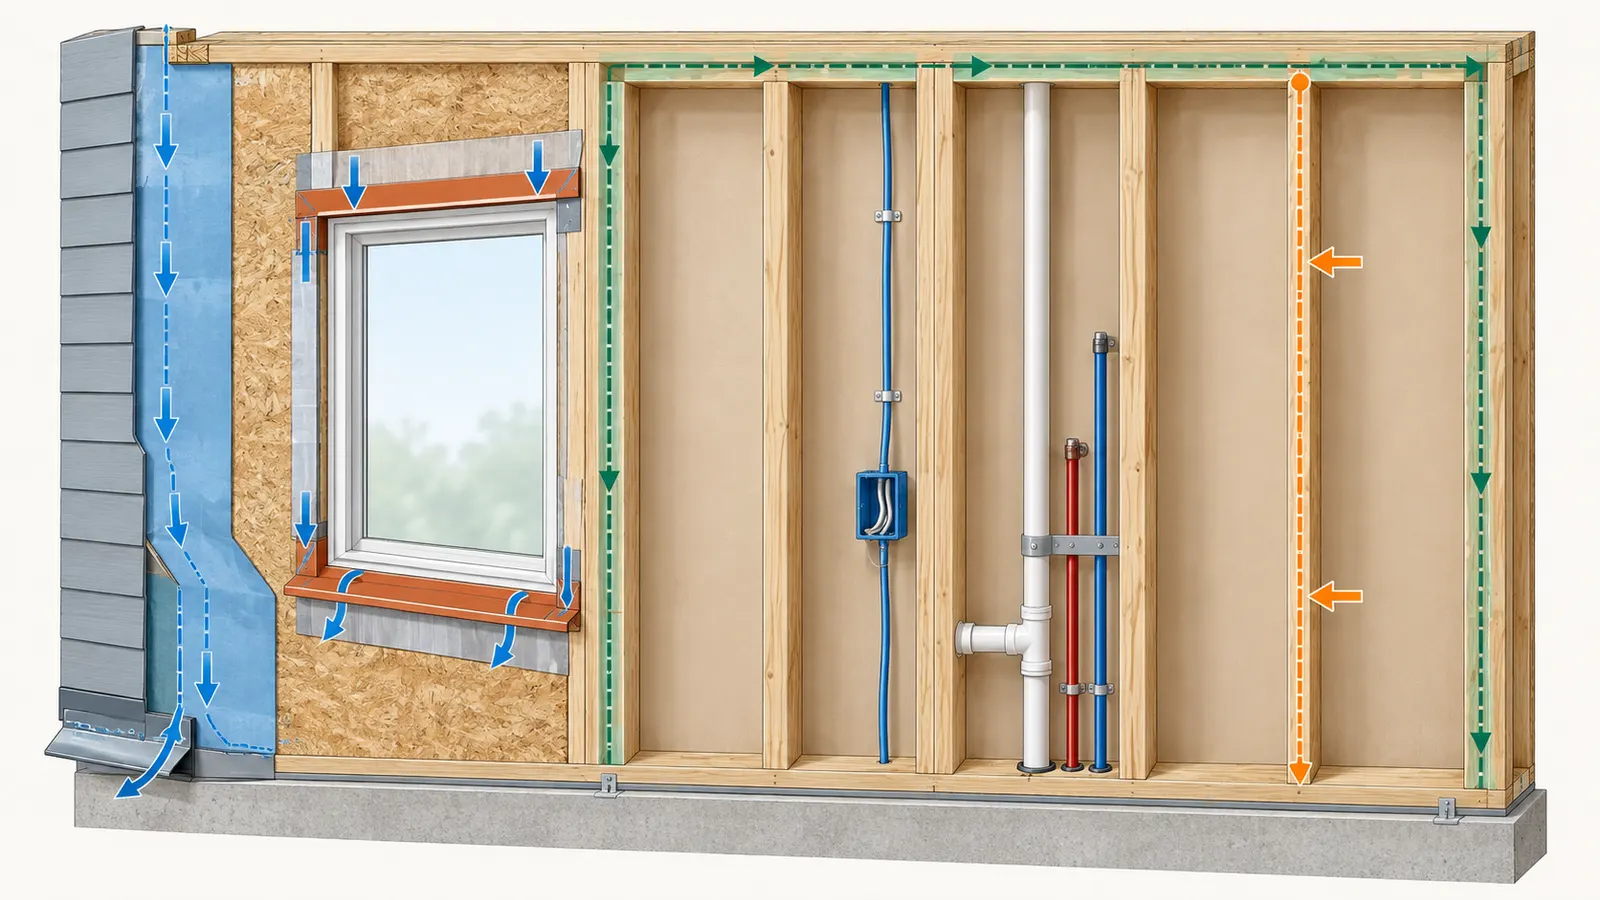
Bulk-water control: roof, openings and WRB
EPA identifies wet construction cavities as major moisture risks and emphasizes exterior weather barriers and attention to openings, seams, roofs and other penetrations. APA's wall guidance likewise identifies leaks and vapor-laden air as primary moisture sources and highlights flashing, WRBs and rain-screen details. Use the EPA moisture-control guidance and APA's moisture-resistant wall construction guide as source-backed inspection questions, not as permission for an unqualified person to approve the installation.
For each zone, ask the builder to show:
- how roof water is directed away from the wall;
- whether the WRB is the specified product and installed in the intended shingle-lapped direction;
- how the WRB transitions at the foundation, roof, corners, window and door openings;
- where sill, jamb and head flashing occur and how they drain;
- whether penetrations are sealed with compatible materials;
- how cladding will be attached without defeating the drainage plane; and
- where a damaged or punctured WRB has been repaired.
Do not assume “housewrap installed” means “wall is water-tight.” The future cladding, flashing, sealants, tapes and penetrations make a system. The DOE-hosted wall guide notes that housewrap joints and top and bottom transitions may need sealing for an air-barrier role and that tape compatibility with wood, temperature and primer requirements should be verified. It also notes that field fasteners can puncture a housewrap. Ask for the actual manufacturer's installation instructions and detail numbers.
If water has entered a zone, first record the source, wetting path and affected materials. Do not let a completed WRB erase evidence of a prior leak. The builder should control the source, remove standing water where appropriate, protect materials from additional wetting and decide whether replacement or specialist review is required. EPA's school-building moisture-control guidance says water-damaged materials should be dried as quickly as possible, preferably within 24 hours, and notes that materials damp or wet for more than 48 hours may need to be discarded. Because that checklist is written for schools, not as a residential demolition order, use it as a prompt for immediate action and ask the builder or remediation professional to determine the correct treatment for the actual material and exposure.
Air control: continuity before the cavity disappears
The DOE-hosted guide says wall air sealing limits air movement into the cavity and reduces moisture loads carried by air. It identifies windows and doors, rim joists, utility penetrations, top and bottom plates, tubs and showers, fireplaces, garage separations and complex chases as places where continuity matters. Read the DOE air-sealing sections against the project's drawings; the cited guide covers 2x6 walls in Climate Zones 3–5 and is not an automatic detail for a different assembly.
Before insulation, walk the air-barrier line with the builder or designer. Trace it rather than looking for isolated patches:
- Start at the foundation or slab and identify how the bottom of the wall connects to the intended air-control layer.
- Follow the exterior or interior barrier across uninterrupted wall fields.
- Stop at every window and door and ask where the frame-to-wall gap is sealed.
- Follow around corners, wall intersections, top plates and the wall-to-ceiling transition.
- Include rim joists, cantilevers, garage separations, knee walls and conditioned-to-unconditioned transitions.
- Mark every electrical, plumbing, HVAC, dryer, bath-fan, fireplace and other penetration.
- Flag details that will be impossible to inspect after insulation or drywall.
The homeowner's task is to mark and ask. The builder and relevant trades own installation. The designer owns a design-intent question when the barrier has no clear path. A blower-door result, if the project includes one, can inform whole-house air leakage but cannot by itself prove that every local wall transition is properly sealed or that a wet material is dry. Keep this release plan canonical around moisture readiness; link any separate test or inspection record rather than treating it as a substitute.
Vapor management: do not choose facing by habit
Vapor diffusion and air leakage are different moisture paths. A vapor retarder may also contribute to air control, but a sheet with a low air-leakage result does not automatically resolve every vapor and drying question. The DOE-hosted guide says vapor-retarder selection for 2x6 walls varies with climate zone, insulation, cladding and drying potential; it recommends balancing vapor control with the ability to dry incidental moisture. It also explains that the same facing choice can behave differently in warm-humid, mixed-humid, marine and cold conditions.
Record the specified class and location, not simply “faced batt.” Ask the designer:
- Which side of the assembly is intended to receive the vapor retarder?
- Is the chosen facing compatible with the climate and cladding?
- Does exterior continuous insulation change the condensation-control calculation?
- Does a low-permeance exterior layer limit outward drying?
- Can the assembly dry inward, outward or both?
- What happens at bathrooms, kitchens, high-humidity rooms and attached garages?
- Which air-sealing details are required before the facing or drywall is covered?
Knauf's EcoBatt instructions for exterior wood-frame walls say to place kraft- or foil-faced batts with the facing toward the warm-in-winter side; for unfaced batts, the page directs the installer to follow local codes and practices for vapor-retarder selection and positioning. The same page has a separate warm-humid note under its metal-frame section, so do not import that assembly-specific note into a wood-frame wall decision. The product page is not a national code interpretation; use the exact manufacturer installation instructions together with the adopted jurisdiction and design. Never flip the facing based on a generic internet rule when the project assembly has been designed for a different climate or vapor strategy.
Drying potential is a design attribute, not a promise
The DOE guide categorizes cladding by the air flow and drainage opportunity behind it. This matters during the release decision because a wall with limited outward drying may deserve more conservative review after wetting than a wall designed with a vented cavity. It does not mean a vented cladding makes wet framing safe to cover; it means the assembly's future drying path is a factor.
Make a simple drying-path statement for each zone:
incident moisture can dry [inward / outward / both / uncertain] through [named layers], subject to [cladding, WRB, vapor retarder and climate assumptions].
If the statement contains “uncertain,” keep the zone open. If the wall design changed after framing—different sheathing, foam, cladding, insulation, paint, membrane or interior finish—send the change to the designer. A last-minute product substitution can change vapor permeance, air control, fit and warranty even when the R-value appears similar.
The pre-insulation visibility check
Before release, photograph the locations that will become concealed: window and door flashing, rough openings, sill plates, rim areas, top plates, penetrations, fireblocking, bath or shower exterior walls, header recesses, corners, chases and the air-barrier transitions. Photograph the zone ID or a scale reference in each image. Store the images with the worksheet and record the date, not merely “photos taken.”
The photographs prove what was visible on that date. They do not prove the tape is bonded behind a layer, the cavity is dry everywhere or the future cladding will be installed correctly. A photograph is a handoff record, not a hidden-condition certificate.
Apply the release, hold, or professional-review gate #
Make the status decision by combining the latest comparable readings with product instructions, exposure history, material condition, wall-control continuity, rough-in completion and accountable review. Release is the narrowest branch; uncertainty is a reason to keep access, not a reason to round the record toward “yes.”
Release branch
Choose release only when all of these are true for the defined zone:
- the roof, openings and temporary or permanent water-control path are substantially in place;
- no active leak, condensation, standing water or unresolved wetting source is present;
- the material and exact insulation product are identified;
- the latest readings use the documented meter procedure and are at or below the applicable product or project limit;
- repeat points are sufficiently consistent for the decision and no exception point is hidden by an average;
- the trend is stable or falling under the project rule, or a qualified reviewer has explained why trend is not required;
- visible swelling, soft wood, delamination, decay or fungal-looking growth has been resolved or reviewed;
- WRB, flashing, air-barrier and drying-path details are complete or accepted by their responsible person;
- rough-in, fireblocking and required inspections are complete for the planned cover sequence; and
- the builder has authorized the insulation handoff and recorded who will verify installation.
The word “release” means “release to the next defined construction handoff.” It does not mean the owner certifies code compliance, structural capacity, future moisture performance or the absence of mold. Write the exact next step: for example, “E-01 released to EcoBatt installer on September 12; installer to verify clean cavity, ≤19% lumber, fit and facing before closing.”
Hold-for-drying branch
Choose hold for more drying when the zone appears recoverable but lacks the evidence to release. Typical reasons include readings above the product limit but falling, dampness after a recent rain with no active leak, incomplete repeat points, high indoor humidity, or a cavity that has not yet experienced a representative drying period.
The hold record should say:
- what is preventing release;
- what protection is being added or maintained;
- whether safe temporary ventilation, heat or dehumidification is being used under the builder's plan;
- who will inspect for a source before the next reading;
- the next measurement date and the same points to repeat;
- what threshold or product instruction will be compared; and
- what event converts the hold into professional review.
Do not write “wait a few days” without a date and owner. Drying time is not a universal constant. A large, wet member in a low-drying assembly may not be improved by simply turning up heat. Rapid surface drying can create a misleading momentary reading while water remains deeper or behind a layer. The builder should protect the structure from new wetting and choose site measures compatible with the assembly and safety requirements.
Professional-review branch
Choose qualified review when the reading or condition is outside the straightforward product-and-process question. Escalation indicators include:
- visible decay, softening, structural distortion, delamination or significant swelling;
- persistent or unexplained high readings after source control;
- an active or hidden leak at roof, window, door, plumbing or foundation interfaces;
- wet material that has remained wet long enough to raise material-disposition or contamination concerns;
- suspected mold or a health concern;
- engineered lumber, structural panels or connections whose condition may affect design values;
- a wall assembly that differs from the approved drawings or product manual;
- contradictory readings that cannot be reproduced safely;
- uncertainty about a vapor-retarder or air-barrier change in the actual climate; or
- a request to approve a concealed condition outside the reviewer's contract.
Match the reviewer to the question. A structural engineer can evaluate structural implications; that does not automatically make the person a mold assessor. A building enclosure professional can review water, air and vapor-control continuity; that does not automatically make the person the code official. A qualified remediation professional can address suspected microbial contamination; that does not automatically approve a changed wall assembly. Ask for scope, credentials, jurisdiction, deliverable, areas reviewed, limitations and whether the opinion is based on observation, testing or documents.
Decision matrix for common evidence combinations
| Latest comparable reading | Trend | Visual/source condition | Controls and rough-in | Next decision |
|---|---|---|---|---|
| At or below documented limit | Falling or stable | No active wetting or unresolved damage | Complete | Release to named installer, subject to builder authorization |
| Above documented limit | Falling | No active source; no apparent damage | Complete | Hold, protect and remeasure at same points |
| At or below limit | Rising or unexplained variation | Leak, condensation or wet detail | Any | Hold; control source and inspect before another number |
| At or below limit | Stable | Swelling, soft wood, delamination or suspicious growth | Any | Qualified review; do not cover to hide it |
| Unknown or unrepeatable | Unknown | Unsafe access or wrong meter/material setting | Any | Hold; assign safe, competent measurement or review |
| At or below limit | Any | Water-control or air/vapor detail incomplete | Incomplete | Hold for envelope/rough-in correction; moisture number cannot release it |
| Above limit | Rising | Active leak or continuing wetting | Incomplete | Immediate source control and qualified review as appropriate |
What not to infer from a “good” reading
Do not infer that:
- one stud represents the whole zone;
- a dry surface means a deep member is dry;
- a dry stud means the sheathing, plate, rim or insulation is dry;
- a falling trend proves the wall is safe to close;
- a completed WRB proves every flashing transition works;
- a building inspection proves every concealed material is within a product limit;
- an insulation installer can approve structural damage;
- a product limit applies to a different product;
- a climate-zone example is the law in the permitting jurisdiction; or
- a release record eliminates future maintenance obligations.
These limits make the plan more credible. The document is valuable because it preserves the boundary between observation, manufacturer instruction, design interpretation, inspection authority and professional opinion.
Handoff, cover, and preserve the record #
The final pre-insulation handoff should be a named, dated transfer of responsibility with a zone status, unresolved items and verification plan. Do not let insulation delivery or a drywall schedule silently convert an incomplete zone into an approved one.
The handoff packet
For each released zone, assemble:
- the zone map with ID, orientation and boundaries;
- the component and material list;
- the raw readings, dates, point IDs, meter settings, repeat values and instrument check;
- weather exposure and indoor temperature/relative-humidity records;
- dry-in, WRB, flashing, air-barrier and drying-path notes;
- product name, model or family, installation page and applicable limit;
- rough-in and inspection dependencies;
- photographs of concealed details before cover;
- the release/hold/review decision and any sensitivity note;
- names and dates for the recorder, builder reviewer, designer or specialist; and
- the next handoff and its verification method.
The packet should be readable by a person who did not attend the walkthrough. Use the actual project date and avoid cosmetic “updated” dates that do not reflect a substantive review. If a zone is held, keep the prior record visible and append the new reading rather than overwriting it. A drying trend is meaningful only when the sequence remains auditable.
Verify the insulation installation itself
Release does not complete the job. The insulation installer must still install the chosen product according to its current instructions, the adopted code and the project's details. Knauf's EcoBatt instructions say wall batts should fit snugly at top and bottom plates, be split or fitted around wiring, plumbing and ductwork without over-compression, include small pieces behind outlet boxes, and avoid gaps or voids. The Knauf wall-installation guidance also addresses headers, facing, penetrations and covering faced products.
Create a post-install verification row for the installer or builder:
- Is the product the one in the release packet?
- Is the required thickness installed without compression that reduces performance?
- Are cavities filled side-to-side and top-to-bottom without substantial gaps or voids?
- Is insulation fitted around services and behind boxes without unsafe contact or interference?
- Are headers, corners, rim areas and narrow cavities handled as detailed?
- Are penetrations and the air barrier still continuous?
- Is the facing on the specified side for the actual assembly?
- Are heat-source clearances and combustible-facing requirements addressed?
- Are all required photos and inspection records attached before drywall?
Knauf's instructions are specific to its products; another insulation manufacturer may specify different substrate limits, facing, clearances or installation details. Treat a product substitution as a new input requiring a new comparison, not as a clerical change.
Handoff to drywall and the owner record
Before drywall, repeat the visibility check on a sample of every zone type and all held or repaired areas. The builder should confirm that inspections required by the actual jurisdiction have occurred and that no electrician, plumber, HVAC installer, firestop trade or designer still needs cavity access. The homeowner should receive the final photos and worksheet export in the project record.
Ask the builder to state whether any areas were excluded from the release, repaired after the first reading, replaced, or closed without a comparable repeat. Those exceptions are more important than a polished cover sheet. If a wall was covered before the issue was resolved, preserve the limitation plainly and ask the appropriate professional whether selective opening, monitoring or another action is warranted. Do not imply that the pre-cover worksheet certifies what cannot now be seen.
The next ownership decision
After the insulation-and-drywall handoff, the next decision is not “forget moisture.” It is whether the owner has enough documentation to maintain the water-control and indoor-humidity conditions the wall design depends on. Keep the product manuals, drawings, WRB and flashing photos, air-sealing details, insulation records, repair notes and inspection documents with the home records.
At completion, ask how the builder expects the owner to notice future problems: staining, recurring condensation, musty odor, swelling, failed sealants, roof or plumbing leaks, elevated indoor humidity and damaged exterior cladding. EPA notes that uncontrolled moisture can damage structure and degrade insulation performance; its school guidance also emphasizes controlling moisture entry and condensation. For a house, the practical owner response is prompt source control and qualified evaluation when the cause or extent is uncertain—not painting over a stain or adding insulation over a wet area.
Diagnose failure cases and choose the next decision #
When the worksheet fails, identify which input or control failed and assign the next decision to the person who can resolve it. The most useful record explains why the zone did not release, not merely that someone “checked moisture.”
Failure case: every reading is high after rain
First ask whether the source has stopped. Inspect from a safe location for roof openings, missing flashing, window and door transitions, damaged WRB, exposed plates, tarp contact, pooling and plumbing leaks. Photograph and map the affected zone. The builder owns immediate protection and source control; a qualified professional may need to assess material damage, structure or contamination.
Do not accelerate drying with unreviewed heat or seal wet framing behind insulation. After source control, repeat the same points under comparable conditions. If readings fall and the material is undamaged, the project may return to the hold branch. If readings remain high, the history is long, or the material is damaged, move to qualified review. EPA's guidance that wetted materials should dry as much as weather permits and that prolonged dampness can create disposal concerns supports acting promptly, but it does not decide the disposition of a residential wall for you.
Failure case: one point is high and the rest are low
Do not average the point away. Confirm material, meter setting, contact, nearby metal or wiring, surface condition and point identity. Take a defined repeat and an adjacent comparison only when safe. If the high point is a plate, sill, corner, header, rim or sheathing edge, keep it as a separate risk zone. Look for a local wetting path: opening, roof intersection, plumbing, foundation splashback or condensation.
If the reading cannot be reproduced with the correct instrument setting, record “measurement uncertainty” and ask for competent verification. If it reproduces, the zone is held even when the middle of the wall is dry. Localized moisture often carries more decision information than a reassuring average.
Failure case: the trend is falling but the schedule is tight
A schedule pressure changes the calendar, not the evidence. Show the builder the exact missed gate, the cost or time of protecting and remeasuring, and the consequence of covering. Ask whether the insulation crew can work in released zones while a held zone remains open. If the builder proposes a substitution, temporary enclosure or assembly change, route it to the designer and product manufacturer as appropriate.
Do not ask an inspector to sign a condition outside the inspection scope merely to preserve the schedule. Do not ask the insulation installer to accept a substrate limit the product instructions do not support. A narrow, well-documented partial release can keep work moving without converting a wet area into a hidden dispute.
Failure case: the meter says “low” but the wall smells musty or looks damaged
Treat visual and odor evidence as a separate trigger. A meter reading does not prove the absence of microbial growth, prior wetting, decay or hidden damage. Do not scrape, bleach, sand, cut or disturb suspected contamination yourself. Keep occupants away as the site plan requires and ask the builder to engage the appropriate qualified professional. If the condition affects structural members, involve the designer or structural engineer; if it raises health or contamination questions, involve the relevant remediation or industrial-hygiene professional.
Record what was observed, where, when and under what conditions. Avoid labels such as “mold” or “safe” unless the qualified professional's report supports them. The safest next decision is whether the area needs characterization, removal, repair or design review before it can re-enter the release sequence.
Failure case: the WRB is installed but the air barrier is unclear
A WRB can manage bulk water without being the complete air barrier for the intended assembly. The DOE guide notes that an air-sealed WRB may need to be combined with other measures and that exterior-only sealing does not necessarily limit indoor moist air entering the cavity. Trace the project’s intended air-control line with the designer or builder and mark missing transitions at top, bottom, penetrations, windows, doors and rim areas.
Keep the zone open until the responsible person explains the detail and verifies the work. Do not add random caulk or tape based on a generic list; compatibility, temperature, primer, substrate, movement and the assembly’s drying strategy matter. A repair that improves air control in one climate or location can create a vapor-drying problem in another if it changes the designed layers.
Failure case: the insulation product changes late
Pause the release and update the product row. Check the new manual for substrate moisture, cavity cleaning, dimensions, facing, vapor-retarder role, fire or heat-source clearances, fit around services, headers, rim areas and finish-cover requirements. Recheck whether the designer's wall assembly and energy-code path still apply. If the new product is wet-applied, spray-applied or otherwise outside this guide's scoped batt example, route the installation to its qualified installer and exact instructions; do not borrow the EcoBatt 19% limit.
Failure case: the inspector says “looks fine” but the record is incomplete
Clarify what was inspected, by which authority, on what date and under which adopted code or permit scope. An inspection result can be valid and still not answer the homeowner's moisture-release question. Keep the result, but do not represent it as a whole-wall moisture certification. Ask the builder to complete the missing readings, product record, zone boundaries or envelope details, or have the appropriate professional define a limited review.
Failure case: the reading is right on the limit
Treat a boundary value as a boundary, not as an invitation to round. Repeat using the documented procedure, keep the displayed value, record environmental conditions and run the illustrative sensitivity check. If the result could cross the product limit under a reasonable measurement uncertainty or the reading is not repeatable, hold or seek qualified review. A later stable reading below the limit may support release; a single borderline value should not erase the exposure history or other failed gates.
Final homeowner checklist
Before you agree that a zone can proceed, confirm that the answer to each question is in the project record:
- Is the zone boundary clear on a plan or elevation?
- Are the component, material and exact insulation product identified?
- Are the same measurement points and meter settings used for repeats?
- Are dates, elapsed days, weather, indoor temperature and relative humidity recorded?
- Is the instrument check or calibration procedure documented?
- Is the latest reading at or below the actual product or project limit?
- Is the trend stable or falling, and is the formula reproducible?
- Has the two-point sensitivity check exposed a borderline result?
- Is there no active leak, condensation, standing water or unresolved wetting source?
- Are staining, swelling, soft wood, delamination or suspected contamination resolved or assigned to a qualified reviewer?
- Are roof, WRB, flashing and opening details visible and assigned to the builder or designer?
- Is the air-barrier path continuous and documented at penetrations, rims, plates and transitions?
- Is the vapor-retarder strategy appropriate to the actual climate, insulation and cladding?
- Are rough-ins, fireblocking and required inspections complete before the planned cover?
- Has the builder named the person who authorizes release and the person who verifies insulation?
- Does the handoff state release, hold or qualified review, with a date and next owner?
- Will the photos and worksheet be preserved with the home's construction records?
If any answer is “no” or “unknown,” the next decision is to resolve that item—not to make the worksheet look complete. The practical value of this plan is that it makes the uncertainty visible while the wall is still accessible. Use the evidence from EPA's moisture-control guidance, APA's framing and sheathing guidance, the DOE climate and wall resources, and the exact insulation manual to ask the right questions, then let the actual jurisdiction, design documents, product instructions and qualified people make the decisions that the worksheet cannot make.
Cite this guide
Brictale. “How to Prepare a New-Home Framing Moisture-Release Plan Before Insulation.” Published 2026-09-27; updated 2026-09-27.
https://brictale.com/build/materials/prepare-new-home-framing-moisture-release-before-insulation · Read the Markdown version
Original contribution: Moisture Release Worksheet and Zone Gate. A zone-by-zone record that connects repeatable wood readings, drying trend, weather exposure, wall-control readiness, product limits, responsibility and the next handoff before insulation.
Sources and scope
Evidence behind this page
- The U.S. Environmental Protection Agency says moisture-absorbing construction materials such as wood and insulation should be kept dry, and that wetted materials should be allowed to dry as much as weather permits.
Moisture Control, Part of Indoor Air Quality Design Tools for Schools
U.S. EPA guidance for school design and construction; used here for the general moisture-control principle and not as a residential code or acceptance test.
Accessed · Link to this claim - EPA identifies wet or damp construction cavities as major moisture and mold risks and says exterior weather barriers and careful detailing at openings, roofs and other penetrations help prevent uncontrolled moisture entry.
Moisture Control, Part of Indoor Air Quality Design Tools for Schools
U.S. EPA school-building guidance; applied as a building-envelope principle within the assigned new residential wood-frame scope, not as a local rule.
Accessed · Link to this claim - EPA's moisture-control checklist says indoor relative humidity should be maintained below 60%, ideally between 30% and 50%, in the school-building context.
Moisture Control, Part of Indoor Air Quality Design Tools for Schools
U.S. EPA school indoor-air-quality guidance; a construction-condition context signal, not a universal residential pre-insulation release limit.
Accessed · Link to this claim - EPA's school-building moisture-control checklist says water-damaged materials should be dried as quickly as possible, preferably within 24 hours, and that materials damp or wet for more than 48 hours may need to be discarded.
Moisture Control, Part of Indoor Air Quality Design Tools for Schools
U.S. EPA guidance written for school buildings; the timing language is used only as an immediate-action prompt and is not a residential demolition order, code requirement or material-disposition decision.
Accessed · Link to this claim - APA says the moisture content of wood products depends on direct wetting, accumulated moisture, temperature, relative humidity and the drying potential of the system; it says acceptable exposure cannot be defined for every construction delay without considering geography, season and weather history.
APA guidance based on framing and sheathing observations; used to reject a one-number national release rule for all wood products and assemblies.
Accessed · Link to this claim - APA states that wood normally stabilizes at an in-service moisture content of about 6% to 14%, while prolonged high moisture around 20% to 25% or higher can contribute to decay and mold; it also notes that extended exposure can affect panel surfaces and that Exposure 1 and Exterior panels have design-value reductions when in-service moisture is 16% or greater.
APA discussion of wood products and structural panels; not a universal pre-insulation acceptance criterion and not a substitute for a product manual or professional assessment.
Accessed · Link to this claim - APA's wall-construction guidance identifies water leaks and vapor-laden air that condenses in the wall as two primary moisture sources and highlights correct wall details, flashing, water-resistive barriers and rain-screen approaches.
Build a Better Home: Moisture-Resistant Wall Construction
APA guidance for architects, designers, builders, homeowners and contractors; used for wall-control verification, not local code approval.
Accessed · Link to this claim - APA's moisture-mitigation guidance flags wood components as particularly vulnerable when moisture content exceeds 19%, where decay and structural deterioration can become concerns.
APA general moisture-mitigation guidance; treated as a risk signal and not as a universal product installation limit.
Accessed · Link to this claim - The Department of Energy says its Building America climate-specific tool uses county or ZIP-code climate-zone lookup and shows wall assemblies intended to meet 2021 IECC and IRC thermal-efficiency and condensation-control requirements.
Building America Climate-Specific Guidance
DOE description of a climate-specific guidance tool; the tool is not a determination of the building's locally adopted code or project-specific assembly.
Accessed · Link to this claim - A DOE-hosted Building America wall guide says improving wall air sealing limits air movement into the cavity and reduces moisture loads carried by air; it identifies windows, doors, rim joists and exterior penetrations as air-sealing locations.
Construction Guide to Next Generation High Performance Walls in Climate Zones 3-5, Part 1: 2x6 Walls
DOE-hosted Building America guide for 2x6 walls in climate zones 3-5; its details are examples and do not automatically apply to every climate, assembly or adopted code.
Accessed · Link to this claim - The DOE-hosted wall guide says vapor-retarder selection varies with climate zone, insulation type and cladding, and that vapor management should balance limiting vapor entry with allowing an assembly to dry if incidental moisture accumulates.
Construction Guide to Next Generation High Performance Walls in Climate Zones 3-5, Part 1: 2x6 Walls
DOE-hosted Building America guidance for climate zones 3-5; not a national prescription for vapor retarders or an approval of the reader's wall design.
Accessed · Link to this claim - The DOE-hosted wall guide describes vented cladding as allowing wall sheathing to dry to the outside with drainage, partially vented cladding as restricting that drying, and non-vented cladding as providing limited or no air flow behind the cladding.
Construction Guide to Next Generation High Performance Walls in Climate Zones 3-5, Part 1: 2x6 Walls
DOE-hosted Building America cladding and drying descriptions for climate zones 3-5; assembly-specific guidance, not a guarantee of drying in an unfinished house.
Accessed · Link to this claim - Knauf's EcoBatt installation instructions require cavities to be cleaned and say lumber in contact with the insulation must have a maximum moisture content of 19% or less, verified with a calibrated moisture meter.
How To Install EcoBatt Insulation
Manufacturer instructions for Knauf North America EcoBatt fiberglass batt products; the 19% limit cannot be generalized to other insulation products or assemblies.
Accessed · Link to this claim - Knauf's EcoBatt installation instructions for exterior wood-frame walls say to place kraft- or foil-faced batts with the facing toward the warm-in-winter side, and direct installers of unfaced batts to follow local codes and practices for vapor-retarder selection and positioning.
How To Install EcoBatt Insulation
Manufacturer instructions for Knauf North America EcoBatt exterior wood-frame walls; the page's separate metal-frame caveat is not applied to this wood-frame decision, and local adopted rules and the designed assembly still control.
Accessed · Link to this claim - Knauf's EcoBatt wall instructions call for sealing exterior-wall penetrations, fitting batts around wiring, plumbing and ducts without over-compression, filling behind outlet boxes, avoiding gaps or voids, and treating headers as exterior walls when space permits insulation.
How To Install EcoBatt Insulation
Manufacturer installation instructions for a named fiberglass batt product; exact product, facing, fire clearances and local requirements still control.
Accessed · Link to this claim