How to Prepare a New-Home Cladding, Drying, and Vapor-Control Brief Before Ordering
Compare a new-home wall package by jurisdiction, climate zone, cladding gap, WRB, insulation, vapor control, penetrations, and handoffs before ordering.
The short answer
Before releasing cladding or insulation, name the permit jurisdiction and adopted code, confirm its IECC climate zone, draw every wall layer, and document how rain drains, air is controlled, and the assembly dries. Match the cladding gap, WRB, exterior-insulation R-value, vapor-perm class, penetrations, and attachment design. If any input or responsible reviewer is blank, hold the order and return the package to the design team.How to Prepare a New-Home Cladding, Drying, and Vapor-Control Brief Before Ordering
Before releasing cladding or insulation, name the permit jurisdiction and adopted code, confirm its IECC climate zone, draw every wall layer, and document how rain drains, air is controlled, and the assembly dries. Match the cladding gap, WRB, exterior-insulation R-value, vapor-perm class, penetrations, and attachment design. If any input or responsible reviewer is blank, hold the order and return the package to the design team.
Originality brief: the missing pre-order decision
Current answers usually explain one slice of the wall: vapor retarders, continuous insulation, siding drainage, or sheathing exposure. Those explanations are useful, but a homeowner comparing two quotes still has to reconcile the slices. The missing decision is whether the complete package is coherent enough to release, jurisdiction-scoped, documented, and handed to the people who must verify it.
For the wider materials journey, start with Brictale’s materials planning hub, then use this brief when a specific wall package is ready for comparison and release.
This guide contributes the Cladding release matrix. It is a planning worksheet, not a hygrothermal model or code approval. Its method is to take each decision input—jurisdiction, climate zone, wall layers, cladding, gap, WRB, insulation, vapor-perm class, penetrations, and responsible trade—and map it to four things: the control or drying question, the document that should answer it, the record that can verify it, and the next handoff. The worked example makes the arithmetic visible and labels every modeled number as illustrative. Method: Map each decision input to the control or drying question, required document, verification record, and next handoff; use an illustrative Denver County 5B example with visible arithmetic and sensitivity.
You can check the contribution by asking whether a second reader can fill the matrix from the permit set, wall section, product literature, attachment design, and meeting record without guessing. You can also check each source link at the point where the matrix uses it. Limitations: This is a planning worksheet, not a hygrothermal model or code approval; it does not replace local professional review, structural fastening design, product approval, permit review, installation inspection, warranty determination, or remote field sign-off. Its job is to expose a blank before that blank becomes a concealed change.
1. Set the jurisdiction and release boundary first #
Set the release boundary at the building permit jurisdiction and the code edition that applies to the permit, not at a national climate label or a supplier’s standard wall package. The homeowner should record the municipality or county, state, project address, permit path, submission date, and adopted energy and building codes before comparing cladding and insulation options. DOE provides county- or ZIP-based climate lookup and climate-specific assembly guidance, but that lookup is an input to local review, not the local rule itself. DOE’s climate-specific guidance describes the lookup and its relationship to 2021 IECC and IRC assembly guidance.
The jurisdiction card
Put this card at the top of the brief:
| Input to record | Example used in this guide | Why it matters | Owner of the confirmation |
|---|---|---|---|
| Country and state | United States; Colorado | The default market is U.S., but state and local adoption can change the applicable code path. | Homeowner and architect |
| Permit jurisdiction | City and County of Denver, Colorado | The enforcing authority is the place to confirm adopted text, amendments, permits, and inspections. | Architect or permit coordinator |
| Adopted code | Denver’s 2025 Building and Fire Codes; energy code incorporates the 2021 IECC | A code edition is a dated legal baseline, not a generic “current code” label. | Architect or code consultant |
| Permit transition date | Submission date and any applicable transition rule | A project can be affected by a code transition even if its material choices were discussed earlier. | Permit coordinator |
| IECC climate zone | Denver County: 5B | The climate zone influences thermal and vapor-control comparisons; it does not by itself approve an assembly. | Energy designer or architect |
| Building type | New single-family home, if that is the project | Residential and commercial provisions, townhome conditions, fire separations, and local programs can differ. | Architect |
| Special overlays | Historic, wildfire, flood, design review, HOA or subdivision restrictions if applicable | These can constrain cladding, fire performance, appearance, or installation details independently of the energy code. | Architect and local authority |
The Denver example is deliberately specific. The City and County of Denver says its 2025 Building and Fire Codes were adopted on June 13, 2025, became effective December 31, 2025, and use the 2021 IECC for the Energy Code while incorporating the 2024 I-codes for the other code families. Its official page also describes the transition for projects submitted by the earlier date. Read the City and County of Denver plan-review and permit page for the city’s current notice, then confirm the project’s actual permit path with Denver Community Planning and Development. That is a Denver statement, not a rule for another Colorado municipality.
DOE’s county table lists Denver County as cold, IECC thermal zone 5, moisture regime B—usually written as 5B. The DOE county climate guide is useful for establishing the starting climate input. It is not a site-specific moisture analysis, and a nearby county can have a different classification. If the property is outside Denver County, replace the example with the actual county or ZIP result and preserve the lookup record in the brief.
What the homeowner should request
Ask for a one-page jurisdiction confirmation before any supplier receives a release request. It should include:
- the complete street address and legal jurisdiction;
- the building department or authority having jurisdiction;
- the code editions named by that authority for this permit;
- the energy-code compliance path, such as prescriptive or performance;
- the climate-zone lookup source and date;
- any local amendments or programs that affect exterior wall, fire, energy, or cladding requirements;
- the person who confirmed each item and the date of confirmation.
Do not let “the plan is in a cold climate” stand in for the code record. “Cold” is a broad Building America region. “IECC 5B” is a climate classification. “City and County of Denver 2025 Building and Fire Codes, with the 2021 IECC energy code” is a jurisdiction-scoped code statement. Those three phrases answer different questions.
When the jurisdiction is not settled
Hold the release if the property is in an unincorporated area and the team has not identified the county authority, if the city and county disagree about the permit authority, if the project is in a municipality with an unverified local amendment, or if the permit will be submitted under a transition provision that has not been documented. The safe next action is a written request to the architect or permit coordinator: “Please identify the authority having jurisdiction, adopted building and energy code editions, effective or transition date, and the climate-zone source used for this wall package.”
The homeowner can collect the parcel address, the preliminary wall section, and the permit intake correspondence. The homeowner should not interpret a code book, promise that a supplier’s package is compliant, or instruct a builder to substitute a different vapor-control product while the jurisdiction card is unresolved. The next handoff is to the architect or code professional, then back to the energy designer once the code baseline is fixed.
2. Draw the wall as control layers, not product names #
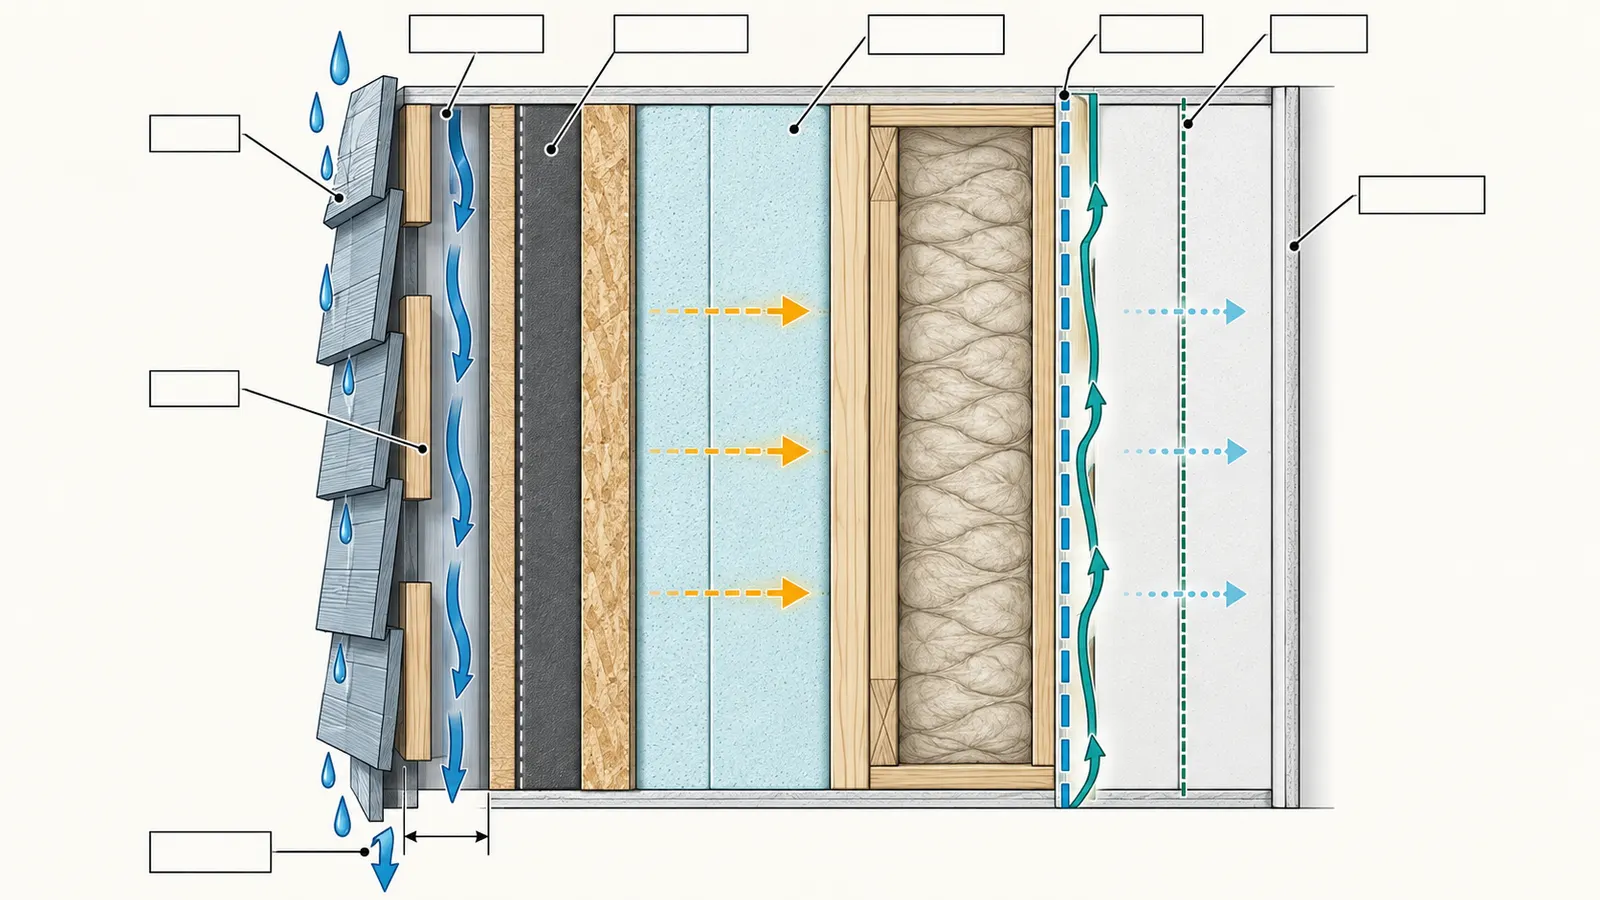
Draw the wall from exterior to interior and assign a continuous function to every layer before naming a brand or accepting a quote. At minimum, the brief must show the cladding, drainage or ventilation space, water-resistive barrier or other water-control layer, sheathing, exterior insulation, framing and cavity insulation, air-control layer, vapor-control layer, and interior finish. One material may serve more than one function, but the drawing must prove continuity at corners, openings, roofs, foundations, and penetrations.
Building Science Education distinguishes air-transported moisture control from vapor diffusion control. An air-barrier system or pressure-control measure addresses air movement; a vapor retarder addresses diffusion where it matters. The Building Science Education explanation of air barriers and vapor barriers says the two controls are related but not interchangeable, and that the need and location of a vapor retarder depend on climate and construction. A product described as “waterproof,” “vapor barrier,” or “air-tight” does not automatically prove all three functions in the proposed assembly.
The four questions for every layer
Use the same four questions on each elevation and wall type:
- What function does this layer perform? Is it shedding bulk water, stopping air leakage, limiting vapor diffusion, providing thermal resistance, carrying structural loads, or supporting the finish?
- Where is it continuous? Trace it across a window head, sill, jamb, deck ledger, roof-to-wall intersection, inside corner, outside corner, floor line, and service penetration.
- What happens when the next layer interrupts it? Identify a flashing, transition membrane, sealant, gasket, tape, furring offset, or engineered connection rather than drawing a vague break.
- What record proves it was installed as documented? The record can be a marked-up drawing, product lot, photo set, inspection report, installer checklist, or approved change order. A photo is evidence of an observed condition, not a guarantee that the hidden layer is correct.
The Building America Solution Center’s water-managed-wall guidance describes the drainage logic plainly: cladding can admit water, and a water-resistant surface such as housewrap or securely sealed rigid foam should direct that water down and out. That means the brief needs a water path even when the cladding is marketed as low-maintenance or weather-resistant.
A wall-section notation that prevents ambiguity
Write each layer with a name, thickness, function, and document reference. For example, an illustrative line might read:
Fiber-cement lap siding, thickness per selected manufacturer; vented or partially vented classification to be confirmed from the system manual; clear gap
g = ___ in; WRB___, permeance___ perms, air-barrier status___; 7/16-in. OSB, APA rating___; exterior insulationR-___, product thickness___ in; 2x6 framing at___ in. o.c.with cavity insulationR-___; interior vapor retarder Class___, perm rating at stated test condition___.
This format makes a quote reveal omissions. “R-30 wall with premium siding” is not enough. It does not say whether R-30 is a sum of nominal product labels or an assembly result, whether the exterior insulation changes window and trim geometry, how the cladding drains, whether the interior finish is a vapor retarder, or who designs the fasteners.
Air, water, vapor, and thermal continuity are different checks
Keep four mark-up colors or four columns in the brief:
| Control | Planning question | Typical record to request | Common false inference |
|---|---|---|---|
| Water | If rain passes the cladding, where does it go and where does it exit? | Wall sections, flashing details, WRB installation manual, drainage-gap detail | “The siding is water-resistant, so the wall needs no drainage plane.” |
| Air | What continuous layer limits air leakage through the wall and at transitions? | Air-barrier line on drawings, sealing schedule, test or inspection plan | “The WRB is taped, so the whole house is automatically air-sealed.” |
| Vapor | Which permeance class is intended, where is it located, and which drying direction remains? | Product data, vapor-control note, code or hygrothermal rationale | “A vapor barrier always makes the wall safer.” |
| Thermal | What insulation is continuous, what is in the cavity, and where are thermal bridges? | Energy model or compliance report, product data, details at framing and openings | “Adding a labeled R-value solves moisture and attachment problems.” |
The DOE 2x6 wall guide treats vapor-retarder selection as dependent on climate zone, insulation type, and cladding system. It also notes that moisture can enter through diffusion and air leakage, which is why a vapor-control line cannot replace an air-control line. Use that source as a comparison framework, then have the design team identify the actual layer and installation sequence.
The wall types that must be separately drawn
Do not assume one wall section covers the whole home. At least separate the typical above-grade wall, garage-to-house wall, wall behind a masonry or stone veneer, wall at a roof-to-wall intersection, wall at a deck or balcony, wall at a projecting bay or cantilever, and any wall with a different interior humidity condition. Also separate an exterior-insulation wall from a cavity-only wall even if the cladding looks identical.
A wall can have a coherent field-of-wall strategy and still fail at the window, deck, or utility penetration. The design review should therefore trace the control layers at an opening, not merely approve the center of the wall. If the wall section is too small to show the path, request a larger detail before ordering.
3. Compare cladding by drying path and drainage gap #
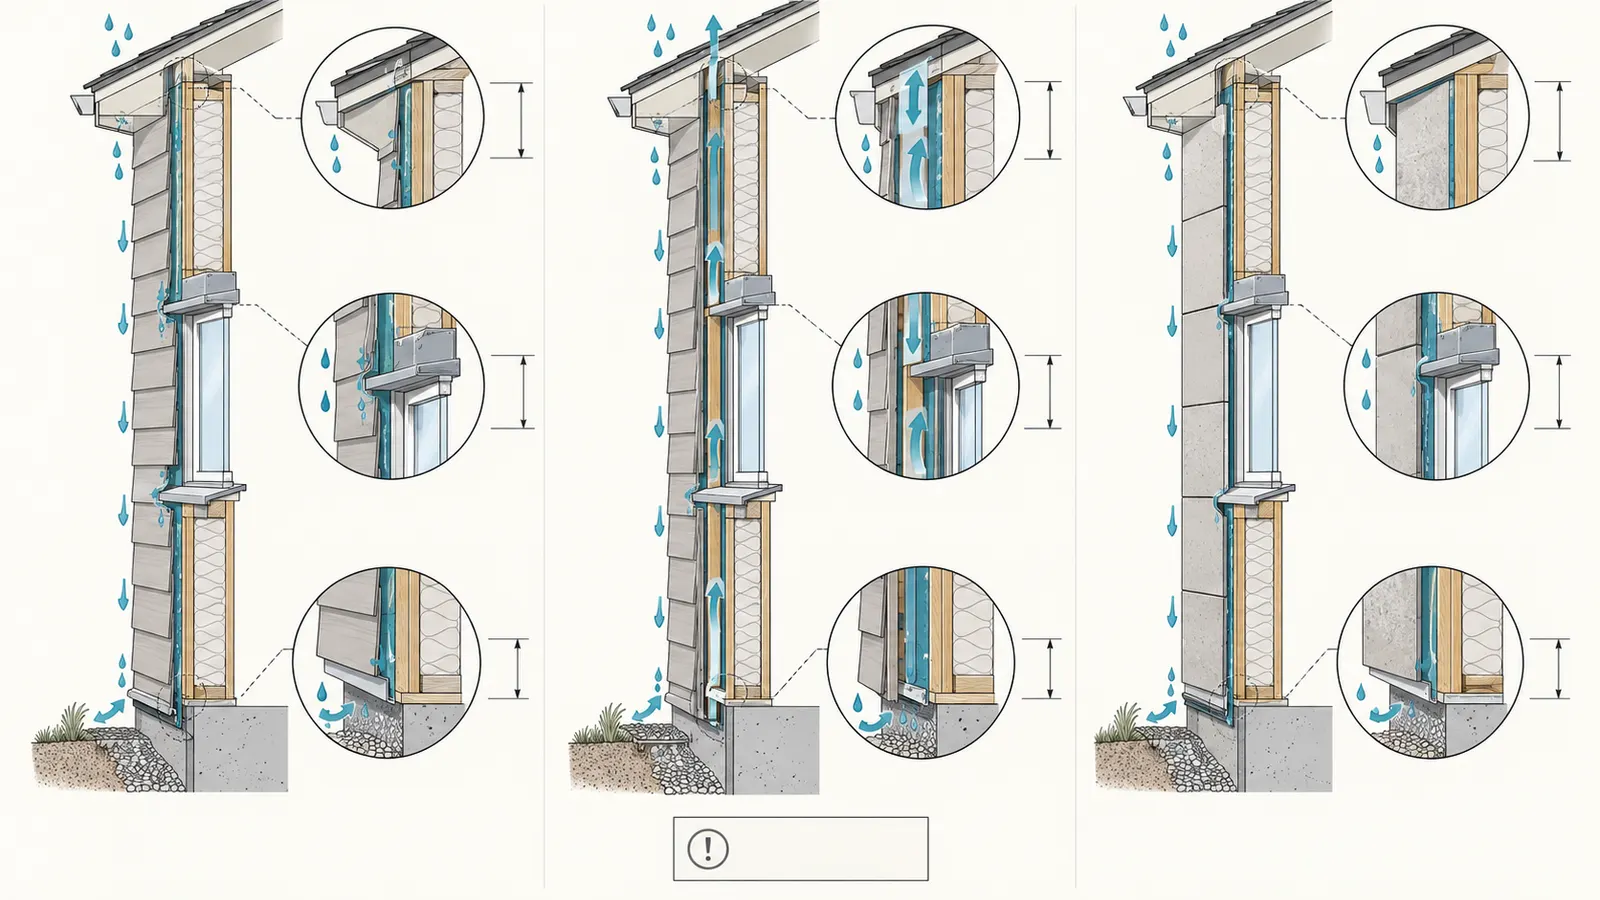
Compare cladding as a moisture-management system, not as a finish sample. For each option, state whether the selected system is vented, partially vented, or non-vented; locate the WRB; specify the clear cavity or furring gap in inches; identify top and bottom openings or drainage outlets; and show how trim and flashing preserve the path. The gap is a design input, not a universal allowance that can be filled from memory.
The DOE 2x6 wall guide links cladding type to drying potential and defines different treatment for vented, partially vented, and non-vented systems. It recommends that the wall’s vapor-control choice be considered together with cladding and drying direction. The guide’s wall and vapor-management tables are a starting point for the comparison; they do not let a homeowner classify a proprietary assembly without the manufacturer’s current instructions.
What “vented” means in the brief
For this planning exercise, a vented cladding path is one in which a deliberate air space connects drainage and ventilation openings behind the cladding, subject to the selected system’s details. A partially vented path may provide limited openings or geometry rather than a fully open cavity. A non-vented path places the cladding close to the WRB or another substrate without a deliberately ventilated cavity. These labels describe the assembly’s intended behavior; they are not synonyms for “siding type.”
The same visual finish can be installed in more than one way. A lap siding product might be direct-applied, installed over furring, or installed over a proprietary drainage mat. A stucco system may be treated as non-vented unless it is fully uncoupled from the WRB drainage plane by a vented gap; that is the classification used in the DOE 2x6 wall guide’s stucco discussion. A brick or stone veneer may store more water than a thin siding product, which makes the drainage and flashing details more consequential. Ask for the system description, not a verbal label.
Comparison table for a homeowner release meeting
| Cladding package | Drying-path question | Inputs that must be filled | Document dependency | Release decision |
|---|---|---|---|---|
| Direct-applied lap siding | Does the selected siding and its joints leave a reliable drainage path to the WRB? | Gap g in inches, WRB location, bottom exit, head and sill flashing | Siding manual, WRB manual, window and trim details | Hold if the quote only states “over sheathing” and does not show water exit. |
| Lap siding over vertical furring | Is the cavity continuous behind trim, blocked by rails, or interrupted at floors and openings? | Furring depth, clear gap, vent openings, fastener penetration into structure | Furring layout, attachment schedule, manufacturer instructions | Release only when drainage and structural attachment are both documented. |
| Metal panels | Does the panel system use clips, rails, or a solid substrate, and where is the drainage plane? | Clip or rail geometry, gap, WRB, panel joints, corrosion compatibility | Panel manual, sub-framing details, fastener or clip design | Hold when a finish sample is approved but the sub-framing and water path are not. |
| Fiber-cement or similar board | Does the selected installation create a vented, partially vented, or non-vented wall? | Product thickness, lap or panel layout, gap, flashing, fastener schedule | Current manufacturer manual, WRB and trim details | Do not infer the classification from the product name. |
| Stucco or adhered finish | Is the finish coupled to the substrate or fully uncoupled from a vented drainage plane? | Base layers, drainage gap, WRB layers, lath or attachment, openings | System manual, code detail, flashing and drainage detail | Hold until the system’s water-control and attachment details are complete. |
| Brick or stone veneer | Where does water drain behind the veneer, and are shelf angles, weeps, or flashings continuous? | Cavity width, support, flashing, weep path, veneer attachment | Masonry or veneer details, structural review, manufacturer data | Treat as a distinct wall type; do not reuse a siding detail. |
The table is a comparison device, not a list of guaranteed properties. The selected product manual may require a different gap, attachment, substrate, or flashing sequence. The homeowner’s role is to require the answer to be written and comparable.
Record the gap as a measurement
Use a field named clear cavity or furring gap, in. Record the intended clear dimension, not just the thickness of a nominal furring strip. A 1x4 may not provide a full 3/4-inch clear cavity after fasteners, battens, mats, trim, or irregular substrates are considered. If a drainage mat is used, request the manufacturer’s declared drainage or ventilation function and the installation limitations; do not convert a product thickness into a performance claim.
Show where the gap starts, where it stops, and how insects, fire blocking, corners, shelf angles, window trim, and horizontal interruptions are handled. A gap that drains in the field but terminates against a sealed sill or is blocked by an unreviewed trim piece is not a complete path. The next action is a section detail with arrows showing water entry, downward drainage, bottom exit, and any ventilation opening.
When a cladding comparison is not ready
Return the option to design review if the proposal uses “rainscreen” without a measured gap, calls a WRB an air barrier without a continuity note, specifies exterior insulation without a window-offset detail, or shows a masonry finish without a bottom drainage path. Also return it if a manufacturer manual is dated differently from the product being quoted, if the quote omits trim and flashings, or if the builder says the cladding will be “field adjusted.”
The safest next decision is not which color to order. It is whether the team can issue a coordinated wall package with a named cladding system, a named water-control layer, a measured gap, a layer-by-layer section, and an attachment design. If not, the homeowner should keep options open and pay for the missing design work before committing material money.
4. Reconcile insulation R-value with vapor-perm class #
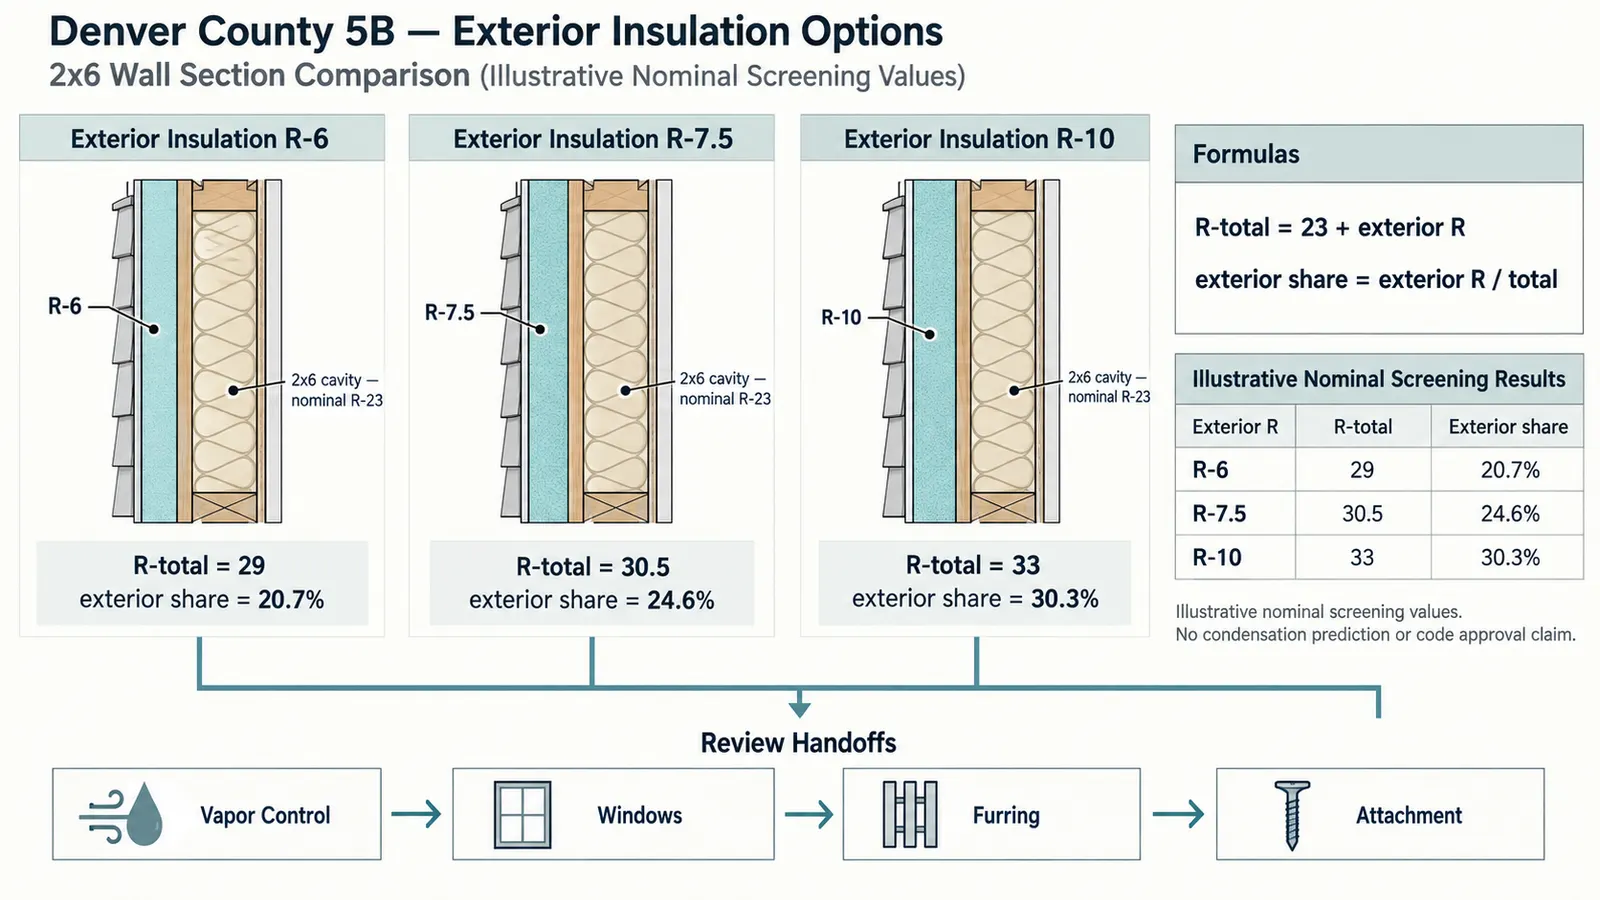
Reconcile exterior insulation, cavity insulation, vapor-perm class, cladding drying, and code before accepting a nominal R-value. In a Denver County 5B example, a 2x6 wall with a Class III interior vapor retarder and exterior continuous insulation around R-7.5 enters a code-sensitive comparison described by the IRC table summarized by DOE; it is not automatically approved for every local project. The architect or energy designer must confirm the adopted code, exceptions, assembly, and compliance path.
Start with vapor-perm classes, not the word “barrier”
Permeance is a rate of vapor movement through a material, usually stated in perms. The Building Science Education vapor-retarder guide describes Class I as 0.1 perm or less, Class II as greater than 0.1 and up to 1.0 perm, and Class III as 1.0 perm or more. The DOE 2x6 guide gives the commonly used Class III range as greater than 1.0 and up to 10 perms. Because sources and product literature may display the boundary differently, copy the exact class, perm value, test condition, and thickness from the selected product data into the brief.
The number is not the entire decision. Ask where the layer sits, what is on either side, whether it is continuous, whether it is sealed at penetrations, and where the assembly can dry if water gets in. A wall may be diffusion-open in one direction but blocked by a finish, membrane, or foam layer in another. The purpose of the brief is to preserve at least one credible drying direction while controlling the wetting paths that the design team has identified.
Separate code minimums from best-practice comparisons
The DOE 2x6 guide’s table for climate zones 3 through 5 reports, for climate zone 5, Class I or II interior vapor retarders in its IRC column and Class II as the best-practice comparison for the wall types shown. It also says that Class I retarders are generally discouraged where they can create a double-vapor-barrier configuration, particularly when the cladding substantially impedes exterior drying. Read the guide’s vapor-management discussion and Table 19 as scoped guidance for the wall configurations it studied, not as a current nationwide code ruling.
The Building America Solution Center code-compliance brief summarizes IRC Section 702.7 and Table R702.7.1: in climate zone 5, a Class III interior vapor retarder is permitted for a 2x6 wall with at least R-7.5 of exterior continuous insulation, subject to the listed code conditions and exceptions. For this guide, that value is a screening input. It does not answer whether the local authority accepts the same assembly, whether a performance path is being used, or whether the selected product provides R-7.5 at its installed thickness and temperature.
Worked example: make the comparison inspectable
The following is an illustrative modeled example, not a recommendation or a code approval. It demonstrates the arithmetic that belongs in a homeowner brief.
Inputs
- Jurisdiction example: City and County of Denver, Colorado.
- Climate input: Denver County, IECC 5B.
- Wall framing: 2x6 cavity, nominal cavity insulation labeled R-23.
- Exterior insulation options: R-6, R-7.5, and R-10.
- Interior vapor-control options: Class II product or Class III finish, pending design review.
- Cladding comparison: a vented option and a non-vented option, with the selected system’s gap still to be documented.
- All insulation values are nominal product inputs for comparison only; they are not whole-wall R-values.
Formula 1: nominal layer sum
nominal layer sum = cavity insulation R-value + exterior insulation R-value
With R-23 cavity insulation and R-7.5 exterior insulation:
R-23 + R-7.5 = R-30.5 nominal layer sum
That sum excludes framing, fasteners, air films, thermal bridges, openings, compression, installation defects, and any code-specific calculation method. It must not be written on a permit drawing as the whole-wall result unless the energy designer has calculated it that way.
Formula 2: exterior-insulation share of the nominal insulation stack
exterior share = exterior R-value ÷ (cavity R-value + exterior R-value)
For the three options:
| Exterior insulation | Nominal layer sum | Exterior share calculation | Exterior share | What changes in the release brief |
|---|---|---|---|---|
| R-6 | R-29 | 6 ÷ (23 + 6) | 20.7% | Confirm whether the vapor-control strategy still works for the proposed climate, cladding, and code path; review window and fastening dimensions. |
| R-7.5 | R-30.5 | 7.5 ÷ (23 + 7.5) | 24.6% | Compare with the climate-zone-5 Class III screening threshold; confirm actual product R-value and the local code path. |
| R-10 | R-33 | 10 ÷ (23 + 10) | 30.3% | Review deeper attachment, sill and trim geometry, and whether the interior vapor strategy can be simplified or must remain specified. |
The sensitivity is the decision. Moving from R-6 to R-7.5 changes the nominal sum by 1.5 R and the exterior share by about 3.9 percentage points. Moving from R-7.5 to R-10 changes the nominal sum by 2.5 R and the exterior share by about 5.7 percentage points. Those figures do not predict condensation. They show why the design team must revisit vapor control, attachment, window placement, and details when exterior insulation changes.
Formula 3: attachment embedment screening quantity
For a simple planning check, not a structural design:
nominal fastener length = cladding or furring thickness + clear gap or furring depth + exterior insulation thickness + sheathing or membrane allowance + required structural embedment
If a proposal uses a 1/2-inch cladding support, a 3/4-inch clear gap, 2 inches of exterior insulation, 7/16-inch sheathing, and a stated 2-inch structural embedment, the arithmetic is:
0.5 + 0.75 + 2.0 + 0.4375 + 2.0 = 5.6875 in.
That is only a dimensional screening number. It does not establish fastener capacity, edge distance, withdrawal resistance, wind performance, corrosion compatibility, spacing, or the required attachment to framing. Round-up, washer, clip, and product-specific allowances belong to the attachment designer and selected system. The BASC continuous-insulation attachment brief says the design must account for framing, furring spacing, fastener type and size, fastener spacing, wind loads, and manufacturer instructions or an approved design.
How to interpret an exterior-insulation quote
Ask the energy designer to identify whether the quoted R-value is a product label, a prescriptive insulation requirement, a modeled whole-wall value, or a trade-off input. Ask the architect to show how the insulation aligns with windows, doors, roof edges, foundations, decks, and cladding supports. Ask the builder to price the actual layers, tapes, membranes, furring, fasteners, flashings, trim extensions, and labor sequence rather than only “foam board.”
If the quote changes from R-7.5 to R-10, the homeowner should expect a coordinated review, not an isolated substitution. The window may move outward. The sill pan and head flashing may change. The fastener length and edge condition may change. The furring may need an engineered layout. The interior finish may interact with the drying strategy. A bigger R-value can be a sound choice, but it is a package change.
Warning signs in vapor-control language
Pause when a proposal says:
- “Use plastic everywhere for safety” without naming the climate, cladding, exterior insulation, and drying direction.
- “The foam is a vapor barrier” without an installed perm value, thickness, seam treatment, and location in the assembly.
- “The wall can dry both ways” without a layer-by-layer section showing what remains vapor-open after finishes, coatings, and cladding are included.
- “The paint counts” without the product’s classification and the design team’s confirmation of the code exception or best-practice rationale.
- “It meets R-30” without saying whether the number is nominal layers or a calculated whole-wall result.
The safest next step is to convert the sentence into a blank in the release matrix: product, perm, thickness, location, continuity, source document, reviewer, and verification record. A blank is easier to resolve than a confident but untestable claim.
5. Make WRB, air control, penetrations, and attachment a document set #
Release the cladding package only when the WRB or water-control layer, air-control line, opening flashings, penetration details, and cladding attachment are coordinated in the same document set. The homeowner does not need to design the flashing or calculate the fasteners, but does need to confirm that a named professional or manufacturer document owns each decision and that the builder’s scope includes the verification record.
WRB is a path, not a roll of material
The BASC wall-penetration guidance describes water-control layers as building paper, housewrap, sheet membranes, liquid-applied coatings, or taped and sealed rigid insulation located behind cladding. It says these layers connect to metal or flexible flashings around windows, doors, and other penetrations, with overlaps or seals arranged so water drains down and out. Use that description to review continuity, but use the selected WRB and flashing manuals for the actual lap direction, primers, sealants, tapes, substrate limits, and temperatures.
The brief should show the water-control layer at:
- window and door rough openings;
- plumbing, electrical, exhaust, and HVAC penetrations;
- exterior lights, hose bibs, vents, and line sets;
- roof-to-wall and wall-to-foundation transitions;
- deck ledgers, porches, balconies, and canopies;
- inside and outside corners;
- cladding joints, trim, and bottom terminations.
The water path should have an arrow and an exit. A line that disappears behind a window or meets a deck ledger without a transition is not a finished detail.
Air-control responsibilities
Identify the air-control layer separately from the WRB. It may be the sheathing and taped joints, a membrane, an interior drywall approach, or a combination, depending on the design. The brief must say who seals the top and bottom of the wall, corners, rim and floor transitions, window perimeter, service cavities, and all penetrations. If the proposed WRB is also intended to be the air barrier, record the manufacturer’s air-barrier status, seam treatment, substrate preparation, and transitions.
Do not assign the air-control inspection to the cladding installer merely because the line appears outside the sheathing. The trade installing the membrane may not own the interior transitions, and the trade installing drywall may not own the exterior penetrations. Assign an overall enclosure coordinator or architect to resolve overlaps.
Penetration matrix
Build a separate penetration schedule. It turns “seal all penetrations” into a handoff that can be verified.
| Penetration | Wall location and size | Water-control detail | Air-control detail | Trade that installs or owns it | Verification record |
|---|---|---|---|---|---|
| Window | Opening ID, rough size, sill/head/jamb | Sill pan, jamb and head flashing integrated with WRB | Interior perimeter transition to air-control layer | Window installer under architect detail | Opening photo set before concealment; product and flashing records |
| Exterior door | Door ID and threshold | Pan, sill, jamb, head, threshold drainage | Perimeter transition and threshold continuity | Door installer and builder | Photo set plus approved detail |
| Exhaust hood or bath vent | Wall elevation and sleeve diameter | Hood cap, sleeve and WRB transition | Seal sleeve to air-control layer | Mechanical trade with enclosure detail | Photo and penetration log |
| Hose bib | Exterior location and pipe size | Flange or flashing integrated with WRB | Seal pipe sleeve or gasket | Plumbing trade and builder | Photo before cladding and pressure-test record if applicable |
| Electrical receptacle or light | Exterior location and box type | Weatherproof box and WRB transition | Gasket or seal to air-control layer | Electrical trade | Photo and product record |
| HVAC line set | Exterior location and bundle size | Boot or sleeve and compatible flashing | Seal annular space | Mechanical trade | Photo plus approved sealant or sleeve data |
| Deck ledger | Elevation, ledger length and fastener pattern | Ledger flashing and water exit | Air-control transition around penetrations | Architect, engineer and framing trade | Detail, engineered attachment, inspection record |
This is not an installation checklist for the homeowner to perform. It is a scope and evidence schedule. The homeowner can check that every opening has an ID and owner. A qualified installer or inspector must perform the work and make the field record.
Sheathing exposure and identification
Before the cladding covers the wall, record the sheathing grade, thickness, span rating, edge support assumptions, and exposure or bond classification. APA explains that Exposure 1 OSB is intended for construction moisture or similarly limited exposure, not long-term outdoor weather, while Exterior panels are designed for repeated wetting and drying or long-term weather exposure. APA also says bond classification does not provide fungal-decay resistance. APA’s OSB guidance is therefore relevant to the brief’s “what must be protected before enclosure?” question.
Do not infer structural capacity from a photograph of an OSB surface or from the word “exterior” in a quote. The APA trademark, grade, thickness, span rating, panel orientation, fastening schedule, and structural design assumptions belong in the construction documents. If panels have been wet, warped, damaged, or exposed longer than the product’s intended construction period, ask the builder and design professional for a disposition before covering them.
Furring and cladding attachment
Exterior insulation changes the distance between the cladding and structure. That distance affects fastener length, load path, deflection, pull-out or withdrawal, wind resistance, corrosion exposure, furring size, spacing, and the location of framing. The homeowner should require an attachment schedule that names the substrate, furring orientation, spacing, fastener type and size, structural embedment, edge distance, and cladding manufacturer limitation.
The BASC attachment brief specifically calls for review of wind-load requirements, manufacturer instructions or approved design, framing type, furring spacing, fastener type and size, and fastener spacing. Use that list as the minimum question set. Do not ask the siding installer to invent a structural attachment detail in the field.
The architect or engineer owns the design coordination. The cladding manufacturer owns the instructions and allowable applications for its product. The builder owns procurement and installation sequencing under the approved documents. The homeowner owns the release decision and should keep the record of what was approved, when, and by whom.
The document package to request before ordering
For each wall type, assemble one controlled package containing:
- The jurisdiction card and code-compliance path.
- The climate-zone source and date.
- The wall section with layer functions and thicknesses.
- The cladding manual and current product identification.
- The WRB, flashing, tape, primer, sealant, and compatibility data.
- The exterior-insulation product data with R-value, thickness, perm rating, facer, and temperature or installation limits.
- The interior vapor-control product data and the design rationale.
- Window, door, roof-to-wall, foundation, deck, and penetration details.
- The furring and attachment schedule, including engineering where required.
- The builder’s scope matrix and sequence of work.
- The verification plan: photos, submittals, checklists, inspections, or tests.
- The change-control rule: no substitution without a written review of water, air, vapor, thermal, fire, structural, and warranty consequences.
If a supplier quote arrives first, treat it as a price input, not as the design package. Price the exact documents and accessories needed to install the package. A lower material price that omits furring, flashings, trim extensions, compatible tapes, or engineered fasteners is not a lower wall cost; it is an incomplete scope.
6. Fill the cladding release matrix before comparing bids #
Fill one release-matrix row for every unresolved wall-package input and do not release the package until each red or amber row has a named owner, source document, and next handoff. The matrix below is the original Brictale planning worksheet. It is designed to expose a nominally high-R wall that has no continuous water path, no drying direction, no vapor-control rationale, or no responsible trade.
How to use the matrix
Create a copy for each distinct wall type. Use the exact units shown. If a value is unknown, write not yet filled and mark the row amber; do not use a guessed value. If a value conflicts between drawings, a quote, and a product manual, mark it red until the architect, engineer, energy designer, builder, or manufacturer resolves the conflict. Add a document revision and date to every row.
| ID and input | Project value and unit | Decision or drying question | Required document or source | Verification record | Responsible owner | Next handoff |
|---|---|---|---|---|---|---|
| J1. Permit jurisdiction | Municipality or county; state; address | Who enforces this project and which local rules apply? | Permit intake record; official authority page | Saved confirmation or permit correspondence | Architect or permit coordinator | Energy designer and builder |
| J2. Adopted code edition | Building, residential, energy, fire; effective or transition date | Which code text and amendments govern this permit? | Adopted code and local amendments | Code note in permit set | Architect or code consultant | Whole design team |
| J3. IECC climate zone | Zone and moisture letter, for example 5B | Which climate-specific assembly and vapor comparison is relevant? | DOE county or ZIP lookup plus local confirmation | Lookup PDF or URL, date, reviewer | Energy designer | Architect |
| W1. Wall type | Typical, garage, veneer, deck, roof transition, etc. | Does this row represent one continuous assembly? | Coordinated wall schedule | Wall-type ID on drawings | Architect | Builder and trades |
| W2. Exterior-to-interior layers | Every layer, thickness, function, and order | Are water, air, vapor, thermal, and structural roles visible? | Wall section and notes | Reviewed marked-up section | Architect and energy designer | Builder |
| C1. Cladding type and product | Brand, series, profile, finish, thickness | Is the selected system vented, partially vented, or non-vented? | Current cladding manual and approval data | Product submittal and revision | Architect and manufacturer | Builder/cladding trade |
| C2. Cavity or furring gap | Clear gap g = ___ in | Is the path continuous, drained, and vented as intended? | Cladding, furring, drainage-mat and fire-blocking details | Pre-cover photo with scale or inspection record | Architect and cladding trade | Enclosure coordinator |
| W3. WRB or water-control layer | Product, location, perm, air-barrier status | Where does rain go after it passes cladding? | WRB manual, flashing manual, wall details | Photo log before cover; batch or submittal record | Architect and WRB installer | Window, door, roof, and cladding trades |
| W4. Drainage exits | Bottom termination, sill, weeps, vents, openings | Can water leave at every interrupted or horizontal condition? | Section details and manufacturer instructions | Photo and checklist by wall elevation | Architect and builder | Cladding installer |
| A1. Air-control layer | Product or assembly, location, transitions | Is air leakage controlled independently of vapor diffusion? | Air-sealing notes and continuity details | Air-sealing checklist or test if specified | Architect/enclosure lead | Framing and drywall trades |
| T1. Cavity insulation | Product, installed R-value, thickness, density | Is the cavity fill compatible with the vapor and drying strategy? | Product data and energy model | Installer record and visual inspection | Energy designer and builder | Insulation trade |
| T2. Exterior insulation | Product, thickness in, R-value, perm, facer | Does the insulation change condensation, drying, window, and attachment decisions? | Product data, code path, wall details | Submittal and pre-cover photo | Energy designer and architect | Furring and window trades |
| V1. Interior vapor control | Class, perm, material, location | Which side of the wall remains able to dry, and why? | Product data plus code or design rationale | Photo or finish record where visible; approved detail | Architect and energy designer | Drywall/finish trade |
| P1. Penetrations | IDs, location, size, service trade | Does each pipe, wire, vent, and box preserve water and air continuity? | Penetration schedule and detail set | Photo before cladding; marked log | Architect and trade installer | Enclosure coordinator |
| S1. Sheathing | Panel grade, thickness, span, Exposure or Exterior bond | Was the structural substrate identified and protected for its intended exposure? | APA trademark, structural drawings, panel data | Delivery or pre-cover photo and disposition of damage | Architect/engineer and builder | WRB installer |
| F1. Furring and attachment | Furring size, orientation, spacing, fasteners, embedment | Does cladding load reach structure through the insulation and gap? | Engineered schedule or approved manufacturer detail | Fastener and layout record before cover | Engineer/architect and builder | Cladding trade |
| M1. Manufacturer compatibility | WRB, tape, primer, sealant, insulation, cladding | Are adjacent products approved to work together under actual conditions? | Current manuals, technical letters, warranty terms | Signed submittal review | Architect and manufacturer | Procurement |
| Q1. Quality and change control | Hold points, photos, substitutions, RFI path | Who can stop a cover-up or approve a different layer? | Scope matrix, inspection plan, change procedure | Meeting minutes and approved RFIs | Builder and homeowner’s representative | Construction team |
The matrix does not require every homeowner to know the answer. It requires the homeowner to know who must answer it. That distinction is important. “Exterior insulation R-10” is an input. “Energy designer confirms installed R-value and vapor-control consequence” is an ownership assignment. “Architect shows changed window and furring details” is a handoff. “Builder photographs the membrane before cover” is a verification record.
Use status labels that lead to action
Use three statuses:
- Green — releaseable: the input is filled, the controlling document is current, the responsible reviewer is named, and the verification record is defined.
- Amber — design decision open: the package can be compared but not ordered. The next owner and due date are written.
- Red — stop: the blank or conflict can change water management, drying, vapor control, structural attachment, fire performance, warranty, or code compliance. Ordering or substituting would create an uncontrolled change.
Do not use green because a person said “we have done this before.” A repeat assembly may be a useful starting point, but a new address, climate zone, cladding, exterior-insulation thickness, or code edition can change the decision. A manufacturer’s standard detail is strong evidence for its own product scope, not permission to combine it with another product outside the documented system.
Source-linked row review
The matrix deliberately maps several rows to different source types. Use DOE for climate lookup and broad climate-specific assembly comparisons. Use Building Science Education for vapor-retarder class language and the distinction between air and vapor control. Use BASC for water-managed-wall, penetration, exterior-insulation, and attachment questions. Use APA for sheathing identification and exposure. Use the local authority for the adopted code. This avoids asking one source to prove a fact outside its scope.
For example, J3 can point to the DOE county guide, but J2 must point to the actual authority having jurisdiction. V1 can use DOE and BASC for a comparison, but the product’s data sheet and the local code path decide whether the selected product and thickness work. F1 can use BASC to establish the question set, but only the project’s engineer, approved design, code table, and manufacturer instructions establish the attachment. The source is not the answer until its scope matches the row.
Compare bids without losing the wall strategy
Put each bidder’s proposal into the same matrix rather than comparing totals on separate estimates. Normalize:
- cladding product and profile;
- trim, flashings, sealants, tapes, primers, and membranes;
- cavity or furring gap and its supports;
- WRB and air-control labor;
- exterior and cavity insulation products and installed thicknesses;
- windows and doors if their placement changes;
- fasteners, furring, clips, rails, and engineering;
- scaffolding, lifts, weather protection, and enclosure sequencing;
- photos, inspections, tests, and close-in records;
- exclusions and substitutions.
The lowest number may omit the very documents that protect the wall. The highest number may include a more complete system or may simply include allowances that have not been checked. The homeowner’s decision is not “which contractor has the best wall?” It is “which proposal prices the same coordinated wall, with the same evidence and handoffs?”
A compact originality check
After filling the matrix, ask a second person to identify the following without verbal help:
- The jurisdiction and code edition.
- The climate-zone input.
- The direction rain travels after it passes the cladding.
- The intended drying direction if the wall becomes wet.
- The interior vapor-control class and why it belongs there.
- The clear gap in inches.
- The attachment designer and structural substrate.
- The trade that photographs each concealed control layer.
- The exact condition that would stop ordering.
- The decision that follows a green release.
If the second person cannot answer one of those from the controlled package, the package is not ready even if the matrix contains a green check. That is how the artifact can be checked: it must transfer the decision without relying on the homeowner’s memory or a supplier’s verbal assurance.
7. Run the release meeting and use stop conditions #
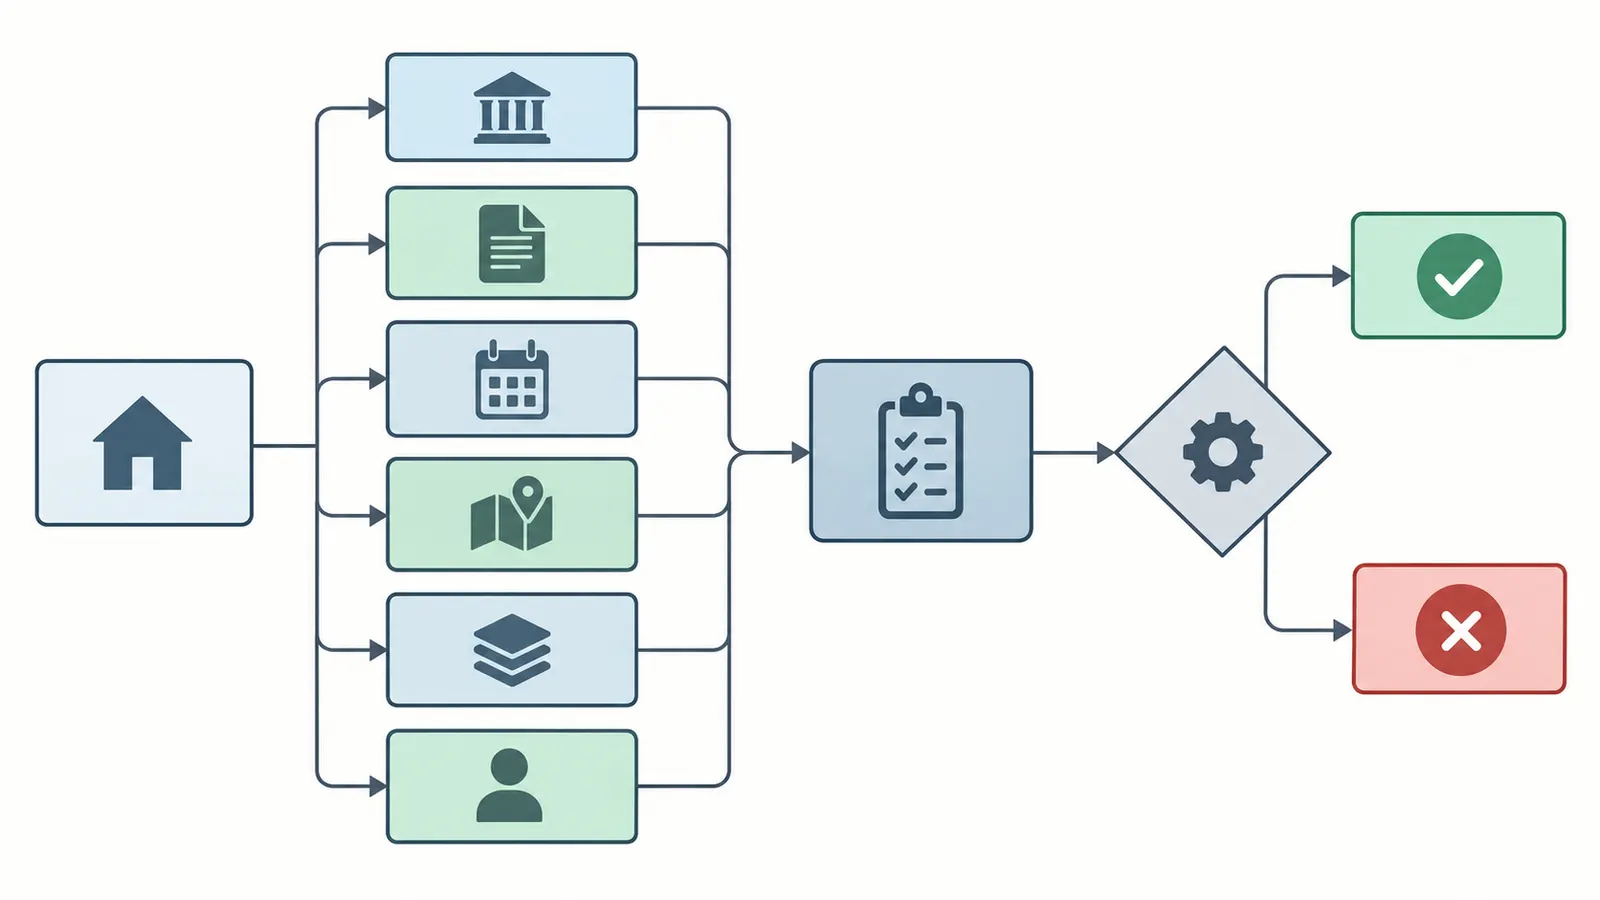
Run a short release meeting in the order that the wall is designed and built: jurisdiction, climate, layer functions, cladding path, vapor strategy, openings and penetrations, attachment, documents, verification, then procurement. The homeowner should release only the package whose unresolved items are closed by the person qualified to decide them. If the meeting reveals a conflict, return the package to design review and record the next decision rather than authorizing a field workaround.
The release sequence
1. Freeze the address and authority. Confirm the permit jurisdiction, code edition, climate-zone source, project type, and permit transition. Attach the official or written records to the meeting packet.
2. Freeze wall types. List every wall type and identify where the standard wall stops applying. Include veneer, deck, roof, garage, foundation, and high-humidity rooms where relevant.
3. Freeze functions. On the wall section, trace water, air, vapor, thermal, and structural functions. Each line must remain continuous or have a documented transition.
4. Compare cladding paths. Fill cladding type, product, gap in inches, drainage exits, trim, and opening details. Confirm vented, partially vented, or non-vented classification from the selected system’s documents.
5. Reconcile insulation and vapor control. Record cavity and exterior R-values, exterior thickness, perm values, vapor class, and the code or design rationale. Run the nominal arithmetic only as a transparent comparison, never as a substitute for the energy or hygrothermal review.
6. Close penetrations and attachment. Review window, door, service, deck, roof, and foundation details. Confirm who owns furring and fastener design and where the structural load path is documented.
7. Close the evidence plan. Name the photos, submittals, inspection points, tests, change-order records, and person who will retain them. Decide which conditions must be visible before the next layer conceals them.
8. Release or return. Sign the matrix status as releaseable, design decision open, or stop. The homeowner authorizes procurement only after the design team and builder confirm the same revision.
Stop conditions that should send the package back
Stop before ordering when any of these conditions exists:
- The actual permit jurisdiction or code edition is unknown.
- The climate zone came from a generic city search rather than a documented county or ZIP lookup and local confirmation.
- The wall section lists insulation but not the WRB, air-control layer, vapor-control class, or cladding gap.
- The selected cladding is called “rainscreen” but the clear gap and top or bottom path are not shown.
- The WRB is named but the windows, doors, roof intersections, decks, or penetrations are not integrated into it.
- Exterior insulation changes the fastener distance, but no attachment schedule or approved design has been issued.
- A Class I or II vapor retarder is proposed without a design review of cladding, exterior insulation, and drying direction.
- A Class III strategy is proposed based only on a nominal foam label, without verifying installed R-value and the applicable code provision.
- The sheathing grade, exposure classification, damage condition, or time under weather is unknown.
- A quote excludes flashing, trim, furring, tapes, sealants, primers, or close-in verification.
- The builder proposes a substitute product without reviewing its perm, compatibility, fire, structural, installation, and warranty consequences.
- The person expected to approve a change is not identified.
These are planning stop conditions, not a claim that every listed issue makes a wall unsafe. They identify questions that can materially change the assembly or its approval. A qualified professional may resolve the item and document a different path.
Common failure cases and the next action
Failure: the R-value is correct but the wall has no drying path
What you observe: The quote has cavity and exterior R-values, but the cladding sits directly on a membrane or insulation with no shown drainage exit. The wall section has no arrows.
What not to infer: Do not infer that thermal resistance creates drainage or ventilation. Insulation controls heat flow; it does not automatically make water leave.
Safest next step: Ask the architect or enclosure professional to mark the water-control layer, gap, interruptions, and exit. Ask the builder to price the complete drainage and flashing scope.
Next handoff: Return to the cladding comparison row, then to the WRB and opening details before procurement.
Failure: a vapor retarder is selected before the cladding is selected
What you observe: The interior finish or membrane is specified as a standard detail, while the exterior cladding is still undecided between a vented siding system and a non-vented or reservoir finish.
What not to infer: Do not infer that one vapor class works for every cladding and exterior-insulation combination.
Safest next step: Hold V1 and C1 as a linked decision. Have the energy designer and architect state the code path, drying direction, exterior-insulation value, and vapor class together.
Next handoff: Release the interior finish only after the wall-type matrix has one closed combination.
Failure: the WRB is continuous in the field but disconnected at openings
What you observe: The wall wrap looks complete in a wide photo, but there is no sill, jamb, head, or penetration detail and no record of the flashing sequence.
What not to infer: Do not infer continuity from a field photo that cannot show concealed laps or transitions.
Safest next step: Request the opening and penetration schedule and the manufacturer-compatible flashing details. Hold cladding cover at the affected elevations until the responsible installer records the work.
Next handoff: Enclosure coordinator to window, door, mechanical, plumbing, electrical, and cladding trades.
Failure: the exterior insulation changes the attachment but the price does not
What you observe: A revised proposal adds 2 inches of insulation but keeps the same fasteners, furring, windows, trim, and labor allowance.
What not to infer: Do not infer that the old attachment remains adequate. Added thickness changes dimensions and may alter the load path.
Safest next step: Ask for a revised attachment schedule and coordinated window, trim, sill, and roof-edge details. Have the engineer or qualified designer confirm the required connection.
Next handoff: Approved attachment revision to builder and cladding installer; revised pricing back to homeowner.
Failure: OSB was left exposed and then covered without a disposition
What you observe: Panels show swollen edges, delamination, staining, or prolonged weather exposure, but the WRB is scheduled to cover them immediately.
What not to infer: Do not infer structural or decay condition from appearance alone, and do not assume Exposure 1 means permanent weather resistance.
Safest next step: Ask the builder and design professional to document the panel grade, exposure history, damage, and disposition before concealment. APA’s OSB exposure guidance distinguishes limited Exposure 1 conditions from Exterior bond classification and warns that bond classification is not decay resistance.
Next handoff: Documented disposition to WRB installer and enclosure coordinator.
Failure: a product substitution is treated as color substitution
What you observe: The supplier cannot deliver the specified membrane, foam, tape, or cladding and proposes a “similar” product with a different facer, perm rating, thickness, or installation method.
What not to infer: Do not infer equivalence from appearance, nominal R-value, or a similar product name.
Safest next step: Trigger the change-control process. Compare perm, R-value at installed thickness, substrate, fire, compatibility, attachment, flashing, warranty, and installation limits.
Next handoff: Architect or energy designer, manufacturer technical representative, engineer when attachment or structure changes, then builder procurement.
Safety and the limit of a remote review
This article is for homeowner coordination before design freeze or ordering. It is not a remote inspection, structural fastening design, site-specific hygrothermal analysis, code approval, or field sign-off. The homeowner can review documents, take notes, compare product identifiers, ask who owns each decision, and maintain the matrix. The homeowner should not climb scaffolds or roofs to photograph concealed work, cut or install membranes, handle sheet goods at height, drill structural attachments, apply unfamiliar sealants or adhesives, or direct a trade to change a wall assembly without qualified supervision.
Cladding work can involve falls, ladders and lifts, sharp sheet edges, heavy panels, dust from cutting, chemical exposure from sealants and primers, weather exposure, and structural risks from incorrectly fastened furring or veneer. Assign work at height, structural fastening, cutting systems, and installation to qualified, properly equipped professionals. If a wall has visible damage, suspected mold or decay, fire-separation concerns, or an unknown structural substrate, stop concealment and bring in the appropriate architect, engineer, inspector, or qualified remediation professional.
A remote document review cannot see hidden laps, wet sheathing behind a membrane, fastener embedment, actual gap continuity, blocked drainage exits, or whether a product was installed at the right temperature. Photos can improve the record, but they do not create a field sign-off. The final verification belongs to the local project team and, where applicable, the authority having jurisdiction.
The next decision after release
Once every required row is green, the next decision is not “start installing.” It is to issue a controlled procurement and construction package with a revision number, accepted product identifiers, approved alternates, sequence, hold points, and evidence responsibilities. The builder can then order the exact cladding, WRB, insulation, furring, flashings, fasteners, trim, tapes, and sealants that the wall section actually requires.
If the package is amber, decide which professional will close the open item and by what date. If it is red, decide whether to redesign the wall, change the cladding, change the exterior-insulation level, change the vapor-control approach, obtain engineering, or reject the supplier’s proposal. Keep the order on hold until that decision is written.
The practical release sentence is:
“For wall type ___ at ___ jurisdiction, under ___ adopted code and ___ IECC climate zone, the approved assembly is ___ from exterior to interior. It drains through ___, controls air at ___, controls vapor with ___, uses exterior insulation ___ R at ___ inches, and attaches cladding through ___ to ___. The architect/energy designer/engineer/manufacturer has reviewed ___; the builder will verify ___ before cover; unresolved substitutions return through ___.”
If the team cannot complete that sentence without guessing, the wall package is still a design decision. Keep the material order unreleased, preserve the comparison record, and send the missing detail back to the design team.
Cite this guide
Brictale. “How to Prepare a New-Home Cladding, Drying, and Vapor-Control Brief Before Ordering.” Published 2026-09-14; updated 2026-09-14.
https://brictale.com/build/materials/prepare-new-home-cladding-drying-vapor-control-brief-before-ordering · Read the Markdown version
Original contribution: Cladding release matrix. A source-linked planning worksheet that compares a new-home wall package by jurisdiction, climate, cladding ventilation, WRB continuity, exterior insulation, vapor-perm class, penetrations, records, and trade handoffs before material release.
Sources and scope
Evidence behind this page
- DOE says its climate-specific assembly guidance includes climate-zone lookup by county or ZIP code and assembly drawings intended to address the 2021 IECC and IRC envelope requirements.
Building America Climate-Specific Guidance
United States; DOE Building America guidance and its linked 2021 IECC climate-specific assembly tool. This supports lookup and comparison, not a local permit determination.
Accessed · Link to this claim - The City and County of Denver states that its 2025 Building and Fire Codes were adopted June 13, 2025, became effective December 31, 2025, and incorporate the 2024 I-codes except that the Energy Code incorporates the 2021 IECC; projects submitted by the stated transition date could use either the 2025 or 2022 code set.
Plan Review, Permits, and Inspections — City and County of Denver
City and County of Denver, Colorado; code adoption and transition information on the city’s official permitting page. This is not a rule for other Colorado municipalities or counties.
Accessed · Link to this claim - DOE’s county climate table lists Colorado’s Denver County as IECC climate zone 5 with moisture regime B, commonly written as 5B.
Building America Best Practices Series: Volume 7.3, Guide to Determining Climate Regions by County
Denver County, Colorado; DOE county table. Climate classification does not by itself establish the adopted local code, assembly compliance, or site-specific hygrothermal result.
Accessed · Link to this claim - Building Science Education states that vapor-retarder class depends on climate zone and cladding type, and defines Class I as 0.1 perm or less, Class II as greater than 0.1 to 1.0 perm, and Class III as 1.0 perm or more; it also notes that many cases do not require a vapor retarder.
Vapor Barriers — Building Science Education
General U.S. building-science education. Product classification and local code compliance require the exact product data, test basis, assembly, and adopted jurisdiction.
Accessed · Link to this claim - Building Science Education distinguishes air-transported moisture control from vapor diffusion control: an air-barrier system or pressure-control measure is needed in addition to a vapor retarder where vapor diffusion is a concern, and the location and need for a vapor retarder depend on climate and construction.
Building Enclosure: Air Barriers vs. Vapor Barriers — Building Science Education
General U.S. enclosure guidance. It does not identify the air-barrier material or inspection method for a particular home.
Accessed · Link to this claim - The Building America Solution Center describes a water-managed wall as a drainage approach in which water that gets past cladding reaches a water-resistant surface such as housewrap or securely sealed rigid foam and drains down and out; it says housewrap should lap over exterior wall flashings at openings and roof-wall intersections.
Water Managed Walls — Building America Solution Center
DOE Building America Solution Center technical guidance for above-grade wall water management. Exact WRB, flashing, compatibility, and installation requirements remain product- and project-specific.
Accessed · Link to this claim - The Building America Solution Center says a wall water-control layer may be building paper, housewrap, sheet membrane, liquid-applied coating, or taped and sealed rigid insulation, and that it must connect with flashing around windows, doors, and other penetrations so water drains to the exterior.
Flashing of Wall Penetrations in Existing Homes — Building America Solution Center
DOE Building America Solution Center wall-penetration guidance, used here for planning continuity in new construction. It is not a complete flashing detail or field inspection.
Accessed · Link to this claim - The DOE 2x6 wall guide says vapor-retarder selection varies by climate zone, insulation type, and cladding system; it describes an air gap outside the WRB as improving drainage-plane effectiveness by promoting drying and distinguishes vented, partially vented, and non-vented cladding.
Construction Guide: Next Generation High Performance Walls — Climate Zones 3–5 Part 1: 2X6 Walls
DOE Building America guide for 2x6 walls in climate zones 3–5. It provides best-practice guidance and older IRC references; it is not a substitute for the adopted local code or current product instructions.
Accessed · Link to this claim - The Building America Solution Center’s code-compliance brief reproduces IRC Table R702.7.1 values showing that in climate zone 5 a Class III interior vapor retarder is permitted for a 2x6 wall with exterior continuous insulation of at least R-7.5, subject to the applicable code and exceptions.
Continuous Insulation — Cladding/Furring Attachment — Code Compliance Brief
IRC Table R702.7.1 as summarized by DOE Building America Solution Center; the value is not a universal design recommendation and must be checked against the adopted code, wall type, moisture exposure, and local amendments.
Accessed · Link to this claim - The Building America Solution Center says cladding or furring attachments through foam sheathing must be specified and checked for framing type, furring spacing, fastener type and size, and fastener spacing, with wind-load requirements and manufacturer instructions or an approved design reviewed.
Continuous Insulation — Cladding/Furring Attachment — Code Compliance Brief
DOE Building America Solution Center code-compliance planning guidance. It does not calculate the attachment design for a particular cladding, wind exposure, substrate, or building.
Accessed · Link to this claim - APA states that Exposure 1 panels are intended for construction moisture or similarly limited exposure and are not suitable for long-term weather exposure, while Exterior panels are designed for repeated wetting and drying or long-term weather exposure; bond classification does not provide fungal-decay resistance.
OSB (Oriented Strand Board) — APA
APA guidance on OSB bond classification and exposure. Panel grade, span rating, structural design, protection, and site conditions still require the project documents and applicable standards.
Accessed · Link to this claim - The DOE 2x6 wall guide treats stucco as non-vented cladding unless it is fully uncoupled from the WRB drainage plane by a vented air gap, and its guidance identifies drainage, WRB, flashing, and vapor-control consequences for cladding choices.
Construction Guide: Next Generation High Performance Walls — Climate Zones 3–5 Part 1: 2X6 Walls
DOE Building America guide’s cladding classification for 2x6 wall comparisons. A stucco system’s actual layers and compliance depend on the selected system, current code, and manufacturer instructions.
Accessed · Link to this claim