How to Plan a Below-Grade Bathroom Drainage System Before the Slab
Decide gravity versus sewage ejector, grinder or macerating drainage before a basement slab covers the elevations, vents, power and access.
The short answer
Before the slab, verify the fixture and sewer elevations from one datum. If every fixture drain can reach the receiving point with the required code slope, gravity may work. If not, have a qualified plumbing professional select a sealed sewage ejector, grinder or macerating system from the actual solids, total dynamic head and route. Record venting, discharge, power, alarm, cleanout, inspection, test and handoff conditions before cover-up.How to Plan a Below-Grade Bathroom Drainage System Before the Slab
Decide the drainage branch from measured elevations, not from a pump brand or a basement-bathroom sketch. If gravity can reach the receiving point with the required code slope, keep the system gravity-drained. If it cannot, have a qualified plumbing professional select a sealed sewage ejector, grinder or macerating system from the actual solids, lift, route and pump curve. Release the work only after venting, discharge, power, alarm, access, inspection, testing and records are complete.
This guide is for a United States homeowner planning a new or unfinished below-grade bathroom during design or pre-slab coordination. “Below grade” describes the room; it does not determine the answer by itself. A basement can sometimes drain by gravity, and a room above a high building sewer can still need pumping. The project’s adopted plumbing code, electrical code, permit conditions and authority having jurisdiction (AHJ) control. San Diego County, California appears once as a clearly labeled onsite-wastewater example, not as a national rule.
1. Make the gravity-or-pumped decision before anyone covers the evidence #
The first decision is whether the lowest fixture drain can reach an approved receiving point by gravity with enough elevation left for the required slope and connection details. If the available fall is insufficient, the next decision is which pumped arrangement is appropriate for the fixtures: a conventional sewage ejector, a grinder system, or a macerating toilet assembly. The homeowner should release the branch only when the selected route, model, responsibilities and verification records are visible on one coordinated plan.
What the decision actually asks
The common question “Do I need a sewage ejector for a basement bathroom?” is too compressed to be useful. The real decision has at least six parts:
- What is the lowest invert or trap-arm elevation of each fixture?
- What is the receiving invert, cleanout, building drain, public sewer connection or approved septic receiving point?
- What horizontal distance and required slope separate those points?
- If gravity is not possible, what lift and discharge route are available?
- Will the system receive a water closet, and if so, what solids path is permitted by the adopted code and selected model?
- How will venting, power, alarm, shutoff, check-valve access, testing and future service remain possible after the slab and finishes are installed?
The answer is not “buy the strongest pump.” Pump strength without a receiving elevation, flow requirement, pipe route and model curve is an incomplete design. The 2024 International Residential Code describes sewage pumps and sewage ejectors as systems that automatically discharge sump contents to the building drainage system. It also distinguishes water-closet solids handling from grinder and single-water-closet macerating exceptions, and ties minimum capacity to discharge-pipe diameter. Those are model-code provisions that must still be checked against the edition adopted by the project’s jurisdiction. See the 2024 IRC sanitary-drainage chapter.
The 2024 International Plumbing Code sanitary-drainage provisions say building subdrains that cannot discharge to the sewer by gravity are directed to a covered and vented sump lifted by an automatic pump or another approved method. Its vent chapter says below-sewer drainage is vented in the same manner as a gravity system, and its sump-vent table relates vent size to pump discharge capacity and developed length. Read those model-code provisions as starting points, then ask the AHJ which adopted IPC, IRC, UPC or locally amended provisions apply.
A short decision path
Use this sequence with the designer, plumber and AHJ:
| Question | If yes | If no | Record before the slab |
|---|---|---|---|
| Is the receiving point lower than every fixture connection by the required fall? | Develop the gravity layout. | Continue to pumping options. | Datum, fixture inverts, receiving invert, horizontal run and required slope |
| Can the gravity line maintain cleanouts, venting, minimum cover and an approved connection? | Ask the plumber to confirm the gravity route. | Treat the route as unresolved, even if the arithmetic looks favorable. | Plan view, profile, cleanouts, pipe material and AHJ comments |
| Does the branch receive a water closet or other solids-producing fixture? | Use a system rated and approved for that solids duty. | An effluent or drain pump may be relevant, but it is not automatically interchangeable with a sewage pump. | Fixture list, solids classification, model instructions |
| Can the selected pump meet total dynamic head at the required flow? | Proceed to coordination and verification. | Change the route, receiving point or equipment selection with the professional. | Pump curve, duty point, friction assumptions and model number |
| Is the destination a septic system? | Obtain onsite-wastewater approval and design review before committing. | Coordinate with the public sewer or other approved receiving authority. | AHJ, receiving point, permit path and written conditions |
Do not infer that a pipe is gravity-capable because it reaches the wall. A pipe can be physically downhill and still fail the decision because its slope is too shallow, its connection elevation is wrong, its route lacks cleanout access, a downstream obstruction creates surcharge, or the destination is not approved to receive the discharge. Conversely, do not infer that a pump is required simply because the room is below exterior grade. Verify the elevations.
Originality brief: what this page adds and how to check it
Current answers usually separate basement-bathroom explanations, pump product pages, code excerpts and septic policies. The missing decision is the pre-slab bridge between them: a homeowner needs to know which elevations to obtain, who verifies each input, which alternative is being compared, and what must be accepted before concrete or finishes hide the route.
The original contribution is the Below-grade sanitary-drainage release worksheet. It is a source-derived worksheet, not a field study. Its method is to combine one datum, fixture and receiving elevations, required fall, lift, route, solids, vent, discharge, power, alarm, access and receiving-point constraints; then have a qualified professional document the selected pump curve, inspection and test evidence. Its limitations are equally important: it is not a sizing calculator, permit, engineering design, inspection certificate or universal code interpretation. Check it by tracing every input back to a measured elevation, adopted-code comment, manufacturer instruction, permit condition or dated professional record. The product and local claims are intentionally bounded to the Liberty Pumps manual, the Zoeller Models 63 and 95 manual and the named local policy.
Contribution record. Method: Use the adopted plumbing code and AHJ instructions for the project, measure every relevant elevation from one datum, calculate available fall against the professional's required slope, then document the selected manufacturer's pump-curve point, vent, discharge, power, alarm, access, test and handoff records. Limitations: This is a planning and release record, not a pump-sizing calculator, permit, engineering design, inspection certificate or universal code interpretation. Product capacities, venting, discharge materials, testing and septic approvals remain model- and jurisdiction-specific.
Who owns the decision
The homeowner owns the brief and the release record. That means you decide whether the room is essential, whether future fixtures are likely, whether a service opening is acceptable, and whether the operating burden fits the household. You should not choose the pump model from a shopping page or declare the branch compliant from a photograph.
The designer or architect coordinates the room layout, finished-floor elevation, structural slab information and future fixtures. The plumbing designer or licensed plumber verifies fixture drains, elevations, slope, venting, discharge routing, cleanouts, pump duty and connection details. The electrician designs and installs the electrical supply, disconnects, controls and alarm power under the adopted electrical rules. The concrete or foundation team protects sleeves, embeds, penetrations and the slab sequence. The AHJ interprets the adopted code, permit and inspection requirements. A septic designer or environmental-health authority becomes an additional decision-maker where onsite wastewater is involved.
The safe next handoff
Before the plumbing proposal is finalized, hand the plumber a one-page brief containing the room plan, fixture schedule, all available elevations, a stated vertical datum, the intended receiving point, sewer-or-septic status, anticipated floor finish, access constraints, electrical location, alarm location and the requested release date. Ask for a marked-up profile rather than a product name alone. The next decision is whether a gravity profile can be accepted or whether the professional must develop a pumped branch.
2. Measure elevations and route constraints from one datum #
The elevation worksheet is the decisive pre-slab input: measure the fixture-side connection and the receiving point from the same datum, calculate available fall, subtract the professional’s required fall and then test the result against cover, connections, cleanouts and inspection access. A tape measurement from an unfinished wall is not enough because slab thickness, finished-floor buildup, pipe invert, fitting geometry and the destination elevation all affect the route.
Choose a datum that will survive the job
Use a datum that the design team can identify later, such as a surveyed benchmark, a clearly documented foundation reference, or a marked project elevation tied to the finished-floor plan. Write the datum on every sketch. Do not mix “top of slab,” “bottom of slab,” “finished floor,” “top of pipe” and “pipe invert” as if they were interchangeable.
For drainage, the invert is usually the inside bottom elevation of a pipe at a point. A fixture plan may show centerlines or rough-in dimensions rather than inverts. A basin inlet may be a hub elevation; a receiving sewer may be measured at the invert or crown. Ask the professional which point must be compared. A useful record names the exact point and unit, for example: “4-inch building drain invert at the north wall, 96.25 inches above project datum,” rather than “drain at 96 inches.”
The field measurement can be homeowner-collected if it is safe and does not require excavation, entry into a confined space, opening a contaminated basin or disturbing an active utility. It becomes a professional verification when the point is buried, inaccessible, structurally sensitive, electrically hazardous or connected to a sewer or septic system. Never enter a pit, tank, trench or confined space to obtain an elevation. Ask the trade to use an appropriate level, laser, survey record or exposed cleanout and to state the uncertainty or assumptions.
Minimum elevation inputs
Record at least the following for each fixture and route:
| Input | What to record | Why it affects the decision | Responsible verifier |
|---|---|---|---|
| Finished floor elevation | Elevation of the planned walking surface and its datum | Determines fixture outlet and access-cover relationship | Designer and plumber |
| Structural slab top and bottom | Planned concrete limits and any thickened or structural zones | Controls burial depth, sleeves and whether gravity fall is available | Designer, structural professional and concrete team |
| Fixture drain or stub-out invert | Exact point for toilet, shower, lavatory and floor drain | Establishes the high side of a gravity calculation | Plumber |
| Building drain or sewer invert | Point where the branch connects to the receiving gravity system | Establishes the low side and possible surcharge condition | Plumber and AHJ or sewer authority as applicable |
| Horizontal developed length | Actual pipe centerline route, not a straight-line room dimension | Determines required fall and friction | Plumber |
| Required slope | The value required by the adopted code and the professional’s layout | Converts route length into required fall | Plumber and AHJ |
| Pump discharge elevation | Highest point or receiving point reached by the force main | Establishes static lift | Pump designer or plumber |
| Discharge route and fittings | Pipe diameter, length, elbows, valves, check valve and connection | Determines friction and total dynamic head | Plumber or pump specialist |
| Septic tank inlet or approved receiving elevation | Only if onsite wastewater is used | Local rules may require gravity to the tank or a specific force-main termination | Septic designer and county or local authority |
The local rule is not “below grade equals pump.” The local rule may instead specify drainage, vent, backwater, cleanout, pump, electrical or septic conditions. Ask the AHJ to identify the adopted code edition and the inspection point before the route is covered. A model code page is evidence of what a model edition says, not proof that the municipality has adopted that edition without amendments.
Calculate available fall against required fall
Use this planning formula only after the professional confirms the points being compared:
Available fall = upstream fixture invert − downstream receiving invert
If the units are inches, keep both values in inches. If the units are feet, keep both in feet. Do not subtract a finished-floor elevation from a pipe invert without converting the points to the same type of elevation.
Then calculate:
Required fall = horizontal developed length × required slope
For a slope written as inches per foot, multiply the route in feet by inches per foot. For a slope written as a decimal, use the same length unit on both sides. The gravity margin is:
Gravity margin = available fall − required fall
A positive number is not a permit. It only means the arithmetic has room before you consider fittings, transitions, minimum cover, connection angles, cleanouts, structural conflicts, backwater protection, testing and field tolerance. A zero or negative number means the gravity route is not released on this worksheet. It does not by itself decide which pump or alternative is correct.
Illustrative modeled example
The following is an illustrative modeled example, not a site measurement or a recommended universal slope. Assume a professional provides these inputs:
- Toilet branch invert: 102.0 inches above datum.
- Receiving building-drain invert: 95.5 inches above the same datum.
- Developed horizontal run: 24 feet.
- Professional-required slope for this route: 0.25 inches per foot.
The available fall is 102.0 − 95.5 = 6.5 inches. The required fall is 24 × 0.25 = 6.0 inches. The arithmetic margin is 6.5 − 6.0 = 0.5 inch.
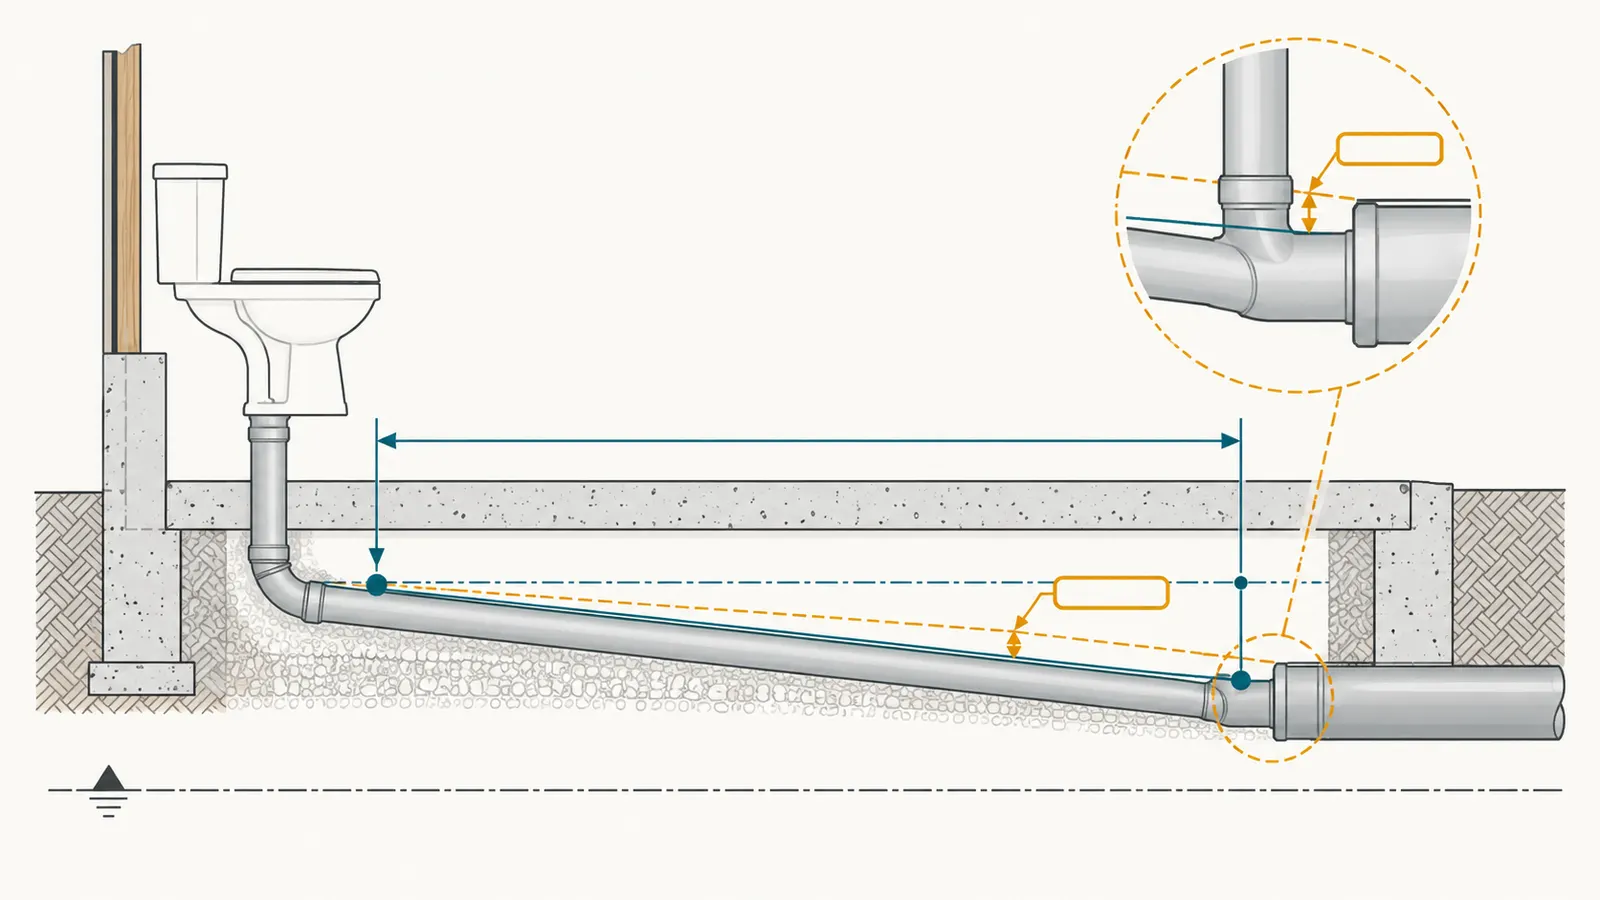
That half-inch is not a comfortable release. A fitting, a changed wall thickness, a lower slab, a revised floor finish or a receiving connection measured at a different point could erase it. The right handoff is to ask the plumber to draw the profile, identify the exact inverts, confirm cover and connection geometry, and state whether the margin is acceptable under the adopted code and site conditions.
Show sensitivity, not just one answer
The worksheet should show what happens when the key inputs move. In the illustrative example:
| Change | Available fall | Required fall | Arithmetic margin | Interpretation |
|---|---|---|---|---|
| Base inputs | 6.5 in | 6.0 in | 0.5 in | Too little to release without professional profile verification |
| Receiving invert 0.5 in higher | 6.0 in | 6.0 in | 0.0 in | Gravity route is no longer a release candidate |
| Fixture invert 0.5 in lower | 6.0 in | 6.0 in | 0.0 in | Same result; slab or fixture revision matters |
| Route grows by 4 ft | 6.5 in | 7.0 in | −0.5 in | Pumped or redesigned gravity branch must be evaluated |
| Required slope changes to 0.125 in/ft | 6.5 in | 3.0 in | 3.5 in | More margin, but only if the AHJ and professional accept that slope |
Sensitivity exposes why “we have about six inches” is not a durable decision. The receiving invert can change after a utility locate or connection exposure. A longer route can appear when the pipe must avoid a footing. The floor buildup can change when tile, waterproofing or radiant heating is added. The correct record identifies which change triggers a recheck.
Do not infer slope from a visual line
A pipe that looks downhill may have reverse pitch at a fitting, a belly in soil, a high spot at a sleeve or a connection that does not have the intended fall. A pipe laid parallel to the wall may also be much longer than the straight-line distance. Ask for a dimensioned profile or field level record. If an existing sewer point is not exposed, label its elevation as assumed and keep it out of the release decision until verified.
The safe next handoff
Give the elevation table and sensitivity table to the plumbing professional. Ask for one of three written outcomes: “gravity profile accepted subject to AHJ inspection,” “gravity profile fails or is not verifiable; develop pumped option,” or “additional exposure or survey required.” Once that outcome is signed into the coordination record, move to comparing the pumped alternatives without pretending the worksheet selected a pump.
3. Compare gravity, sewage ejector, grinder and macerating alternatives by duty #
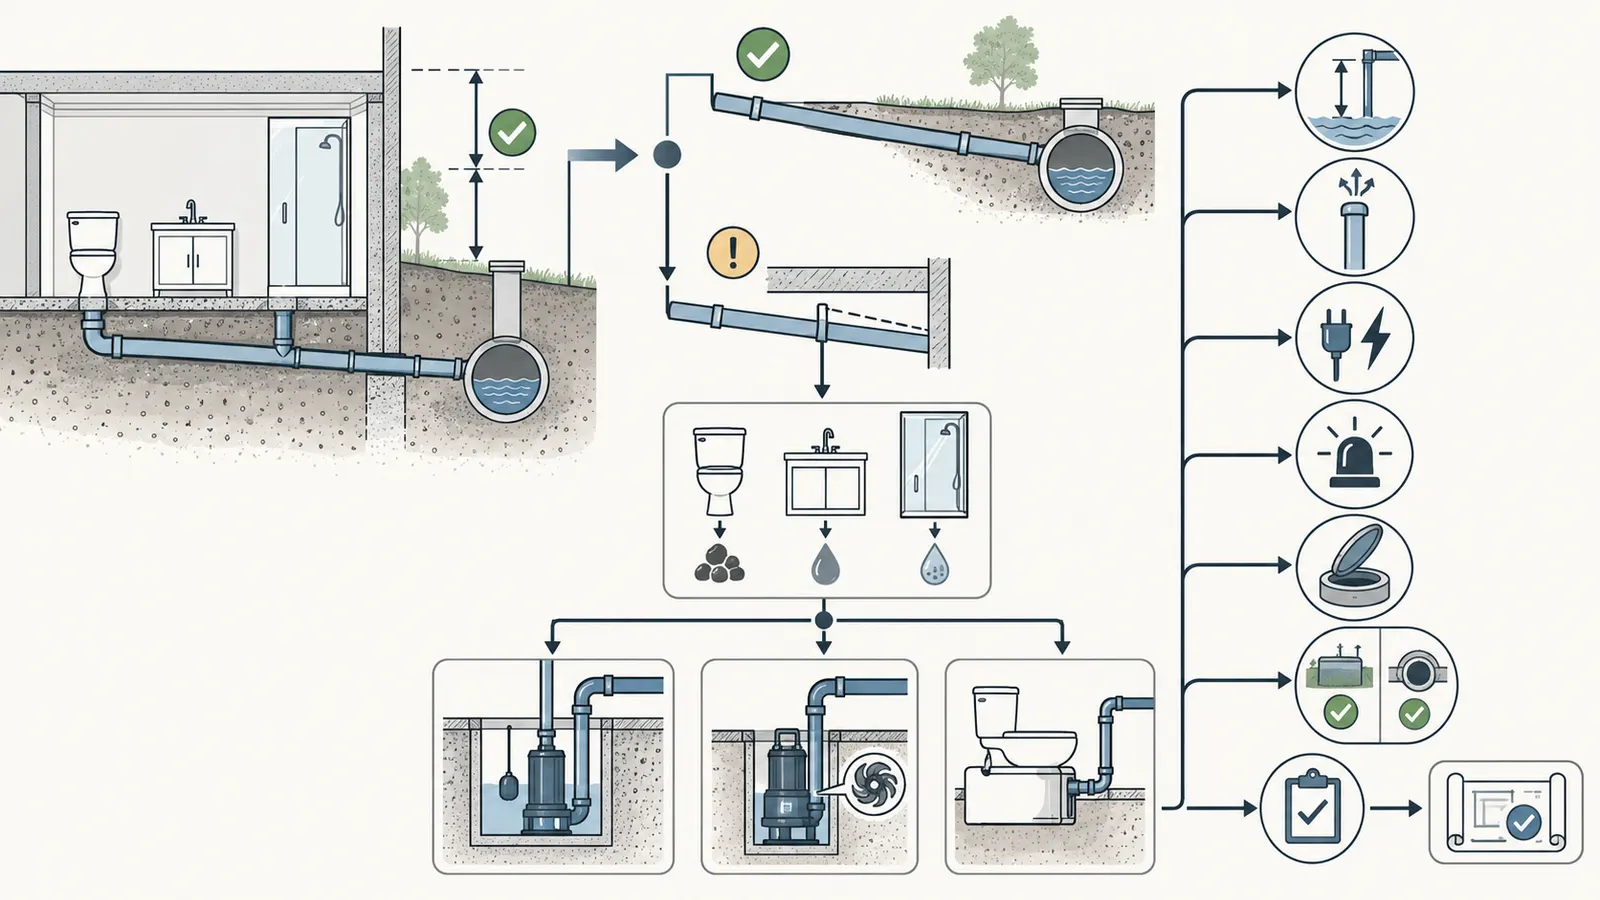
Gravity drainage has the least equipment dependence when the elevation and route work. A sealed sewage-ejector basin is the usual branch-level alternative when multiple fixtures or a water closet must be collected below the receiving sewer. A grinder system is a different solids-handling choice for a force-main route or other approved application. A macerating toilet system is a compact, manufacturer-defined assembly for a narrower fixture arrangement. None of these alternatives is universally interchangeable.
Gravity drainage
Choose gravity when the profile, slope, receiving point, venting, cover, cleanout and inspection path are all acceptable. Its advantages are straightforward flow, no pump motor or high-water alarm, lower electrical coordination and less dependence on periodic pump service. Its disadvantages are geometric: it consumes elevation, may require deeper excavation or slab changes, and can force a longer route or a larger structural coordination problem.
Gravity is not automatically maintenance-free. The branch still needs appropriate traps, venting, cleanouts, accessible connections, inspection and protection from surcharge where the adopted code requires it. The 2024 IRC backwater-valve provision is tied to fixture flood-level rims and the upstream public-sewer manhole cover. That condition depends on actual elevations, so record the manhole relationship if the AHJ or plumber says it matters; do not add or omit a valve from a generic basement rule.
Sealed sewage-ejector basin
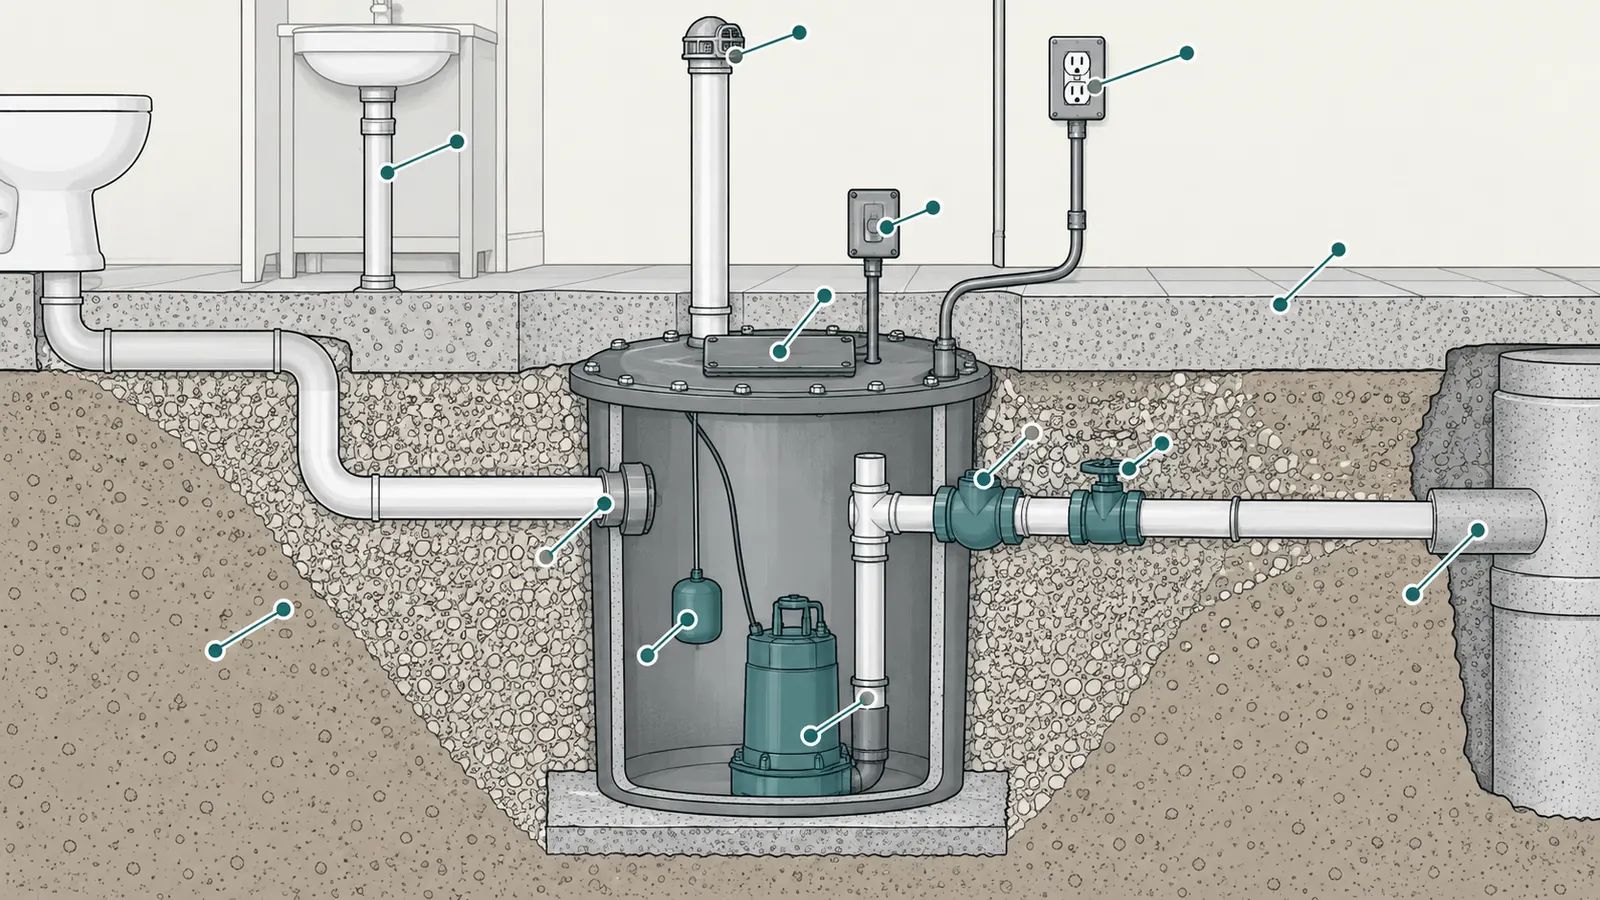
Use a conventional sewage ejector when the below-sewer branch collects sewage, usually including a water closet, into a sealed basin and the pump lifts it to an approved gravity drainage connection. This arrangement can serve several fixtures, but the basin volume, inlet, vent, pump, float, alarm, discharge, valves, cover, power and access all become part of the system.
The Liberty Pro380 product page illustrates why product details must be kept model-specific: Liberty describes that family as a 24-by-24-inch, 41-gallon simplex sewage system with 2- or 3-inch discharge, factory pre-assembly and an alarm-ready option. Those facts help a team understand the coordination envelope. They do not establish that the basin fits your slab, that its pump meets your head, or that your AHJ accepts the exact installation.
A sealed basin also changes the service question. Before the slab is poured, decide how the cover will remain accessible, whether the finished floor needs a removable access panel or riser, where the alarm can be heard, how a technician will isolate the discharge, and what happens if power is out. A basin hidden beneath a fixed cabinet or inaccessible finish is a future failure of the design even if the pump initially runs.
Grinder system
A grinder pump uses a cutting mechanism and a force-main arrangement to reduce solids. It may be appropriate where the route requires smaller pressure piping, greater lift or a system specifically designed around grinder service. It can also add more specialized components, higher service consequences and a more exact need to match the pump, controls, pipe and receiving connection.
The 2024 IRC sewage-pump provisions distinguish grinder-pump discharge-opening exceptions from standard sewage-pump solids handling. That distinction is not permission to substitute a grinder for a conventional ejector without a design review. Check the adopted code, manufacturer application, pump curve, force-main conditions, access, alarm and receiving authority. If a public sewer utility or septic authority controls the connection, its requirements may be stricter than the model-code baseline.
Do not describe a grinder as “better” just because the pipe is smaller. A smaller discharge can have different friction, cleaning, valve and receiving-point implications. A grinder can be a bad fit when the route or receiving point was designed for another system, when a service technician cannot access the basin, or when the household expects no pump-related operating burden.
Macerating toilet system
A macerating toilet system is a compact assembly in which the manufacturer defines the toilet, pump, macerator, discharge, allowable connected fixtures, venting, route and installation method. It can be useful when a slab cannot be opened or when a room is being added with limited structural disruption, but it is narrower than a whole-room sewage-ejector design.
The 2024 IRC sanitary-drainage chapter says macerating toilet systems and pumped waste systems must comply with ASME A112.3.4/CSA B45.9 and be installed according to the manufacturer’s instructions. Verify that the exact assembly is listed or accepted where required, that the connected fixtures are permitted, that the discharge route and lift fit the instructions, and that the service access remains available. Do not call a macerating toilet a universal alternative for a shower, floor drain, laundry or multiple bathroom fixtures.
Comparison matrix
| Option | Best fit to investigate | Main inputs | Main coordination burden | Common wrong inference |
|---|---|---|---|---|
| Gravity branch | Verified fall is available to an approved receiving point | Elevations, slope, route, cover, cleanouts, vent and surcharge | Deep route, slab/footing coordination and precise profile | “Below grade always needs a pump” |
| Sealed sewage ejector | Multiple below-sewer fixtures, often including a water closet | Basin, solids duty, total dynamic head, discharge, vent, alarm, power, access | Sealed basin, service opening, valves, alarm and pump testing | “Any sump pump will carry toilet waste” |
| Grinder system | Approved force-main application requiring grinder solids handling | Grinder curve, head, flow, force main, controls, receiving point | Specialized pump and service, controls, alarm and receiving authority | “Smaller pipe always means easier installation” |
| Macerating toilet | Narrow, manufacturer-defined toilet-centered retrofit or low-disruption branch | Listed assembly, allowed fixtures, lift, route, vent, power and access | Strict instructions and limited fixture scope | “It can replace a full ejector basin for every fixture” |
The pump category is not selected by the bathroom label. Select it from the fixture solids, route, lift, flow, receiving point, access and approvals. For a full pump-curve conversation, a homeowner can also use Brictale’s existing guide to reading a pump curve; that page concerns well-water pumps, so reuse only its general duty-point discipline, not its water-well equipment assumptions.
Total dynamic head is not just vertical lift
For a pumped branch, the professional must account for static lift plus friction and fitting losses at the required flow. A simple planning record can show:
Total dynamic head = static elevation lift + pipe friction loss + fitting/valve losses + receiving-condition allowance
Do not fill the friction terms with a guessed percentage and call the result final. Liberty’s engineering specification plots Pro380 performance as total head versus flow for specific configurations and warns that specifications can change. The Pro380 engineering specification therefore belongs in a model-specific professional selection record, not as a universal pump-sizing chart. Liberty’s Online Pump Sizing page provides a curve path for known flow, a questionnaire path for custom design and an email path for questions; use that manufacturer handoff with the professional’s calculated duty point, not as a universal calculator.
The safe next handoff
Ask the plumbing professional to return one selected option and one rejected-option reason. For example: “Gravity rejected because available fall is 0.5 inch short at the verified receiving invert; macerator rejected because the shower and floor drain are outside the listed fixture scope; conventional sewage ejector selected pending curve verification at 18 feet total dynamic head and the AHJ’s vent and valve comments.” That sentence is more valuable than a product link because it preserves the next decision.
4. Turn the selected branch into a coordinated materials and responsibility schedule #
The pre-slab material decision is a system schedule, not a basin shopping list. The drawing and scope must show the fixture branch, basin or assembly, inlet, vent, discharge, check valve, isolation valve, cleanout or union, power, alarm, access, receiving point, sleeves, backfill and inspection sequence. Assign every item to a responsible person before the concrete team arrives.
The physical package
For a gravity branch, the package normally includes fixture drains and traps, sanitary drainage pipe and fittings, vent piping, cleanouts or access fittings, sleeves or penetrations, approved supports or bedding and the receiving connection. The exact pipe materials and dimensions come from the adopted code, local amendments, design and manufacturer instructions.
For a sealed sewage-ejector branch, add:
- a listed or approved basin sized for the application;
- a sealed cover with the correct inlet, discharge and vent connections;
- a pump selected for the actual total dynamic head and required flow;
- level controls and a high-water alarm;
- an appropriately sized discharge line;
- an accessible check valve and full-open or isolation valve where required;
- a union or disconnect arrangement that allows service;
- a vent route tied into the approved building vent system or routed as the applicable code and manufacturer permit;
- a dedicated, properly protected electrical supply and any required disconnect;
- an accessible service opening or riser;
- approved bedding and backfill that will not damage or collapse the basin;
- a record of model, serial number, installation date and manuals.
The Liberty installation manual says the covered systems require qualified personnel for pump, control, protection-device and general-wiring installation and maintenance. It describes 2- or 3-inch discharge and vent connections for system variants, calls for the vent to connect to the existing building vent or extend outside in the described arrangement, and shows check and ball valves in the discharge layout. Treat those as instructions for the covered Liberty systems, not as a national materials schedule.
Venting is part of the room plan
An ejector basin that is sealed but not correctly vented can create odor, pressure and operation problems. A vent is not a decorative pipe added after the pump is installed; it needs a route through framing, fire stopping, roof or approved alternative, and it needs to fit the adopted code. The 2024 IPC vent chapter says below-sewer drainage is vented in the same manner as gravity drainage and provides sump-vent sizing based on discharge capacity and developed length. The plumber should record the vent diameter, route, termination, connection point, developed length and any AHJ comment.
The Liberty qualified-installation guidance assigns electrical and safety work to qualified personnel under applicable code and safety practices; it is model documentation, not permission for homeowner wiring or basin entry.
The manufacturer may add model-specific conditions. Zoeller’s 2025 Models 63 and 95 instructions call for a gas-tight basin cover and venting of sewage gases through a vent pipe. They also describe a small vent hole below a check valve for those models to relieve trapped air and warn that it must be cleaned periodically. That detail must not be copied to another pump without its own manual. See the Zoeller installation instructions.
Keep sewer-gas and electrical hazards visible in the plan. The Liberty installation manual warns that sewage systems can produce flammable or explosive gases and says not to have live, exposed circuits in or around open basins. It also says electrical and safety practices must follow the National Electrical Code, OSHA and applicable local ordinances. The homeowner should not open a sewage basin, wire a pump, test live equipment in a wet area or enter a pit. Put those tasks in the qualified professional’s scope.
Discharge, valves and receiving connection
The discharge route has to be selected at the same time as the pump. Its diameter, length, vertical rise, horizontal run, elbows, check valve, isolation valve, cleanout or union and connection point all affect head and service. The 2024 IPC sanitary-drainage provisions address check valves, full-open valves, access and pressure-rated or compatible discharge materials. Use the IPC Chapter 7 sanitary-drainage provisions as a model-code reference, then verify the adopted code.
Zoeller’s manual similarly calls for a check valve and union, says not to use a discharge pipe smaller than the pump discharge, calls for a full-size discharge pipe in the recommended installation and places the combination union/check valve where the pump can be removed. These are valuable failure-prevention prompts, but they remain model-family instructions. A different pump may require another valve arrangement, pipe size or vent-hole detail.
Ask the plumber to mark the connection at the receiving gravity drain. A force main should not disappear into a wall with no identified connection fitting, cleanout or access logic. The connection may also need to be located to avoid a vertical stack base, preserve flow direction or meet a local code distance. If the destination is a septic system, the receiving point is a local approval question as well as a hydraulic one.
Power, alarm and service access
Electrical work is not a homeowner rough-in improvisation. The Liberty manual says the power supply for below-grade installations must be located within cord limitations and at least 4 feet above floor level for the covered systems, and calls for a separate properly fused and grounded branch circuit sized to the pump nameplate. The Zoeller manual says not to use an extension cord and recommends a properly protected circuit. The exact outlet, disconnect, GFCI or other protection depends on the equipment and adopted electrical requirements; the electrician and AHJ must resolve it.
Plan the alarm as a human response system. A light hidden behind a closed door is not equivalent to an alarm that the household can hear or see. Record alarm location, reset behavior, test method, power source, who receives a call during an absence, and the safe action when it sounds. Do not silence an alarm by unplugging the pump or opening the basin. The next action is to stop adding wastewater if appropriate and call the responsible service professional under the written operating plan.
Responsibility matrix
| Deliverable | Homeowner | Designer/plumber | Electrician | Concrete/foundation team | AHJ or utility |
|---|---|---|---|---|---|
| Room fixture brief | Decide fixtures, future use and access expectations | Confirm fixture scope and drain points | — | Coordinate sleeves | Comment if permit scope requires |
| Datum and elevation record | Provide known surveys and protect reference marks | Verify inverts, slope, lift and receiving point | — | Preserve marks through slab work | Confirm inspection datum if needed |
| Gravity or pumped branch | Approve documented option and tradeoff | Design profile or pump system | — | Build openings and slab interfaces | Review permit and inspection requirements |
| Pump/model/curve | Approve budget and service burden | Select and document model and duty point | Confirm electrical load | Protect basin and access | Accept if required by permit |
| Vent and discharge | Confirm future access | Detail pipe, valves and connection | — | Protect penetrations | Confirm adopted rules |
| Power and alarm | Decide alarm response plan | Provide load and control requirements | Install and test | Protect conduit and sleeves | Inspect if required |
| Pre-cover release | Attend or receive records | Verify plumbing and system test | Verify electrical test | Confirm no cover-up before release | Perform required inspection |
| Handover | Keep manuals and schedule service | Provide as-built and test record | Provide circuit and alarm record | Provide slab photos/locations | Close permit or provide approval |
The safe next handoff
Have each trade initial or electronically approve only the scope they own. A plumber should not silently accept electrical responsibility; an electrician should not select a pump; a concrete crew should not move a basin to avoid a footing without a revised profile. The next decision is whether the coordinated schedule can be inspected and serviced after the slab is closed.
5. Resolve the sewer-or-septic destination and actual jurisdiction #
The receiving system controls more than the last connection: it can determine whether pumping is allowed, where the force main terminates, whether a backwater valve is needed, what documents are required and whether the fixture is even eligible for the proposed branch. Confirm the project’s AHJ and receiving authority before excavation, and never turn one county’s septic policy into a national rule.
Public sanitary sewer
For a public sewer, identify the building sewer or approved connection point, invert information, upstream manhole relationship, utility-owner requirements, easements and any backwater or surcharge protection. The building department may control plumbing permits while a sewer district controls connection conditions. The designer should show where the pumped discharge connects to the gravity building drain and whether the connection is accessible for inspection and service.
Ask the AHJ these questions in writing or through the permit record:
- Which plumbing code and edition are adopted for this address?
- Are the IRC, IPC, UPC or local amendments controlling for a one- or two-family home?
- Does below-sewer drainage require a sealed and vented basin for this fixture set?
- What pump, grinder or macerating listings and standards are accepted?
- What discharge pipe, valve, cleanout and access details are required?
- Is backwater protection required based on the actual manhole and fixture elevations?
- What rough-in, pressure, air, water, vent or operational tests must be witnessed?
- May the slab be poured before the plumbing inspection, and what photos or records are accepted if it cannot?
Do not treat the answers on a phone call as a permit approval unless the authority’s process recognizes them. Put the permit number, plan revision, inspector comment or written utility condition into the release packet.
Onsite wastewater and septic
Septic changes the decision because a pumped bathroom branch may feed a household system with limits on hydraulic loading, surge, gravity flow and approval. A septic tank is not a public sewer manhole, and a force main into a septic system is not automatically an acceptable substitute for a gravity house drain.
The supplied local example is San Diego County, California, Policy 47 in the County’s 2010 Design Manual for Onsite Wastewater Treatment Systems. It says the policy concerns sewage-ejector pumps serving ancillary rooms or structures when the main structure is served by gravity flow to an onsite wastewater system. It describes secondary or supplemental baths, toilets, wet bars and hand sinks as examples that may be approved, but says approval is case by case. It also preserves gravity flow for basic household sanitary facilities and the septic disposal path. Read the San Diego County Policy 47 source as a local, dated example only.
That policy gives a useful planning lesson even outside San Diego: the destination and operating behavior can matter as much as the room. Policy 47 says a proposed force-main termination should, when possible, connect at the distal end of existing house plumbing or use another arrangement that decelerates sewage before it enters the septic tank. It calls for design review, permits and inspection, and it identifies pump/chamber details, lift capacity, model numbers and several elevations as design inputs. None of that authorizes a pump in another county. Use the County Policy 47 manual only for this named local example.
What to bring to the septic authority
Bring the approved or current septic plan, tank and dispersal-area information, bedrooms or design flow, the proposed fixture list, the house plumbing diagram, pump and basin model, force-main route, septic-tank inlet elevation, force-main peak elevation, fixture stub-out elevation, alarm plan and maintenance responsibility. Ask whether a secondary below-grade bathroom is allowed, whether the proposed system must be reviewed by environmental health, where the force main may terminate, and what test and operating records are required.
If the county says a professional design or permit is required, stop at planning. Do not excavate a pump basin, connect a force main or pour a slab while treating an application as an approval. In the named San Diego County onsite-wastewater example, Policy 47 recommends an operating manual, periodic alarm-testing instructions and a maintenance or repair phone number; see the County Policy 47 manual. Treat that as a local example and request the actual owner manual and written maintenance contact for the project.
Jurisdiction and remote-assessment limits
The article cannot tell you whether your town allows a certain fixture, whether your sewer district accepts a discharge connection, or whether your septic field can handle a new bathroom. It also cannot see buried utilities, groundwater, structural footings, unknown pipe elevations or concealed defects. Remote planning can organize questions and records; it cannot replace a field measurement, permit review, pump-curve selection, inspection or septic approval.
The safe next handoff
Name the authority in the worksheet, not just “local code.” Example: “City of ___ Building Department, plumbing permit; ___ Sewer District, building-sewer connection; San Diego County DEH, only if project is in that County and uses onsite wastewater.” Once the authority and receiving point are named, ask the professional to revise the profile and materials schedule to the written conditions.
6. Sequence the work so inspection and testing happen before cover-up #
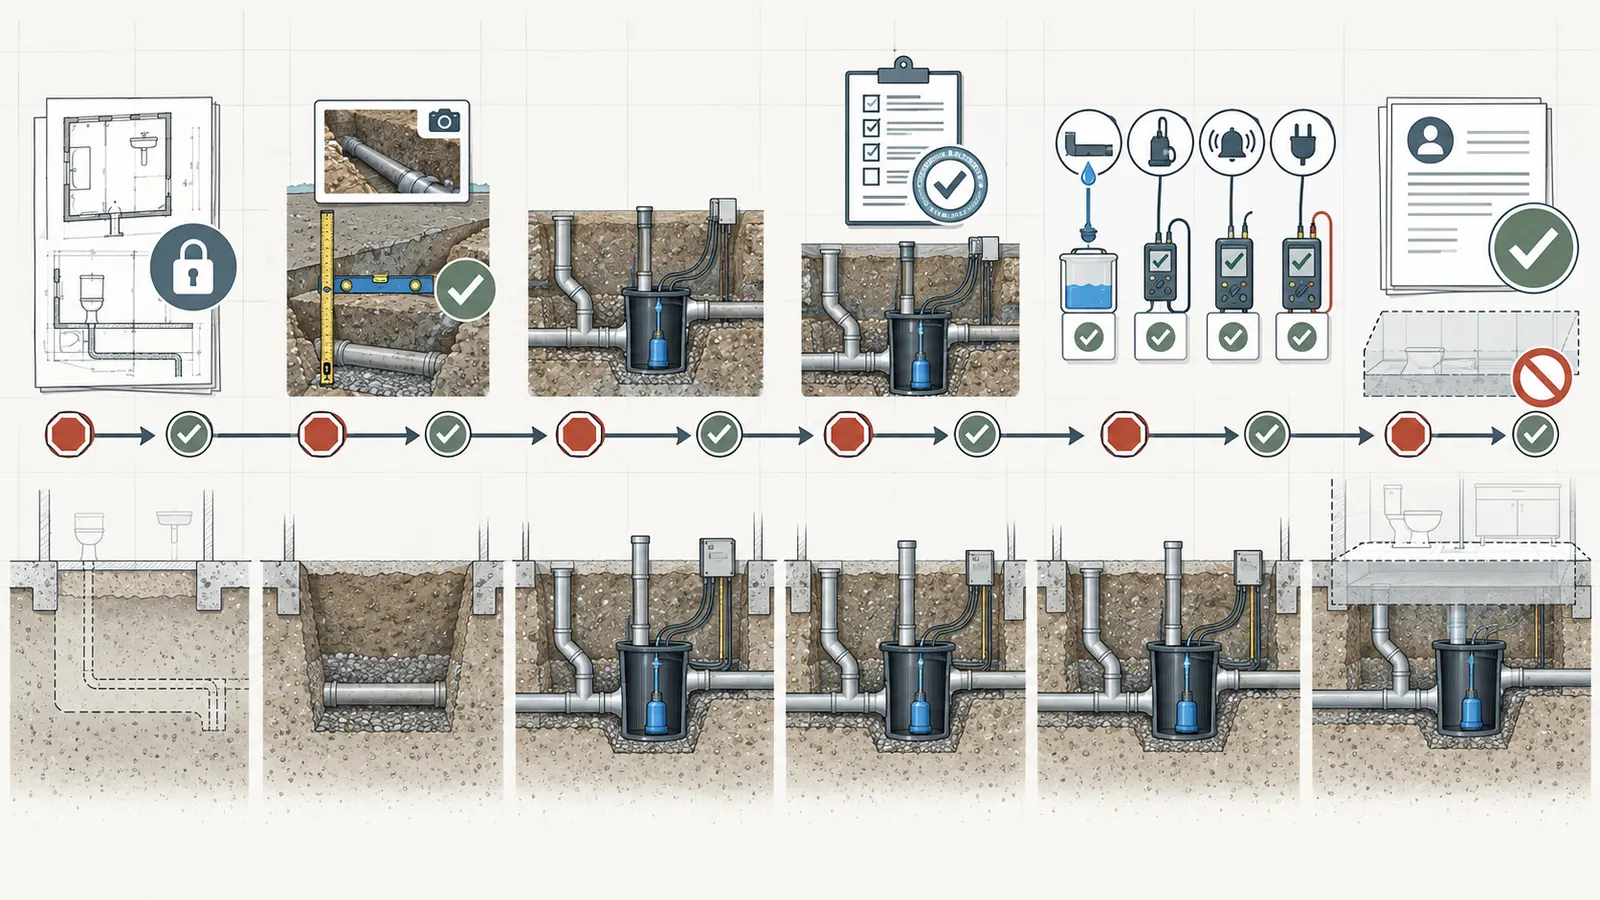
Release the bathroom in staged gates: design freeze, field verification, underground installation, inspection, test, documentation and only then slab or finish cover. The pump may not be fully commissioned at the rough-in stage, but the evidence needed to preserve the decision must be collected before it becomes inaccessible.
Gate 1: design freeze
Freeze the bathroom fixture list, fixture locations, finished-floor elevation, slab limits, structural penetrations, receiving point, sewer-or-septic status, selected alternative, vent route, discharge route, power location, alarm location and access opening. Mark future fixtures as future; do not leave a blank stub and assume a later owner can add a toilet without recalculating flow, solids, venting and pump duty.
The design freeze should include a one-page profile and a one-page responsibility schedule. If the alternative is pumped, include the exact model number, pump curve or manufacturer selection record, basin dimensions, expected duty point, discharge diameter and receiving elevation. Liberty’s manual explicitly warns that sewage applications require minimum fluid flows and directs the installer to consult for proper pump sizing before installation. That is why a horsepower label or “basement package” description is not enough.
For the professional sizing handoff, include Liberty’s Online Pump Sizing page alongside the manual and the project inputs. Its curve, questionnaire and email paths serve different starting points; none replaces the professional’s calculated duty point, model check or AHJ review.
Gate 2: verify field conditions
Before trenches or slab cuts, verify the datum, building-drain invert, receiving point, footing locations, existing utilities, slab thickness, floor buildup, water table or groundwater concerns where relevant, and the safe excavation approach. The homeowner can protect survey marks and compare the installed layout with the plan. The qualified team should locate utilities, expose buried points, assess structural implications and handle trench, excavation, electrical and wastewater hazards.
Photograph the exposed route with a tape or marked datum, but do not treat a photo as a level survey. Record the measurement, instrument or method, date, person, point name and revision. If a point differs from the plan, stop and issue a change record. Moving a basin six inches may change inlet slope, pump static head, vent routing, alarm location and access clearance.
Gate 3: install the underground branch
The plumber or qualified installer sets the drain route, basin, sleeves, bedding, pipe, fittings, vent stub, discharge stub and access elements according to the approved plan and manufacturer instructions. The concrete team protects the installed work from displacement. No one should compact or backfill in a way the basin manual prohibits.
The Liberty manual gives model-specific cautions about basin placement, fine aggregate backfill and maintaining cover access, and it warns against heavy pressure or equipment on backfill that could collapse a tank. The Zoeller instructions call for a clean basin, a level pump, clear float movement, an adequate cover and full-size discharge piping. Those are not universal details for every product, but they show why the system must be released as an assembly.
Gate 4: inspect before cover
The AHJ, not this article, determines which rough-in and underground inspections are required and when. Schedule the inspection before the slab or wall closes the work. Provide the approved plan, permit, elevation profile, product manual, listing information if required, and any utility or septic approval.
Ask the inspector or plumbing professional to record what was visible: pipe route, slope or support, fittings, cleanouts, basin location, vent, discharge, valves, sleeves, structural clearances and access. If an item cannot be seen after cover, photograph it with a scale and location reference before cover-up. A photograph does not replace an inspection when the AHJ requires one.
Gate 5: test the right thing
Test requirements vary by jurisdiction, system type and product. The plumber should identify whether the drain and vent require a water or air test, whether the basin or cover requires a stack or leak test, and whether the pump must demonstrate automatic operation. The Liberty manual references a 10-foot stack test in its cover-sealing instructions. That is a manufacturer instruction for the covered system context, not a statement that every jurisdiction uses the same test.
For a pumped system, the commissioning record should show at least:
- the pump starts at the intended control level;
- the pump stops without the float binding;
- the alarm activates at its intended high level;
- the alarm can be heard or seen where the household expects it;
- the check valve prevents unintended reverse flow as designed;
- the isolation valve and union or disconnect are accessible;
- the discharge reaches the approved receiving point without leakage;
- the basin cover and penetrations remain gas-tight where required;
- the vent route is connected and unobstructed;
- the electrical supply, grounding and protective devices have been tested by the electrician;
- the model and serial number match the approved record;
- the owner receives the manual, warranty, service contact and test date.
Never create a sewage test by opening a basin or handling wastewater as a homeowner. The installer should use a safe commissioning method appropriate to the stage and equipment. Electrical testing in wet or contaminated conditions belongs to qualified personnel. Confined-space entry is excluded from this guide and should not be attempted.
Gate 6: cover only after a release record
The release record is not a signature that everything will work forever. It is evidence that the planned decision survived field verification at a defined date and revision. The person releasing the slab should be able to answer:
- Which plan revision was inspected?
- Which datum and elevations were verified?
- Which option was installed?
- Which model and serial number were installed?
- Where are the vent, discharge, valves, cleanouts, basin and service opening?
- What tests were performed, by whom and with what result?
- What remains open, such as final electrical connection or final AHJ approval?
- Who owns the next handoff?
If any answer is “unknown,” defer the cover-up or write a documented exception with a responsible person and deadline. An exception that is never closed becomes a hidden failure point.
The safe next handoff
Give the release packet to the general contractor or construction manager, plumber, electrician, concrete team and homeowner. The next decision is whether the slab can be poured under the permit and inspection status, not whether the homeowner feels confident after seeing a clean photo.
7. Use the release worksheet to catch failure cases and define the next decision #
The worksheet is complete only when it tells the next person what is known, what is assumed, what failed, who must act and what evidence closes the issue. Use the matrix below to prevent a narrow pump choice from hiding a broader coordination failure.
Failure and interpretation matrix
| Observation before the slab | What it may mean | What it does not prove | Safest next action |
|---|---|---|---|
| Drain line appears lower than sewer | Gravity may be possible | That it has the required slope, cover or approved connection | Verify inverts and profile with the plumber and AHJ |
| Available fall is less than required fall | Gravity route is not released on current inputs | That a specific pump will work | Redesign profile or develop a pumped duty-point selection |
| Pump curve shows head at zero flow | The model may have shutoff head | That it delivers the required flow at actual total dynamic head | Plot required flow and total dynamic head on the exact model curve |
| A product page lists a 41-gallon basin | The named model has that manufacturer capacity | That the basin fits this slab or that the pump meets this route | Check dimensions, inlet, access, model instructions and curve |
| Small pipe fits through framing | It may be physically routable | That the system’s solids, pressure, friction and receiving point are acceptable | Check the adopted code and manufacturer application |
| Basin cover is under a cabinet | The fixture plan consumed access space | That future service can be performed | Revise layout or add approved access before cover-up |
| Alarm is in a utility room | The alarm exists | That occupants will hear it or know the response | Move or supplement the alarm and write the response plan |
| Check valve is present | Reverse flow may be controlled | That the valve is accessible, correct for the model or vented as required | Verify model manual, access and test result |
| Septic installer says “it should be fine” | A professional may see a viable path | That the county or health department approved it | Obtain the actual local review, permit or written condition |
| Slab crew wants to pour before inspection | Schedule pressure exists | That hidden work will be accepted later | Escalate to the responsible contractor and AHJ; hold cover-up |
The matrix separates observation from inference. That is the core safety behavior of the worksheet. A homeowner can observe that a basin is inaccessible; only a qualified professional or AHJ can determine whether a particular access arrangement complies.
The Below-grade sanitary-drainage release worksheet
Copy this structure into the project record. Blank fields are unresolved decisions, not zeros.
Project and jurisdiction
| Field | Entry |
|---|---|
| Project address | |
| State, county and municipality | |
| Building/plumbing AHJ and contact | |
| Sewer district or utility, if applicable | |
| Environmental-health or septic authority, if applicable | |
| Adopted plumbing-code family and edition | |
| Adopted electrical-code edition or AHJ instruction | |
| Permit number and plan revision | |
| Planned inspection date | |
| Planned slab or cover date | |
| Named release owner |
Fixtures and use
| Field | Entry |
|---|---|
| Room and finished-floor elevation | |
| Toilet included? | Yes / No |
| Shower or tub included? | Yes / No |
| Lavatory included? | Yes / No |
| Floor drain, laundry or other fixture included? | |
| Future fixture stub reserved? | |
| Expected household use or occupancy assumption | |
| Solids duty and selected code/model basis |
Elevations and gravity test
| Field | Entry |
|---|---|
| Datum description and elevation | |
| Fixture 1 connection point and invert | |
| Fixture 2 connection point and invert | |
| Lowest fixture connection point and invert | |
| Receiving point description and invert | |
| Building sewer or manhole reference, if relevant | |
| Developed horizontal run | |
| Professional-required slope | |
| Available fall formula and result | |
| Required fall formula and result | |
| Gravity margin | |
| Cover, footing and sleeve constraints | |
| Sensitivity trigger that requires a recheck | |
| Professional gravity outcome | Accepted / Rejected / More verification |
Pumped-option inputs, if gravity is not released
| Field | Entry |
|---|---|
| Proposed system type | Sewage ejector / grinder / macerating / other approved |
| Basin or assembly manufacturer and model | |
| Pump manufacturer, model and serial, if installed | |
| Inlet elevation and basin access elevation | |
| Static lift to highest discharge point | |
| Discharge pipe diameter and material | |
| Developed discharge length | |
| Fittings, valves and check valve | |
| Required flow | |
| Calculated friction and fitting losses | |
| Total dynamic head | |
| Exact pump curve or manufacturer selection record | |
| Professional curve verdict at required flow | |
| Vent diameter, route and termination | |
| Alarm location and response | |
| Electrical branch, voltage, protection and disconnect | |
| Receiving point and connection detail | |
| Cleanout, union, isolation and service access | |
| Sealed-cover or gas-tight requirement |
Receiving-system approval
| Field | Entry |
|---|---|
| Public sewer or onsite wastewater | |
| Receiving authority | |
| Written approval, permit or inspection condition | |
| Septic tank inlet and force-main peak elevation, if applicable | |
| Force-main termination and surge-control instruction | |
| Maintenance or alarm reporting requirement |
Release and handoff
| Check | Record |
|---|---|
| Plan and profile inspected before cover | Date, person, revision |
| Pipe, basin, vent and discharge photographed before cover | File or drawing reference |
| Required AHJ inspection complete | Result and permit record |
| Drain/vent/basin test complete | Test, date, person and result |
| Pump automatic start/stop tested | Test, date, person and result |
| High-water alarm tested | Test, date, person and result |
| Electrical installation tested | Electrician record |
| Model, serial and installation date recorded | |
| Manuals and warranty handed to owner | |
| Service contact and maintenance interval recorded | |
| Open items and responsible person | |
| Slab-release decision | Release / Hold / Release with dated exception |
What the worksheet can and cannot calculate
The worksheet can calculate a transparent fall comparison from supplied elevations and slope. It can expose sensitivity to an elevation or route change. It can make missing inputs obvious. It can organize a professional pump-curve selection and preserve evidence before cover-up.
It cannot choose a pump from a universal formula. It cannot infer code approval, determine a septic field’s capacity, certify structural excavation, inspect electrical work, approve a product listing, or guarantee that an alarm will be heard in every household. The professional must select the required flow, total dynamic head, solids capability, basin controls, valves, vent, receiving connection and testing method for the actual jurisdiction and model.
The worksheet also does not decide whether the room should exist. A homeowner may reasonably choose not to add a below-grade bathroom if the required excavation, access, pump dependence, service plan, noise, backup strategy or septic approval is disproportionate to the use. That is a legitimate next decision. “Pump required” is not the same as “pump project approved.”
Maintenance begins at design
If the selected system includes a pump, write the maintenance expectation into the handoff before the bathroom is finished. The Zoeller Models 63 and 95 manual says to test the pump immediately after installation and recommends inspection and testing at least every three months for those models. It also lists debris, float movement, valve condition, discharge blockage, trapped air, voltage and excessive head as possible causes of poor operation. Use those as model-specific prompts, not as a universal schedule.
For a generic owner record, include:
- the manufacturer’s stated inspection and test interval;
- who may open, clean or service the basin;
- how to test the alarm without creating a contamination hazard;
- what household items must never enter a non-grinder sewage system;
- where the breaker, disconnect, basin, valves and cleanout are located;
- what to do during a power outage or alarm;
- who to call for pump, plumbing, electrical or septic problems;
- when the permit, warranty and service records should be reviewed.
The Liberty manual warns that non-grinder sewage systems can be damaged or blocked by wipes, towels, feminine products, dental floss and similar items, and says the covered equipment should not run dry or handle materials such as cement, sand, grease or chemicals. That warning matters to the ownership decision: the lowest installation price can be the wrong choice if the household cannot follow the system’s use restrictions or if service access is impractical.
The final next decision
At the end of the release review, choose one documented outcome:
- Release gravity: the verified profile, code questions, receiving connection, vent and inspection path are accepted, and no pump system is needed.
- Release pumped branch: the gravity profile is not available or not approved; the selected sewage ejector, grinder or macerating system has a professional duty-point selection, approved destination, vent, discharge, power, alarm, access and test plan.
- Hold for evidence: an elevation, AHJ condition, model curve, septic review, structural constraint, electrical design or inspection remains unresolved.
- Change the room brief: reduce fixtures, move the room, raise the floor, change the receiving route or decide that the service burden is not worth the bathroom.
The best pre-slab decision is not the one with the most equipment. It is the one that still makes sense when the concrete is closed, the alarm sounds at an inconvenient time, the pump needs service, the AHJ asks for the profile, or a future owner needs to understand what was installed and why.
Cite this guide
Brictale. “How to Plan a Below-Grade Bathroom Drainage System Before the Slab.” Published 2026-10-06; updated 2026-10-06.
https://brictale.com/build/materials/plan-below-grade-bathroom-drainage-before-slab · Read the Markdown version
Original contribution: Below-grade sanitary-drainage release worksheet. A pre-slab worksheet that turns verified elevations, slope, lift, solids, receiving point and coordination constraints into a documented gravity, sewage-ejector, grinder or macerating decision.
Sources and scope
Evidence behind this page
- The 2024 International Residential Code states that a sewage pump or sewage ejector must automatically discharge the sump to the building drainage system; water-closet sewage pumps or ejectors must handle spherical solids up to 2 inches, while grinder pumps and single-water-closet macerating assemblies have stated smaller discharge-opening exceptions, and the table sets minimum capacity by discharge-pipe diameter.
2024 International Residential Code, Chapter 30 Sanitary Drainage, Sections P3007.4-P3007.6
2024 IRC model-code text as displayed by the International Code Council. It is not automatically the adopted plumbing code in every US jurisdiction; the project AHJ and adopted edition control.
Accessed · Link to this claim - The 2024 IRC requires backwater-valve protection where plumbing-fixture flood-level rims are below the elevation of the manhole cover of the next upstream public-sewer manhole, subject to the code's installation provisions.
2024 International Residential Code, Chapter 30 Sanitary Drainage, Section P3008.1
2024 IRC model-code provision. A homeowner must confirm whether this edition and provision are adopted and how the local AHJ applies it.
Accessed · Link to this claim - The 2024 International Plumbing Code's vent chapter requires drainage piping below sewer level to be vented in the same manner as a gravity system, and sets sump-vent sizing by pump discharge capacity and developed length for sewage pumps and sewage ejectors.
2024 International Plumbing Code, Chapter 9 Vents, Section 906.5.1
2024 IPC Chapter 9 model-code text as displayed by the International Code Council. It is not automatically the adopted plumbing code in every US jurisdiction.
Accessed · Link to this claim - The 2024 International Plumbing Code sanitary-drainage provisions say building subdrains that cannot discharge to the sewer by gravity are discharged to a covered and vented sump from which an automatic pump or other approved method lifts the liquid to the gravity drainage system.
2024 International Plumbing Code, Chapter 7 Sanitary Drainage, Section 712.1
2024 IPC Chapter 7 model-code text. The local adopted code and AHJ instructions control whether and how this provision applies to the project.
Accessed · Link to this claim - The 2024 International Residential Code requires macerating toilet systems and pumped waste systems to comply with ASME A112.3.4/CSA B45.9 and to be installed according to the manufacturer's instructions.
2024 International Residential Code, Chapter 30 Sanitary Drainage
2024 IRC model-code text as displayed by the International Code Council. Confirm the adopted code edition, local amendments and listing or approval path with the project AHJ.
Accessed · Link to this claim - The 2024 IPC sanitary-drainage provisions require a check valve and a full-open valve on a pump or ejector discharge with access to the valves, and require discharge piping and fittings to be compatible with the operating pressure, temperature and burial conditions.
2024 International Plumbing Code, Chapter 7 Sanitary Drainage, Section 712
2024 IPC model-code text. The supplied chapter-9 link is the source-plan entry for venting; this chapter-7 URL is included to cite the related discharge-component provisions separately. Verify the adopted edition and local amendments.
Accessed · Link to this claim - Liberty Pumps describes the Pro380-Series as a 24-by-24-inch simplex sewage system with a 41-gallon capacity, 2- or 3-inch discharge, a factory pre-assembled package and an alarm-ready option; Liberty states a standard three-year warranty for the Pro-Series.
Liberty Pumps Pro380-Series product page
The named Liberty Pumps Pro380-Series product family only. These are manufacturer specifications, not universal requirements or a recommendation that this model fits a particular home.
Accessed · Link to this claim - Liberty Pumps' simplex sewage/grinder installation manual warns that sewage applications require minimum fluid flows and tells the installer to consult Liberty for proper pump sizing before installation; the manual also instructs that the system be sized by a professional.
Liberty Pumps 7225000L Simplex Sewage/Grinder Systems Installation Manual
Liberty Pumps models and system families covered by manual 7225000L. It supports professional, model-specific sizing; it does not supply a universal homeowner sizing rule.
Accessed · Link to this claim - Liberty Pumps' Online Pump Sizing page offers pump-curve selection for users who know the desired flow, a pump-sizing questionnaire for quoting or custom system design, and an email-specification path for non-professionals or questions; it describes the curve path as a way to match a pump to a specific application.
Liberty Pumps Online Pump Sizing
Liberty Pumps' current online sizing service. It is manufacturer guidance and a request workflow, not a substitute for the licensed professional's hydraulic calculations, adopted code or AHJ approval.
Accessed · Link to this claim - Liberty's installation manual assigns installation and maintenance of pumps, controls, protection devices and general wiring to qualified personnel; it also requires applicable electrical, OSHA and local-code practices, identifies a separately fused and grounded supply, and describes vent and discharge connections for the covered systems.
Liberty Pumps 7225000L Simplex Sewage/Grinder Systems Installation Manual
Safety and installation instructions in Liberty manual 7225000L. The applicable electrician, plumbing contractor, AHJ and adopted electrical/plumbing codes remain controlling.
Accessed · Link to this claim - Liberty's simplex sewage/grinder installation manual warns that sewage systems may contain flammable or explosive gases and says live, exposed circuits must not be present in or around an open basin; it directs installation and safety work to qualified personnel under applicable code and safety practices.
Liberty Pumps 7225000L Simplex Sewage/Grinder Systems Installation Manual
Safety warnings and installation instructions in Liberty manual 7225000L. They do not authorize homeowner electrical or confined-space work and do not replace the adopted electrical code or AHJ direction.
Accessed · Link to this claim - Liberty's 7225000L installation manual specifies, for the covered below-grade systems, a power supply within the cord limitations and at least 4 feet above the floor, with a separate properly fused and grounded branch circuit sized to the pump nameplate.
Liberty Pumps 7225000L Simplex Sewage/Grinder Systems Installation Manual
Liberty manual 7225000L instructions for its covered systems only. The selected equipment, adopted electrical code, electrician and AHJ control the actual circuit, protection and location.
Accessed · Link to this claim - Liberty's 7225000L installation manual gives model-specific basin placement and fine-aggregate backfill instructions, requires cover access to remain available, and warns that heavy pressure or equipment on backfill can collapse a basin.
Liberty Pumps 7225000L Simplex Sewage/Grinder Systems Installation Manual
Liberty manual 7225000L basin and backfill instructions. Do not transfer these details to another basin or system without checking its current instructions and project conditions.
Accessed · Link to this claim - Liberty's 7225000L installation manual references a 10-foot stack test in its cover-sealing instructions for the covered system context.
Liberty Pumps 7225000L Simplex Sewage/Grinder Systems Installation Manual
A manufacturer instruction in Liberty manual 7225000L, not a universal plumbing-test requirement. The project AHJ and adopted code determine required testing and witnessing.
Accessed · Link to this claim - Liberty's 7225000L installation manual warns that non-grinder sewage systems can be damaged or blocked by wipes, towels, feminine products, dental floss and similar items, and says the covered equipment should not run dry or handle cement, sand, grease or chemicals.
Liberty Pumps 7225000L Simplex Sewage/Grinder Systems Installation Manual
Liberty manual 7225000L operating warnings for the covered equipment. Follow the selected product's current manual; these restrictions are not a universal rule for every pump or grinder.
Accessed · Link to this claim - Liberty's Pro380 engineering specification presents performance as total head versus flow for specific Pro380 pump configurations and states that specifications are subject to change; the curve must therefore be checked against the selected model and the project's calculated duty point.
Liberty Pumps Pro380-Series Engineering Specification
The current Pro380-Series engineering specification reviewed on 2026-09-08. It is a model-family curve and dimensional document, not a substitute for professional system sizing or AHJ approval.
Accessed · Link to this claim - Zoeller's 2025 Models 63 and 95 instructions say not to use an extension cord, call for a properly protected circuit, direct the installer to test the pump immediately after installation, and recommend inspection and testing for proper operation at least every three months; the troubleshooting table identifies debris, float movement, valve condition, discharge blockage, trapped air, voltage and excessive head as possible causes of poor operation.
Zoeller Models 63 and 95 Installation Instructions, FM2895, 2025
Zoeller Models 63 and 95 manual only. The three-month inspection interval is the manufacturer's instruction for those models and is not a universal code maintenance interval.
Accessed · Link to this claim - Zoeller's Models 63 and 95 instructions call for a clean basin, a level pump, clear float movement, an adequate basin cover and full-size discharge piping as installation conditions for the covered pump models.
Zoeller Models 63 and 95 Installation Instructions, FM2895, 2025
Zoeller Models 63 and 95 installation instructions only. Check the selected model's current manual before transferring any assembly detail.
Accessed · Link to this claim - Zoeller's Models 63 and 95 instructions call for a check valve and union, a full-size discharge pipe, a basin cover, gas-tight seals and venting of sewage gases through a vent pipe; the manual also warns that a check-valve installation needs a periodically cleaned vent hole below the cover to relieve trapped air.
Zoeller Models 63 and 95 Installation Instructions, FM2895, 2025
Zoeller Models 63 and 95 installation and caution instructions. Do not transfer the vent-hole detail to another model without checking its manual; it is not a universal plumbing-code dimension.
Accessed · Link to this claim - San Diego County, California Policy 47 allows sewage-ejector pumps for some ancillary or supplemental bathrooms and similar rooms served by an onsite wastewater system, but says approval is case by case and preserves gravity flow for the main sanitary facilities and septic disposal path.
San Diego County, California onsite-wastewater example, 2010 design-manual edition, Policy 47. It is not a national rule, not a public-sewer rule and not evidence of the current requirements in another county or state.
Accessed · Link to this claim - San Diego County Policy 47 says sewage-ejector designs require review by an Environmental Health Specialist III or higher, electrical and plumbing work under permit and inspection, and a design record with the pump/chamber description, lift capacity, model, septic-tank inlet elevation, force-main peak elevation, fixture stub-out elevation and fixture floor plan.
San Diego County, California Policy 47 only. The record categories are used here as a local example of useful coordination inputs; the project's actual AHJ determines required approvals and documents.
Accessed · Link to this claim - San Diego County, California Policy 47 recommends that the design professional provide an operating manual to the property owner, with instructions for periodic alarm testing and a maintenance or repair phone number, after the sewage-effluent pump system is designed and approved under the County's onsite-wastewater program.
San Diego County, California March 22, 2010 Design Manual, Policy 47 and immediately preceding sewage-effluent-pump provisions. It is a dated local onsite-wastewater example, not a national homeowner maintenance rule.
Accessed · Link to this claim