How to Plan a Garage Door Repair or Replacement Before Winter
Use safety tests, condition inputs, warranty records, local wind rules, and comparable scopes to choose garage-door maintenance, repair, or replacement before winter.
The short answer
Before winter, test the opener’s reversal and photo eyes, observe the door’s manual balance without adjusting springs or cables, inspect seals, tracks, panels, and hardware, then document the model and warranty. Use failed safety tests, tension-related defects, structural or wind-rating needs, repeated repairs, and incompatible parts as professional handoff gates. Compare repair, component replacement, and full replacement using identical scope line items and local permit checks.How to Plan a Garage Door Repair or Replacement Before Winter
Choose the smallest safe scope that restores reliable operation and winter protection: homeowner maintenance for clean, intact, balanced systems; a professional repair for a localized defect; component replacement when the door and opener remain compatible; or full replacement when damage, repeated failures, compatibility, warranty, insulation, or wind exposure make piecemeal work a poor fit. Test the opener, record the door and model data, check the actual local authority's rules, and compare written scopes before scheduling.
Decide what kind of winter work the garage door actually needs #
The right winter decision is not “repair or replace because the door is old”; it is a documented choice among maintenance, professional repair, component replacement, and full replacement after safety gates are passed. Age is a context input. A failed reversal test, exposed spring or cable defect, bent track, structural damage, incompatible opener, missing wind evidence, or recurring repair pattern can change the choice even when the visible door looks acceptable.
Start with the decision, not the part
An attached or detached residential garage usually combines several systems that fail differently:
- The door leaf or sections provide the opening closure, weather seal, visual finish, and—where required—wind-pressure resistance.
- Hinges, rollers, tracks, brackets, cables, springs, drums, bearings, and fasteners guide and counterbalance the door.
- The opener supplies powered movement and includes controls, travel limits, force response, photo eyes, an emergency release, and sometimes battery backup or unattended-operation features.
- Bottom and perimeter seals limit drafts, water, dirt, and pests, but they cannot correct a twisted frame, a door that is out of balance, or a wall opening with structural movement.
- The garage opening, jambs, header, ceiling support, electrical receptacle, and attachment points are part of the installation context. A new door does not automatically fix a deficient opening or support condition.
That is why a quote for “replace the rollers” cannot be compared with a quote for “new garage door” until each scope says what happens to the door, opener, tracks, springs, seals, trim, wind documentation, disposal, permits, and final tests. A low line-item price can be a high total cost if it leaves the root defect or creates a compatibility problem.
Clopay's maintenance guidance provides a useful observation set: clean tracks, tighten loose hardware carefully, lubricate the parts named for the system, test pressure/auto-reverse and photoelectric sensors, check manual balance, and inspect seals before winter. Those are manufacturer maintenance actions, not permission to adjust spring tension, remove a bottom bracket, straighten a loaded track, or repair a cable without the exact instructions and appropriate training. See the Clopay seasonal maintenance and replacement guide for the source checklist and its manufacturer-specific limits.
Use four possible outcomes
Use these labels in your notes and when asking for a service scope:
| Outcome | Evidence that supports it | Typical owner action | Professional handoff | Next decision |
|---|---|---|---|---|
| Seasonal owner maintenance | Door and hardware are intact; both safety tests pass; manual balance observation is normal; seal has minor dirt or wear; no structural or tension defect is visible | Clean, observe, lubricate only as the manual allows, replace accessible seal if the product instructions allow it, and document the result | Ask for inspection if any observation is uncertain | Recheck on the stated seasonal cadence and after severe weather |
| Localized professional repair | One identifiable defect, such as a worn roller, hinge, seal, sensor mount, or opener accessory, with the rest of the system compatible and sound | Stop at the safe observation boundary and supply model, symptoms, photos, and test results | Have a qualified garage-door technician diagnose and repair the affected part | Verify operation, balance observation, sensor response, and written warranty for the work |
| Component replacement | A spring set, opener, rollers, seals, or a panel/section is beyond useful service, but the remaining door, tracks, attachments, opening, and wind documentation remain compatible | Request a component-specific scope with compatibility confirmation | Technician confirms load, dimensions, hardware, counterbalance, opener rating, and installation instructions | Confirm the new component does not transfer an old defect to the repaired system |
| Complete door and/or opener replacement | Door has multiple failure points, structural or wind-rating uncertainty, recurrent repairs, widespread corrosion/rot, obsolete or incompatible opener, or a replacement component would not produce a documented safe system | Prepare a replacement brief and local-rule check before accepting a quote | Qualified installer verifies opening, product, wind pressure, attachments, opener, electrical interface, permits, and final tests | Decide whether to replace the door, opener, or both, then preserve manuals and warranty evidence |
The word “component” must remain precise. Replacing a bottom weather seal is not the same decision as replacing a spring assembly. A proposed opener or door must be checked against the actual door, dimensions, hardware, and balance; a new operator is not a substitute for diagnosing a door that is hard to lift. The federal instructions rule requires combination-system instructions to identify the operator, compatible door dimensions, required hardware, and counterbalance method, while Clopay warns that added insulation can increase door weight and opener wear. Use those documents as compatibility prompts, not as permission to infer compatibility across brands. See the eCFR operator instruction requirements and the Clopay insulation comparison. Replacing one damaged section may be sensible when the manufacturer supports a match, but it may be poor value when the existing sections are discontinued, the finish will not match, the track geometry is damaged, or the proposed section changes the system's documented weight or balance.

What existing manufacturer advice does and does not answer
The current common answer is distributed across maintenance, safety, product, and warranty pages: clean tracks, lubricate, test sensors, check balance, inspect seals, and call a professional for spring-related work. Clopay's current maintenance guidance and cable-maintenance guidance illustrate that pattern, but it does not itself answer the decision this guide is designed to make: which findings are safe owner observations, which require an immediate professional boundary, and how to compare a localized service scope with a complete replacement scope before winter.
The original contribution here is the Garage-door winter-readiness repair-versus-replacement worksheet. Its method is to record observed inputs and source documents, apply safety stop gates, normalize each professional scope into the same line items, and compare illustrative totals with a sensitivity table. Its limitations are equally important: it cannot diagnose spring, cable, structural, electrical, wind-load, or code conditions remotely, and it does not replace the exact manual, warranty, qualified inspection, or local building department. This is a source-backed planning instrument, not a field test or a market-price survey.
Method: Record observed inputs and source documents, apply the safety stop gates, normalize each professional scope into the same line items, and compare illustrative totals with a sensitivity table; the numbers are modeled examples, not market quotes.
Limitations: The worksheet cannot diagnose a spring, cable, structural, electrical, wind-load, or code problem remotely, and it does not replace the exact door or opener manual, the manufacturer warranty, a qualified service inspection, or the named local building department's permit and wind requirements.
The check is reproducible. Another homeowner should be able to inspect the same documents, see which fields were observed versus unknown, trace each safety and code boundary to its source, request the same scope lines from two providers, and reach a different conclusion if the inputs change. That is the point of documenting the decision rather than treating “replace” or “repair” as a universal answer.
Originality brief
Current manufacturer answers explain seasonal cleaning, lubrication, seal checks, balance observations, safety testing, and warranty routing. The missing decision is how a homeowner turns those separate findings into a safe maintenance, repair, component-replacement, or full-replacement handoff before winter. This guide contributes a reusable worksheet, normalized quote schema, and illustrative sensitivity method. It can be checked by tracing each material claim to the linked source, marking every input as observed, documented, unknown, or professional verification required, and recalculating the modeled scenarios with the same line items.
This guide is part of Brictale's single homeowner blog, where garage-door ownership sits in the handover and ownership journey alongside other home decisions.
Make the first handoff before winter gets close
If the door is currently unreliable, leaves the opening unsecured, binds, falls, slams, shows a broken spring, or fails either opener safety test, the next decision is not how to shop. It is whether to stop normal automatic use and arrange qualified service. The U.S. Consumer Product Safety Commission identifies 16 CFR Part 1211 as the mandatory federal consumer-product safety standard for automatic residential garage-door operators; it is a product-safety baseline, not a diagnosis of the installed door. Read the CPSC automatic residential garage-door operator requirements when you need to distinguish the federal operator standard from local construction administration.
If the door passes the safety gate but has a draft, worn seal, noise, cosmetic deterioration, or a single non-tension hardware issue, you can assemble the brief first. If a qualified professional then identifies a larger defect, your recorded baseline makes it easier to understand why the scope expanded.
Set the safety gate before testing, cleaning, or shopping #
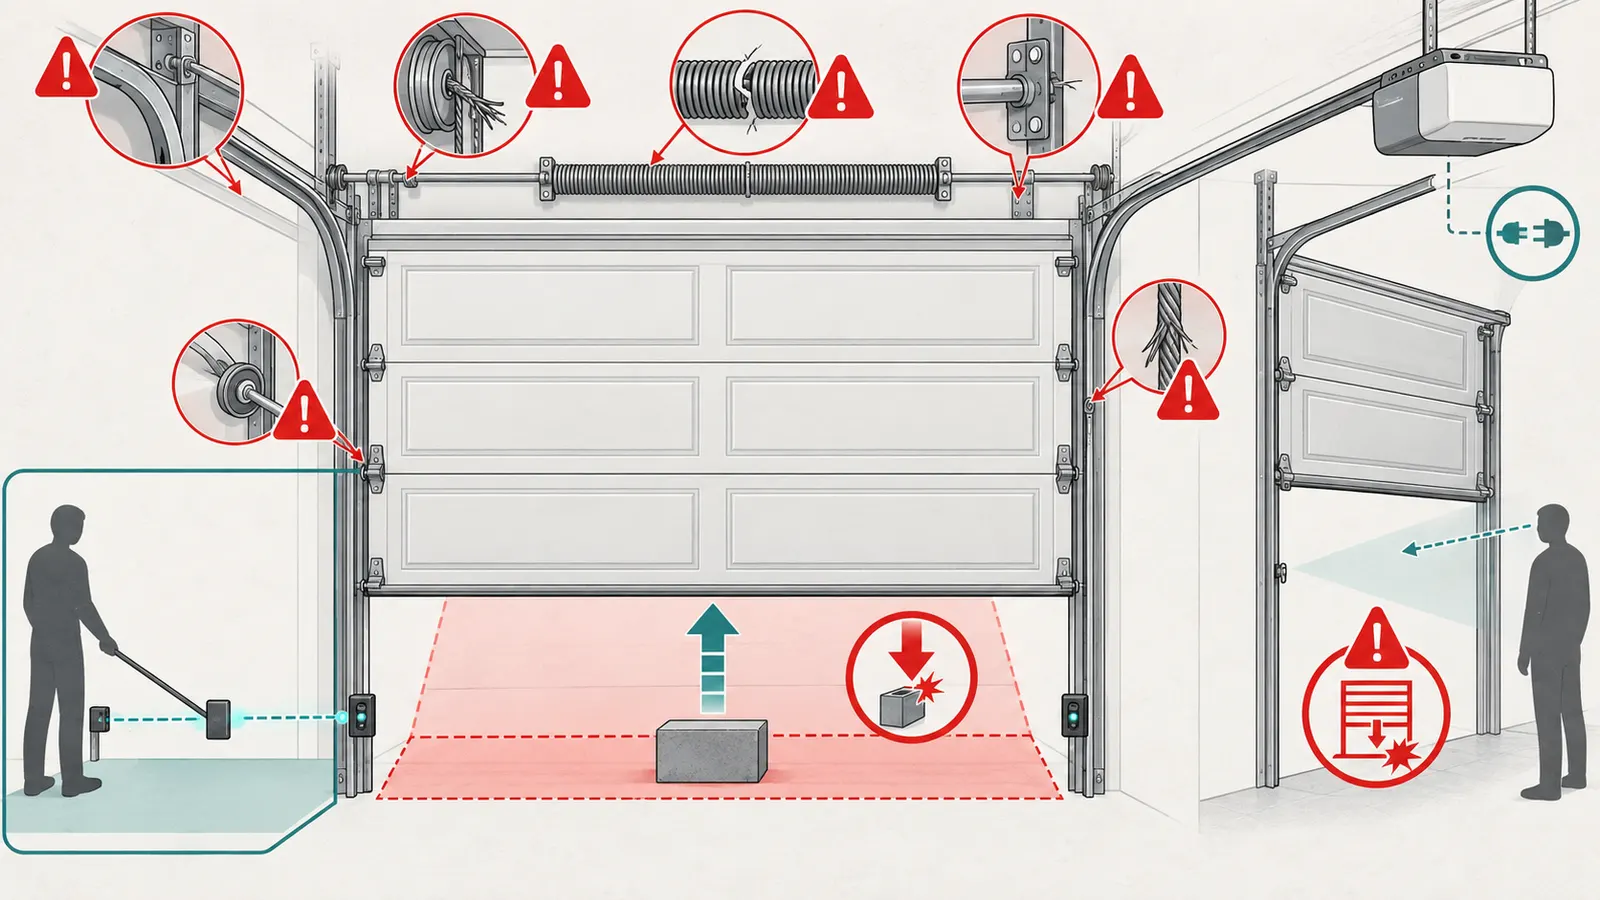
The safety gate is simple: test only from a position that keeps you out of the door's path, stop if the door behaves unexpectedly, and assign springs, cables, counterbalance, loaded brackets, structural attachments, and electrical work to qualified professionals. A homeowner can collect information without turning a seasonal check into a hazardous repair attempt.
Safety hazards that matter for this decision
Garage-door planning has several specific hazards:
- Entrapment: An opener that does not reverse or whose photo-eye protection does not respond can close on a person, pet, vehicle, or object. Do not use a failed system as though it were merely noisy.
- Stored spring energy: Torsion and extension systems can release substantial force. Do not wind, unwind, disconnect, substitute, or balance springs because a door fails the halfway observation.
- Cable and bracket failure: A frayed lift cable, displaced drum, loose bottom bracket, or broken spring can allow a heavy door to move unexpectedly. Do not remove a bottom bracket while the door is under tension.
- Falling door or panel: Never stand under a stopped partially open door. Do not climb, reach over the door, or use a ladder against a moving assembly to inspect a high component.
- Track and structural load: A bent track, detached rear hanger, cracked jamb, loose header attachment, or impact damage may involve loads that are not safely corrected with a wrench.
- Electrical work: Do not open an energized opener, alter fixed wiring, add a receptacle, or bypass a safety circuit. Route wiring and power problems to a qualified electrician or door professional as appropriate for the local rule and scope.
- Weather and emergency access: A power outage, freezing weather, ice at the threshold, and a failed battery backup can make a normally automatic exit unavailable. Learn the manual-release procedure from the exact manual without using it to compensate for a failing door.
The federal operator instructions in 16 CFR § 1211.16 require covered operator instructions to address installation, operation, and user maintenance. The rule's required installation warning says to install only a properly balanced door and to have a qualified service person make repairs to cables, spring assemblies, and other hardware before installing the opener. That is a warning and pre-installation instruction in the federal product standard, not a general federal statement that every garage-door repair must be performed by a federally defined qualified person. Brictale uses a conservative professional-only boundary for these hazards; label that as Brictale scope, and follow the actual manual and applicable local licensing rules.
The two homeowner safety checks
The exact test procedure in the installed manual controls. If your manual differs from the generic description below, follow the manual and document the difference. A field check does not certify the opener; it tells you whether to stop and get help.
Photo-eye or external-sensor check. With the door open and the area clear, use the wall control or remote as directed by the manual to begin closing. From outside the door path, interrupt the sensor beam with a long object such as a broom, not your body. The door should respond as the manual describes, normally reversing or refusing to close. Record whether the indicator lights show alignment, whether the door attempts to move, and whether it stops in a way that matches the manual. Never tape, bypass, relocate, or defeat the sensors to make an unreliable opener work.
Obstruction or pressure-reversal check. Use the exact test object, position, and sequence in the installed manual; do not substitute a generic board dimension. The federal product test specifies a 1-inch-high solid object for the floor test, along with defined installation, force, travel, and compliance conditions, so that rule is not a complete homeowner test recipe. Keep hands, feet, pets, and vehicles away. The federal reversal requirement in 16 CFR § 1211.7 says a covered vertically moving operator must initiate reversal within two seconds of contact with the specified obstruction, subject to the rule's stated travel exception. Treat any failure, hesitation, crushing force, refusal to reverse, or unexpected movement as a stop condition.
Do not keep repeating a failed test while changing force or travel settings at random. If a setting is adjusted by a qualified person or exactly as the manual permits, the safety test must be repeated. The practical owner decision is not whether you can make a failure disappear; it is whether a qualified person can verify the complete system after the change.
Observe balance without adjusting balance
If the manual permits a homeowner balance observation, close the door, disengage the opener using the exact procedure, and lift the door only from a safe position to the approximate midpoint. Do not place yourself under a door that cannot be controlled. A door that will not remain near the midpoint, rises or falls rapidly, feels unusually heavy, binds, or moves unevenly is not a lubrication problem to solve by adding force.
Clopay's current maintenance guidance describes the same observation—disconnect the opener and see whether the door holds halfway—and says not to fix balance yourself. It also places spring, cable, pulley, safety-reversal, and worn-component checks in professional maintenance. Use that manufacturer guidance as an observation model, then defer to the exact brand and model manual.
Verify the manual release without creating a new hazard
The red emergency-release handle is part of the ownership handoff. Read the exact instructions and confirm that household members know where it is and what a power-outage release does. Do not test it with the door open if the manual warns that a weak or broken spring could let the door fall. Do not use manual release as a routine workaround for an automatic system that fails its safety check.
The federal standard addresses a manual detachment means for covered operators. 16 CFR § 1211.9 includes requirements for the red handle and its detachment function, but the installed product's manual still governs the homeowner's procedure. Record the handle location, whether the instructions are present, and whether a service provider must verify it after work.
Use a stop-and-call matrix
| Observation | Safe interpretation | What not to infer | Safest next step |
|---|---|---|---|
| Sensor beam is interrupted and door responds as manual says | External protection appears to respond in this field check | The opener, springs, and structure are fully healthy | Record result and continue only with non-invasive observations |
| Sensor beam is blocked and door continues closing or behaves unpredictably | Safety function failed or procedure is not understood | Cleaning alone will fix it | Stop automatic use and call a qualified door professional |
| Door reverses on the approved obstruction test | Primary reversal appears to respond in this field check | The door is balanced or all components are safe | Record the manual and test object; continue with visual inspection |
| Door fails to reverse, crushes, hesitates, or does not follow manual behavior | Entrapment risk is unresolved | A higher force setting is a safe fix | Disconnect or disable automatic use only as the manual permits and arrange qualified service |
| Door stays near midpoint when manually observed | Balance observation is consistent with the manual | Springs are correctly sized or undamaged | Record conditions and continue without spring adjustment |
| Door falls, rises, binds, or is very heavy | Counterbalance or mechanical condition needs professional assessment | Lubricant or a new opener will correct it | Stop and route springs, cables, and hardware to a qualified professional |
| Spring appears broken or cable is frayed/off drum | Stored-energy or falling-door hazard | A single spring or cable is a homeowner replacement | Keep people clear and arrange qualified service |
| Door seal has a small tear with an otherwise sound door | Localized weather-seal scope may be reasonable | A seal cures a misaligned or wind-damaged door | Confirm model/track/channel and replace only per manual or service scope |
| Track is bent, detached, or twisted | Alignment or attachment problem | It can be forced straight in place | Stop and obtain a professional inspection |
If the result is in the right-hand column, winter planning becomes a service handoff. Send the provider your observations; do not send a request that says only “tune up garage door” when you have recorded a failed reversal or broken spring.
Capture the door, opener, opening, and winter inputs #
The most useful pre-winter brief identifies the installed system well enough for a professional to price a compatible scope without guessing; it records observations separately from assumptions; and it identifies unknowns that must be verified on site. Spend your time on labels, dimensions, photos from safe positions, documents, and access constraints—not on dismantling the system.
Record the door identity and configuration
Start at eye level and use the manufacturer's label, owner packet, purchase record, prior invoice, or warranty registration. Record:
- Manufacturer, product family, model or series, and approximate installation year.
- Door type: sectional overhead, one-piece tilt-up, rolling, or another configuration. This guide is primarily for common residential sectional and overhead systems; a different system needs its own manual and professional assessment.
- Material and finish: steel, wood, aluminum, composite, or a mixed assembly.
- Number of sections and visible windows, vents, decorative overlays, insulation insert, or special hardware.
- Nominal width and height in feet and inches, measured at the opening rather than inferred from a listing. A two-car appearance is not a sufficient dimension.
- Track layout, lift type, spring type if the label or manual identifies it, and whether the opener is ceiling-mounted, wall-mounted, or another design.
- Bottom seal profile, perimeter seal, threshold, visible light gaps, and water or pest paths.
- Wind-rating label, positive and negative design pressure values, testing reference, installation drawing reference, and any storm or high-wind designation.
Do not scrape away a label, remove trim, or enter the spring area to find a model number. Photograph the label from a safe distance and transcribe what is legible. If no label is available, mark the field “unknown” rather than guessing from the appearance of the panels.
Record the opener and control system
Record the opener manufacturer, model, serial or date code if present, horsepower or rated door size if shown, drive type, battery-backup status, wall control model, remote controls, keypad, photo-eye style, emergency release, smart-home accessories, and any error lights or diagnostic codes. Photograph the opener label and the installed safety labels without opening the housing.
The model matters because a replacement door may need a different attachment bracket, travel setting, weight range, trolley or wall-mount arrangement, rail length, control accessory, or battery-backup interface. Conversely, a replacement opener cannot be used as a substitute for diagnosing a counterbalance defect. For combination sectional systems, the federal instructions rule requires the manual to identify the operator, compatible door manufacturer/model and size range, required hardware, and how to properly counterbalance the door. Use the operator instruction requirements in 16 CFR § 1211.16 as a federal product-document baseline, then obtain the actual manual from the manufacturer. A provider must still verify the installed combination on site.
Separate symptoms from findings
Write down what you observed and what you think it means in separate columns. For example:
| Observed fact | Owner interpretation to avoid | Question for professional |
|---|---|---|
| Door shudders during opening | “The opener is failing” | Is the cause balance, rollers, track, hinges, fasteners, or operator drive? |
| Door reverses before reaching the floor | “The sensors are dirty” | Is the beam aligned, is the floor/threshold changing the close position, or is the travel/force setup wrong? |
| One panel is dented | “Only one panel needs replacing” | Is the section available and compatible, and did the impact affect tracks, hinges, jambs, or balance? |
| Seal no longer touches the floor | “A thicker seal will fix it” | Is the floor uneven, the door out of level, the bottom retainer damaged, or the seal worn? |
| Opener is loud | “A new opener is needed” | Is the sound in the operator, or is the door transferring mechanical strain? |
| Door is hard to lift | “The opener needs more power” | Is the counterbalance unsafe or out of specification? |
This separation prevents a service request from preselecting a part before the system has been inspected. It also lets you compare providers on diagnosis rather than on who promises the fastest replacement.
Inspect visually from safe positions
With the door closed and the opener not moving, inspect from the side and front without touching spring assemblies or loaded brackets. Use a flashlight and photos. Look for:
- cracks, rot, delamination, corrosion, impact dents, bowed sections, loose windows, and damaged end stiles;
- loose or missing hinge screws, displaced rollers, broken wheels, bent shafts, and worn bearings;
- bent, twisted, rusted, or detached tracks and rear hangers;
- frayed, slack, displaced, or corroded cables;
- broken or visibly damaged spring components;
- loose opener attachment or a missing reinforcement bracket;
- loose wall control, exposed wiring, damaged receptacle, or an extension-cord arrangement that the manual or local authority does not permit;
- torn or hardened bottom and perimeter seals, daylight at corners, water staining, pest paths, and ice-prone threshold conditions;
- corrosion at the lower edge in a wet climate, especially where a steel skin meets a damaged seal or where snow and deicing residue collect;
- finish failure on wood, including peeling coating, open joints, swelling, and unprotected edges;
- panel or frame damage caused by a vehicle, wind, falling object, or settlement around the opening.
Clopay's current maintenance guidance tells homeowners to observe irregular movement, inspect cables and tracks from safe positions, avoid repairing damaged tracks, and call a professional when damage or tensioned-part problems appear. Use that manufacturer-specific visual guidance as a prompt, not as a substitute for the exact model manual or a professional inspection.
Measure only what helps a quote
Use a tape measure from the floor or jamb while the door is closed and stationary. Record:
- clear opening width and height, in inches;
- door overall width and height if safely observable;
- side room from jamb to the nearest obstruction on each side;
- headroom from the top of the opening to the nearest obstruction, including tracks, lights, ductwork, and framing;
- backroom from the opening toward the rear wall, if visible and relevant;
- ceiling height and the apparent location of the opener support;
- distance from the door face to trim, siding, downspouts, utility equipment, or a shared wall;
- threshold condition, slope, and any recurring water or ice path;
- whether the garage is attached to conditioned space, has stored materials limiting access, or has a service door that affects the work sequence.
Do not climb on the door or use a ladder in the door path to measure a high point. If a value cannot be measured safely, mark it for the site visit. A provider should verify final dimensions before ordering a door or replacement section.
Record climate and exposure without overclaiming
The winter decision changes with exposure, but “cold climate” is not a complete design specification. Record:
- the city and state, county if relevant, and whether the property is in a coastal, hurricane, tornado, high-wind, heavy-snow, freeze-thaw, or salt-exposure area;
- wind exposure, nearby open terrain, and whether the door is a large opening on an attached garage;
- the direction the door faces and whether wind-driven rain, drifting snow, or direct afternoon heat affects the seals and finish;
- whether the garage is intentionally conditioned, semi-conditioned, or unconditioned;
- whether the garage shares a wall or ceiling with living space;
- whether winter operation is essential for a vehicle, heating equipment, freezer, workshop, or emergency exit.
For wind, record evidence rather than selecting a marketing adjective such as “storm ready.” Ask the building department with jurisdiction over the property which code edition, amendments, permit, inspection, wind zone, design pressure, labeling, and product documentation apply to your replacement. The agency's answer—not a national model-code summary or an installer’s verbal assurance—is the local rule record. Name the city or county department, address, date, contact or webpage, and any permit reference in the worksheet.
Collect the documents before collecting quotes
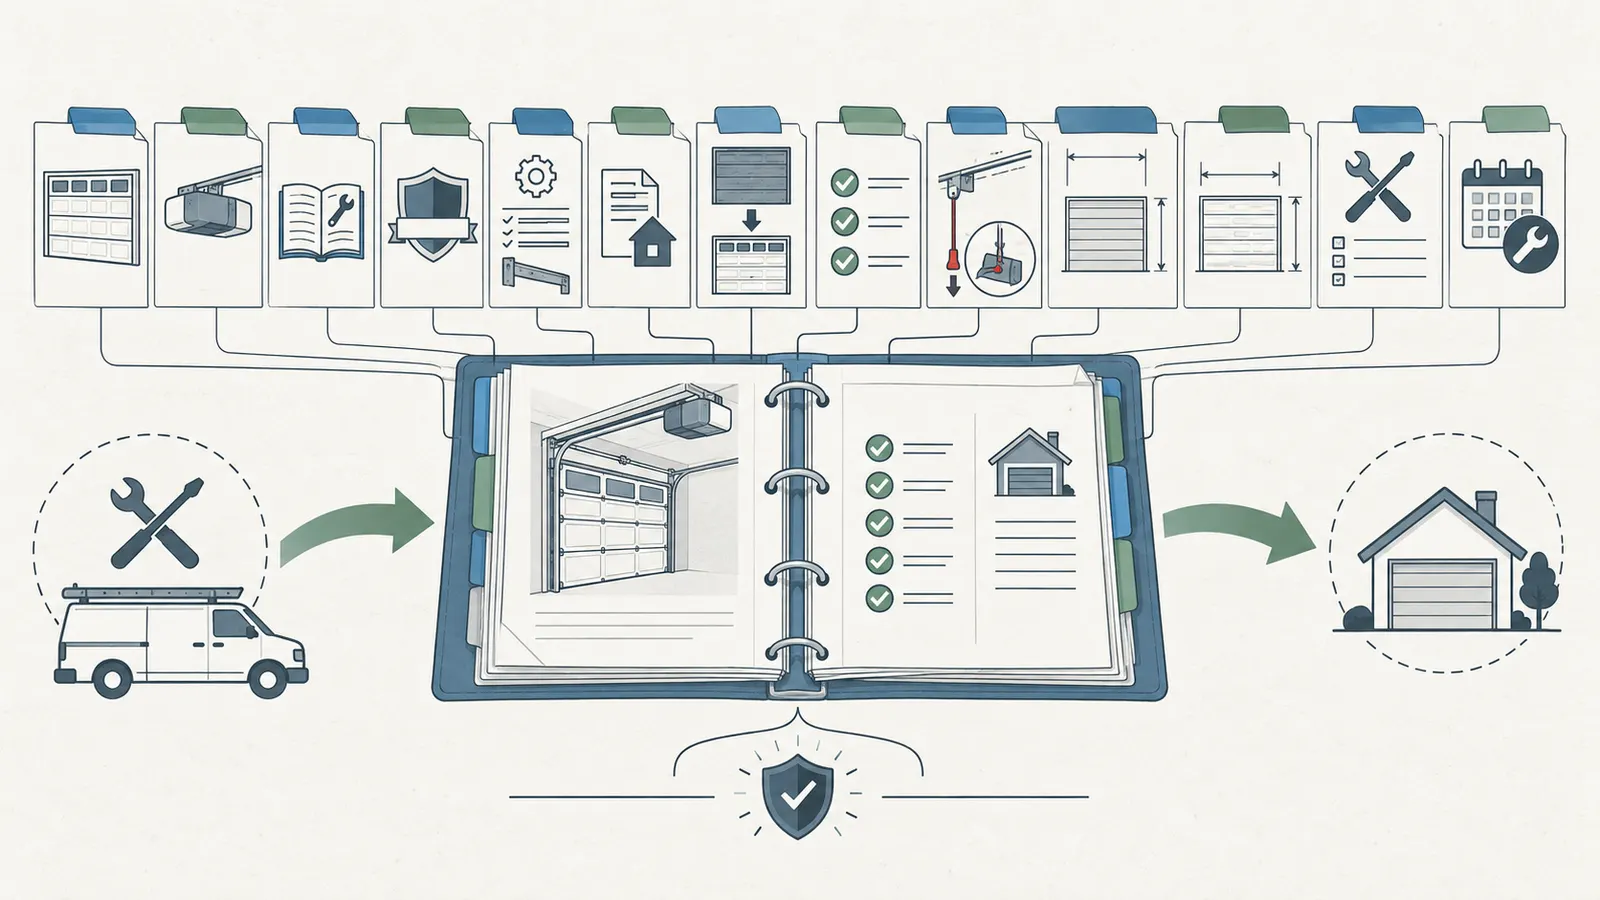
Put these in one folder:
- door and opener manuals;
- product labels and model/series numbers;
- purchase receipt, installation completion date, and prior service invoices;
- manufacturer warranty, registration, and exclusions;
- installation warranty and the installer’s contact details;
- photographs of the door, labels, seals, tracks, opener, sensors, and visible defects;
- the date and result of each safety test, including the manual used;
- permit, inspection, or prior replacement records if available;
- the local building department response or permit reference;
- a list of household access constraints, preferred dates, and winter blackout or storm concerns.
Clopay's warranty page shows why the model field matters: warranty information is organized by product family, including steel, wood, composite, and aluminum-glass lines. The Clopay warranty information page supports verifying the exact product before assuming a repair is excluded or covered. If a replacement was installed by an eligible Clopay authorized dealer, the Clopay installation-warranty page says the installation warranty begins when work is completed and includes exclusions and a dealer-first contact path. Those are Clopay terms; do not transfer them to another brand.
Interpret defects without turning observations into a diagnosis #
The best interpretation is the narrowest one supported by the observation: record a symptom, identify the risk it raises, and route the unresolved cause to the responsible professional. A winter worksheet should make uncertainty visible, because a guessed diagnosis can lead to the wrong part, an unsafe adjustment, or a replacement that preserves the original defect.
Weather seals and cold-air complaints
A cracked, hardened, compressed, missing, or poorly seated bottom seal can allow drafts, water, dirt, and pests. It can be a legitimate localized maintenance or replacement scope when the door sits squarely, closes evenly, and the retainer and threshold are sound. Clopay describes the bottom weather seal as helping limit heat loss at the bottom of the door and keeping out water, dirt, and pests; it also recommends checking it before winter in the seasonal guidance linked above.
Do not infer that every draft is a seal failure. Check for:
- a continuous gap that follows the whole door width;
- gaps at one corner only;
- light around the side or top perimeter seals;
- a threshold that has settled, cracked, or slopes away from the door;
- a door that is not square in the opening;
- panel damage, track misalignment, or movement in the jamb;
- water entering above the door or through the wall, not beneath the seal.
The action depends on the pattern. A replaceable seal may be a small scope. A corner gap combined with uneven travel is a professional diagnosis. A wet attached garage may require broader envelope and drainage investigation. The Department of Energy's air-sealing guidance distinguishes weatherstripping for moving components such as doors from caulk for stationary joints and identifies garage-separation gaps as an air-sealing location in applicable retrofit guidance. That does not mean a garage-door seal alone provides a code-required thermal or fire separation.
Noise and vibration
Noise is a symptom, not a replacement trigger. Categorize it by when it occurs:
- Only while the door moves manually: suspect rollers, hinges, track friction, balance, panel movement, or fasteners before blaming the opener.
- Only while the opener runs with the door connected: suspect the operator, drive, attachment, travel setup, or a door system that is imposing abnormal load.
- Only while the opener runs disconnected from the door, if the manual allows that observation: the sound may be in the operator, but the decision still requires model-specific diagnosis.
- A bang or snap followed by a heavy door: treat as a spring, cable, or counterbalance stop condition.
- Rattle in wind while closed: inspect seals, panel stiffness, lock engagement, tracks, and wind exposure; do not assume cosmetic noise is harmless if the door moves in the opening.
Clopay says noisy, shaking, or struggling doors should be inspected by a professional, and its maintenance page connects improper lubrication and dirt to sticking, wear, and loud noises. Lubrication can be appropriate preventative maintenance when the manual allows it, but it cannot restore a broken bearing, straighten a track, reestablish balance, or add missing wind reinforcement.
Reversal and sensor faults
An opener that reverses as it reaches the floor may have an obstruction, sensor issue, incorrect travel, threshold interaction, wiring fault, or a door condition outside the operator's expected setup. An opener that does not reverse when the manual's test calls for it is a higher-priority safety issue. Do not solve a reversal fault by bypassing photo eyes or increasing force until the door becomes harder to stop.
The CPSC and the federal standard describe entrapment protection as a safety function. The federal rule's two-second reversal statement is not a promise that any arbitrary homeowner test will be a valid certification test; it is a reason to treat failed field behavior seriously. The CPSC safety page identifies the mandatory federal standard, while 16 CFR § 1211.7 states the covered performance requirement. Record the actual test object, the door position, the result, and the manual version supplied to the technician.
Spring, cable, track, and bracket findings
These are not ordinary homeowner replacement parts. A spring can look intact while the door is out of balance; a cable can appear only slightly frayed before moving off a drum; a track can look straight while its hanger or attachment has loosened. If the door is heavy, falls, rises, binds, sits crooked, or has a visibly broken or displaced tension component, stop.
The safe brief should say “visible spring/cable/track observation; no adjustment attempted” rather than “replace spring” unless a qualified professional has diagnosed it. This protects the quote comparison from a false certainty. Ask the provider to identify:
- the failed or worn part;
- whether both sides or a matched set should be serviced;
- whether the door weight, dimensions, and lift type match the proposed component;
- whether the track, brackets, drums, rollers, hinges, and attachments are within specification;
- whether a replacement changes the door's balance or opener compatibility;
- what final tests will be performed and recorded.
Panels, wood, aluminum, steel, and composite doors
Material affects the maintenance and replacement branch, but it does not determine it by itself.
Steel: Look for corrosion at edges, fastener points, lower sections, and damaged coatings. Clopay describes coated steel as a low-upkeep option that benefits from cleaning and touch-ups; treat that as manufacturer guidance for the cited product range, not a guarantee for every steel door. A dented section may be repairable cosmetically, replaceable as a matched section, or a sign that tracks and hardware need inspection. An insulated steel door may weigh more than a comparable non-insulated version, so record the exact product and require the provider to verify the opener and counterbalance rather than assuming existing settings. See the Clopay garage-door materials guide and insulation comparison.
Wood: Look for swelling, rot, open joints, cracked coating, unprotected edges, and water collection. Clopay says natural wood doors require periodic painting or staining to protect against moisture and sun; use the exact door’s care manual to decide whether recoating is allowed. Recoating can be a maintenance scope if the wood is sound, but rot at attachment areas, widespread distortion, or repeated coating failure needs professional diagnosis. Do not treat a fresh coat as structural repair. See the Clopay material guidance.
Aluminum and glass: Inspect frames, glazing, retainers, seals, fasteners, and impact damage. Clopay describes aluminum and glass doors as rust- and corrosion-resistant and aluminum as lightweight, but those product characteristics do not establish the condition of a particular installation. A cracked panel or loose retainer may require a product-specific component and professional handling. The visual finish and panel availability can make a one-section replacement less comparable than a full door. See the Clopay material guidance.
Composite: Check for delamination, swelling, cracked overlays, failed fasteners, and warranty-specific limitations. Clopay describes its composite overlay products as moisture-resistant and built over an insulated steel base, but another manufacturer's composite construction may differ. Composite does not mean maintenance-free, and a replacement section must match the actual system's weight and attachment details. See the Clopay material guidance and the exact product manual.
The current decision is not “which material lasts longest.” It is whether the existing material can deliver a documented safe, weather-appropriate, compatible system for the expected ownership period and exposure. If the material is no longer available, the warranty has expired, and the repair will create a visible or balance mismatch, request a full replacement alternative even if a localized repair is technically possible.
Wind exposure and structural implications
Wind exposure is a design and jurisdiction question, not a label to improvise. This guide does not determine a property's design pressure, wind approval, product label, permit, inspection, or attachment requirement; it treats exposure as a trigger for a local-authority handoff. Do not present a national model-code explanation as the property's rule. Ask the actual authority having jurisdiction for the adopted wind criteria, product evidence, and permit path, and retain that response with the quote documents.
For the property-specific handoff, ask the authority having jurisdiction—usually the city or county building department, but the actual agency depends on the address—to answer:
- Is a same-size replacement treated as repair, alteration, or replacement for permit purposes?
- Which code edition and local amendments apply?
- Does the property lie in a windborne-debris, hurricane, high-wind, or special wind region under the adopted rule?
- What positive and negative design pressures or product approvals are required for this opening?
- Is a permanent product label, engineering letter, installation drawing, or inspection required?
- Does opener replacement trigger an electrical, building, or other inspection?
- Are there historic-district, condominium, HOA, flood, coastal, or insurance requirements that affect the exterior appearance or product evidence?
For a concrete local example, if the authority having jurisdiction for the property is Miami-Dade County, Florida, the County's published stand-alone garage-door replacement checklist specifies a Category 22 building-permit application, total garage-door area, a contact sheet, an exterior-wall elevation with door sizes and product-approval numbers, and the current Notice of Acceptance for each garage door. The County's garage-door replacement permit checklist and Product Control Search are Miami-Dade County sources for that jurisdiction's process and for looking up approved products and positive or negative design-pressure fields. This is a local example, not a permit or wind rule for another Florida municipality, county, state, or property authority.
The answer must be recorded with the jurisdiction name, department, date, contact or webpage, and any permit reference. “The installer said no permit is needed” is not a local-rule record. If the replacement changes framing, opening size, header, jambs, or structural attachments, route the design to the appropriate qualified professional and permit authority.
Compare repair, component replacement, and full replacement on one scope sheet #
Comparable quotes require identical scope boundaries, named assumptions, and a clear division between supplied materials, installation, permits, disposal, testing, and warranty. Ask at least two appropriately qualified providers for a diagnostic visit when the cause is uncertain, and ask each provider to price the same alternatives where they are technically viable.
The minimum brief to send
Write the service request as a fact pattern:
Residential [attached/detached] garage at [city, state]. Door observed as [type], approximately [width × height], material [material], manufacturer/model [known or unknown], opener [manufacturer/model/age]. Photo-eye result: [result]. Obstruction/reversal result: [result]. Manual-balance observation: [result/not attempted]. Visible findings: [list]. Winter concern: [draft, water, ice, reliability, wind exposure, access]. Documents attached: [manual, warranty, prior invoice, photos]. Please diagnose before recommending parts, provide a repair/component/full-replacement alternative when appropriate, state assumptions, identify permit or product documentation requirements, and list final tests and warranty terms.
This wording preserves the provider's responsibility to diagnose. It also prevents the homeowner from instructing a technician to perform a spring adjustment because an online checklist suggested it.
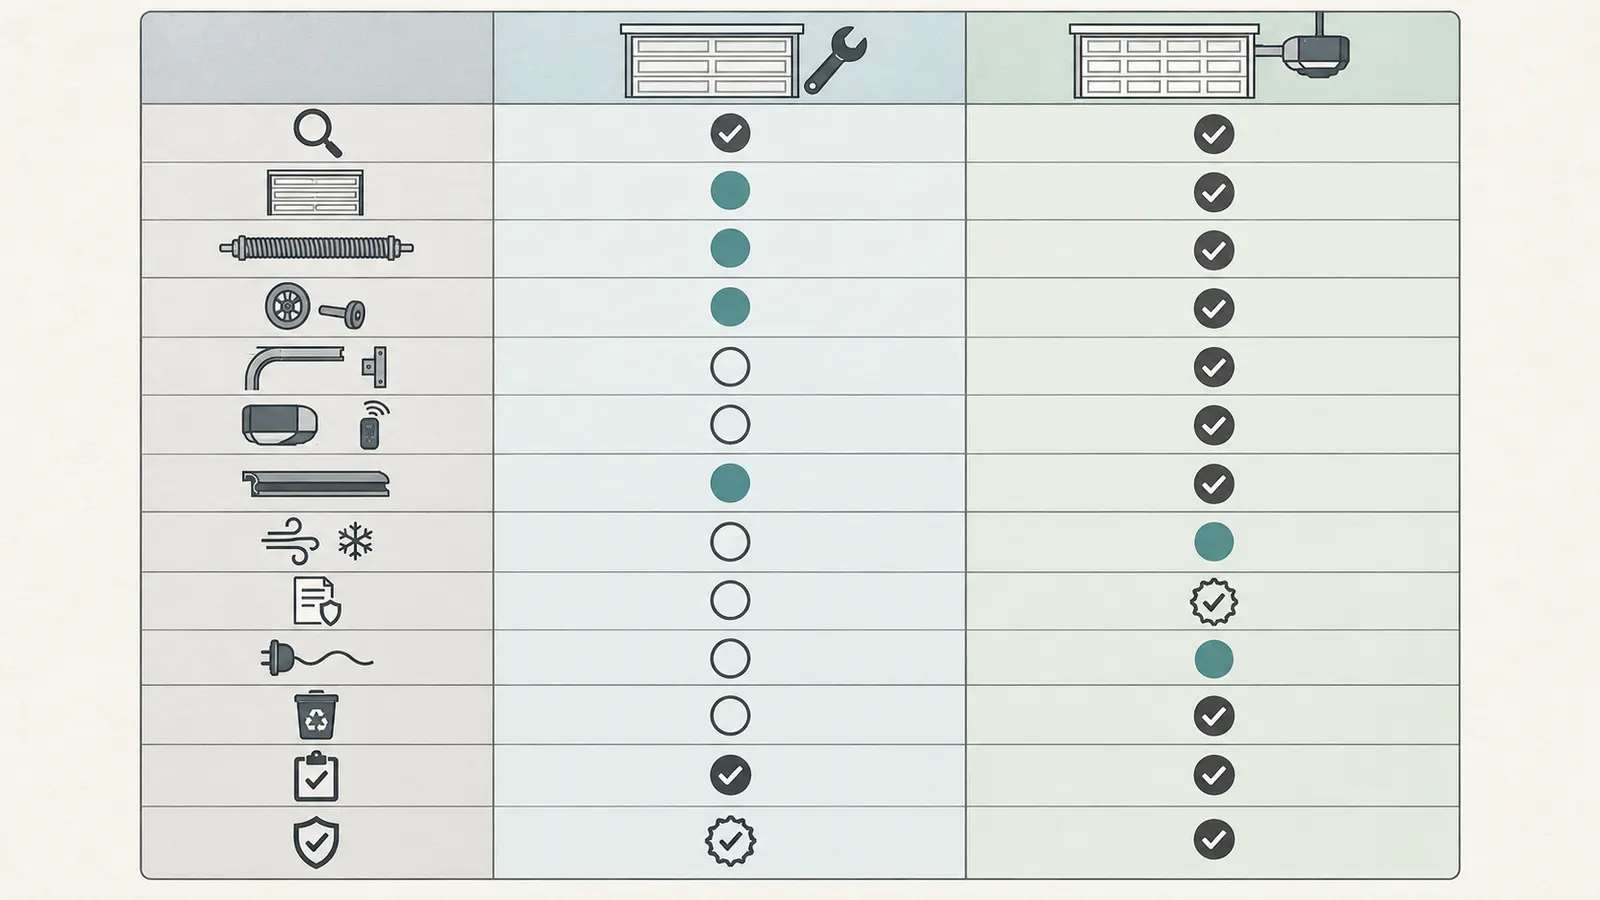
Normalize every quote into line items
Ask each provider to place “included,” “excluded,” “allowance,” or “not applicable” beside each line:
| Scope line | Repair or component option | Full door or opener option | Verification question |
|---|---|---|---|
| Diagnosis and safety inspection | Included or separate fee | Included before ordering | Is the fee credited, and what tests are included? |
| Door sections or panel | Repair or matched section | New door product and finish | Does the proposed section match weight, dimensions, finish, and availability? |
| Springs and counterbalance | Diagnosed repair or matched set | New matched system sized to new door | Who sizes and adjusts it, and what is excluded? |
| Cables, drums, rollers, hinges | Named parts and quantities | New hardware set or retained hardware | Are existing parts retained, and why are they compatible? |
| Tracks, brackets, rear hangers | Repair/replace and attachment work | New or retained per manufacturer | Is framing sound and are attachments included? |
| Opener | Repair accessory or opener replacement | New opener or retained opener | Is the operator rated and compatible with the door? |
| Photo eyes and controls | Alignment, wiring, or component | New controls/sensors as required | What happens if the test still fails? |
| Seals and threshold interface | Bottom/perimeter seals | New seals and retainer | Does the scope address floor slope and jamb gaps? |
| Wind documentation | Existing label or professional review | Product label, pressures, drawings | What authority or standard is being used, and is it local? |
| Permits and inspections | Identify responsibility | Identify responsibility | Who pulls the permit and schedules inspection? |
| Electrical work | Identify separately | Receptacle, wiring, or no change | Who is qualified and what jurisdiction rule applies? |
| Removal and disposal | Old parts and debris | Old door, tracks, opener, packaging | Are hazardous or oversized materials included? |
| Finish and trim | Patch/paint if included | Exterior and interior trim | What areas remain unfinished? |
| Testing and handover | Safety, balance, release, operation | Same plus product-specific commissioning | Will results be written down? |
| Warranty | Parts and labor terms | Product and installation terms | Who is the first contact, and what exclusions apply? |
Do not accept “complete replacement” as a sufficient scope. It should name the door manufacturer and series, dimensions, material, insulation description if relevant, windows, finish, hardware, wind label or pressure evidence, tracks, springs, opener, controls, seals, trim, disposal, permits, inspections, tests, and warranty. “Labor included” is not enough to know whether the old tracks, reinforcement, or electrical work are included.
Assign responsibilities explicitly
The homeowner is responsible for providing access, records, property constraints, the local address, and a decision about desired performance. The door professional is responsible for diagnosing the mechanical system within their qualifications, confirming compatibility, safe tension work, installation, adjustment, and final operation tests. The product manufacturer is responsible for the terms of its product warranty and instructions. The installer or dealer is responsible for the installation warranty they actually issue. The authority having jurisdiction is responsible for interpreting and administering its adopted building and permit rules. An electrician is responsible for electrical work within the applicable license and jurisdiction.
Those responsibilities should appear in the quote or work order. If no one is named for the permit, wind documentation, disposal, warranty registration, or final test, that is a scope gap rather than a homeowner task to silently absorb.
Treat a warranty as a routing document, not proof of quality
A warranty can tell you who to contact, what product family is covered, how long a term lasts, and what exclusions apply. It does not prove that the current installation is safe, that a replacement component is compatible, or that routine maintenance is covered. Record:
- product warranty term and start date;
- installation warranty term and start date;
- original purchaser and transfer rules;
- labor, parts, finish, glass, springs, opener, and seal coverage;
- maintenance obligations and exclusions;
- damage exclusions, including misuse, alteration, weather, settlement, or third-party parts if stated;
- claim process and first contact;
- whether replacement under warranty must use an authorized dealer or specified installer.
For Clopay, the manufacturer page presents warranty documents by model and the installation-warranty page identifies a one-year term for eligible replacement installations, with stated exclusions and dealer-first routing. The Clopay installation-warranty source supports that narrow claim only. A provider may offer a different labor warranty; attach the actual written terms to the worksheet.
Decide when two quotes are not enough
Two quotes are useful only when they are based on the same known condition. Get a third opinion or a more qualified specialist when:
- one provider recommends a spring or cable action and another recommends replacement without explaining the different diagnosis;
- the door is in a high-wind jurisdiction and no one identifies the governing authority or product pressure evidence;
- the quote assumes the existing opener is compatible but does not name the model or load range;
- the proposed section or panel is discontinued, visibly mismatched, or changes the door weight;
- the opening, jamb, header, or attachment condition is uncertain;
- the quote excludes permits, disposal, electrical work, trim, or post-installation testing;
- a failed safety test is described as an optional upgrade rather than a stop condition;
- the door is attached to a condominium, historic property, flood-prone area, or HOA-controlled exterior and approval is unknown.
The purpose is not to solicit endless bids. It is to resolve a material uncertainty before ordering a product that may not be legal, compatible, warrantable, or winter-ready.
Use the winter-readiness worksheet and an illustrative budget sensitivity #
The worksheet produces a defensible decision when every important input is marked observed, documented, unknown, or professional verification required, and when modeled costs are clearly separated from actual quotes. It is a comparison method, not a promise that a repair or replacement will cost a particular amount.
Fill the input block before looking at totals
Copy this block into your notes:
Property and jurisdiction
- Address or project identifier: ____________________
- City, state, and county: ____________________
- Authority having jurisdiction and contact/page: ____________________
- Date and answer about permit, inspection, wind, and product documentation: ____________________
- Attached or detached garage: ____________________
- Shared wall or ceiling with conditioned space: yes / no / unknown
- Winter-critical access or equipment: ____________________
Door identity
- Manufacturer and model/series: ____________________
- Install year or date: ____________________
- Type: ____________________
- Material: steel / wood / aluminum / composite / other / unknown
- Door width × height: ______ in × ______ in
- Sections: ______
- Windows/overlays/insulation: ____________________
- Wind label and positive/negative design pressures: ____________________
- Spring/lift type if documented: ____________________
Opener identity
- Manufacturer/model/serial or date code: ____________________
- Approximate age: ______ years
- Drive type and rated capacity if shown: ____________________
- Battery backup: yes / no / unknown
- Wall control, remote, keypad, smart accessory: ____________________
- Exact manual obtained: yes / no
Safety and condition
- Photo-eye test: pass / fail / not tested / manual differs
- Obstruction/reversal test: pass / fail / not tested / manual differs
- Manual-balance observation: holds / rises / falls / heavy / not attempted
- Emergency release instructions located: yes / no
- Broken spring visible: yes / no / unknown
- Frayed or displaced cable: yes / no / unknown
- Bent or detached track/hanger: yes / no / unknown
- Panel/section damage: ____________________
- Hinge/roller/fastener condition: ____________________
- Bottom seal: sound / cracked / hard / torn / missing / unknown
- Perimeter seal and light gaps: ____________________
- Water, ice, dirt, pest, or draft path: ____________________
- Corrosion, rot, delamination, or finish failure: ____________________
- Photos attached: yes / no
Warranty and records
- Product warranty located: yes / no / unknown
- Installation warranty located: yes / no / unknown
- Original installer/dealer: ____________________
- Prior service and parts: ____________________
- Warranty claim route: ____________________
Quote normalization
- Diagnostic visit: included / separate / unknown
- Door or section: ____________________
- Springs/cables/drums: ____________________
- Rollers/hinges/track/brackets: ____________________
- Opener and controls: ____________________
- Seals/threshold/trim: ____________________
- Wind documentation: ____________________
- Permit/inspection: ____________________
- Electrical: ____________________
- Removal/disposal: ____________________
- Final tests and handover records: ____________________
- Parts warranty: ____________________
- Labor/installation warranty: ____________________
Do not complete unknown fields with a guess. An unknown is an actionable next step: find the manual, photograph the label, call the building department, or ask for an on-site diagnosis.
Apply the decision gates in sequence
Use this sequence:
- Safety gate: If either opener test fails, or the door is unstable, heavy, broken, displaced, or unexpectedly moving, stop normal automatic use and arrange qualified service.
- Condition gate: If the door, tracks, attachments, springs, cables, or opening show damage, require diagnosis before choosing a part.
- Compatibility gate: If a component or opener is proposed, require manufacturer/model, weight, dimension, hardware, and installation-instruction compatibility.
- Jurisdiction gate: Before replacing the door or changing opening, framing, attachments, or electrical work, ask the named local building department about permits, inspections, wind, and product evidence.
- Warranty gate: Check whether a product or installation warranty changes the correct contact, part, installer, or documentation.
- Scope gate: Compare the same line items across repair, component, and full-replacement options.
- Winter gate: Confirm completion date, access during work, seal performance, release instructions, final tests, manuals, and warranty documents before the first freeze, storm, or heavy use period.
The gates prevent an attractive replacement quote from bypassing a failed safety test or local wind requirement. They also prevent a cheap repair from being approved when the provider has not confirmed the remaining system is compatible.
A modeled example with inputs, units, formula, and sensitivity
The following is an illustrative modeled example, not a market survey, contractor quote, or claimed price in any U.S. region. It demonstrates how to compare scopes. Replace every dollar value with a real written quote and keep tax, permit, financing, and site conditions separate.
Assume one 16 ft × 7 ft sectional door at a detached garage in a U.S. city. The door label is readable; the opener is 11 years old; the bottom seal is cracked; the door makes noise; the photo-eye test passes; the obstruction/reversal test passes; manual balance holds near midpoint; one roller is worn; the local building department has not yet confirmed whether a same-size replacement needs a permit; the wind label is present but its pressure values have not been compared with the jurisdiction.
Illustrative scope values
| Line item | Repair scenario R | Component scenario C | Full replacement scenario F |
|---|---|---|---|
| Diagnostic visit | $125 | $125 | $125 |
| Roller/hinge/service work | $260 | $420 | $0 |
| Bottom and perimeter seals | $140 | $180 | $180 |
| Opener | $0 | $650 | $650 |
| Door section or panels | $0 | $450 | $2,400 |
| New door hardware/springs/tracks | $0 | $0 | $850 |
| Installation labor | $350 | $550 | $1,050 |
| Removal/disposal | $0 | $75 | $250 |
| Permit/inspection allowance | $0 | $100 | $175 |
| Illustrative subtotal | $875 | $2,550 | $5,680 |
The formula is:
Scenario total = diagnosis + door/section + counterbalance/hardware + opener + seals + labor + disposal + permit/inspection + explicitly stated allowances
These numbers are deliberately simple so the method is inspectable. They do not claim that a 16 ft × 7 ft replacement costs $2,400, that an opener costs $650, or that any contractor will use these line items. The worksheet's value is that the same categories appear in every scenario.
Sensitivity 1: a hidden opening or wind requirement
Suppose the local authority requires additional product documentation, a different wind-rated door, or attachment work that the full replacement scenario did not include. Add a modeled $700 allowance to F and a modeled $350 professional review allowance to C. The totals become:
- R = $875, but R is not an acceptable choice if the current wind evidence is insufficient or the repair leaves the defect unresolved.
- C = $2,900.
- F = $6,380.
The decision is not “choose R because it is cheapest.” The safety and jurisdiction gates decide whether R is eligible at all. A lower ineligible scenario is not a lower-cost solution.
Sensitivity 2: the opener is compatible and reliable
If a qualified provider confirms that the existing opener is compatible with the proposed door, passes all tests after installation, and remains within the manufacturer's instructions, remove the modeled $650 opener line from C and F. C becomes $1,900 and F becomes $5,030. If the opener instead fails the reversal test or is not approved for the new door, the line cannot be removed just to make the replacement appear cheaper.
Sensitivity 3: repeat repair probability
To expose the tradeoff without inventing a failure rate, define a homeowner assumption rather than a claimed probability. Let p be the owner's estimated chance that another $600 repair will be needed within the planning horizon, and let r be the modeled cost of that repeat repair. The expected modeled repair exposure is:
repair exposure = current repair total + (p × r)
If p = 0.25 and r = $600, R exposure is $875 + (0.25 × $600) = $1,025. If p = 0.75, exposure is $875 + (0.75 × $600) = $1,325. These are decision sensitivities, not evidence that a garage door has a 25% or 75% failure probability. Use your documented prior invoices and the professional's diagnosis to choose whether a scenario assumption is reasonable, and show the assumption beside the result.
Sensitivity 4: winter access value
If the garage is the only vehicle exit, contains freeze-sensitive equipment, or serves a household member who cannot tolerate an unreliable door, a small price gap may not justify a high risk of delay. Do not convert that concern into a made-up dollar value. Record it as a priority constraint: “must be complete and verified by [date]” or “manual access must remain available during the work.”
Choose a scenario only after eligibility is clear
The worksheet supports these conclusions:
- Choose maintenance when the safety gate passes, the system is intact and compatible, and the work is limited to documented cleaning, approved lubrication, seal care, and non-invasive observation.
- Choose professional repair when a qualified diagnosis identifies a localized defect and the remaining system is safe, compatible, and worth preserving.
- Choose component replacement when a major part is at end of service but the door, opening, track, wind evidence, and opener relationship can be verified.
- Choose full replacement when multiple systems are failing, the door cannot meet the jurisdiction's requirements, the product is obsolete or unavailable, the opener and door are incompatible, damage is widespread, or repeated repairs no longer produce a documented safe and suitable system.
The modeled total is a comparison aid. It is not evidence of local price, and it cannot override a failed safety or jurisdiction gate.
Sequence the work and verify the winter handoff #
The winter sequence should move from evidence to diagnosis, then authorization, installation, verification, and records; it should not begin with ordering a door from a photograph. Give yourself schedule margin for a permit, product lead time, discontinued parts, weather, inspection, and a correction visit.
Phase 1: owner preparation
Complete the input block, gather the manuals and warranty records, take safe photographs, and run only the manual-approved safety observations. Write the city and state prominently. Identify the authority having jurisdiction before soliciting a replacement scope, especially where wind or a structural change could apply.
If the opener fails, the door is unstable, or a spring/cable/track defect is visible, record “professional stop” and limit the brief to safe access and documentation. Do not remove the opener, pull the release while the door is open, loosen hardware under load, or keep operating the door to see whether the defect worsens.
Phase 2: local-rule verification
Contact the actual local building department or other named authority for the property's address. Ask for a written webpage, email, permit number, or counter reference. Verify whether the planned work is:
- seal or finish maintenance only;
- component repair;
- same-size door replacement;
- opener replacement;
- opening, jamb, header, track support, or electrical alteration;
- wind-rated or impact-related work.
Record the edition and amendments the local authority applies. If the official answer is “no permit,” ask whether wind label, inspection, product approval, or technical provisions still apply. If the authority cannot answer from the information supplied, ask what documents a permit reviewer needs. Keep the authority's written response or reference number; this guide does not name a single national permit rule because the actual jurisdiction controls.
Phase 3: diagnostic and comparable quotes
Send the same brief to providers who are qualified for the work. Ask each one to identify what they inspected, what they are assuming, what they will not touch, what parts are included, and which tests happen at completion. For repair, ask whether the recommendation preserves the existing door's compatibility, balance, wind evidence, and warranty. For replacement, ask who verifies the opening and who is responsible for the permit and final inspection.
Request the repair and replacement options in writing even if the professional recommends one strongly. A good recommendation explains why an alternative is excluded. “We cannot safely repair the existing system because the model is discontinued and the wind label cannot be established” is a decision explanation. “You need a new door” without a condition record is not.
Phase 4: authorization and order review
Before paying a deposit, verify:
- door and opener model, size, material, finish, insulation description, windows, and hardware;
- wind pressure or product documentation required by the local authority;
- opening measurements and attachment assumptions;
- permits, inspections, and who obtains them;
- schedule, access, temporary closure, and weather contingencies;
- scope for old door, tracks, springs, opener, packaging, and disposal;
- electrical scope and responsible qualified person;
- product warranty, installation/labor warranty, maintenance requirements, and claim path;
- final tests, manuals, keys/remotes, code reset, and handover records.
Do not sign a scope that contains an allowance for a safety-critical component without a cap, a decision rule, and written approval requirement. If a provider cannot know the exact spring or hardware until the site visit, the quote should say how the change will be priced and approved.
Phase 5: installation or repair day
Keep children, pets, vehicles, and stored items away from the work zone. Confirm who controls the opener during the work. Do not ask the installer to leave a door partially supported while the crew departs. If work changes the opening, framing, or electrical arrangement, confirm the inspection sequence before concealing or finishing the affected area.
For a repair, verify that the defective component is identified and that adjacent parts were checked for damage. For a new door, verify that the old system was removed as promised and that the new product label, manual, installation drawings, and warranty documents are retained. For an opener replacement, verify that the door itself is balanced and moves correctly before the new operator is commissioned.
Phase 6: final verification
The final handoff is complete only when the door, opener, safety devices, emergency release, seals, access controls, and documentation are verified. Ask the installer to demonstrate and document:
- full open and close travel without binding or unexpected movement;
- photo-eye response using the product instructions;
- obstruction/reversal response using the product instructions;
- manual-release operation and reattachment;
- balance or counterbalance observation;
- wall control, remotes, keypad, smart accessory, and battery backup if present;
- seal contact at the floor and perimeter, with no unresolved gap claimed to be fixed by caulk alone;
- visible attachment, track, bracket, and opener reinforcement condition;
- product model, serial, installation date, and warranty registration route;
- permit or inspection record, if required by the authority;
- care, lubrication, cleaning, paint/stain, and winter operating instructions.
Take photographs of labels and documents, not only of the finished façade. Ask for any exceptions in writing. If the final reversal test fails, do not accept “it just needs to settle” as the final condition; the safety function must be diagnosed and corrected before normal automatic use.
Confirm the warranty handoff
Write down the first call for each issue:
- product defect: manufacturer or authorized dealer shown in the product warranty;
- installation defect: installer or dealer under the written installation warranty;
- opener defect: opener manufacturer or installer as the warranty states;
- permit or inspection issue: the authority having jurisdiction;
- electrical issue: the responsible qualified electrician or authority-required trade;
- damage from impact, wind, water, settlement, or alteration: the party identified by the applicable warranty or insurance process.
For Clopay, its published installation-warranty route is dealer-first for eligible replacement installations, and it separates installation defects from product warranty terms. Preserve the Clopay warranty page and the Clopay installation warranty with your handover folder if those products and installers are involved. If not, use the actual brand's documents.
Turn the result into an ownership maintenance record #
The next decision after winter work is not “never think about the door again”; it is when to repeat the owner's safe observations and when to bring a professional back. Record the baseline while the system is known to pass, then compare future changes to it.
A practical owner schedule
Use the exact product manual when it calls for a different interval. A conservative record can include:
| Timing | Owner action | Record | Escalate when |
|---|---|---|---|
| Monthly or manual interval | Observe photo-eye and reversal behavior using the manual's test; keep the path clear | Date, manual/test object, result, error light | Any failed or changed safety response |
| Monthly visual check | Look at seals, panels, tracks, rollers, hinges, cables, springs, brackets, and opener attachment from safe positions | Photos or short notes | Any broken, frayed, displaced, bent, cracked, or loose condition |
| Season change | Check bottom/perimeter seals, threshold, drafts, water, ice path, and emergency-access plan | Weather observation and repair status | Seal replacement does not close a structural or alignment gap |
| Annually | Arrange professional inspection consistent with the manufacturer's annual-inspection guidance and local needs | Provider, date, findings, completed work | No written result, unresolved defect, or recurring failure |
| After impact or severe wind | Keep the door closed if safe, inspect from a distance, and call for assessment if anything changed | Event date, photos, authority/insurer contact | Door, opening, tracks, label, or attachments may have changed |
| After any adjustment or repair | Repeat the manual-approved safety tests and record the result | Before/after results, invoice, warranty | Any failed test or unexplained behavior |
Clopay's current cable-maintenance guidance recommends an annual technician check of the system, including cables, and its current maintenance guidance discusses seasonal seal, sensor, balance, and emergency-release observations. Those are useful manufacturer references, not a universal legal schedule or promise that one annual visit is sufficient for every door, climate, or use pattern.
What changes the next decision
Open the worksheet again when any of these occurs:
- a safety test changes from pass to fail;
- the door becomes heavy, crooked, noisy, shaky, or difficult to move;
- the opener begins to reverse, stop, or report an error;
- a spring, cable, roller, hinge, track, bracket, window, or panel is damaged;
- the door leaks, drafts, admits pests, or freezes at the threshold;
- a storm, vehicle impact, or settlement changes the opening;
- the product label or warranty information cannot be found;
- a repair quote grows to include several unrelated parts;
- the local authority changes its adopted code or a property status changes;
- the household's winter access, conditioning, security, or wind exposure changes.
If a small maintenance action repeatedly leads to a new repair, do not automatically buy a new door. Look for the system cause and ask a qualified professional whether the door, opener, opening, or installation context is the limiting component. Conversely, do not preserve an old system solely because one seal is inexpensive when the same record shows failed safety, missing wind evidence, obsolete parts, and repeated breakdowns.
The completed decision statement
Finish the worksheet with one sentence that names the evidence and the next handoff:
As of [date], the [door/opener] at [city, state] is [winter-ready / owner-maintenance only / awaiting qualified repair / awaiting replacement decision] because [observed and documented reasons]. The next responsible party is [homeowner / door professional / installer / manufacturer / authority having jurisdiction / electrician], who must verify [specific unresolved item] before [date or winter condition].
Examples:
- “As of October 12, the door passes both manual-approved safety tests, holds near midpoint, has intact panels and track, and needs only a replaceable bottom seal; the homeowner will verify the seal model and complete the maintenance record before the first freeze.”
- “As of October 12, the opener fails the obstruction test and the door is heavy when disconnected; automatic use is stopped, and a qualified door professional must diagnose balance and reversal before any quote is accepted.”
- “As of October 12, the door has repeated panel and roller repairs, its wind label cannot be matched to the city requirement, and the opener model is not confirmed; the homeowner will obtain the building department's written direction and a comparable replacement scope.”
That sentence keeps the decision auditable. It also makes the handover useful to the next owner, service provider, insurer, or permit reviewer without claiming that a remote article inspected the installation.
Final winter-readiness checklist
- Door and opener manufacturer, model, dimensions, and installation date are recorded.
- Exact manuals and warranty terms are saved.
- Photo-eye and reversal tests were performed only as the manual permits and the results are recorded.
- Manual-balance observation was completed safely or explicitly deferred to a professional.
- Springs, cables, tracks, brackets, and structural attachments were not adjusted by the homeowner.
- Seals, threshold, water path, draft, ice risk, and shared-wall conditions are documented.
- Wind exposure and product-label requirements were checked with the actual local building department where applicable.
- Repair, component, and full-replacement scopes use the same line items and identify exclusions.
- Disposal, permits, electrical work, inspection, final testing, and warranties have named owners.
- A completion date includes time for product delays, weather, corrections, and inspection.
- Final safety, release, balance, operation, seal, access-control, and documentation checks are written down.
- The next owner check and professional-inspection date are entered in the home maintenance record.
The most reliable winter plan is therefore a small evidence package: the condition worksheet, safe test results, model and warranty documents, local-rule record, normalized quotes, and final handoff record. It gives the homeowner a clear next decision without pretending that a spring adjustment, structural change, electrical repair, wind rating, permit, or safety certification can be completed from a remote checklist.
Cite this guide
Brictale. “How to Plan a Garage Door Repair or Replacement Before Winter.” Published 2026-10-04; updated 2026-10-04.
https://brictale.com/build/handover/plan-garage-door-repair-or-replacement-before-winter · Read the Markdown version
Original contribution: Garage-door winter-readiness repair-versus-replacement worksheet. A source-backed worksheet that turns safety results, door condition, compatibility, warranty status, wind exposure, and normalized quote scope into a documented winter decision.
Sources and scope
Evidence behind this page
- Clopay's residential maintenance guidance recommends cleaning tracks, tightening loose hardware without overtightening, lubricating specified moving parts, testing the pressure/auto-reverse and photoelectric safety features, checking manual balance, and inspecting seals before winter.
Garage Door Replacement Parts Guide
Manufacturer guidance for Clopay residential garage doors; maintenance observations and seasonal preparation, not a universal repair specification for every brand or model.
Accessed · Link to this claim - Clopay's current maintenance guidance says an unbalanced door should not be fixed by the homeowner and describes professional technicians checking springs, cables, pulleys, safety reversal, and worn components; it identifies those tensioned parts as work for a professional.
Garage Door Replacement Parts Guide
Current Clopay residential maintenance guidance; used to distinguish safe homeowner observation from balance, spring, cable, pulley, and related professional work. It is not a universal repair specification for every brand or model.
Accessed · Link to this claim - Clopay's current cable-maintenance guidance tells homeowners to schedule an annual technician inspection of the garage-door system, including the cables, while using monthly visual checks to identify fraying, rust, slack, or other damage.
Current Clopay manufacturer guidance for its residential garage-door systems; an annual inspection recommendation, not a universal legal schedule or substitute for the installed product manual and local needs.
Accessed · Link to this claim - Clopay presents residential garage-door warranties by model or product family, so warranty routing requires identifying the actual door model and reviewing its applicable terms rather than assuming one warranty applies to every Clopay door.
Garage Door Warranty and Registration Information
Clopay warranty information for its residential product families; not a warranty statement for other manufacturers.
Accessed · Link to this claim - Clopay states that its one-year residential installation warranty applies to replacement doors installed by specified authorized dealer categories, begins when work is completed, and has exclusions and a dealer-first contact path.
Residential Garage Door Installation Warranty
Clopay replacement-door installation warranty only; not a national warranty rule and not evidence that another installer or manufacturer offers the same coverage.
Accessed · Link to this claim - The CPSC identifies 16 CFR Part 1211 as the mandatory federal consumer-product safety standard for automatic residential garage-door operators and notes certification requirements.
Automatic Residential Garage Door Operators
United States federal product-safety standard for automatic residential garage-door operators; it does not answer a local building-permit question or diagnose an installed system.
Accessed · Link to this claim - 16 CFR § 1211.16 requires covered operator instructions to include installation, operation, and user-maintenance instructions. Its required installation warning says to install only a properly balanced door and to have a qualified service person make repairs to cables, spring assemblies, and other hardware before installing the opener; this is a product-standard warning and pre-installation instruction, not a blanket federal qualification rule for every garage-door repair.
16 CFR § 1211.16 — Instruction manual
Official eCFR text for the United States federal product standard; applies to covered residential operators and is not a substitute for the exact current manufacturer manual. Brictale's conservative professional-only repair boundary is editorial safety scope, not a claim that federal law licenses every repair.
Accessed · Link to this claim - 16 CFR § 1211.7 requires covered vertically moving residential operator systems to initiate reversal within two seconds of contact with the specified obstruction, subject to the rule's stated travel exception and test conditions; the floor test specifies a 1-inch-high solid object and defined installation and force conditions.
16 CFR § 1211.7 — Inherent primary entrapment protection requirements
Official eCFR text for the United States federal operator performance requirement; a homeowner's field test is a safety screen, not a certification test, and the installed manual controls the homeowner procedure.
Accessed · Link to this claim - 16 CFR § 1211.9 requires covered operators to provide a manual detachment means and specifies requirements for the red handle and detachment function, while also addressing adjustment access and live-part exposure.
16 CFR § 1211.9 — Additional entrapment protection requirements
Official eCFR text for the United States federal operator standard; the exact emergency-release procedure and any limitations still come from the installed operator's manual.
Accessed · Link to this claim - Clopay's residential materials guide describes steel as a coated, low-upkeep option; composite overlay doors as an insulated steel base with a moisture-resistant composite overlay; natural wood as requiring periodic painting or staining for moisture and sun protection; and aluminum and glass as rust- and corrosion-resistant, with aluminum described as lightweight.
Residential Garage Door Material Options
Clopay manufacturer descriptions of its residential material options; these characteristics are not universal specifications for every manufacturer or installed door.
Accessed · Link to this claim - Clopay's insulated-versus-non-insulated comparison says adding insulation increases overall door weight, that a heavier door may require a more powerful opener, and that the added weight can contribute to wear on the opener and other moving parts.
Insulated vs. Non-Insulated Garage Doors
Clopay manufacturer comparison of its residential insulated and non-insulated door options; the exact weight, opener rating, balance, and compatibility must be verified for the installed or proposed model.
Accessed · Link to this claim - The U.S. Department of Energy describes weatherstripping as an air-sealing method for moving components such as doors and distinguishes it from caulk for stationary joints; it also identifies garage-separation gaps as an air-sealing location in applicable retrofit guidance.
Energy-Efficient Home Improvement Credit Insulation and Air-Sealing Essentials
U.S. Department of Energy building-envelope guidance and 2021 IECC context; it does not establish a garage-door replacement requirement or a specific product R-value.
Accessed · Link to this claim - For properties whose authority having jurisdiction is Miami-Dade County, Florida, the County's published stand-alone garage-door replacement permit checklist specifies a Category 22 permit application, total garage-door area, a contact sheet, an exterior-wall elevation with door sizes and product-approval numbers, and the current Notice of Acceptance for each garage door; the County's Product Control database supports searching approved products and design pressures.
Windows, Shutters, Doors and Security Bars — Garage Door Replacement
Miami-Dade County, Florida's published building-permit checklist and product-control process for the jurisdiction's stand-alone garage-door replacement permits; not a rule for another Florida municipality, county, state, or property authority.
Accessed · Link to this claim - Miami-Dade County's official Product Control Search states that its database searches products, certificates, and listings approved for use on buildings and provides search fields for maximum positive and negative design pressure.
Official Miami-Dade County, Florida product-control search interface; it is a lookup resource and does not determine whether a particular property or proposed installation satisfies every permit or engineering requirement.
Accessed · Link to this claim