How to Verify Passive-Design Assumptions Before Plan Freeze
Use a project-specific packet to verify orientation, glazing, shading and thermal mass before freezing a new-home design.
The short answer
Before freezing a new-home plan, document the site coordinates and true north, nearby obstructions, room use, window geometry and product ratings, shade dimensions, thermal-mass and ventilation assumptions. Have the architect and qualified energy modeler run one traceable base case plus controlled sensitivities using the project weather file. Freeze only when the outputs and unresolved risks support the homeowner’s agreed decision; otherwise revise or obtain the missing evidence.How to Verify Passive-Design Assumptions Before Plan Freeze
Before freezing a new-home plan, document the site coordinates and true north, nearby obstructions, room use, window geometry and product ratings, shade dimensions, thermal-mass and ventilation assumptions. Have the architect and a qualified energy modeler run one traceable base case plus controlled sensitivities using the project weather file. Freeze only when the outputs and unresolved risks support the homeowner’s agreed decision; otherwise revise or obtain the missing evidence.
This guide is for a United States homeowner moving from schematic design toward design development. It is about deciding whether an orientation, glazing, shading and thermal-mass concept has enough project-specific evidence to freeze. It is not permit-ready documentation, structural sizing, HVAC sizing, code compliance, a comfort certification, a product test or a promise that the finished home will perform as modeled. If a rule is relevant to your project, record the actual authority and jurisdiction by its proper name—for example, the responsible city building department, county planning office or state program office—with your architect or building official. This guide does not state a national or local rule.
If your brief is still being formed, use Brictale’s design and layout journey to keep site constraints, room priorities and later verification connected.
A plan freeze is an evidence decision, not a promising sketch #
A passive-design concept is ready to freeze only when the project team can show which assumptions drive the result, who supplied each input, how the base case was modeled, what controlled sensitivities changed, and which risks remain. A sketch that points toward the sun is not evidence by itself. The decision is to freeze, revise, or obtain more evidence—not to declare a home universally passive, comfortable or code compliant.
What “verify” means at this design stage
At schematic design, a passive-design promise often sounds simple: rotate the house toward the sun, add south glass, put mass on the floor, shade the windows and let the house stay comfortable. Each phrase hides a chain of dependencies:
- The site has a latitude, longitude, elevation, horizon and true-north reference.
- The proposed building has a position, shape, roof and window geometry.
- Trees, neighboring buildings, terrain, fences and the building itself change solar access.
- Each room has a use, occupancy pattern, lighting need, privacy expectation and comfort priority.
- Each window has an actual size, orientation, frame, U-factor, solar heat gain coefficient (SHGC), visible transmittance (VT), operability and shading relationship.
- Thermal mass is not just a material name. Its location, exposed surface, thickness, heat capacity, interior finish and connection to room air determine whether it participates in the daily cycle.
- Natural ventilation is not just “windows open.” It has an opening area, wind exposure, operating schedule, security limit, noise condition and weather boundary.
- The weather file, solar data, occupancy schedule and model conventions affect the outputs.
The verification task converts those statements into documented inputs and then tests whether the design conclusion survives reasonable variation. DOE describes whole-building energy modeling as a physics-based simulation that combines geometry, materials, systems, controls, schedules and local weather, often using hourly or shorter intervals and producing energy and comfort-related metrics. That is why a model request that only includes a floor plan and a general climate zone is incomplete. DOE’s overview of building energy modeling supports the input inventory, but it does not set a pass/fail threshold for your home.
This is also why the timing matters. DOE’s architectural-design guidance describes modeling as a way to quantify project-specific trade-offs and notes that orientation, floor plan and major façade decisions are commonly settled early. Once the roof form, window openings, structural grid, exterior shading or room layout is frozen, a later performance concern can require a costly chain of revisions. DOE’s Building Energy Modeling 101 guidance supports modeling early; it does not say that every home needs one particular software package.
The compact originality brief
Current answers explain the ingredients. DOE and NREL explain passive-solar elements such as apertures, thermal mass, heat distribution and control; DOE explains window metrics and whole-building modeling; LBNL explains that shade performance depends on climate and use; and ORNL describes the need to balance energy, daylight, glare, views and comfort. Those answers are useful, but they generally stop before the homeowner’s design-freeze decision.
The missing decision is: does this particular site-and-house concept have enough traceable evidence to freeze, or should the team change it while the design is still flexible?
The original contribution in this article is the Passive-Design Verification Packet. Its method is to inventory project inputs, assign responsibility, create a base case, run one controlled change at a time, compare multiple outputs, and close with a freeze, revise or obtain-more-evidence decision. Its method is described in detail below so another homeowner, architect or modeler can reproduce the review rather than merely trust a conclusion.
The packet’s limitations are equally important. It is not a code document, permit submission, engineering calculation, HVAC sizing report, comfort certification, product rating, site survey, laboratory test or guarantee. Example numbers and calculations are illustrative. They show how to make an assumption inspectable; they do not predict a real home. A reviewer can check the contribution by tracing every packet field to a drawing, survey, product record, weather file, model input, output report or unresolved-risk entry.
Contribution method and limitations in full
Contribution title: Passive-Design Verification Packet.
Method: Start with measured or documented project inputs, assign each input to a responsible person, create one traceable base case, vary one material assumption at a time, compare daylight, glare, thermal-comfort and energy outputs, and record the next handoff using the decision matrix in the article.
Limitations: This is an editorial decision aid, not a code-compliance report, permit document, structural or HVAC calculation, comfort certification, product test, site survey or guarantee of performance. The example inputs and calculations are illustrative and must be replaced with project-specific evidence.
Those limitations change how the packet should be used. It is a record of the decision process, not an extra professional credential. It can expose an omitted window, an unrealistic shade schedule or an untested obstruction. It cannot tell a homeowner whether a beam can carry an overhang, whether a roof edge will leak, whether a window meets a local energy provision, or whether an HVAC system is correctly sized. Those questions belong to the professionals whose scopes include them and to the actual authority having jurisdiction when a rule is involved.
The packet is most valuable when it is created before the team feels finished. At that point, the homeowner can still ask for a different room relationship, a smaller west window, a deeper exterior shade, a different glazing path, a more exposed mass surface or an alternative ventilation strategy. After the design is frozen, the same question may require changes to structure, waterproofing, electrical controls, interior finishes or procurement. The packet does not eliminate those costs, but it makes the trigger for reopening the design visible.
The three possible decisions
Use three outcomes so uncertainty does not get hidden inside the word “approved.”
| Decision | Meaning | Evidence required | Next handoff |
|---|---|---|---|
| Freeze the concept | The material assumptions are documented, the base and sensitivities answer the agreed questions, and remaining risks are named and accepted. | Packet complete enough for the assumptions that affect orientation, glazing, shading, mass and ventilation; model files and output records retained. | Architect incorporates the verified concept into design development and identifies any assumptions that must remain on the drawing set. |
| Revise before freeze | A material sensitivity changes an agreed comfort, glare, daylight, solar-gain or operational outcome, or the design depends on a behavior the household will not accept. | Affected input, comparison case, consequence and responsible decision-maker identified. | Architect revises massing, room layout, window, shade, mass or ventilation concept; modeler reruns the changed case. |
| Obtain more evidence | The decision might be sound, but a missing or weak input prevents a defensible comparison. | Missing field, reason it matters, source needed, owner and due date recorded. | Surveyor, architect, window supplier, energy modeler, rater or other qualified professional supplies the evidence. |
Do not use “freeze” to mean that every detail is final. A design-development package can preserve an assumption as an explicit hold point. For example, the room may be fixed while the exact window series remains open, provided the model includes a bounded product range and the window supplier later confirms that the selected product fits the range. If the final product could change the conclusion, the window decision is not yet harmlessly open.
What this decision does not authorize
The packet does not authorize you to climb a roof to measure an overhang, remove a wall, alter a structural opening, install electrical controls, change a ventilation system, or make a code interpretation. A homeowner can gather photographs, dimensions from grade, product literature and household preferences. A qualified professional should handle roof access, survey control, structural implications, detailed solar studies when needed, mechanical design, electrical work and jurisdiction-specific compliance.
The remote limit matters. A satellite view may miss a seasonal tree canopy, a future neighboring building, a grade change, a tall fence, reflected glare or a roof edge that shades the glazing. A model can be precise about the wrong site. Treat remote observations as provisional until the architect, surveyor or modeler confirms the condition that matters to the design.
Assemble the packet before asking for a model #
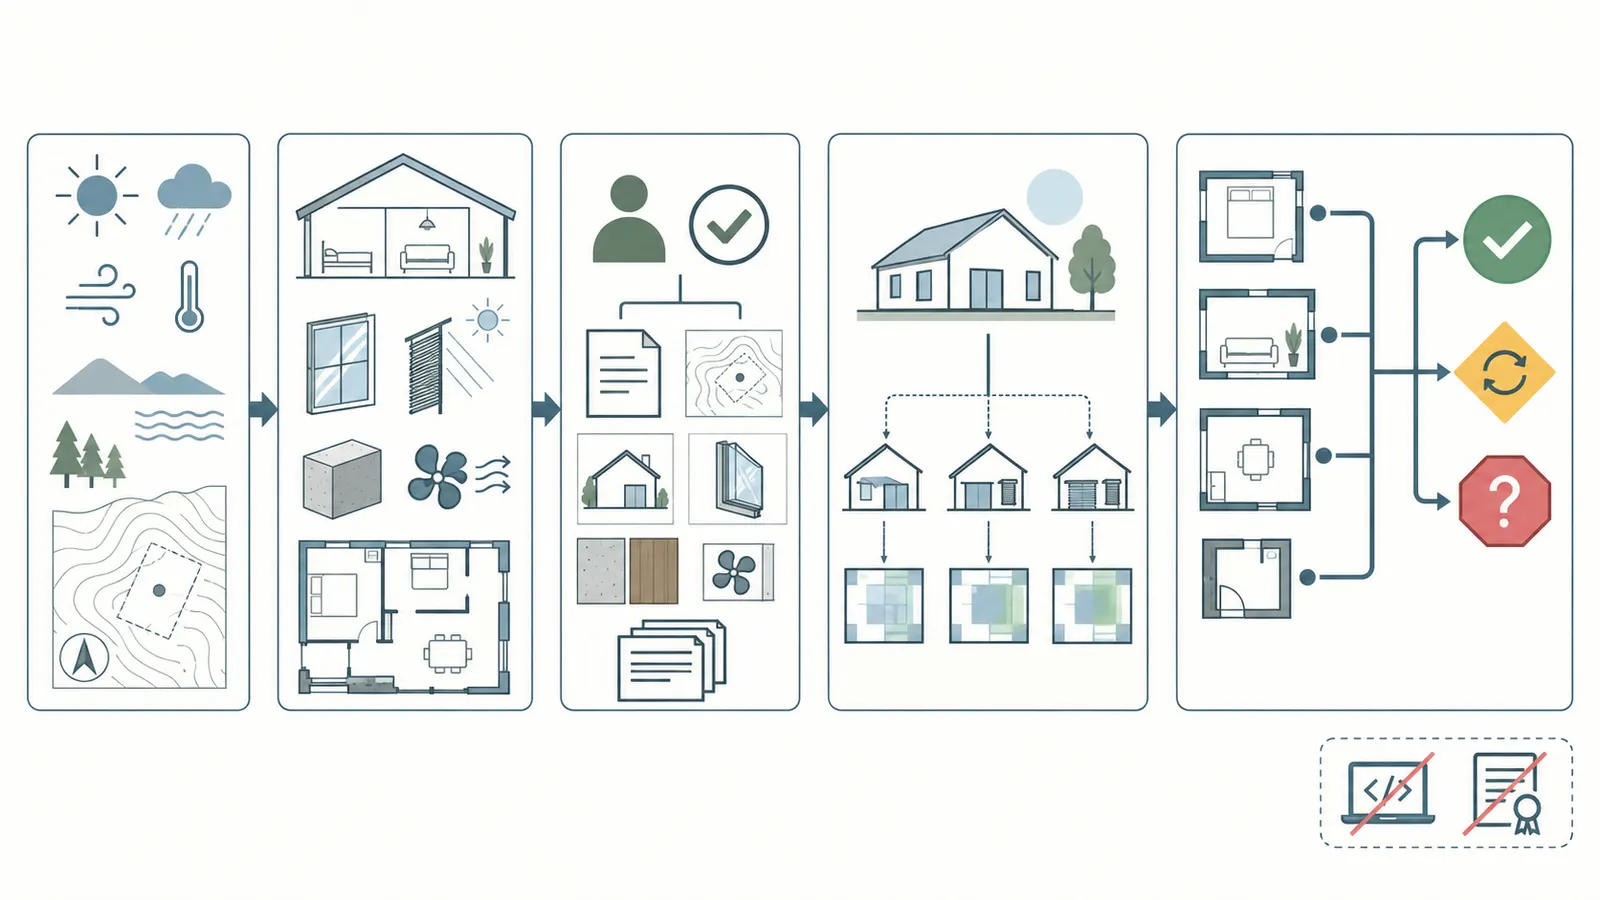
The model should begin with a controlled input record, not with a software screenshot. Gather the site, household, room, window, shading, mass, ventilation and weather assumptions first. If a field is unknown, write “unknown,” identify its owner and explain the likely decision impact; never let an undocumented default masquerade as a verified project fact.
Start with the site and solar reference
Record the property address and the latitude and longitude used by the model. If the property is large, sloped or irregular, record the coordinate reference point and explain whether it represents the proposed house, the center of the lot or a weather-station mapping point. Use consistent units: decimal degrees for coordinates, feet or meters for dimensions, degrees for azimuths, and a named convention for clockwise rotation from true north.
Record true north, not merely the top edge of a screenshot. The architect or modeler should state how true north was established: survey, civil plan, geospatial source, instrument reading or another documented method. Magnetic north can differ from true north, and a drawing can be rotated for convenience. The packet needs the model’s north arrow and the drawing’s north arrow tied together.
Map the proposed building footprint, roof edges, floor elevations, window centerlines, grade and the relevant horizon. Then record obstructions that can materially change solar access:
- existing buildings and their approximate height, distance and façade position;
- neighboring buildings likely to remain or be built under a known project condition;
- evergreen and deciduous trees, including seasonal leaf condition if relevant;
- terrain, retaining walls, fences and outbuildings;
- the proposed house’s own roof, porch, upper floor, wing or chimney that may shade a lower window;
- reflective surfaces that could increase glare or unwanted solar gain;
- privacy, noise and security constraints that could prevent a window from operating as assumed.
DOE’s passive-solar guide identifies orientation, room layout, materials and surrounding outdoor conditions as interacting parts of passive design. It gives an example of windows within 30 degrees of true south and winter solar access, but that example is not a universal requirement and cannot replace site-specific modeling. The DOE passive-solar guide is best used here as an element checklist, not as a promise that one compass rule will work everywhere.
Record the household and room priorities
A house is not occupied by an abstract average household. Write down the people, pets, work patterns and rooms that matter to the decision. The modeler can standardize some schedules for comparison, but the homeowner must know where the standardized schedule differs from real life.
For each room or thermal zone affected by the passive concept, record:
- room name and intended use;
- floor area, ceiling height and adjacency to other rooms;
- typical weekday and weekend occupied periods;
- sleep, work, cooking, exercise or quiet-use periods;
- desired daylight condition and whether screens or glare-sensitive tasks are present;
- privacy and view priorities;
- whether the occupants would close shades, open windows or move activities when conditions change;
- whether a room can tolerate a wider temperature swing than a bedroom, nursery, office or archival storage area;
- any accessibility, respiratory, acoustic, security or caregiving constraint that changes how the space can be operated.
Do not silently substitute a modeler’s default occupancy for the household’s decision. A standard schedule can be useful for comparing cases, but it is not proof that the result will match a household that works from home, sleeps during the day, leaves pets alone, cooks heavily or refuses to operate manual shades. DOE’s modeling overview specifically identifies occupancy, lighting, plug-load and thermostat schedules as model inputs. The DOE modeling overview supports making those schedules visible.
Record window geometry and ratings separately
A window is not a single line item called “high performance.” For each opening, record the orientation, rough opening or actual modeled size, sill and head height, frame and glazing description, operability, interior finish relationship, exterior shade relationship and the source of each performance value.
At minimum, the packet should show:
| Window field | Record | Why it matters |
|---|---|---|
| Orientation | Wall azimuth from true north | Changes sun path, heat gain, glare and shading geometry. |
| Width and height | Inches, feet or millimeters; state whether rough opening or glazed area | Affects aperture, daylight and solar gain. |
| Head and sill | Height above finished floor or grade | Changes view, sun penetration and overhang relationship. |
| Window-to-wall ratio | Glazed area divided by wall area, with the areas defined | Helps compare massing and façade alternatives consistently. |
| U-factor | Product or assembly value with rating basis identified | Represents thermal transmittance in the selected product record; compare like with like. |
| SHGC | Product or assembly value with rating basis identified | Represents solar heat-gain behavior in the selected product record. |
| VT | Visible-transmittance value and source | Affects daylight transmission and interacts with glare and shade choices. |
| Frame and edge condition | Frame material, spacer or modeled equivalent if known | Can affect thermal behavior and view area. |
| Operation | Fixed, awning, casement, slider or other; opening limits | Determines whether natural ventilation is physically available. |
| Shade | Fixed or operable; exterior or interior; geometry and control | Changes direct sun, heat gain, daylight, glare and occupant behavior. |
DOE’s fenestration guidance says window energy effects vary by climate and identifies U-factor and SHGC as primary efficiency properties, which is why the packet records the climate and the values together rather than selecting a rating in isolation. DOE’s residential fenestration guidance is federal purchasing guidance, not a homeowner mandate or a complete product-selection instruction.
Do not infer VT from a marketing phrase such as “bright,” “clear,” “solar control” or “low-e.” Ask for the actual value and the rating or simulation basis. Do not infer SHGC from U-factor. A low U-factor does not, by itself, show that a south or west window will avoid overheating, and a low SHGC can reduce useful winter gain in a design that depends on it. The packet’s job is to preserve those trade-offs for the modeler and homeowner to review.
Review the window record with the supplier
When the homeowner or architect sends a window request to a supplier, ask for enough information to compare the product to the model rather than merely confirm that the brand is familiar. Request the exact series or model, nominal and actual size basis, frame type, glazing build-up, U-factor, SHGC, VT, operability, spacer or edge description if relevant, and whether the values apply to the whole window or a different rating basis. Ask whether the record is current and whether the listed value changes with size or configuration.
Keep separate records for the window and the shade. A supplier may provide a glazing value while the architect or shade manufacturer provides the exterior screen or overhang geometry. If a screen, film, louver or blind has its own optical or thermal data, preserve the source and the deployment state. If the attachment is not represented in the available model, the modeler should state whether a proxy, range or more detailed method is appropriate.
Ask the supplier or architect to flag product constraints that affect the design decision: maximum size, mullion location, opening type, hardware, insect screen, egress or safety needs, privacy glass, tint, exterior attachment, cleaning access and replacement path. These are not all passive-design metrics, but they can force a window to move, shrink or become fixed. A product that performs well in a model but cannot be purchased in the required size is not a verified design option.
The homeowner should not turn a supplier conversation into a performance guarantee. Keep the product record as evidence for a case, then ask the modeler whether the product is within the modeled range and ask the architect whether the installation and detailing scope remains valid. DOE’s fenestration guidance emphasizes climate-dependent U-factor and SHGC decisions, while LBNL’s attachment research emphasizes climate, orientation and use. DOE’s fenestration guidance and LBNL’s attachment research support this division of responsibilities.
Describe shade dimensions instead of naming a shade concept
“Add a deep overhang” is not a model input. Record the horizontal projection, vertical position relative to each window, side returns, adjacent fins, window recess, roof or porch edge, and any seasonal or operable control. For an exterior shade, record whether it is fixed, manually operated, motorized or controlled by a rule. For an interior shade, record fabric or optical information if available, deployment schedule and whether the household agrees to operate it.
The distinction between exterior and interior control matters. LBNL notes that attachment performance depends on mounting, occupant use, orientation and climate, and that different operating strategies can change results. LBNL’s residential windows and attachments research supports modeling the actual attachment and use assumption instead of treating “shading” as a universal benefit.
If a tree is part of the shade strategy, record its current species or description, height, crown width, distance from the window, seasonal condition and whether the owner controls its future maintenance. A tree that provides useful summer shade can also block winter sun or grow beyond the assumed horizon. If a neighboring tree or building is outside the homeowner’s control, label it as an uncertainty and create a sensitivity case.
Describe thermal mass and ventilation as behaviors of the assembly
Record where thermal mass is located, how much of its surface is exposed to the room, what is between the mass and the room air, and whether furniture, rugs, cabinets or finishes block it. Record the material, thickness and assembly only as documented; do not use “concrete floor” as shorthand for a modeled heat capacity without confirming how the model represents it.
DOE explains that thermal mass can moderate temperature swings under some conditions, but its effect depends on temperature differences and heat transfer between the mass and indoor air. DOE’s passive-design techniques guidance is the reason to record mass as an active modeling assumption rather than as a decorative material preference.
For natural ventilation, record opening dimensions, free area if known, insect-screen or security restrictions, cross-flow path, stack path, door positions, window control, noise and outdoor-air conditions. State whether the model assumes the occupants open windows manually, whether a control algorithm operates them, and when the assumption is unavailable because of rain, smoke, outdoor humidity, allergens, security or absence.
The article scope stops before HVAC sizing. That does not mean mechanical systems are irrelevant. The modeler may need a representative system or a design condition to compare passive cases, but the homeowner should not treat an early passive-design model as a final equipment schedule. The architect and mechanical designer own that later handoff.
Choose and document the weather file
Record the weather file name, station or location, period represented, file source, mapping method and reason it was selected. If the modeler uses a typical meteorological year, record that choice and its limits. Ask whether the design question also needs a stress case such as a hotter summer sequence, a warm winter, a cloudy season or a period with restricted window operation. The stress case is not a forecast; it is a controlled test of sensitivity.
DOE identifies weather as a key input to building energy modeling and notes that historical typical-year data may not represent the conditions a building experiences over a long lifetime. DOE’s FEMY discussion supports recording the weather file and its time horizon. The correct file for your project is a modeler’s documented choice, not a national default that this article can prescribe.
The minimum packet input table
Use this table as a starting worksheet. Replace each unassigned entry with a named person and date before the model is used for a freeze decision. The packet is stronger when each line points to a drawing, survey, product record, photograph, calculation or model file.
| Packet field | Required entry and units | Initial owner | Verification record |
|---|---|---|---|
| Site location | Address; latitude and longitude in decimal degrees | Homeowner and architect | Survey, site plan or documented geospatial source |
| North reference | True-north method; drawing azimuth convention | Architect or modeler | North arrow and method note |
| Site horizon | Obstruction azimuth, height, distance and season | Architect, surveyor or modeler | Site photos, survey or obstruction diagram |
| Building massing | Footprint, stories, heights and roof edges in feet or meters | Architect | Current schematic model and date |
| Room program | Room use, area, height and adjacency | Homeowner and architect | Brief and plan revision |
| Occupancy | People, hours, weekends, thermostat and shade/window behavior | Homeowner | Signed schedule assumptions |
| Window schedule | Orientation, dimensions, sill/head, U-factor, SHGC, VT and operation | Architect and supplier | Window schedule and product data |
| Shade schedule | Projection, elevation, returns, operation and control | Architect | Elevation, detail or shade data |
| Thermal mass | Material, thickness, exposed area and interior finish | Architect and modeler | Assembly description and model input |
| Ventilation | Opening free area, cross-flow path and operating limits | Architect and modeler | Plan/elevation and control assumption |
| Weather | File, station, source, period and stress-case decision | Energy modeler | Weather-file record and model notes |
| Outputs | Comfort, daylight, glare, solar gain, energy and risk metrics selected | Homeowner, architect and modeler | Output report with units and case name |
If you cannot fill a row, do not delete it. Mark it “open,” explain why it matters, assign the owner and make the next handoff explicit.
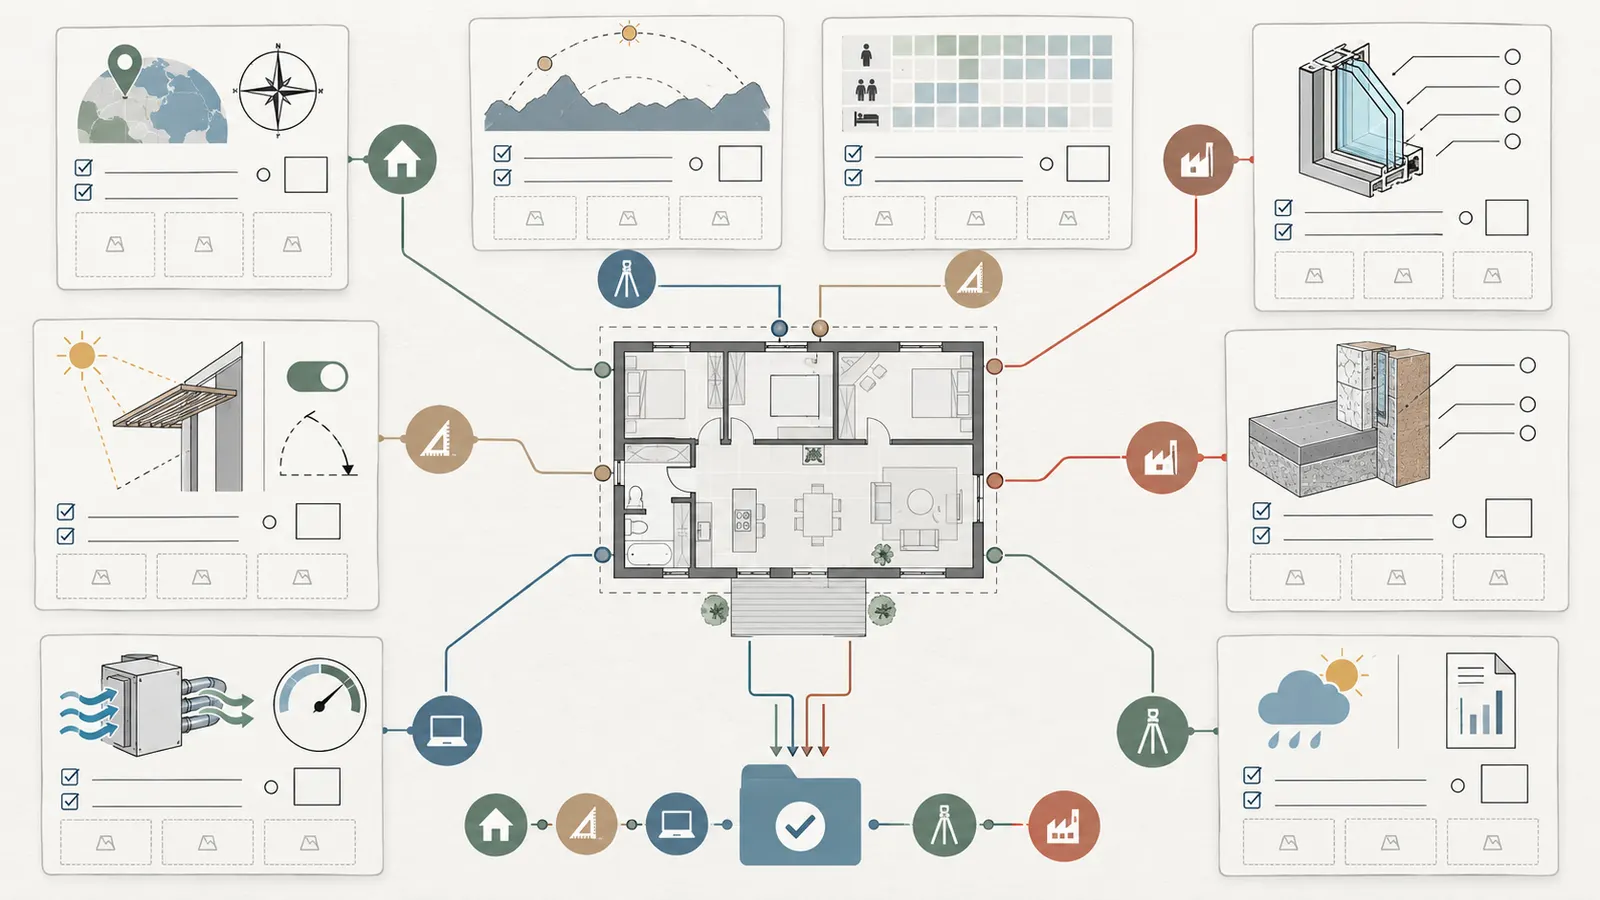
A safe field-observation procedure
The homeowner can make the first evidence pass without turning it into an informal survey or a construction task. Use a current site plan, a phone or camera, a tape measure from grade where safe, a compass or documented mapping source, and a notebook. Do not climb roofs, trees, retaining walls, scaffolds or unfinished structures to improve an observation. If the height or location of an obstruction matters and cannot be observed from grade, ask the architect, surveyor or another qualified professional to verify it.
Walk the site at the proposed building location and write the observation date, approximate time, weather, leaf condition and camera direction. Photograph the proposed south, north, east and west horizons from a consistent point. Photograph the neighboring building, tree line, fence, porch, roof or terrain edge that could change the window’s view of the sky. Add a sketch with approximate distance and height, but label it “homeowner observation” until it is confirmed.
Use a simple obstruction log:
| Obstruction ID | Direction from proposed window | Approximate distance | Approximate height | Seasonal condition | Confidence | Professional follow-up |
|---|---|---|---|---|---|---|
| OBS-01 | South-southeast | 40 ft | 25 ft | Deciduous; leaf-off in winter | Medium | Architect/modeler to confirm horizon |
| OBS-02 | West | 70 ft | 18 ft | Existing garage | High | Check current site plan |
| OBS-03 | Southwest | Unknown | Possible future building | Low | Ask architect to identify planning assumption and jurisdiction |
The entries above are an illustrative format, not observations from a real site. Do not copy the values into a model. The useful part is the separation between direction, distance, height, season and confidence. A photo that shows a tree but no approximate distance is not enough to reproduce a shading condition. A survey that shows a property line but no tree crown may also be insufficient for a solar-access question.
For window and shade measurements, record whether the dimension is inside-to-inside, outside-to-outside, rough opening, glazed area, shade projection or roof projection. Use one unit system throughout the packet. If a field changes from inches to feet, write the conversion. For example, 48 in ÷ 12 = 4.0 ft; do not leave the modeler to guess whether “48” means inches or feet. Keep a photograph of the tape position when a measurement is important, but do not treat a photo as proof of a hidden dimension.
For true north, do not simply point a phone compass at the site and erase the uncertainty. Note the source, date and possible magnetic or local interference. Give the raw observation to the architect or modeler for confirmation. The final packet should contain one adopted north reference and, if uncertainty is material, a small azimuth sensitivity. The sensitivity is often more useful than an argument about which screenshot looks correct.
For the household schedule, ask each occupant to mark a normal weekday, a weekend and a difficult day. A difficult day might be a work-from-home day, a summer day with closed windows, a winter day with low sun, or a period when a child sleeps in a room that was originally treated as occasional. The purpose is not to produce a perfect forecast. It is to reveal where the design relies on a behavior that the initial brief did not mention.
Evidence quality labels
Use five labels so the packet distinguishes facts from design intent:
- Documented: stated in a current drawing, survey, product record or written project decision.
- Measured: observed or measured with a method, unit and date, then checked for relevance.
- Selected: chosen by the homeowner or design team, such as a target window family or shade operation.
- Estimated: a provisional value used to enable comparison, with an owner and replacement condition.
- Unknown: not available and capable of changing the decision.
An estimate is not a defect if it is visible and bounded. An undocumented estimate is a defect because the team cannot tell whether it is still current. The modeler can use estimates for screening, but the decision record should say whether the freeze depends on replacing them.
Ask what the climate changes in the packet
The same design intent can create different risks in different parts of the United States. The packet should not begin with a national ranking of “best” glazing or “best” orientation. It should begin with the site and then ask which seasonal conflict is most important.
In a heating-dominated location, a homeowner may be interested in winter solar access and useful gain, but the same south-facing glass can create a summer or shoulder-season overheating problem if shading and ventilation are weak. The model should test both the desired winter condition and the warm-period condition, including the shade state the household will actually use. Do not turn a winter-gain objective into a year-round claim.
In a cooling-dominated location, the priority may be limiting solar gain and glare while preserving daylight and views. The model should test low-angle east and west sun, not only a horizontal south overhang. It should also show the difference between an exterior control and an interior shade if the design depends on keeping heat out before it reaches the glass. LBNL’s work describes climate-dependent outcomes for window attachments and operating strategies. LBNL’s residential attachment research supports this question, not a universal shade ranking.
In a humid location, opening windows may be constrained by outdoor moisture even when the temperature looks favorable. In a dry location, night ventilation may have more potential during suitable conditions but can still be limited by smoke, security, dust or noise. In a marine or cloudy location, the daylight question may be more important than a simple winter-sun rule. These are design questions for the modeler and architect, not fixed regional promises in this article.
Use a climate-boundary note with four lines:
- Primary seasonal risk: the condition most likely to defeat the concept.
- Secondary seasonal opportunity: the benefit the concept is intended to preserve.
- Restricted operation: when windows, shades or other controls cannot be used.
- Stress case: the agreed period that tests whether the decision is fragile.
The note keeps the team from claiming that a single output applies to every season. It also gives the homeowner a plain-language way to explain why a design choice is being tested. DOE’s fenestration guidance says energy effects vary with climate, and DOE’s weather-data discussion explains why historical typical-year files do not represent every future condition. DOE’s window guidance and DOE’s weather-data discussion support documenting both the climate context and the weather-file limit.
Record what would change the decision
For every uncertain field, write a consequence sentence. “Tree height unknown” is less useful than “If the south tree crown blocks winter sun to the living-room windows, the winter-gain premise may change; the architect will confirm the horizon before design development.” “Window product not yet selected” becomes “If the selected SHGC or VT falls outside the tested range, the modeler will rerun the living-room and office cases before procurement.”
Use a three-column risk record:
| Uncertainty | Why it matters | Closure evidence |
|---|---|---|
| True-north method not confirmed | A small azimuth error may change shade and window comparison | Architect or surveyor confirms adopted north and drawing convention |
| Deciduous tree crown not measured | Seasonal sun and shade may be misrepresented | Site observation or survey with season and height note |
| Final product not selected | U-factor, SHGC, VT, frame and shade compatibility may change | Current supplier record linked to window ID |
| Shade operation not agreed | Daylight, glare and heat result may depend on behavior | Homeowner signs the operating assumption or design changes |
| Mass finish not chosen | Exposed area may be smaller than the model assumes | Assembly and finish schedule confirmed |
| Weather stress case absent | A typical year may hide a fragile warm-period result | Modeler and homeowner agree on a stress case or record why not |
This record makes the packet useful even when the answer is not ready to freeze. It tells the next professional what question remains and prevents the team from repeating discovery after a drawing revision.
Make solar-geometry assumptions legible
The homeowner does not need to calculate every solar angle, but should be able to identify the inputs that produced a sun or shade conclusion. Ask the modeler to name the site latitude, the date or date range, the time convention, the façade azimuth, the sun elevation or path source, and whether the calculation uses true-solar time or clock time. Daylight-saving changes and local clock time can shift an observation even when the underlying solar position is the same.
For an early screen, the team may use a solar-position diagram, a shading mask, a daylight model or a whole-building model. The packet should record which one was used and what it can answer. A simple noon projection can show a geometric relationship but cannot prove that the window is shaded for the entire afternoon. A sun-path image can reveal an obstruction but cannot by itself calculate room comfort. A whole-building model can compare hourly cases but may simplify optical details. The choice is acceptable when the method matches the decision and the limits are written down.
Use a geometry note such as: “The model uses the adopted true-north reference, the window wall azimuth, the overhang projection from the current elevation, and the obstruction mask from the site diagram. The result is a design-stage comparison of direct-sun periods; it does not certify the construction detail or account for every reflected-light condition.” This sentence gives the next reviewer a way to challenge the assumption without guessing what the original analysis meant.
If the team uses an illustrative rule such as a window being near true south, ask what happens when the actual façade is rotated, the roof edge is deeper, the window head is lower, the porch is added or the tree grows. A rule is useful only within the conditions that make it meaningful. The packet’s job is to replace a slogan with those conditions.
Assign responsibility and protect the handoffs #
The homeowner owns the decision criteria and household behavior; the architect owns the design geometry and coordination; the qualified energy modeler owns model construction and interpretation within the agreed scope; the window supplier owns product-specific data; and a surveyor, rater, engineer or other professional owns any specialized field information they are retained to provide. No one person should be expected to invent all of the inputs.
A practical responsibility matrix
| Work item | Homeowner | Architect | Energy modeler | Window supplier | Surveyor/rater/other qualified professional |
|---|---|---|---|---|---|
| Define rooms that must be comfortable or glare-controlled | Owns priorities and routine | Coordinates into brief | Advises on useful zones | Consulted if product constraints matter | Consulted as needed |
| Confirm site address and access | Supplies records and photos | Uses in design | Checks model location | Not responsible | Verifies field data if retained |
| Establish true north and building azimuth | Reviews understandable explanation | Owns drawing coordination | Confirms model convention | Not responsible | May provide survey control |
| Describe obstructions | Reports what the household knows | Coordinates with site plan | Converts to model geometry | Not responsible | Measures or surveys when needed |
| Set window geometry | Approves functional priorities | Owns design schedule | Checks model translation | Confirms available product data | Not responsible |
| Supply product ratings | Reviews performance trade-offs | Requests data | Enters documented values | Supplies current product record | May review installation implications |
| Define shade operation | Commits to realistic behavior | Designs or coordinates shade | Models stated schedule | Confirms product limits if applicable | Reviews safety or structural interface when needed |
| Represent thermal mass and ventilation | Describes use constraints | Specifies assemblies and openings | Documents model assumptions | Not responsible | Engineer or specialist reviews when retained |
| Select model cases and outputs | Approves decision question | Helps identify design options | Proposes cases and runs model | Responds to product alternatives | Reviews specialized findings |
| Decide freeze, revise or obtain evidence | Makes the homeowner decision | Advises design consequence | Explains model result and uncertainty | Confirms product path | States professional limitations |
This is not a contract and it does not replace the agreements with your architect or consultants. Its purpose is to prevent a common handoff failure: a homeowner assumes the architect checked performance, the architect assumes the modeler used the latest window schedule, and the modeler assumes the household will operate shades or windows in a way no one agreed to.
Use one assumption register
Create an assumption ID for every material input. A simple naming convention might be SITE-NORTH-01, WIN-S-03, SHADE-LIVING-02, MASS-SLAB-01 and OCC-WEEKDAY-01. The ID should appear in the packet, the model input list and the output case name. Record:
- statement of the assumption;
- value and unit;
- source or reason;
- responsible person;
- date and drawing/product revision;
- confidence: documented, measured, selected, estimated or unknown;
- which model cases use it;
- what result could change if it is wrong;
- owner and due date for verification.
This register is more useful than a polished model image. If the product changes from a window with one SHGC and VT to another, the team can identify exactly which cases are invalid rather than assuming the design intent survived the substitution.
Handoff gates
Use four gates. Each gate should end with a saved record, not a verbal “looks good.”
Gate 1: design question. The homeowner writes the decision in one sentence: “Can we freeze this south-facing living-room glazing and fixed-shade concept for design development while meeting our agreed winter daylight, summer comfort and glare priorities?” Avoid an unbounded request such as “optimize the house.”
Gate 2: input freeze. The architect, homeowner and modeler list the geometry, schedule, product and site inputs to be held constant for the base case. Unknowns are labeled, not hidden.
Gate 3: comparison freeze. The team agrees which one-at-a-time sensitivities will be run and what each one is intended to reveal. A sensitivity is not useful if two or five design changes occur at once and no one can tell which change caused the outcome.
Gate 4: decision record. The modeler explains outputs and limitations; the architect explains drawing consequences; the homeowner chooses freeze, revise or obtain more evidence. The decision record names the next handoff and the conditions that would reopen the issue.
Common handoff failures
A generic climate label replaces the weather file. “Mixed-humid” or “hot-dry” can orient a conversation, but it does not tell you which weather series, solar data, temperature sequence or humidity assumptions entered the model. Ask for the file name and source.
A plan rotation is confused with true-solar orientation. The drawing may be rotated to fit a page. Ask for the model azimuth convention and the relationship between the drawing north arrow and true north.
A product family is treated as a product. “Triple-pane low-e” describes a category, not a confirmed U-factor, SHGC, VT, frame, size or spacer. Ask the supplier for the current record and make the modeler state whether it was entered as a generic assembly or a specific product.
A shade is assumed to operate continuously. Manual shades that are never closed, or always closed because glare is intolerable, produce different daylight and heat outcomes. Model the agreed behavior and mark behavior-dependent conclusions.
A homeowner signs off on a metric they cannot interpret. A chart with annual energy can hide a few uncomfortable hours in a bedroom or a glare problem at a desk. Ask the modeler to show outputs by room and period, not only a single annual total.
The latest drawing never reaches the model. Put the drawing revision, date and file name in the packet. If the model uses an earlier window schedule or roof edge, the result is not a verification of the current design.
Build a traceable base case before testing alternatives #
The base case should represent the current proposed concept with documented inputs and no silent “optimizations.” A qualified energy modeler should state the software, version, model boundary, geometry source, weather file, operating schedules, thermal-mass representation, ventilation assumptions, shading representation, output metrics and known limitations. The model is a decision instrument for this stage, not an official certification.
Define the model boundary
For this opportunity, the minimum useful boundary includes the building geometry and orientation, room or zone layout, exterior surfaces, windows, fixed and operable shades, thermal mass, infiltration or ventilation assumptions relevant to the comparison, internal gains, occupancy schedules and a representative conditioning or comfort calculation setup. The boundary can be narrower than a final whole-house design model, but the modeler must explain what is excluded and why the exclusion will not reverse the decision.
Do not ask the model to answer a question it does not contain. A daylight-only model cannot establish annual heating performance. A simplified thermal model cannot certify a window installation. A model with no site obstructions cannot verify a solar-access claim. A model without occupancy schedules cannot tell you whether glare will occur when someone is actually working at the desk.
DOE describes BEM as a whole-building method that combines geometry, construction, systems, controls, use and weather, and notes that it can calculate system interactions and comfort-related results. DOE’s explanation of BEM is a useful boundary check. The modeler should still state which of those categories are simplified for the current design stage.
Translate the drawing faithfully
Ask for a plan or model overlay showing:
- the building outline and true-north arrow;
- room boundaries and zone boundaries;
- all modeled windows and doors with identifiers;
- window head, sill and floor heights;
- roof, porch, balcony, wing and fin geometry that can shade openings;
- nearby obstructions and their assumed heights and distances;
- interior mass surfaces and finishes if they are part of the concept;
- operable openings and the cross-flow or stack path assumed for ventilation.
Compare the overlay against the homeowner’s current plan. Count windows. Check that a large picture window was not reduced to a generic opening, that a porch was not omitted, that a west-facing office was not assigned north orientation, and that a future garage or neighboring wall was not left out. These are simple checks a homeowner can perform without editing a model.
Use product data with a clear basis
A model input should say whether a value comes from a certified product record, a manufacturer document, a generic library assembly, a preliminary estimate or an assumption. The team should not combine center-of-glass values with whole-window values without understanding the difference. If the exact product is unavailable, use a bounded range or a conservative case and mark the procurement handoff.
LBNL’s residential attachment work shows why the same label can produce different outcomes: performance depends on the attachment, mounting, orientation, climate and deployment behavior. LBNL’s attachment research supports requesting the actual shade geometry and schedule. It does not mean every LBNL modeled category applies to the product you may buy.
For U-factor and SHGC, preserve the units, rating basis and source. For VT, preserve the value and source. For an unusual coating, frit, screen, exterior louver or complex shade, ask whether a basic model input can represent the optical behavior. If not, the modeler should say whether the case is bounded, simplified or deferred to a more detailed analysis.
Make the occupancy schedule visible
Print or export the schedule that controls the room-level decision. It should show at least weekday, weekend and seasonal differences relevant to the home. For a home office, show desk hours. For bedrooms, show sleep hours. For living spaces, show evening use. For manual shades, show the assumed deployment. For natural ventilation, show the conditions under which windows open and close.
A schedule is not a judgment about how you should live. It is a declared test condition. The homeowner can request two schedules if the decision is behavior-sensitive: a “likely” schedule and a “do-not-rely-on” schedule. The second case is important when the design only works if occupants close shades before leaving, open windows at midnight, or tolerate glare during a work call.
Select outputs that answer the decision
Agree on outputs before seeing the results. A useful base-case record may include:
- hourly indoor air temperature by affected room or zone;
- operative temperature or another modeler-selected comfort indicator, with definition and units;
- hours above and below homeowner-agreed review bands, with the bands labeled as project criteria rather than national rules;
- peak and seasonal solar gain by room or façade;
- daylight metrics selected by the modeler, with definitions and limits;
- glare indicators or a documented glare-risk review for rooms with work, screens or sensitive occupants;
- shade deployment hours and window-opening hours;
- annual and peak heating/cooling loads only as design-stage comparisons, not equipment sizing;
- unresolved assumptions and sensitivity conclusions.
ORNL’s study is a useful warning against reducing daylight and shading to one energy metric or one daylight metric; its abstract notes that energy-use intensity and useful daylight alone can overlook glare, views and thermal comfort. The ORNL multi-metric study supports a multi-output review, but it does not provide a universal homeowner threshold.
Perform a homeowner audit of the base case
Before the modeler runs alternatives, use this ten-minute audit:
- Is the building location correct?
- Is the north arrow tied to true north?
- Does the proposed room use match the model zone name?
- Are the windows the same count, orientation and approximate size as the current plan?
- Are porches, eaves, fins, trees and adjacent buildings represented?
- Does the shade schedule match what the household would actually do?
- Is the weather file named?
- Are the occupancy and thermostat schedules visible?
- Is the thermal mass described rather than merely labeled?
- Are outputs listed by room and case, with units and a model date?
If any answer is no, the next decision is usually “obtain more evidence” rather than “freeze.” A clean-looking report cannot cure an input mismatch.
Request a model handoff package, not only a conclusion
Ask for a compact handoff package that someone else can inspect later. It need not expose every software setting, but it should identify the model version, files, assumptions and outputs that carry the decision. A useful package includes:
- a one-page design-question statement;
- a plan or model overlay with north and window IDs;
- an assumption register with source, unit, revision and confidence;
- the weather-file name, location and source;
- the base-case and sensitivity-case table;
- a window and shade schedule linked to the model IDs;
- the occupancy, thermostat, shade and ventilation schedules;
- a list of metrics with units and review periods;
- output charts or tables by room and case;
- a limitation note that names excluded physics or unresolved site conditions;
- a decision record and next handoff.
Use version names that preserve history, such as SD04_BASE_2026-09-07, SD04_SHADE_B_2026-09-07 and SD04_GLAZING_B_2026-09-07. The exact naming convention is up to the team. The purpose is to stop a later file from being called “final” while the drawings, product records and weather assumptions are different.
During the handoff meeting, ask the modeler to open one base case and one sensitivity and show the changed input. Ask the architect to point to the same window or shade on the drawing. Ask the homeowner to explain the household behavior in plain language. If those three descriptions do not align, the packet is not yet traceable.
Do not ask the homeowner to validate equations or become a modeler. The homeowner’s useful review is narrower: Is this my site? Is this my house? Is this the room use I described? Is this the product or a stated proxy? Is this behavior realistic? Are the outputs the ones needed for my decision? Those questions catch high-impact handoff failures without pretending that software inspection is an amateur task.
Questions that test the model without pretending to certify it
A homeowner can ask a qualified modeler questions about traceability and limitations without challenging the modeler to defend every calculation in a design meeting. Ask:
- Which inputs came from the current architectural drawing, and which came from a generic library or previous revision?
- Which geometry controls solar access at the windows under review?
- How are the site obstructions represented, and which are provisional?
- Which weather file is used, how was it mapped to the project, and why is it appropriate to this decision?
- What occupancy, lighting, plug-load, thermostat, shade and window-operation schedules are active?
- Which window properties are whole-window values, and which are center-of-glass or generic assumptions?
- How does the model represent the fixed overhang, fins, exterior screen, interior shade or complex glazing?
- How is exposed thermal mass represented, and what is omitted?
- What happens when natural ventilation is unavailable?
- Which output is most sensitive to the uncertain input?
- Which result is robust across the sensitivity cases?
- Which conclusion should not be carried into a later code, HVAC, structural or product decision?
The answers should appear in the packet or the modeler’s report. A meeting can resolve a question temporarily, but a future window supplier, contractor or rater will not be present to recall the explanation. The packet is a memory aid for the project team.
Ask also how the model was checked. A software engine may have documentation, test procedures or validation records, but that does not mean this particular house model is accurate. DOE notes that BEM software development and testing improve confidence in calculations; that general software confidence is different from verifying that a project model contains the correct site, geometry and schedules. DOE’s BEM overview supports distinguishing engine capability from project-input verification.
For a new home there may be no measured operating data with which to calibrate the model. Do not request a fabricated “calibration.” Instead, ask the modeler to show input provenance, run checks, case-to-case differences and sensitivity behavior. After construction, measured observations or commissioning records may answer a different ownership question; they do not retroactively turn an early design estimate into a measured result.
Keep early modeling separate from later professional scopes
The packet may reveal that a later scope is needed. A large glazing area may require mechanical coordination. A deep overhang may need structural and waterproofing review. A fixed exterior shade may change façade attachment, drainage or maintenance. A natural-ventilation concept may need detailed controls or mechanical backup. A local incentive or energy program may require a particular compliance method. The packet should list those handoffs without attempting to do them.
Use a scope boundary table:
| Question | This packet can do | Later scope may need to do |
|---|---|---|
| Does orientation change the design-stage comparison? | Compare named orientations using the documented site and weather inputs. | Confirm siting, survey control, planning constraints or jurisdictional requirements. |
| Does a proposed overhang reduce direct sun in the tested geometry? | Compare geometry in the model or solar study. | Design structure, attachment, drainage, waterproofing and construction details. |
| Does a candidate window alter the modeled trade-off? | Compare documented U-factor, SHGC, VT and geometry. | Confirm product availability, installation, flashing, structural opening and required ratings. |
| Does thermal mass contribute in the tested cycle? | Compare the documented assembly and exposure assumption. | Coordinate structure, assembly, finishes, moisture and construction sequence. |
| Could natural ventilation help? | Test agreed openings and operating limits. | Design controls, mechanical systems, indoor-air-quality strategy and code-required provisions. |
| Is the design acceptable for the project? | Record the homeowner’s decision at this stage. | Complete professional design, permit, compliance, construction and commissioning scopes. |
This table protects the homeowner from two opposite errors: asking an early model to do work it cannot do, and assuming that a design-stage comparison is useless because it is not a final certification. Its value is proportional to the decision it is asked to support.
Run controlled sensitivities and inspect the trade-offs #
Run a base case plus controlled sensitivities that vary one material assumption at a time or use a clearly documented combined scenario. A sensitivity is useful when it answers “how much does this conclusion depend on this assumption?” It is not useful when it merely produces more colored charts.
The sensitivity set
Start with the assumptions most likely to change the design or household decision:
| Case | Hold constant | Change one assumption | Question answered |
|---|---|---|---|
| Base | Current site, plan, windows, shades, mass, schedules and weather | Nothing | What does the documented concept predict under the stated assumptions? |
| Orientation | All base inputs | Building or façade azimuth within the plausible site range | Does a small siting or drawing rotation change the conclusion? |
| Obstruction | All base inputs | Add or remove the uncertain tree, building or terrain edge | Is the passive claim dependent on a condition outside the homeowner’s control? |
| Glazing | Geometry and shade fixed | Alternative U-factor, SHGC and VT from actual candidate records | Is the concept robust to the likely product choice? |
| Shading | Window and plan fixed | Overhang depth, side fin, exterior screen or agreed deployment | Does the control strategy solve heat and glare without creating an unacceptable winter or daylight trade-off? |
| Occupancy | Geometry and products fixed | Realistic and do-not-rely-on schedules | Does the design require behavior the household may not provide? |
| Thermal mass | Geometry and windows fixed | Documented mass present, reduced participation or alternate finish | Is “thermal mass” carrying more of the promise than the assembly can support? |
| Ventilation | Geometry and products fixed | Windows unavailable, available only under limits, or controlled as agreed | Is natural ventilation a bonus or a required condition? |
| Weather stress | Design inputs fixed | Agreed hot, cold, cloudy or restricted-operation period | Does a reasonable stress case expose a risk hidden by a typical year? |
Do not set arbitrary pass/fail numbers in a generic article. The homeowner, architect and modeler should define review bands appropriate to the room and project. A nursery, home office, bedroom, living room and circulation space may not have identical priorities. The important requirement is that the band is written before the team debates the chart, that its units are visible, and that the team records who accepted it.
Illustrative worked example: overhang sensitivity
The following is an illustrative example, not a prediction, site measurement, product recommendation or comfort result. It shows how to make one geometry assumption inspectable. Replace every number with the project’s survey, drawing and model inputs.
Assume a proposed living-room window on a wall facing 8 degrees east of true south. The vertical distance from the underside of the fixed overhang to the bottom of the target glazing is 4.0 feet. The homeowner wants to compare three candidate projection depths against three solar elevations selected by the modeler for the relevant dates and times.
For a simplified vertical-shadow screen, use the geometric relationship:
projection depth P = vertical distance H / tan(solar elevation angle α)
With H = 4.0 ft:
| Illustrative solar elevation α | Calculation | Illustrative minimum projection P |
|---|---|---|
| 58° | 4.0 ft ÷ tan(58°) | 2.5 ft, rounded |
| 50° | 4.0 ft ÷ tan(50°) | 3.4 ft, rounded |
| 42° | 4.0 ft ÷ tan(42°) | 4.4 ft, rounded |
The calculation is intentionally narrow. It does not account for side sun, window recess, overhang thickness, diffuse sky, reflected light, the sun’s movement over the day, adjacent obstructions, rain drainage, structure, water management, snow, wind, view or the exact solar-control behavior of glass. It is not a construction detail. It simply demonstrates why a phrase such as “deep overhang” cannot be verified without a dimension and a reference condition.
The modeler can turn the example into three controlled cases: SHADE-A at 2.5 feet, SHADE-B at 3.4 feet and SHADE-C at 4.4 feet, while holding the window, room, occupancy, weather and other geometry constant. The output review should ask:
- At what hours does direct sun enter the living room in each case?
- What is the change in room solar gain or operative-temperature indicator?
- Does the deeper projection reduce useful winter daylight or winter gain under the same window assumption?
- Does it create a view, maintenance, structural or water-management consequence for the architect to resolve?
- Does the household still receive the daylight and view it actually values?
The correct conclusion is not “4.4 feet is the answer.” The conclusion is that the design team now has a traceable geometric variable to test. The actual model may show that side angles, a different window head height, a neighboring tree, a low-SHGC product or an exterior screen matters more than this simplified noon relationship.
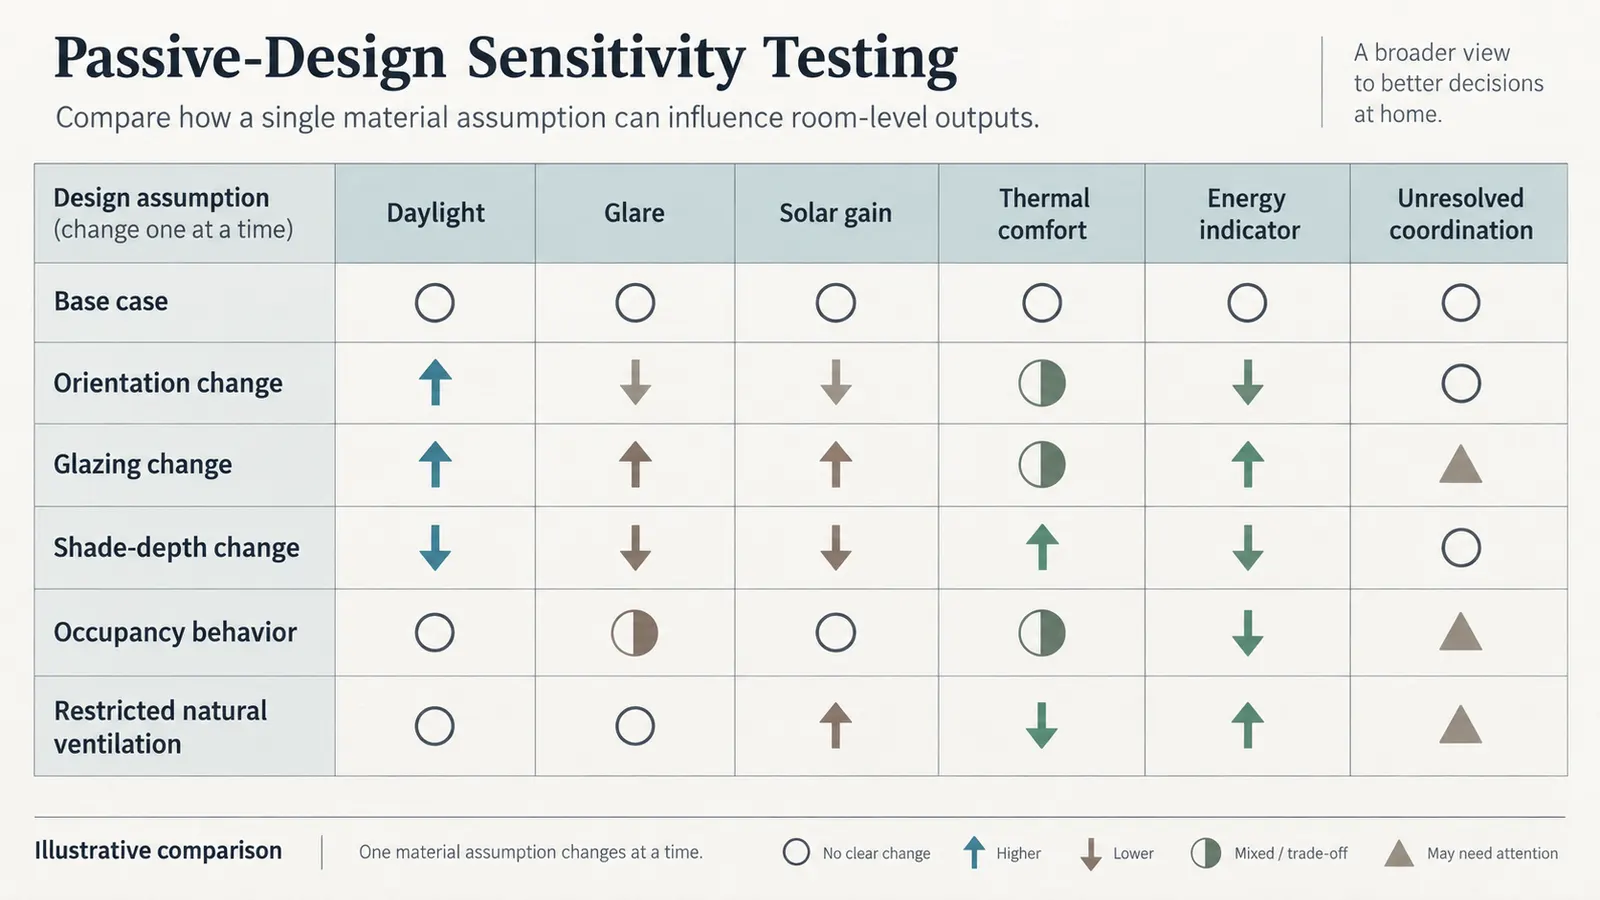
Illustrative window and occupancy sensitivity
Continue the same illustrative room only to demonstrate recordkeeping. Assume three south-wall windows, each 4.0 feet wide by 5.0 feet high. Glazed area is:
3 windows × 4.0 ft × 5.0 ft = 60 ft²
Assume the south wall is 18 feet long and 9 feet high, so gross wall area is:
18 ft × 9 ft = 162 ft²
The illustrative window-to-wall ratio is:
60 ft² ÷ 162 ft² = 0.370, or approximately 37%.
That ratio is only a screening calculation. It depends on whether the project team defines wall area gross or net, whether openings are counted consistently, and whether the ratio is being used for a façade comparison or a code-related calculation. This article does not make a code conclusion.
For the illustrative base case, record a candidate whole-window U-factor of 0.28 Btu/(h·ft²·°F), SHGC of 0.42 and VT of 0.54, only if those values come from a documented candidate record. Create a product sensitivity with a different actual candidate, not an invented “better window.” For example, GLZ-B might use the supplier’s current product record with its own U-factor, SHGC and VT. The modeler should then explain whether any output change came from thermal transmittance, solar gain, visible transmission, frame area or a combination.
For occupancy, the illustrative base case could record two occupants, living-room use from 5:00 p.m. to 11:00 p.m. on weekdays, daytime use on weekends, manual shade deployment only when glare prevents screen use, and windows closed during rain, smoke, security concern or absence. A sensitivity could remove the shade operation and another could add a weekday work-from-home period. These are not claims about typical households. They are named scenarios that expose whether the concept depends on behavior.
LBNL’s study of window U-value effects modeled a prototypical house in Miami, Phoenix and Madison and reported that, under its assumptions, solar heat gain, latent loads and internal loads dominated some cooling comparisons more than U-value alone. The LBNL study abstract is evidence for preserving multiple window variables and site conditions; it is not evidence that one U-factor or SHGC is best for your home.
Sensitivity discipline
Use these rules to keep the comparison intelligible:
- Give every case a name and a one-sentence purpose.
- Change one material input at a time unless the case is deliberately a combined option, in which case label it as such.
- Hold the weather, occupancy and reporting period constant when comparing design alternatives.
- Record units and sign conventions in the output table.
- Preserve the base-case file; do not overwrite it with an improved option.
- Ask the modeler to identify whether a result is an absolute value, a difference from base, a percentage change or a range.
- Record whether a change is robust across the year or occurs only during a short period.
- Do not treat a model output as measured performance in an unbuilt home.
- Trace each input change back to a decision the architect or homeowner can actually make.
- Record the next action beside each material finding.
When a sensitivity is inconclusive
A flat result does not automatically prove that the design is safe. It may mean the changed variable is genuinely minor, the model resolution is too coarse, the output is dominated by another assumption, or the input was not translated correctly. Ask the modeler:
- Is the changed input present in the model file?
- Is the output metric sensitive enough to show the expected change?
- Did another assumption mask the effect?
- Does the issue need a higher-resolution daylight, façade or thermal model?
- Would a physical mock-up, site observation or product record resolve it better?
- Is the conclusion robust under the occupancy and weather stress cases?
An inconclusive sensitivity usually leads to “obtain more evidence,” not to a confident freeze.
Decide which differences are material
Not every modeled difference deserves a redesign. A material difference is one that can change a stated homeowner priority, the selected design option, the professional scope, the product range, the local review path or the risk register. The packet should not hide behind a percentage alone. A small annual change can matter if it creates a short, severe glare event in a work room; a larger annual change may be acceptable if it occurs in an unoccupied storage area.
Use a materiality note for each sensitivity:
| Sensitivity finding | Difference type | Room or asset affected | Homeowner consequence | Design consequence | Material? |
|---|---|---|---|---|---|
| West shade deployment changes | Glare hours and daylight availability | Office desk | Shade may remain closed during work | Reconsider exterior control or window placement | Yes if office use is fixed |
| South glazing alternative changes | Solar gain and winter daylight | Living room | Seasonal comfort and view trade-off | Keep product range open or revise shade | Team decision |
| Tree horizon changes | Afternoon direct sun | Bedroom | Possible late-day heat | Verify tree or add a bounded case | Yes if tree is outside owner control |
| Mass finish changes | Temperature response | Slab-adjacent living space | Less benefit than brief assumes | Coordinate finish and furniture plan | Depends on result |
The rows above are illustrative decision prompts, not findings from a real model. They show why the word “material” must connect a chart to a room and a next action. Let the homeowner, architect and modeler agree on the materiality statement before using it to freeze.
When an outcome is close to the agreed review band, treat it as a reason to document uncertainty rather than round it into a pass. Ask whether the model input, product availability, site condition or operating behavior could move the result across the band. A robust decision remains acceptable across credible variants; a fragile decision may still be possible, but it needs a named hold point and an owner.
Choose sensitivities by the decision they protect
A sensitivity list can become an expensive wish list. Select cases from the failure that would be costly to discover later. If the homeowner is deciding whether to keep a large west-facing office window, the useful cases are west obstruction, low-angle solar control, actual shade deployment, desk glare and the likely product range. A generic change to wall insulation may be less relevant to that decision even though it is important elsewhere in the project.
If the homeowner is deciding whether to orient the long axis toward an open southern horizon, test the feasible rotation range, the actual roof and porch shade, the seasonal obstruction and the room layout that the rotation forces. If the preferred orientation moves the kitchen, bedroom or office into a less workable location, record that trade-off rather than treating energy as the only objective.
If the homeowner is deciding whether to use thermal mass, test the actual exposed area, a covered or furnished condition, the warm-period and cool-period cycles, and the restricted-ventilation case. Do not create a fictional mass option that cannot be built or maintained.
If the homeowner is deciding whether to depend on natural ventilation, test windows available, windows closed and windows available only under the agreed outdoor conditions. The useful output is often not “natural ventilation saves X.” It is “the design remains within the agreed review band without relying on an opening behavior the household cannot provide,” or the opposite.
If the homeowner is deciding between two window candidates, preserve the geometry and shade while changing only the documented product properties. If the candidates have different sizes, frames or visible areas, say so. A combined change may be realistic for procurement but it no longer isolates one property. Label it as a combined product case.
Use a case-selection sentence: “We are running this case because, if the assumption is wrong, it could change the affected room, homeowner priority or design action.” If the team cannot write that sentence for the actual project, the case may be curiosity rather than decision evidence.
Do not mistake precision for certainty
A chart with decimal places can look more authoritative than a rough site observation, but output precision is not the same as input certainty. If the tree height is estimated, the model can still produce a precise result for the estimated tree. The packet must carry the input confidence into the interpretation.
Record a confidence note beside every material result: high if the geometry and product are documented and the result is robust; medium if a bounded estimate is used but the decision survives the range; low if an unresolved input can reverse the conclusion. This is a Brictale editorial aid, not a statistical confidence interval. Do not call it a probability or imply that the model has measured the future home.
When a result changes materially across a plausible input range, prefer a design that is less fragile or keep the design open until the input is confirmed. A homeowner may still choose a fragile option for view, cost, site or lifestyle reasons, but the risk should be explicit. The decision record can say, “We accept dependence on seasonal tree condition because the homeowner values the view and will keep the shade control available,” if that is the actual decision.
The same rule applies to weather. A typical-year result can be useful for comparing alternatives, but it should not be reported as the home’s future annual energy or comfort. DOE’s weather-data work distinguishes historical typical data from future and extreme weather considerations. DOE’s FEMY page supports writing the weather limitation next to the output.
Interpret daylight, glare, comfort and energy together #
Freeze a passive concept only after reviewing the outputs as a set. A design can reduce annual energy while creating glare at a work surface, improve winter gain while overheating a bedroom, increase daylight while forcing shades closed, or rely on thermal mass that is not exposed enough to participate. The best case is the one that satisfies the homeowner’s priorities with a transparent trade-off, not the chart with the lowest single number.
Review by room and time, not only by annual totals
Ask for a room-level view of the periods that matter. An annual average may look acceptable while a short afternoon event makes a room unusable. For each affected room, review:
- morning, afternoon and evening conditions;
- heating-season and cooling-season periods;
- occupied and unoccupied hours;
- the direct-sun and shade schedule;
- the weather stress case;
- daylight and glare during the room’s actual task;
- the consequence of a window being fixed, closed or unavailable.
For a home office, a glare problem at 2:00 p.m. may matter more than a favorable annual daylight metric. For a bedroom, a late-afternoon heat spike may matter more than a bright morning. For a living room, the homeowner may accept a wider temperature range if the view and daylight are valuable. The decision criteria must come from the household and be documented before the model result is used to choose among designs.
Daylight is not direct sun
Daylight can make a room useful without placing a bright solar patch on a desk or sofa. DOE’s building-envelope guidance recommends considering orientation, fenestration, shading, filtering, baffling and reflecting surfaces together, and notes that occupant interaction with blinds can change the outcome. DOE’s daylighting and envelope guidance supports checking direct-sun exposure and glare rather than treating a larger window as automatically better.
DOE Building Science Education similarly describes strategic window and skylight placement as a way to provide light while controlling solar gain, and notes that north and south openings are generally easier to control for heat and glare than east- and west-facing openings. DOE Building Science Education’s daylighting explanation is a directional principle, not a substitute for the site’s solar geometry.
Use the model or a qualified daylighting review to ask whether light reaches the task surface, whether the contrast between window and room is acceptable, whether shades are likely to be closed, and whether the view requirement conflicts with the shade geometry. A room that only works when shades remain closed has not realized the intended daylight strategy, even if its unshaded chart looks excellent.
Glare and view are household decisions
Glare is not only a technical metric. A homeowner may prioritize a computer workstation, television, piano, artwork, a nursery, a kitchen worktop or a view. Record the task and the person affected. If the modeler uses a glare indicator, ask for its definition, view direction, sky condition, shade state and time period. If the modeler performs a qualitative review, record the images, sun positions and limitations.
Do not promise that a fixed overhang will solve all glare. Low-angle east and west sun can enter beneath or beside a horizontal projection. Interior shades may reduce glare but also reduce daylight, view and useful solar gain. An exterior screen may help heat and glare but introduce maintenance, wind or appearance issues. A tree may change the result seasonally. The packet should show which control is responsible for which problem.
Thermal mass is a conditional strategy
Thermal mass can help when the design creates a useful temperature difference and the mass can absorb or release heat on the required time scale. It can be ineffective when it is covered, isolated, poorly located, or disconnected from the room’s solar and ventilation cycle. It can also change peak behavior without eliminating the need for conditioning.
DOE’s passive-design guidance explains that internal mass needs air-to-mass temperature differences for heat transfer and that the benefit depends on the ambient daily cycle crossing the relevant temperature range. DOE’s thermal-mass guidance supports asking the modeler to state how the slab, masonry, tile or other mass is represented and exposed.
Ask the architect and modeler to show:
- the area and location of exposed mass;
- the layers between room air, solar radiation and the mass;
- the schedule during which the mass is expected to charge and discharge;
- the ventilation or night-purge assumption, if any;
- what happens if furniture, rugs or finishes cover part of the surface;
- whether the strategy increases a minimum or overnight conditioning demand;
- whether moisture, acoustics, finishes or construction sequencing create a separate design constraint.
Do not add mass as a generic remedy after the windows and shading are settled. It may be less effective than reducing unwanted solar gain, improving shade control, changing glazing, or changing the room relationship. The model should help the team decide which lever is worth keeping.
Natural ventilation is not a guarantee of comfort
Natural ventilation can be useful, but it depends on outdoor temperature, humidity, wind, air quality, rain, noise, security, insect screens, opening free area, room layout and occupant behavior. A model that assumes open windows during every suitable outdoor hour should show the rule and let the homeowner decide whether it is realistic.
Ask for three cases where ventilation matters: windows available as intended, windows unavailable, and windows available only under a restricted rule. If the passive concept fails when the windows are closed, state that plainly. The next decision may be to improve shading, reduce solar exposure, add a mechanical strategy through the appropriate designer, or accept the behavior requirement. This article does not size that mechanical system.
Climate and orientation exceptions
Passive solar is not a south-only formula. NREL describes south-facing windows, thermal mass, distribution, shading and natural ventilation as elements that interact in passive solar design. NREL’s passive-solar overview supports the element map but not a universal answer for every U.S. climate.
DOE’s homeowner guide also distinguishes colder and warmer contexts when discussing window placement and shade. The DOE passive-solar guide should therefore be read as a starting framework. Coastal fog, humid nights, desert temperature swings, wildfire smoke, snow, dense urban surroundings, tall trees, steep sites and privacy constraints can all change the useful design choice.
This is where the actual weather file, site obstruction record and occupancy behavior do the work. A rule that performs well in one state or city is not a national rule. If your project is subject to a local design review, energy program, historic district, wildfire requirement or building-code provision, your architect must identify the actual jurisdiction and verify it with that authority. Do not put an unverified rule into the packet as if it were a performance result.
Keep energy as one output among several
Energy use and load comparisons still matter. They can reveal a costly or counterintuitive trade-off and help the team discuss envelope, glazing, shading and equipment implications. But energy alone cannot tell you whether the desk has glare, whether the bedroom is comfortable at the actual sleep time, whether the view is preserved, or whether the family will operate the shades.
LBNL’s residential window study illustrates why a product property may matter differently by location and load type: its modeled cooling comparison found solar heat gain, latent loads and internal loads were important relative to U-value under the study assumptions. LBNL’s window U-value study is useful evidence for multi-variable comparisons, not a product ranking.
ORNL’s multi-objective daylight and shading work similarly supports reviewing several outputs together. The ORNL publication explicitly warns that a narrow optimization can overlook glare, views and thermal comfort. Your packet should record the trade-off in words: “Case B reduces afternoon solar gain but creates earlier shade deployment and lower daylight at the desk,” not merely “Case B wins.”
Run the review meeting in a fixed order
A fixed meeting order makes it harder for a persuasive annual-energy chart to dominate the discussion. Use this sequence:
First, restate the decision. The architect or homeowner reads the one-sentence question, the affected rooms and the design revision. If the question has drifted from “can we freeze the concept?” to “which case has the best annual energy?” pause and reset it.
Second, confirm the base case. The modeler names the site, north reference, weather file, plan revision, window schedule, shade geometry, mass, ventilation and occupancy. The homeowner confirms that the behavior assumptions are recognizable. The architect confirms that the geometry is current.
Third, review risk-first outputs. Look at the room or period most likely to create a bad surprise: west afternoon glare, south summer solar gain, winter bedroom exposure, a closed-window case, or an obstruction outside the homeowner’s control. Risk-first review helps the team see whether the design depends on a fragile condition.
Fourth, review daylight and view. Identify the task, eye position or room use represented. Ask whether the modeled shade is likely to be used and whether the view and privacy requirements are retained. If a visual output is supplied, keep its date, sky condition, viewpoint and case name with the packet.
Fifth, review thermal comfort. Ask which metric was used, what it averages, which hours are included and what it does not capture. A metric is a lens, not an occupant. If the room-level output is not available, record that limitation and decide whether another analysis is warranted.
Sixth, review energy and load comparisons. Use annual and peak values to understand trade-offs and downstream design implications. Do not translate an early comparison into a final HVAC size. If the modeler says a later mechanical designer needs the result, write that as the next handoff.
Seventh, read the limitations aloud. Include weather uncertainty, site obstruction uncertainty, product proxy, schedule dependence, model resolution and excluded scopes. A limitation that is heard but not recorded tends to disappear when the decision is summarized.
Eighth, decide. Choose freeze, revise or obtain more evidence, name the owner and state the next artifact. Do not end with “we will keep an eye on it.” Define what is being watched, by whom and at what revision.
Translate outputs into plain-language actions
For each material result, write four sentences:
- Observe: “The west-facing office shows a concentrated afternoon glare risk in the work period under the unshaded case.”
- Interpret: “The result is sensitive to shade deployment and the exact west window geometry; the annual energy difference does not describe the desk experience.”
- Safest next step: “Ask the architect and modeler to compare an exterior control, a changed window location or a bounded glazing option before freezing the office façade.”
- Bring to the professional: “Bring the current plan revision, task location, window ID, shade schedule and the two case outputs.”
These sentences are a communication template, not a claim about the example room. They prevent the homeowner from carrying an unexplained chart into a design meeting and asking a professional to guess what decision it was supposed to support.
A compact output review sheet
For each case, complete one row before discussing which option feels better:
| Case ID | Changed input | Room/time reviewed | Daylight finding | Glare finding | Comfort finding | Energy/load finding | Operational consequence | Action |
|---|---|---|---|---|---|---|---|---|
| BASE | None | Enter room and period | Enter finding | Enter finding | Enter finding | Enter finding | Enter consequence | Continue review |
| ORIENT-A | Enter azimuth change | Enter room and period | Enter finding | Enter finding | Enter finding | Enter finding | Enter consequence | Freeze/revise/evidence |
| SHADE-B | Enter projection or control change | Enter room and period | Enter finding | Enter finding | Enter finding | Enter finding | Enter consequence | Freeze/revise/evidence |
| GLZ-B | Enter product record | Enter room and period | Enter finding | Enter finding | Enter finding | Enter finding | Enter consequence | Freeze/revise/evidence |
The bracketed entries are blanks for the project team, not invented results. The row forces the same categories to appear for each case. If the modeler uses different metrics, add their definitions in the header. If a category is outside scope, write “not modeled” and explain why rather than leaving an empty cell.
Use the output sheet to distinguish observation from interpretation. “Peak operative temperature increased in the west room during the occupied afternoon” is an output statement. “The window is too large” is an interpretation. The latter may be correct, but it should follow a review of shading, glazing, occupancy, room task, alternative geometry and the homeowner’s priorities.
This distinction matters when a professional later reviews the package. The professional can challenge the interpretation while preserving the source output. It also makes a revision efficient: if a new shade is proposed, the team can rerun the affected case without rewriting the entire brief.
Compare room priorities before choosing a “best” case
Different rooms can legitimately select different design outcomes. A south living room may benefit from a view and seasonal solar access, while a west office may need stronger glare control. A bedroom may prioritize stable overnight conditions, while a kitchen may tolerate a wider range because people move through it. A single whole-house winner can hide those conflicts.
Create a room-priority card for each affected room:
| Room | Primary use | Critical period | First priority | Second priority | Behavior accepted | Failure that reopens design |
|---|---|---|---|---|---|---|
| Living room | Evening family use | Summer afternoon and winter evening | Comfort and view | Daylight | Occasional shade use | Persistent overheating or lost view |
| Home office | Screen work | Weekday afternoon | Glare control | Daylight | Exterior shade or task shade | Shade must stay closed or desk is unusable |
| Bedroom | Sleep | Night and morning | Stable comfort | Privacy | Windows closed during sleep | Solar or ventilation assumption conflicts with sleep |
The rows are an illustrative template, not a household survey. The homeowner should replace them with actual use. The value is that a modeler can report why a case is preferred in one room and not another. A design can then be intentionally asymmetric: different glazing, shade, window size or interior treatment by orientation and use.
If the homeowner has not chosen the priority, do not let the model decide by default. A software optimization will use the objective supplied to it. The household may prefer a modest energy trade-off for a view, a lower glare risk for a work room, or an easier operating routine over a small annual saving. These are legitimate project decisions when stated honestly.
The room cards also help with future changes. If a guest room becomes a nursery or an office becomes a bedroom, the packet reveals which assumptions and outputs should be revisited. That is more useful than preserving a single “optimal” score with no explanation of whose priorities it optimized.
What the model cannot tell you by itself
A model output cannot tell you whether a household will like the room, whether a shade will be operated, whether a future neighbor will build, whether a tree will be pruned, or whether construction will match the drawing. It cannot identify an unmodeled glare reflection from a nearby surface, a water leak at a shade attachment, a noisy window, a difficult-to-clean exterior screen or a product that is unavailable. Those questions need observation, professional coordination, product records or later verification.
It also cannot turn an illustrative calculation into an as-built measurement. The overhang equation in this guide shows how depth relates to an assumed solar elevation; it does not show how much heat the room receives. The window-to-wall ratio shows how two areas compare; it does not establish a code allowance. The model’s hourly chart shows the behavior of the modeled inputs; it does not prove what a family will experience under every weather sequence.
Write a “do not infer” note beneath the outputs. Examples: “Do not infer final HVAC size from this early comparison.” “Do not infer code compliance from this design-stage model.” “Do not infer product performance from a generic library entry.” “Do not infer an as-built shade dimension from a schematic elevation.” “Do not infer future comfort under a different occupancy schedule.”
The note is not defensive wording. It tells the next professional exactly where the current evidence stops and where a new scope begins. It also keeps the homeowner from overpaying for a decision that the analysis was never designed to answer.
Make the freeze, revise or obtain-more-evidence decision #
The final decision should be a short record tied to the packet, not an email saying “approved.” Freeze when the design survives the agreed checks and its remaining assumptions are controlled. Revise when a material sensitivity conflicts with the homeowner’s priorities or depends on unacceptable behavior. Obtain more evidence when the design may work but the input chain is incomplete.
The decision matrix
| Review question | Freeze when | Revise when | Obtain more evidence when |
|---|---|---|---|
| True north and orientation | The convention is documented and the model matches the current plan. | The feasible site rotation changes a material result or conflicts with the room brief. | The north reference, survey control or building azimuth is uncertain. |
| Solar access | Obstructions and seasonal conditions are represented or bounded. | The concept depends on a tree or neighboring condition that produces unacceptable results. | A tree height, horizon, future building or grade condition is unresolved. |
| Window geometry | The count, size, orientation, head/sill and operation match the design. | Glazing area or placement creates glare, overheating, daylight or privacy problems. | The drawing and model disagree or the opening schedule is still conceptual. |
| U-factor, SHGC and VT | Candidate product records are named and the likely product range is tested. | Product alternatives change the agreed decision or require behavior the household rejects. | The supplier record, rating basis or product availability is missing. |
| Shading | Geometry and operation are documented, and the household accepts the control. | The shade solves one issue by creating an unacceptable winter, daylight, view, maintenance or water-management consequence. | The shade detail, optical data, control schedule or attachment limit is unknown. |
| Thermal mass | Location, exposure and modeled participation are documented. | The concept depends on mass that is covered, poorly connected or ineffective in the tested cycle. | Assembly layers, finish, exposed area or model representation is uncertain. |
| Natural ventilation | The design remains acceptable under the agreed restricted-operation case. | Comfort or risk depends on open windows that the household cannot or will not use. | Opening area, control rule, cross-flow path or outdoor boundary is not documented. |
| Daylight and glare | Room-level outputs support the tasks and priorities recorded by the homeowner. | Glare, contrast or shade use conflicts with a room’s intended use. | Metric definition, view direction, sky condition or task position is missing. |
| Thermal comfort | The modeler explains the selected metric and the homeowner accepts the review bands. | A material room or period falls outside the agreed band in a credible case. | The model is too coarse or the band is not defined. |
| Weather | The file and stress case are documented and the result is robust enough for the design question. | A reasonable stress case reverses the decision. | The site mapping, file provenance or stress case is unresolved. |
The word “freeze” should be attached to a revision number and date. Write, for example: “Freeze passive concept at schematic revision SD-04 for design development, subject to verification of the west-tree height and final window product before procurement.” That sentence is stronger than “passive strategy approved” because it preserves a condition that can reopen the decision.
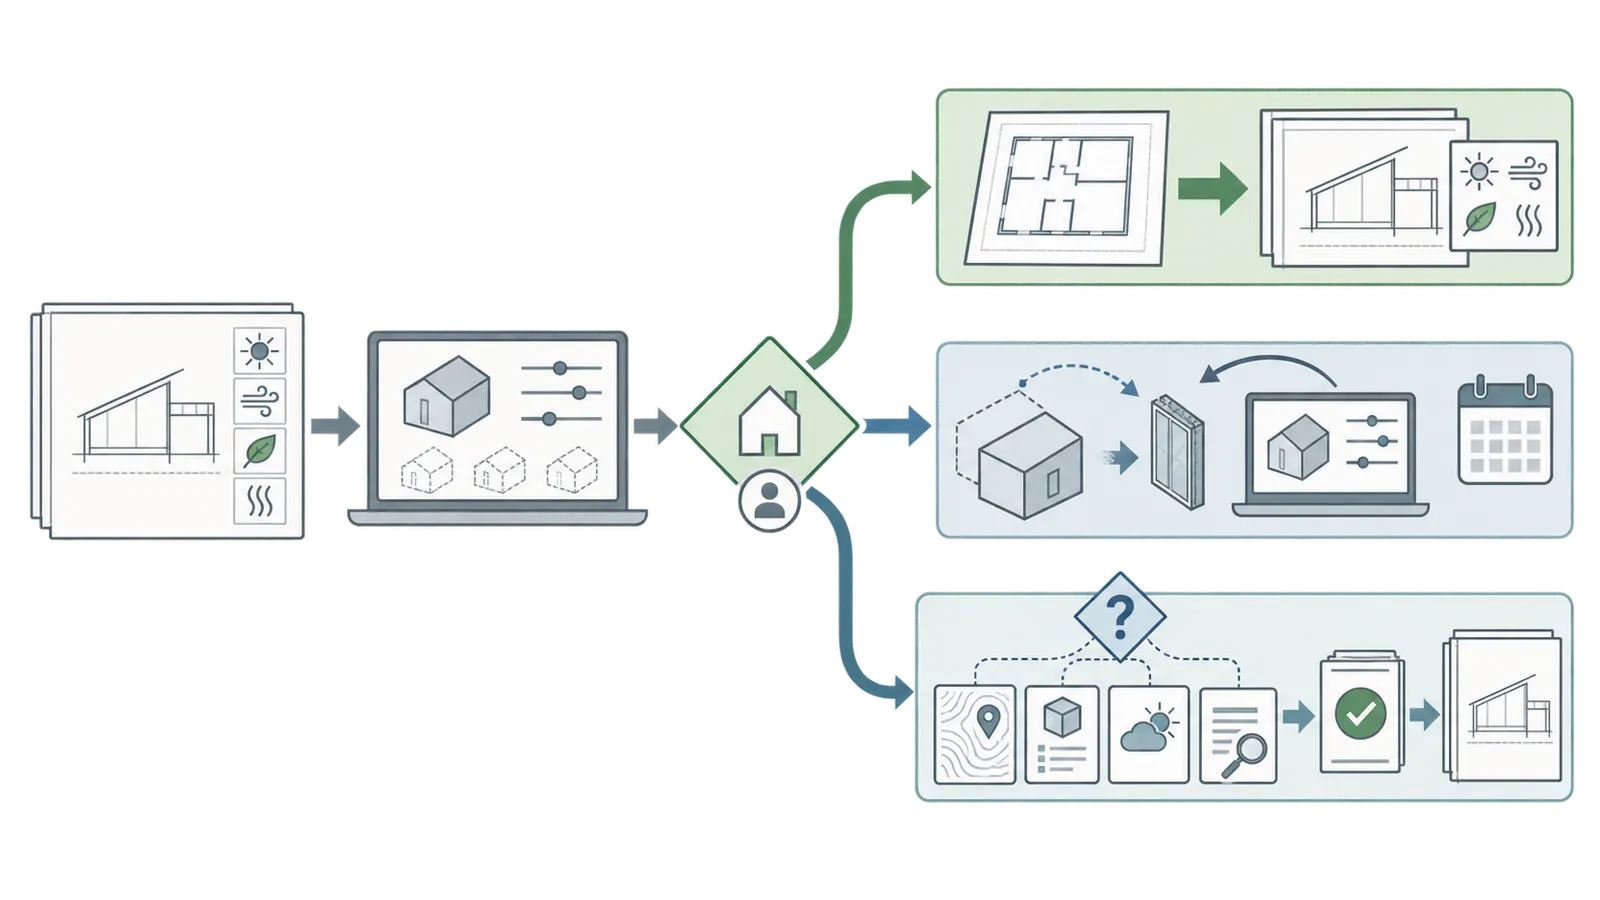
Handoff into design development and procurement
Once the concept is frozen, convert the packet into design-development actions. The architect should carry the orientation, room relationships, window IDs, head and sill heights, shade geometry, mass exposure and ventilation assumptions into the drawings and schedules. The modeler should identify which fields are still provisional and which later changes require a rerun. The homeowner should keep the decision record with the project brief rather than treating it as a marketing promise.
When a window supplier is approached, send the supplier the window IDs, rough or finished dimensions, orientation, shade relationship and performance values that the design actually needs. Ask the supplier to return the exact product record, size, frame, glazing, spacer and available ratings. A quote that names only a series or aesthetic line is not a complete verification record. If the product record differs from the model, compare the difference before accepting a substitution.
When a shade or overhang moves toward detailing, add the coordination questions that the simplified geometry did not answer: attachment, drainage, waterproofing, wind exposure, structure, maintenance access, snow or debris, insect screening, view, cleaning and the actual jurisdiction’s requirements if a local rule is implicated. Those are not passive-solar equations, but they can determine whether the modeled control survives construction and ownership.
When the project reaches a rater, certification program, mechanical designer, engineer or building official, pass along the packet but do not represent it as that professional’s required submission. Ask the professional to identify which inputs, metrics and jurisdiction-specific rules they will use. A professional may use a different method or request additional evidence. That is a normal scope handoff, not a failure of the homeowner packet.
Preserve a change-control trigger
Write a short trigger list into the design record:
- reopen if the footprint rotates beyond the tested range;
- reopen if a major window changes orientation, area, head height, SHGC, VT or operation;
- reopen if an exterior shade changes projection, height, return or control;
- reopen if a tree, neighboring building or terrain condition changes the horizon;
- reopen if a room changes from occasional use to sleeping, work or childcare;
- reopen if a mass surface is covered, isolated or relocated;
- reopen if natural ventilation becomes unavailable or is expected to carry more of the comfort strategy;
- reopen if the weather-file or stress-case decision changes;
- reopen if a local authority or program requirement changes the project scope.
The last item must name the actual jurisdiction or program when it is used. “Code changed” is not a sufficient record. A useful entry identifies the actual county building department and the document it requested, or the actual state energy program and the scope it requires. This article does not supply a local rule and does not replace that authority’s review.
The trigger list keeps verification proportional. A paint color change may not reopen the passive concept; a change from an exterior fixed shade to an interior roller shade probably deserves a review. The architect and modeler should decide the exact threshold for a rerun based on the project question, and the homeowner should understand the reason.
Carry the packet into ownership
The design team should hand the homeowner a readable packet, not only a proprietary model file. Keep the one-page decision statement, the adopted assumptions, the final design revision, the product records, the case table, the limitations and the reopen triggers. If the model cannot be transferred, preserve a PDF or other reviewable export plus the responsible professional’s contact and scope.
During construction, the packet can help the homeowner recognize a material change. A porch may become shallower, a window may move to clear a beam, a shade may be omitted for cost, a tree may be removed, or a room may change use. The homeowner should ask the architect or builder whether the change touches a packet trigger. Do not direct a trade to alter structure, waterproofing, glazing, electrical controls or ventilation based on this article.
At handover, compare the installed design to the verified assumptions at a practical level: window identifiers and orientations, shade presence and geometry, room use, exposed mass surfaces and operable openings. This is not a laboratory test or a certification inspection. It is a document check that can identify a visible divergence to send to the appropriate professional.
For maintenance, record the controls the design relied on. A fixed shade may need cleaning, a tree may need qualified pruning, an operable shade may need service, and a window-opening strategy may depend on screens, hardware and safe access. The packet should not prescribe a maintenance interval without a product manual or professional advice. Instead, it should name the condition: “If the exterior screen is damaged or the tree horizon changes, revisit the solar-control assumption.”
Do not frame the packet as a guarantee to a future buyer. It is a dated design record with a method, limitations and evidence boundary. It can explain why an orientation, window or shade was selected and what assumptions should remain visible. Future owners may have different schedules, furniture, trees, finishes, privacy needs or comfort preferences. The design record helps them understand the starting point without claiming that the original model predicts their lived experience.
Close the loop with a clear next decision
The packet is complete only when the next decision is named. If the concept is frozen, the next decision is usually how to carry the assumptions into design development and which fields remain hold points. If the concept is revised, the next decision is which changed geometry or product will be modeled next. If more evidence is needed, the next decision is who will obtain it, by when, and what outcome would change the path.
Write the next decision in a form another person can execute: “Architect to confirm the west-tree horizon and issue SD-05; modeler to rerun SHADE-B and GLZ-B using the updated window schedule; homeowner to confirm whether the office may use an exterior shade; review freeze decision after those records arrive.” This is specific without pretending that a result already exists.
The value of a homeowner-owned packet is not that it makes professional design unnecessary. It makes professional work easier to direct, easier to check and harder to misremember. It turns a passive-design promise into a visible chain of inputs, responsibilities, tests, trade-offs and decisions that can survive the move from sketch to drawing, procurement, construction and ownership.
Review the packet for evidence quality before you sign it
Do one final review that is separate from the design preference discussion. The purpose is to check whether the packet supports the conclusion it makes. This is the point where a homeowner can catch an attractive but unsupported claim without needing to choose the technical remedy.
For each material claim, ask four questions:
- What is the claim? Write it as a bounded statement, such as “the tested shade geometry reduces direct afternoon sun in the living-room case,” rather than “the shade solves overheating.”
- What evidence supports it? Identify the drawing revision, product record, weather file, model case, calculation or professional observation.
- What is the scope? Name the room, season, weather case, product, occupancy schedule and design stage. A result outside that scope is a new question.
- What is the limitation? State what the evidence does not establish, such as code compliance, final construction, universal comfort or future weather.
Use a claim ledger:
| Claim ID | Design claim | Evidence record | Scope | Limitation | Decision status |
|---|---|---|---|---|---|
| C-01 | Documented orientation supports tested comparison | North note and base-case file | Site and current revision | Does not establish local approval | Open or closed |
| C-02 | Candidate glazing is within tested range | Supplier record and GLZ case | Identified window IDs | Does not certify installation | Open or closed |
| C-03 | Shade geometry changes direct-sun period | Elevation, calculation and SHADE case | Named dates and times | Does not establish structure or waterproofing | Open or closed |
| C-04 | Room priority is met under agreed case | Room card and output sheet | Room, task and schedule | Does not predict every household behavior | Open or closed |
The rows are a blank, illustrative ledger. The homeowner should complete it with the project’s own records. A claim can be technically plausible and still be not ready for a freeze if the evidence record is missing or the scope is broader than the case. The ledger forces the team to narrow the language to what was actually checked.
Next, review the source support behind the general design principles. DOE’s passive-solar guide supports the interacting element map, not a universal compass rule. DOE’s BEM pages support the need for geometry, schedules and weather, not a guarantee that a particular model predicts an unbuilt home. LBNL supports climate- and use-dependent attachment behavior, not a product endorsement. ORNL supports multi-metric evaluation, not a homeowner comfort threshold. The packet should preserve those boundaries when it summarizes why a case was selected.
Finally, read the conclusion without the charts. If the plain-language sentence says “freeze,” can a new reader identify the site, room, product, model case, unresolved risks and next handoff? If it says “revise,” does it identify the design lever and the reason? If it says “obtain more evidence,” does it name the owner and the evidence needed? If not, the packet is still a collection of analysis rather than a decision surface.
This review is especially important when a team is under schedule pressure. A plan freeze may be needed for structural coordination, pricing or a consultant handoff, but an explicit provisional freeze is different from pretending that every passive-design assumption is verified. The homeowner can approve the next stage while preserving a hold point: “Proceed with design development using this orientation and room layout; do not release the window order or delete the exterior shade until the product and shade cases are closed.” That wording keeps the project moving without erasing a known dependency.
How to write the decision record
Use this structure:
Decision question. What exact design choice was reviewed, and for which rooms?
Base case. What site, geometry, product, schedule, mass, ventilation and weather inputs were used?
Sensitivities. Which assumptions changed, one at a time or as named combined cases?
Material findings. Which outputs changed, in what units, during which hours or seasons, and for which rooms?
Household trade-off. What does the result mean for daylight, glare, view, comfort, operation, maintenance, cost coordination or future ownership?
Unresolved risks. What is still unknown, who owns it, and what would cause the decision to reopen?
Decision. Freeze, revise or obtain more evidence.
Next handoff. Which drawing, schedule, product record, survey, model file or professional review comes next, and by what revision or date?
Failure branch: the model says “comfortable” but the room is unusable
First check the metric and the room task. A whole-zone average may hide a solar patch, a radiant asymmetry, a screen reflection or a peak that occurs only during work hours. Ask for room-level and time-specific outputs, the position and orientation of the task, the window and shade state, and the weather condition. If the model cannot answer, obtain a higher-resolution daylight or façade review or revise the design. Do not freeze because an annual average looks acceptable.
Failure branch: the design works only when shades are closed
Record the closed-shade case and the household’s actual willingness to operate shades. If the design loses its daylight, view or passive-gain purpose when shades are closed, the team should revise the glazing, exterior shading, room task location or control strategy. An always-closed shade can be a valid privacy or heat-control choice, but it means the original daylight or solar premise has changed.
Failure branch: the product changes after the model
Do not treat a substitution as administrative. Compare the new U-factor, SHGC, VT, size, frame and shade compatibility with the modeled record. Ask the window supplier to identify the exact product and the modeler to determine whether it falls within the tested range. If not, reopen the affected case. The safest next handoff is a revised window schedule linked to a new product record and a short model delta, not a verbal assurance that the window is “similar.”
Failure branch: the site obstruction is outside your control
Model both the documented current condition and a bounded alternative if the tree, neighboring wall or future development can change solar access. Record what is legally or contractually known only through the actual jurisdiction or project documents; this article does not provide local land-use or tree rules. If the design fails when the obstruction is present, decide whether to revise the house, accept the risk explicitly, or obtain a professional site and planning review.
Failure branch: the team wants one universal threshold
Resist a threshold that is detached from the room, occupant and model definition. The homeowner and professional team should state the review band, the source or rationale, the room, the time period and the consequence of exceeding it. A threshold can be useful for a decision, but it is not a universal code or comfort promise. If the team cannot agree on what “acceptable” means, the next decision is to define the brief before optimizing the model.
The final homeowner checklist
Before signing the design-development handoff, confirm that the packet contains:
- The project address, latitude, longitude and true-north method.
- A current plan or model revision with building azimuth and roof/shade geometry.
- Site obstructions, seasonal assumptions and unknown conditions.
- Room use, task, occupancy and weekend/seasonal schedules.
- Window identifiers, dimensions, orientations, sill/head heights and operation.
- U-factor, SHGC and VT for each modeled product or bounded product range.
- Shade projection, height, returns, control and deployment assumption.
- Thermal-mass location, assembly, exposed area and model representation.
- Natural-ventilation openings, free-area assumption and restricted-operation case.
- Weather-file name, location, source, period and stress-case decision.
- Base-case model file, input export or reproducible input record.
- Named sensitivity cases with one-sentence purposes.
- Room-level outputs for daylight, glare, thermal comfort and energy-related comparisons.
- Units, metric definitions, time periods and known limitations.
- A list of unresolved risks with owners and due dates.
- The freeze, revise or obtain-more-evidence decision tied to a drawing revision.
- The next handoff to the architect, modeler, window supplier, rater, surveyor, engineer or other qualified professional.
What happens after a freeze
A freeze is a handoff into design development, not the end of verification. The architect should carry the verified concept into drawings, elevations, window schedules, shade details, room layouts and finish decisions. The energy modeler should preserve the base and sensitivity cases so later changes can be compared. The window supplier should confirm that the selected product matches the modeled properties or identify the delta. If a rater, certification body, engineer, mechanical designer or building official is involved, the homeowner should ask that professional to state the separate scope and actual jurisdiction.
During later design, reopen the packet when a material change occurs: building rotation, roof or porch geometry, window size or product, shade depth, tree or neighboring obstruction, interior finish that covers mass, room use, occupancy, ventilation strategy or relevant local requirement. Do not update the date merely because the page or drawing has a new title block. Update the packet when the evidence or decision changes.
Keep the record understandable to someone joining the project later. A new architect, estimator, window supplier or homeowner should be able to identify the approved concept, the open risks and the evidence needed to reopen it without reconstructing the decision from scattered emails. That continuity is especially useful when a value-engineering change removes a shade, changes a window series or relocates a room after the original design team has moved on.
The homeowner’s ownership consequence is simple: keep the packet with the design records. It tells you what the passive concept assumed, which controls were required, which products were considered, and which risks were accepted. That record helps with procurement, construction questions, substitutions, commissioning conversations and future maintenance. It also prevents a common ownership problem: a home inherits a passive-design promise after the dimensions, products and behaviors that made the promise plausible have disappeared.
The safest final answer is therefore conditional. Freeze the concept when the input chain is traceable, the base case and sensitivities answer the agreed room-level questions, and unresolved risks are consciously accepted. Revise when the design fails a material household priority or relies on unacceptable operation. Obtain more evidence when the result might work but the site, product, geometry, weather or model assumption is not yet strong enough to support the next design handoff.
Cite this guide
Brictale. “How to Verify Passive-Design Assumptions Before Plan Freeze.” Published 2026-10-06; updated 2026-10-06.
https://brictale.com/build/design/verify-passive-design-assumptions-before-plan-freeze · Read the Markdown version
Original contribution: Passive-Design Verification Packet. A homeowner-owned record that connects site, climate, occupancy, glazing, shading, thermal-mass and ventilation assumptions to responsible people, model cases, outputs, unresolved risks and the freeze, revise or obtain-more-evidence decision.
Sources and scope
Evidence behind this page
- DOE describes whole-building energy modeling as physics-based simulation that uses building geometry, construction materials, lighting, HVAC and controls together with occupancy, lighting, plug-load and thermostat schedules and local weather to calculate hourly or shorter-interval results, including comfort and energy metrics.
About Building Energy Modeling
U.S. Department of Energy overview of whole-building energy modeling; supports the packet’s input inventory and the need to name weather and operating assumptions. It does not establish a project-specific acceptance threshold.
Accessed · Link to this claim - DOE says early building energy modeling can quantify project-specific trade-offs among orientation, floor plan, façade elements, construction cost and operating energy, and that major architectural choices are often settled early in design.
Building Energy Modeling 101: Architectural Design Use Case
DOE architectural-design guidance, with examples that are largely commercial; used here for the timing and trade-off principle, not as a residential code or cost claim.
Accessed · Link to this claim - DOE identifies windows or apertures, an absorber, thermal mass, heat distribution and controls such as overhangs or shades as interacting elements of passive solar design, and notes that orientation, room layout, materials and surroundings matter.
Guide to Passive Solar Home Design
DOE homeowner guide; its example guidance includes windows within 30 degrees of true south and seasonal shading, but those are not universal design or code requirements and must be tested against the actual site and climate.
Accessed · Link to this claim - DOE says fenestration energy savings vary with climate and identifies U-factor and solar heat gain coefficient as primary efficiency properties for windows, doors and skylights; it recommends identifying the installation climate before comparing product levels.
Purchasing Energy-Efficient Residential Windows, Doors, and Skylights
DOE Federal Energy Management Program purchasing guidance, updated December 2021; federal acquisition guidance is not a homeowner mandate and does not select a product for a particular project.
Accessed · Link to this claim - DOE’s building-envelope guidance says orientation, fenestration area, climate zone, shading and interior finishes interact in daylighting, and that direct solar penetration should be limited with orientation, shading, filtering, baffling or reflection because occupant interaction affects results.
ZEB Technologies: Building Envelope & Architectural Considerations
DOE zero-energy-building architectural guidance; used for interaction and glare-risk reasoning, not for residential code compliance or a universal daylight target.
Accessed · Link to this claim - NREL describes passive solar homes as using south-facing windows, thermal mass, heat distribution, shading and natural ventilation to capture useful winter sun and reduce unwanted summer heat, with effectiveness depending on the design context.
Passive Solar Technology Basics
National Renewable Energy Laboratory overview; supports the concept-level element map and does not certify a homeowner’s design or prescribe a single orientation.
Accessed · Link to this claim - DOE explains that thermal mass can reduce temperature swings and peak conditioning demand in some conditions, while its effectiveness depends on the temperature cycle and whether heat can transfer between the mass and indoor air.
ZEB Technologies: Passive Design Techniques
DOE passive-design guidance; used to require a modeled thermal-mass assumption rather than treating a material label such as concrete or tile as proof of performance.
Accessed · Link to this claim - LBNL reports that window-attachment performance depends on mounting, occupant use, orientation and climate; its modeled attachment outcomes differ among climates and operating strategies, so a generic shade label is not a project result.
Residential Windows & Attachments
Lawrence Berkeley National Laboratory residential window-attachment research and modeling overview; includes modeled and measured research context, not a guarantee for a particular shade or house.
Accessed · Link to this claim - An LBNL study of a prototypical single-story house in Miami, Phoenix and Madison found that window U-value effects on cooling loads were smaller than solar heat-gain, latent and internal-load effects in that study, while lower U-value reduced peak cooling load under its assumptions.
Window U-Value Effects on Residential Cooling Load
LBNL report abstract for three modeled locations and a prototypical house; not a current product comparison, not a universal ranking of U-values, and not a substitute for the project model.
Accessed · Link to this claim - An ORNL peer-reviewed study says optimizing daylight and shading by energy-use intensity and useful daylight alone can overlook glare, outdoor views and thermal comfort, and presents a multi-input, multi-output approach using window-to-wall ratio, shade properties and overhang depth.
Oak Ridge National Laboratory publication abstract; its research context is not a homeowner pass/fail standard, but it supports comparing multiple metrics before freezing a design.
Accessed · Link to this claim - DOE identifies weather as a key input to building energy modeling and notes that common historical typical-year files may not represent future conditions over a building’s lifetime, which is a reason to record the selected weather file and consider an agreed stress case.
FEMY: Future and Extreme Weather Data
DOE project page discussing historical TMY3 and future/extreme weather data; it does not prescribe which weather file a particular U.S. home must use.
Accessed · Link to this claim - DOE Building Science Education says window and skylight placement can provide daylight while controlling solar gain, and that north and south openings are generally easier to control for heat and glare than east- and west-facing openings.
DOE Building Science Education homeowner-level daylighting guidance; used as a directional design principle, not a substitute for solar geometry or project simulation.
Accessed · Link to this claim