How to Prepare a Passive-Solar Siting Brief for a Sloped Lot
Compare sloped-lot house positions before schematic design with a solar, grade, view, access, utility and room-priority worksheet.
The short answer
Prepare a one-page site brief that fixes true north, slope direction and grade, seasonal obstructions, access and utility limits, then compare two or three viable footprints against room priorities, winter solar access, summer overheating risk, cut-and-fill uncertainty, views and arrival. Use owner weights to expose the compromise. Have the surveyor, architect, civil or structural professional and energy modeler verify their parts before schematic design is frozen.How to Prepare a Passive-Solar Siting Brief for a Sloped Lot
Choose the strongest house position before schematic design by comparing two or three viable candidates against the same record: true north, slope direction and grade, winter solar access, summer overheating risk, views, arrival, utilities, room priorities and unresolved professional work. Treat the score as an owner-weighted conversation starter, not an engineering result. The winning option is the one whose compromises are visible, testable and acceptable to your design team.
Decide what the siting brief must prove #
Your siting brief should prove which two or three candidate positions deserve schematic-design effort and which unresolved conflicts must be modeled or surveyed before the choice is frozen. It does not need to prove that a house will meet a comfort target, fit a setback, resist earth pressure or pass a permit review.
That distinction matters on a sloped lot because a tempting view or a south-facing façade can hide a chain of consequences. Moving the house a few feet may change the apparent grade at the entry, the length and slope of the driveway, the amount of cut and fill, the retaining-wall question, the route of utilities, the privacy of bedrooms, the exposure of west glass, and the location of the best outdoor space. A two-dimensional sketch can help you compare those consequences, but it cannot establish soil bearing, groundwater, drainage performance, structural sizing, accessible-route compliance or a permit decision.
The brief is therefore a decision record. It gives your architect a bounded design problem rather than a vague request for “passive solar.” It also gives the surveyor, civil or structural professional, and energy modeler a list of assumptions to confirm or reject. Keep the record dated. When an assumption changes, record the reason and whether the score must be rerun.
What passive solar means in this decision
Passive solar is not simply “put the largest windows on the sunny side.” The U.S. Department of Energy describes a system made from an aperture, absorber, thermal mass, heat distribution and control, with orientation, room layout, materials and surroundings all contributing. DOE’s Guide to Passive Solar Home Design is useful here because it frames the house and its surroundings as one system rather than treating orientation as an isolated compass choice.
NREL similarly describes south-facing windows, thermal mass, distribution and control as parts of a successful passive-solar design. Its general heating-season guidance places the aperture within 30 degrees of true south and calls for it to remain unshaded from 9 a.m. to 3 p.m. during the heating season. NREL’s Passive Solar Technology Basics is a starting point for candidate generation, not a promise that every U.S. climate or every room should follow that geometry.
Use “true south,” not an unexamined phone-compass reading. Magnetic north changes by location and time, and a site plan may already carry a surveyor’s north arrow or a geodetic reference. If your first observation is from a phone, write “approximate magnetic reading” in the brief and ask the surveyor or architect to establish the reference used for drawings. The point is not to produce a perfect solar study yourself; it is to prevent the design team from comparing candidates built on different north arrows.
The decision boundary
The brief is ready for professional review when it answers these questions in plain language:
- Which candidate footprints or room-zoning schemes are still physically and legally plausible in the project’s actual jurisdiction?
- Which site features are fixed for now, such as the road connection, protected vegetation, a view corridor, an easement shown in title documents or an existing utility point?
- Which choices are negotiable, such as the location of the garage, the shape of the footprint, the position of bedrooms, the amount of south glass, or the location of a porch?
- Which room priorities justify accepting a solar compromise?
- Which compromises may cause overheating, winter heat loss, glare, privacy loss, difficult arrival or uncertain earthwork?
- Who must verify each uncertainty, with what record, before schematic design is approved?
Do not use a score to turn a prohibited option into a viable one. First remove candidates that fail a known hard constraint. A candidate that crosses a recorded easement, cannot connect to the permitted access, or requires a use the local authority will not allow is not “low scoring”; it is out of the comparison. The city, county, state or other authority having jurisdiction for the property must answer local zoning, setbacks, tree, driveway, grading, stormwater, septic, fire-access and utility questions. This article names no national rule for those topics.
The owner’s responsibility
You own the priorities and the accuracy of the brief’s observations. You do not own the professional conclusions that depend on a boundary survey, topographic survey, soil information, drainage analysis, structural design, energy model or jurisdictional interpretation.
Write the priorities before asking a professional to draw. “A great view” is not enough. Record what the view is for, from which rooms, in which seasons, and whether it outranks a shorter driveway, a level entry, a quieter bedroom, winter sun or a smaller retaining-wall scope. A priority is useful only when it can change the comparison.
The architect’s responsibility
The architect or residential designer turns the brief into coordinated candidate plans and tests whether room zoning, structure, envelope, circulation, daylight, privacy, arrival and exterior spaces can coexist. Ask for two or three clearly labeled alternatives with the same gross floor area and the same stated room program before comparing them. If one option is allowed a larger house or better window package, you are comparing packages, not siting.
The architect should identify what the drawings assume about north, finished floors, driveway grade, building height, roof form, window area, overhangs, trees and future additions. If an option depends on a large south-facing glazing wall, make the thermal-control strategy explicit rather than treating the glass as a free benefit.
The surveyor, civil or structural professional, and energy modeler
The surveyor establishes the site reference and measured geometry. The civil professional reviews grading, access, stormwater and utility implications within the agreed scope. The structural or geotechnical professional evaluates the slope, soil and foundation or retaining conditions that the candidate exposes; this article does not size those systems. The energy modeler tests the candidate’s actual climate, envelope, windows, shading, internal loads and mechanical assumptions. On some projects one firm may cover more than one role, but the verification questions should remain separate.
PNNL-20442 is a useful reason to preserve those handoffs: it says passive-solar design is complex and building modeling is essential, and it notes that views, neighbors and other residential conditions can make prescriptive orientation or glazing requirements impractical. Read the passive-solar discussion in PNNL-20442. Your worksheet makes a choice inspectable; it does not replace the model.
Collect a site record before you draw candidates #
Collect a north-referenced base plan, the slope’s direction and grade, seasonal obstruction observations, access and utility constraints, room priorities and jurisdiction questions before asking for a final siting recommendation. Separate measured or documented inputs from homeowner observations and assumptions so a later professional can tell what needs verification.
Begin with the material you already have: purchase or title documents, the survey provided at closing, recorded easements, the road or driveway connection, utility correspondence, well or septic records if applicable, flood or hazard information supplied for the property, and any land-use or design-review documents from the actual city or county. Do not assume that a listing plan, aerial image or tax map is a boundary or topographic survey. Label each file by source and date.
Input sheet A: orientation and geometry
Record the following in a table or annotated plan:
| Input | Record in the brief | What it can and cannot tell you |
|---|---|---|
| North reference | “Survey north arrow,” “architect north,” or approximate field reading; include source and date | Lets candidates use the same reference; it is not a solar-access certification |
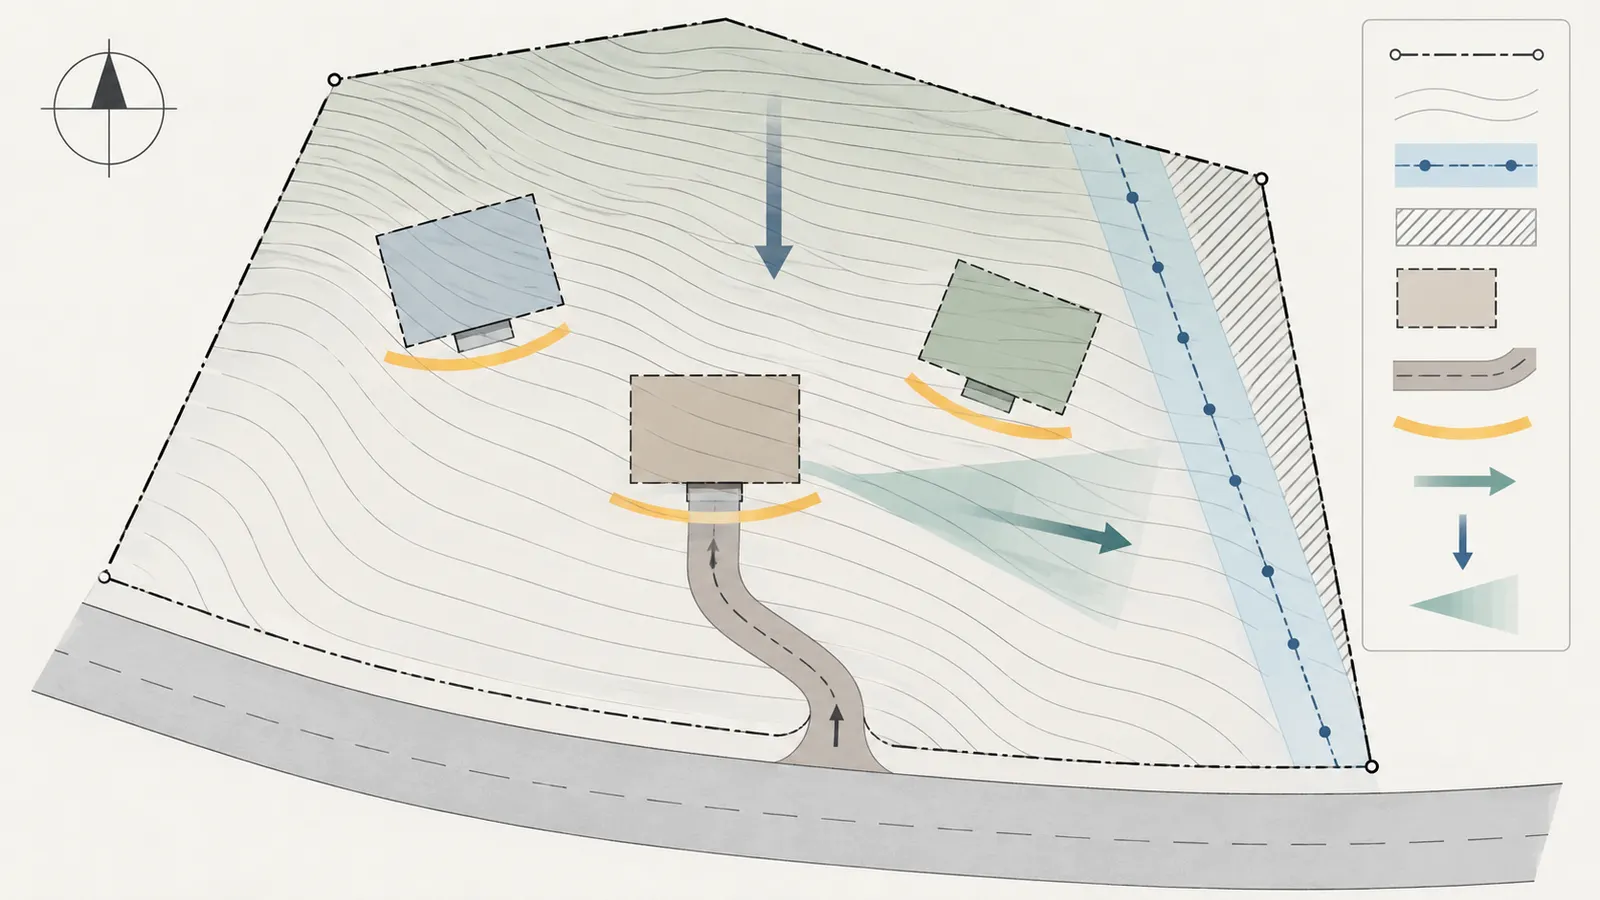
| Slope direction | The direction of the fall, such as “falls generally south-east”; mark ridges, benches and breaks | Helps reveal likely entry, views and grade conflicts; it does not give foundation or retaining design |
| Grade | Survey spot elevations or contours, with units and datum if supplied | Allows a professional to compare finished-floor and access concepts; it does not calculate cut/fill or drainage |
| Candidate footprint | A simple rectangle or labeled room-zone outline with length, width and orientation | Makes options comparable; it is not a permit-ready plan |
| Height and roof assumption | Number of stories, approximate ridge/eave concept and any upper-level glazing | Helps identify self-shading and view effects; it does not prove structural or energy performance |
| Solar-facing façade | Which candidate façade is intended for primary winter collection and where living spaces might face | Supports room zoning; the energy value depends on glass, shade, mass, climate and controls |
Use one unit system. Feet and degrees are practical for a U.S. homeowner brief, but note whether grades are recorded as a percentage, ratio or angle. Do not convert a slope label casually. A 20 percent grade is not the same as a 20-degree slope. If you only know that the lot is “steep,” write that as an uncertainty rather than inventing a number.
If a survey provides contours, trace the candidate footprint across them and mark where a proposed floor line might meet the ground. The trace is a visual comparison only. It can show that Option A crosses more contours than Option B; it cannot tell you whether either option is buildable, how much earth moves, whether a retaining wall is needed, or how water behaves around the foundation. Those are professional questions.
Record the direction of the slope separately from the direction of the best view. They may point the same way, but they do different work. A south-facing slope may improve solar exposure but make a downhill view-facing façade tall, exposed and difficult to enter. A north-facing slope may offer the desired view while reducing winter solar access or increasing shading from the landform. The worksheet should show both instead of compressing them into “good orientation.”
Input sheet B: sun, shade and obstruction dates
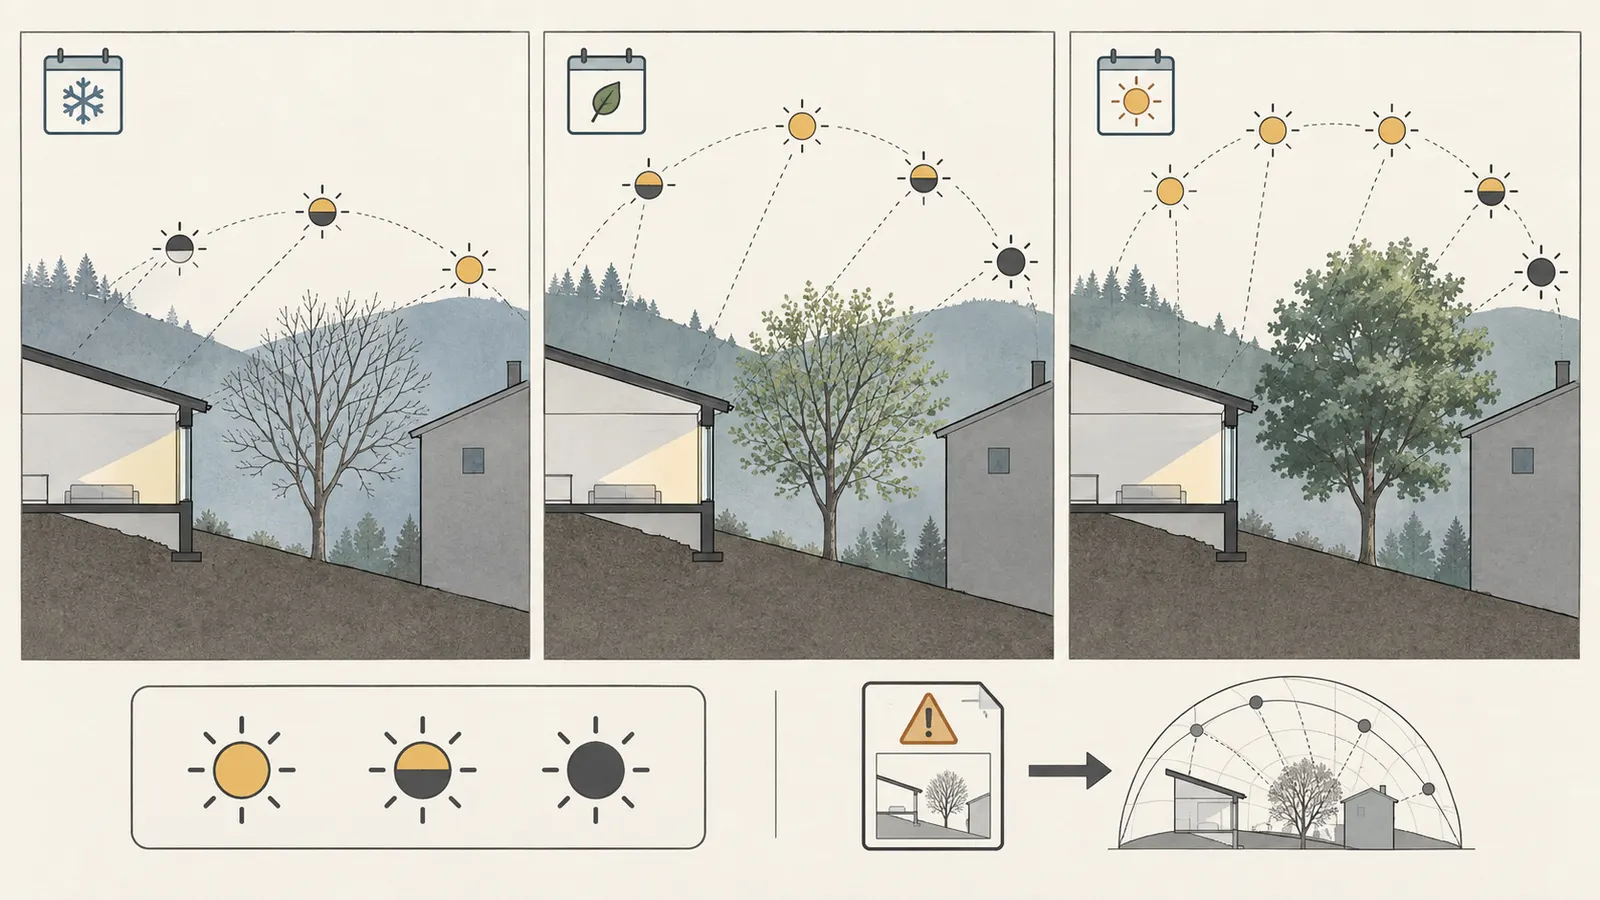
List every meaningful obstruction in the solar-facing and east/west directions: neighboring buildings, ridges, mature trees, utility poles, rock outcrops, proposed future structures and the house itself. Record its approximate bearing, apparent height above the horizon, distance if known, ownership or control, and whether it is likely to remain. Then record observation dates rather than relying on a single sunny afternoon.
At minimum, plan observations near a winter condition, a spring or fall shoulder condition, and a summer condition. The exact dates should be chosen with the design team for the property’s latitude and climate; the worksheet does not pretend that a three-date observation represents every day. On each date, note approximate time, cloud cover, the point on the lot, and whether a shadow reaches the proposed aperture zone. Photograph from the same marked locations when possible.
Use “blocked,” “partly blocked,” “clear,” or “unknown,” not invented percentages. A tree that appears clear in winter may leaf out in summer. A deciduous tree can provide useful summer shade but may not be the same control as an architectural overhang. PNNL’s landscaping guidance says east and west walls and windows receive the most solar heat in midsummer, recommends prioritizing shade there, and also says the shade-versus-winter-gain decision depends on the length of the heating season. See PNNL’s landscaping guidance. This is why the brief records seasonal observations and species or canopy uncertainty rather than promising a mature tree’s future performance.
The 9 a.m. to 3 p.m. heating-season reference in the NREL overview is a useful screen for a candidate that depends on winter collection, but it is not the only question. Ask when the living room is occupied, when bedrooms need morning light, when glare is unacceptable, and whether the site’s obstruction blocks low winter sun. A candidate can “pass” a generic time window yet fail the family’s actual schedule or create late-afternoon overheating.
Input sheet C: room priorities and outdoor life
List rooms by use, occupancy, desired light, desired view, privacy, noise tolerance, thermal sensitivity and relationship to outdoor space. A room matrix is more useful than a single “south side” instruction.
| Room or zone | Occupancy priority | Preferred light | View priority | Overheating/glare sensitivity | Preferred relationship |
|---|---|---|---|---|---|
| Main living | Daily / high | Winter sun and balanced daylight | High | Medium | Porch or terrace |
| Kitchen / dining | Daily / high | Morning or south light | Medium | Medium | Arrival or garden |
| Main bedroom | Daily / high | Low-glare morning or controlled light | Medium | High | Quiet, private outdoor edge |
| Secondary bedrooms | Daily / medium | Even daylight | Low to medium | High | Privacy and easy egress review |
| Work / study | Daily / high | Stable, low-glare light | Medium | High | Quiet, controlled exposure |
| Utility / storage / garage | Intermittent | Low | Low | Low | Arrival, service and buffer |
These are placeholders. Replace them with your household’s actual priorities and add a weight from 1 to 5. A person who works from home may give glare control more weight than a person who wants winter sun in the living room. A household with a heat-sensitive occupant may treat overheating as a hard constraint for one bedroom even if it is a soft preference elsewhere. State that distinction.
Include the arrival sequence. Note where visitors approach, where groceries enter, whether a delivery vehicle must turn, where trash leaves, how snow or heavy rain affects the route, and whether a future occupant may need a more level or direct entry. Do not declare an accessible route based on a sketch. In the project’s actual jurisdiction, the architect and local authority determine which accessibility, zoning, fire-access or site rules apply.
Input sheet D: views, privacy, utilities and service
Map the desired views by room and standing or seated eye level. “The valley view” may be visible only from an upper floor or only through a narrow window. Record the view’s direction, elevation, season, likely future obstruction and whether the view is worth changing the house’s solar axis. Put view priority beside solar priority so the trade is explicit.
Map utilities as constraints and questions: the road connection, electric service point, water service or well area, septic reserve or sewer connection, communications, propane or other fuel storage, and any service access. The worksheet does not determine a utility provider’s route or capacity. Ask each utility or the relevant licensed professional what must be kept accessible, what easements apply, and what is known versus assumed.
Mark construction access separately from permanent arrival. A candidate may have a beautiful final entry but no practical location for construction traffic without crossing a neighbor’s land or damaging a protected feature. The builder and civil professional should review staging, deliveries, erosion control and temporary access. Do not instruct a homeowner to cut a slope, install a temporary road, remove a tree or excavate as a test.
Input sheet E: jurisdiction and uncertainty register
Create one row for every local question. Name the jurisdiction, authority, question, document or contact needed, responsible person and decision date.
| Jurisdiction or authority | Question | Evidence needed | Owner / professional | Status |
|---|---|---|---|---|
| City or county planning authority for the parcel | Which setbacks, height, lot-coverage, tree, grading or design-review rules affect each candidate? | Current zoning or site-review response tied to parcel | Owner with architect | Open |
| City or county building department | What submittal, grading, drainage or site-plan requirements apply? | Written current guidance or staff direction | Architect / civil | Open |
| State and local environmental or health authority | If onsite wastewater or other regulated infrastructure is relevant, where are approved areas and reserves? | Property-specific records and current agency requirements | Qualified local professional | Open |
| Utility serving the parcel | What connection point, easement, route and service constraints are known? | Utility correspondence and map | Owner / civil | Open |
| Fire or emergency authority, if consulted by the project | What access, turnaround or water-supply review applies in this jurisdiction? | Current jurisdiction-specific criteria | Architect / civil | Open |
Do not copy a neighbor’s permit condition into your brief as a national rule. A county may have a grading threshold, a city may have a tree ordinance, and a state may assign septic review to a health department; the applicable authority depends on the parcel. If you do not know the authority, record “unverified” and ask the architect or permitting professional to identify it.
Generate comparable candidate positions and room zones #
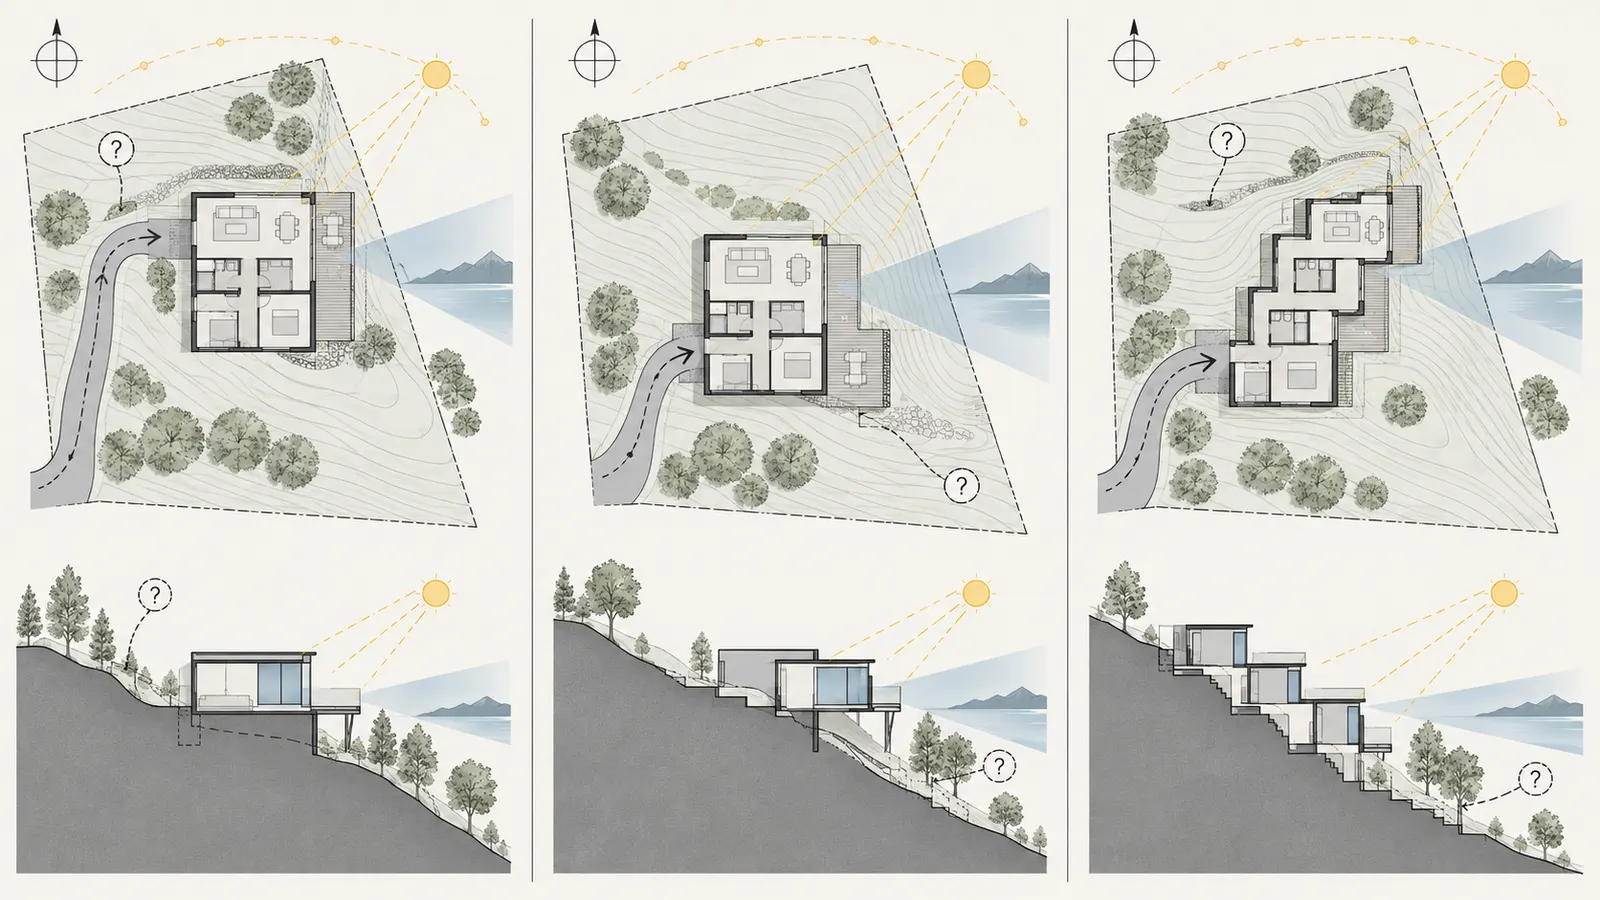
Generate two or three candidates that share the same house program and are different in one meaningful way: footprint location, long-axis orientation, story arrangement, entry side, or room zoning. This isolates the decision and prevents a seductive view, larger house or premium window package from disguising a siting choice.
Start with a no-compromise reference candidate. It might be the footprint that best follows the desired solar axis on the most buildable bench, or the footprint that best follows the driveway and grade. Then create alternatives that deliberately relax one priority. For example:
- Candidate A: a compact two-story form on the upper bench, with the long axis east/west, living spaces toward the most useful solar exposure, and a shorter service route.
- Candidate B: a lower, more view-oriented form shifted toward the downhill edge, with a larger view façade but more uncertain earthwork and west exposure.
- Candidate C: a split-level or stepped form that follows contours, preserves a lower-impact arrival, and places the primary living zone toward the view while accepting more complex structure and circulation.
These descriptions are illustrative. Do not assume the site can support them. The architect, surveyor, civil professional and structural or geotechnical professional must determine whether the options are plausible.
Keep the candidates apples-to-apples
Give each candidate the same nominal conditioned floor area, room list, number of occupants, number of stories unless story count is itself the variable, and design stage. Use a consistent footprint convention. If the gross footprint includes garage, porch or unconditioned areas in one option but not another, show those areas separately.
Record the option’s orientation as the bearing of the relevant wall or long axis, not just “south-facing.” Record window zones separately from wall orientation. A house can have an east/west long axis and still place a large amount of glass on an east wall. DOE says east and west glass can be problematic for solar heat gain and that orientation, climate, glazing, shading, views and other design factors work together. Review DOE’s envelope guidance.
Mark the following on each plan:
- True north and the intended winter-solar façade.
- Main living, dining, kitchen, bedroom and work zones.
- Window bands by approximate direction, with high-priority view windows distinguished from general daylight windows.
- Roof overhangs, porch roofs, balconies or other intended control elements.
- Existing and likely future obstructions.
- Entry, driveway, turning, service, construction-staging and utility corridors.
- Approximate finished floor levels and where the ground falls away.
- The outdoor spaces the household wants to use and the spaces that need privacy.
Do not add detailed window sizes, structural members or retaining-wall shapes merely to make the drawing look finished. Those details can imply a certainty the site record does not support. Use a dashed line or note such as “architect to test” for assumptions.
Candidate question: is slope direction an asset or a liability?
Treat slope direction as both an opportunity and a risk. A slope falling toward the solar-facing side may open the horizon and reduce obstruction from the uphill ground, but it may also increase the exposed foundation, entry grade, retaining or drainage questions on that side. A slope falling away from the solar-facing side may support a more sheltered foundation but create self-shading or a view conflict. The correct answer depends on contours, soil, water, finished-floor levels and the proposed form.
Ask the professional team to compare a common finished-floor datum across candidates. If one option quietly raises the floor to gain solar access and another stays low to simplify arrival, record that as part of the alternative, not as an invisible assumption. A finished floor is a design variable with consequences for views, steps, ramps, foundations, mechanical distribution and earthwork.
Candidate question: should you prioritize wind?
Give wind a place in the brief, but do not let a casual breeze observation overturn every other priority. PNNL says wind is valuable for passive cooling but that wind direction is variable in most U.S. locations, and it generally places shading and solar control ahead of trying to face the house directly into the wind. See PNNL’s siting and wind discussion.
That is a general design priority, not a hazard conclusion. A coastal lot, exposed ridge, wildfire-prone area, cold windy site or place with known severe weather deserves local analysis. Record prevailing summer and winter wind observations if they matter to comfort, smoke, snow or outdoor use, but hand the question to the architect and relevant local professionals. Do not infer wind loads, wildfire behavior or natural-ventilation performance from a phone weather app.
Candidate question: can a buffer fix an imperfect solar axis?
Sometimes. A garage, storage zone, stair, bath or other non-conditioned space on an east or west edge can act as a buffer, and PNNL includes non-conditioned spaces among strategies to reduce solar gains to conditioned areas. But a buffer also consumes area, changes circulation, affects service access, and may not protect a room if the roof, upper floor or windows remain exposed.
Use the buffer as a labeled hypothesis: “Could place garage at west edge to reduce afternoon exposure; architect to coordinate structure, ventilation, fire separation, daylight and arrival.” Do not mark the issue solved until the envelope and room plan show how the buffer works.
Score the options with the slope-and-solar siting worksheet #
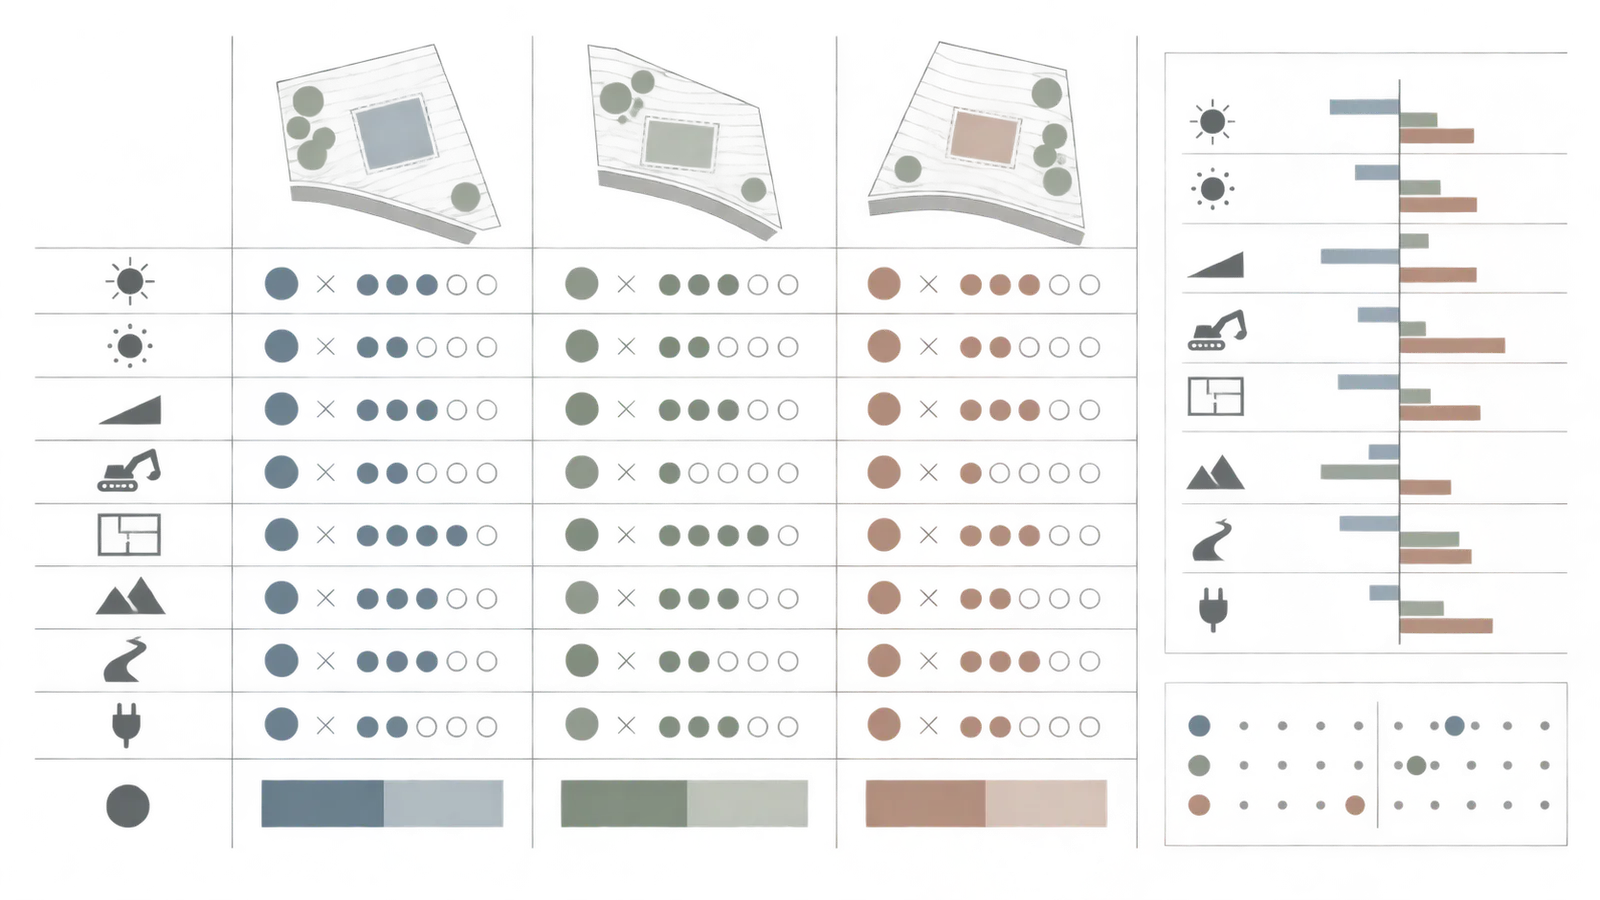
Score only candidates that survive the hard-constraint screen, and show the inputs, units, formulas, weights and uncertainty beside the total. The worksheet is an owner decision tool that organizes tradeoffs; it is not a measured solar study, cost estimate, geotechnical report, or energy model.
Slope-and-solar siting worksheet
Copy this table into your working document. Use a 0-to-5 rating for each criterion, where 0 is unacceptable or unresolved enough to stop, 3 is workable with a known professional task, and 5 is strongly aligned with the brief. If a criterion is unknown, use the uncertainty rule below rather than guessing.
| Criterion | Question to answer | Weight (w) | Candidate A (r) | Candidate B (r) | Candidate C (r) | Evidence / next check |
|---|---|---|---|---|---|---|
| Winter solar access | Does the intended winter-solar zone have a plausible clear path, using the same true-north reference and obstruction record? | 5 | Survey/solar study; energy model | |||
| Summer overheating control | Can east/west exposure, south penetration, roof and window assumptions be controlled for this climate and use? | 5 | Architect/envelope review; energy model | |||
| Slope and grade fit | Does the candidate fit the measured contours with a credible finished-floor and arrival concept? | 5 | Topographic survey; civil/structural review | |||
| Earthwork uncertainty | How much unresolved cut, fill, retaining or foundation complexity does the option expose? | 4 | Civil/geotechnical/structural scope | |||
| Room priorities | Does the option place high-priority rooms where their light, view, privacy and thermal needs are most compatible? | 5 | Owner room matrix; architect plan | |||
| View quality | Does it deliver the intended view from the intended room, eye level and season? | 3 | Section/perspective; future-obstruction check | |||
| Arrival and daily access | Can people, deliveries, cars and service use arrive in a practical sequence? | 4 | Civil/architect site plan; jurisdiction review | |||
| Utilities and service | Does the option preserve plausible routes, easements and maintenance access? | 4 | Utility records; civil review | |||
| Outdoor comfort | Does it support shade, usable outdoor rooms, privacy and seasonal use without overclaiming landscape performance? | 3 | Landscape/architect review | |||
| Wind and exposure | Does it avoid an obvious comfort or exposure penalty while keeping wind in proportion to solar control? | 2 | Local design-team review | |||
| Compactness and program efficiency | Does the form reduce unnecessary envelope or circulation while still meeting the room program? | 3 | Area schedule; energy model | |||
| Future flexibility | Can the household adapt room use, shading, landscape or equipment without destroying the basic strategy? | 2 | Owner/architect review |
The formula is:
weighted score = Σ (weight × rating)
With twelve criteria and the allowed 1-to-5 weight and 0-to-5 rating scales, the theoretical maximum is:
12 criteria × 5 weight × 5 rating = 300 points
For the illustrative weighting set shown above, the comparable maximum is lower because the owner assigned some criteria weights below 5:
(5+5+5+4+5+3+4+4+3+2+3+2) × 5 = 225 points
Use 225 as the denominator only while those owner weights remain unchanged; if the household changes a weight, recalculate the denominator as Σ(weights) × 5. Neither denominator is a market benchmark, and no score means that an option is “safe.” The rating scale is ordinal: a 4 is better aligned than a 2 for the criterion as defined, but the difference is not a measured percentage improvement.
How to assign a defensible rating
Write the reason, not just the number. For winter solar access, a 4 might mean “intended south-facing living zone appears clear in three dated observations, but ridge height and tree canopy need a solar study.” A 2 might mean “winter access is partly blocked and the option depends on enlarging glazing before overheating is modeled.” For grade fit, a 4 might mean “footprint sits mostly along a surveyed bench with an unresolved lower-level edge”; a 1 might mean “candidate crosses several contours and the entry requires an untested steep route.”
Use the lowest defensible rating when a material fact is unknown. Do not punish an option forever because information is missing; mark the rating U in a separate column, keep its provisional score conservative, and add the verification owner. A candidate should not win because it has the most optimistic assumptions.
You may use a two-part record:
Provisional rating: the score used for today’s comparison, with uncertainty shown.Verified rating: blank until the assigned professional or document confirms the input.
If a professional says the criterion cannot be scored at this stage, preserve “not yet modelable” and carry the issue to the next decision. That is more useful than replacing uncertainty with a false decimal.
Worked illustrative example
The following example is modeled for method demonstration only. It is not a real property, measured observation, energy result, cost estimate or professional recommendation.
Assume a hypothetical 1.2-acre U.S. lot with a surveyed north arrow, a general slope falling southeast, a road on the north, a view to the southeast, and a 2,400-square-foot conditioned program. The owner gives winter solar access, summer overheating control, slope fit and room priorities the highest weights. The household wants a daylighted living room and kitchen, a quiet main bedroom, a home office with low glare, a sheltered outdoor room, and a direct service route.
The architect sketches three equal-area concepts:
- A is a compact two-story rectangle on an upper bench, long axis east/west, with living and dining toward the southeast and service spaces on the west.
- B is a one-story bar shifted downhill toward the view, with a larger southeast-facing living façade and a more exposed west side.
- C is a stepped two-level form aligned more closely with contours, with the living level toward the view and the entry at the north side.
The owner records three seasonal shade observations but does not claim they represent the full year. The survey has not yet resolved finished-floor elevations. The ratings below are deliberately transparent.
| Criterion | Weight | A rating | A points | B rating | B points | C rating | C points |
|---|---|---|---|---|---|---|---|
| Winter solar access | 5 | 4 | 20 | 5 | 25 | 3 | 15 |
| Summer overheating control | 5 | 4 | 20 | 2 | 10 | 4 | 20 |
| Slope and grade fit | 5 | 4 | 20 | 2 | 10 | 4 | 20 |
| Earthwork uncertainty | 4 | 4 | 16 | 2 | 8 | 3 | 12 |
| Room priorities | 5 | 4 | 20 | 4 | 20 | 4 | 20 |
| View quality | 3 | 3 | 9 | 5 | 15 | 4 | 12 |
| Arrival and daily access | 4 | 5 | 20 | 2 | 8 | 3 | 12 |
| Utilities and service | 4 | 5 | 20 | 3 | 12 | 3 | 12 |
| Outdoor comfort | 3 | 4 | 12 | 3 | 9 | 4 | 12 |
| Wind and exposure | 2 | 3 | 6 | 2 | 4 | 3 | 6 |
| Compactness and program efficiency | 3 | 5 | 15 | 3 | 9 | 3 | 9 |
| Future flexibility | 2 | 4 | 8 | 3 | 6 | 4 | 8 |
| Total | 186 | 136 | 158 |
The arithmetic for A is 5×4 + 5×4 + 5×4 + 4×4 + 5×4 + 3×3 + 4×5 + 4×5 + 3×4 + 2×3 + 3×5 + 2×4 = 186 points. B scores best on view and winter-solar access in this imagined record but loses on heat control, grade, arrival and earthwork uncertainty. C is between them.
The conclusion is not “build A.” The defensible conclusion is narrower: “A deserves the first schematic-design test because it leads under the stated weights and has fewer unresolved grade and arrival conflicts; B remains a view-first alternative only if the architect and energy modeler show a credible summer-control strategy and the civil or structural review bounds downhill work; C remains a contour-following alternative pending finished-floor review.” That wording preserves the next decision.
Sensitivity: let the owner see what changes the winner
A siting decision can look objective simply because it has a number. Sensitivity keeps the number honest. Change one weight at a time while leaving ratings fixed, and show whether the order changes. The following table uses the illustrative ratings above.
| Sensitivity case | Changed owner weight | A total | B total | C total | Result |
|---|---|---|---|---|---|
| Base case | Winter solar 5; overheating 5; slope 5; view 3 | 186 | 136 | 158 | A leads |
| View-first household | View weight 5 instead of 3 | 192 | 146 | 166 | A still leads, B closes some gap |
| Solar-cautious household | Winter solar weight 3 instead of 5 | 178 | 126 | 152 | A still leads; all options lose points because winter solar is less important |
| Earthwork-averse household | Earthwork weight 5 instead of 4 | 190 | 138 | 161 | A leads by more |
| Lower priority on solar, higher on view | Winter solar weight 3; view weight 5 | 184 | 136 | 160 | A still leads in this example |
The formulas are the same: subtract the old contribution and add the new contribution, keeping every changed weight between 1 and 5. For example, in the view-first case, A changes by (5−3)×3 = 6, B by (5−3)×5 = 10, and C by (5−3)×4 = 8; the totals become 192, 146 and 166. If a realistic weight change flips the leader, do not hide the result. Report that the decision is preference-sensitive and ask the owner to decide which priority is genuinely higher.
Sensitivity is more useful when you also test uncertainty. Change one provisional rating by one point for a fact likely to move after survey or modeling. If B’s summer-control rating could reasonably move from 2 to 4 after a detailed shading and glazing study, B gains 5×2 = 10 points, moving from 136 to 146. That still does not beat A in the illustrative base case, but it tells the team exactly what evidence B needs. Do not reduce a safety or legal hard constraint to a sensitivity exercise.
What the worksheet can and cannot calculate
It can calculate weighted preferences from disclosed inputs. It can expose whether a candidate is winning because of one high-priority criterion. It can show which professional handoff would change the provisional result. It cannot calculate solar radiation, annual heating and cooling energy, glare, indoor temperature, structural loads, wall or window performance, cut-and-fill volume, drainage, construction cost or permit approval.
Building Science explains why window data matters: SHGC is the fraction of incident solar radiation that becomes heat indoors, and lower SHGC transmits less solar heat. It also describes a different tradeoff for south-facing passive-heating windows with summer shading than for east or west windows exposed to unwanted morning or afternoon sun. Read the SHGC discussion in BSD-011. Use that principle to ask better questions; do not choose a window specification from the worksheet alone.
NREL’s Home Energy Score documentation reinforces the data-handoff point: it records window area and properties by building side and uses orientation or azimuth, U-factor and SHGC as inputs. See NREL’s window-input documentation. Preserve the candidate’s approximate window zones and direction so the modeler can see what you intended. If the modeler uses different inputs, record the change and why.
Resolve the conflicts before schematic design is frozen #
Resolve conflicts by naming the priority, testing the smallest change that could solve it, and assigning the remaining question to the professional who can verify it. Do not “solve” an overheating, grade, view or access conflict by quietly changing the program or assuming that a future tree, blind, fan or retaining wall will perform as hoped.
Conflict 1: winter solar access versus summer overheating
The correct response is usually a coordinated aperture, shading, mass, envelope and mechanical strategy, not a blanket instruction to add or remove glass. DOE and NREL describe collection, storage, distribution and control as a system. PNNL recommends minimizing heat gain before adding passive cooling measures and warns that some cooling choices can increase winter heating loads in cooler climates. Review PNNL’s heat-gain priorities.
Ask the architect to show, for each candidate:
- Which rooms receive direct winter sun and at what times of day.
- Which windows face east, south, west and north, and which are for view, daylight or collection.
- What architectural shading is assumed, including overhang depth, porch roof, vertical fins, exterior screens or deciduous landscape.
- What happens when the shading is absent, the tree is immature, a screen is not deployed, or the room is unoccupied.
- Where thermal mass is exposed to the intended sun and how heat distributes to adjoining rooms.
- Which cooling and ventilation assumptions are required in the local climate.
The energy modeler should then test the actual candidate, including orientation, floor area, window area, U-factor, SHGC, overhangs, shading obstructions, envelope assumptions, internal gains and mechanical system. The model should identify which assumptions drive discomfort or load, not just report one annual total. Ask for room-level or zone-level findings where the living room, bedroom and office have materially different exposures.
Do not infer that a “passive” house will never need mechanical cooling. PNNL says passive and low-energy cooling are rarely as effective, versatile or controllable as mechanical air conditioning and are generally poor at precise dehumidification. Read PNNL’s climate and expectations section. In a humid U.S. climate, outdoor-air strategies can introduce humidity even when outdoor air is cooler. The local mechanical designer must determine the system and controls.
Conflict 2: south-facing view versus true-south solar axis
A view can be worth a solar compromise, but the compromise should be a conscious room-by-room decision. Start by asking whether the view can be captured from a narrower, higher, lower, corner or carefully shaded opening while the main collection zone stays near the preferred axis. Test a porch, roof form, exterior shade or buffer before changing the whole house orientation.
If the view is southeast or southwest rather than true south, document the bearing and the time of day that matters. Do not call it “south” because it feels sunny. NREL’s orientation guidance is a general starting point, while PNNL-20442 explicitly recognizes views and other residential conditions as reasons a prescriptive orientation or glazing rule may not be practical. The professional task is to model the compromise, not to pretend the view does not exist.
Use section and eye-level studies. A downhill view may require the window sill to be higher or the house to be elevated; either move can affect privacy, egress, furniture, overheating, structure and the amount of exposed foundation. A lower sill may deliver a better seated view but create glare or privacy problems. A roof monitor or clerestory may provide daylight but brings its own heat-gain and weatherproofing decisions. Record the idea as an option until the architect coordinates it.
Conflict 3: slope fit versus solar exposure
Ask whether the candidate can follow the contours without making the solar-facing room line excessively complex. A stepped form may reduce apparent excavation or improve a split-level relationship, but it can create level changes, waterproofing transitions, thermal bridges, more roof geometry, circulation costs and difficult furniture or mechanical routes. A compact upper-bench form may simplify the envelope yet create a more exposed downhill edge or a steeper entry.
The first handoff is a common-base topographic overlay. The second is a conceptual section through each candidate showing existing grade, proposed finished floors, likely retaining zones, vehicle approach, pedestrian approach and the intended solar-facing rooms. The third is professional review of soil, drainage, foundation and structural implications. Do not ask a contractor to price an unbounded slope concept as if it were a complete scope.
Use words such as “earthwork unknown,” “retaining potential,” “drainage interface,” “foundation concept pending” and “access grade pending.” Avoid invented quantities such as “about 100 cubic yards of fill” unless a qualified professional produced that estimate from a defined plan and assumptions. The worksheet can rank uncertainty; it cannot measure it.
Conflict 4: arrival versus living-room orientation
The best solar façade may face downhill while the road arrives uphill. That can produce a good separation between public arrival and private view, or it can produce an awkward sequence with a long internal route, stairs, split levels and inaccessible service. Draw the arrival from the property line or permitted access to the front door, parking, deliveries, trash, mechanical service and outdoor living.
Count turns and level changes as design questions, not just lines on a plan. The architect and civil professional should coordinate emergency access, driveway geometry, drainage, grading and any local standards with the city, county or other authority having jurisdiction. This article does not establish the applicable rule because the jurisdiction was not provided.
If a candidate’s arrival works only by cutting a new drive, crossing an easement, removing vegetation or using a retaining wall, it needs a separate feasibility gate before it receives a high rating. If the arrival is less direct but uses an existing connection, show the trade. Daily convenience is a valid owner priority; it should not be smuggled into the solar score.
Conflict 5: utility corridors versus future landscape shade
Trees and landscape can shade east and west exposures, but their placement must be coordinated with access, utilities, foundations, fire considerations and maintenance. PNNL’s guidance says shading should be balanced against winter solar heat gain and that landscaping can affect cooling load. It does not say that any tree at any distance will create reliable shade.
Mark existing vegetation by condition, approximate canopy, ownership, likely retention and uncertainty. Mark the utility and service corridors that must remain accessible. Ask the landscape professional or architect to produce a planting and maintenance concept only after utility and site constraints are known. Do not plant, remove or heavily prune a tree as a design test without confirming ownership, local rules, utility clearance and professional advice.
Conflict 6: compactness versus daylight and outdoor connection
PNNL says compact construction can reduce roof and wall area per square foot of floor area but also notes that compactness can conflict with elongating a house on an east/west axis. See the PNNL orientation and shape guidance. That is exactly the kind of conflict your matrix should reveal.
Compare the conditioned area, exterior-envelope area, roof complexity, circulation length and window area of each candidate. Do not reward a compact shape if it turns the living spaces into a dark core or forces large east/west windows for daylight. Do not reward an elongated bar if its exposed envelope, roof, grade or circulation undermines the program. Ask for a daylight and energy review of the actual room plan.
Hand the brief to the right professional and verify the decision #
The next decision is not “approve the highest score”; it is “approve one candidate for schematic development with a written list of tests, assumptions and stop conditions.” Send the same dated brief and the same candidate set to every reviewer so feedback is comparable.
Handoff packet
Assemble one packet with these files:
- A north-referenced base plan with source, date, scale and units.
- Title, easement, access and utility records that affect the candidate area.
- Topographic information, clearly labeled as survey, approximate contour or observation.
- Annotated obstruction photographs and a seasonal observation log.
- The owner’s room-priority matrix and hard constraints.
- Two or three equal-program candidate diagrams.
- The weighted score table, ratings, reasons and sensitivity table.
- An uncertainty register with an owner for every open issue.
- A one-paragraph provisional recommendation and the conditions under which it changes.
Put a plain-language cover note on the packet: “This is a pre-schematic homeowner comparison. It includes illustrative ratings and does not establish code compliance, structural adequacy, drainage, retaining design, energy performance, construction cost or permit approval.” That sentence helps stop a conceptual diagram from being mistaken for a professional deliverable.
Survey handoff
Ask the surveyor to confirm the north reference, property boundary information within the contracted scope, contours or spot elevations, visible features, access and utility evidence, and any discrepancies between the owner’s base plan and the survey. Ask which datum, units and accuracy apply to the information supplied. Ask for the candidate footprints to be overlaid without implying that the surveyor is approving a building design.
Bring these questions:
- Does the site plan use the same north reference as the candidate diagrams?
- Which elevations are measured, and what datum do they use?
- Where are the meaningful grade breaks, benches, ridges and low points near each candidate?
- Which visible utility features, easements or access conditions are documented, and which are not?
- What additional survey or stakeout would be needed before schematic design?
Do not ask a surveyor to determine soil bearing, retaining-wall sizing or energy performance unless that is within a separately stated professional scope. Do not use a survey to infer subsurface conditions.
Architect handoff
Ask the architect to redraw the candidates at a common scale and program, produce sections through the slope, identify room and window zones, and list the assumptions that create each score. Ask for a direct answer on what can be solved through room zoning, footprint shape, roof form, porch or buffer and what requires energy modeling or another specialist.
Questions to ask:
- Which option best satisfies the owner’s top three priorities without relying on an unverified assumption?
- What is the intended winter-solar aperture, and how is summer control represented?
- Where do east and west windows remain, and why?
- Which candidate rooms are most sensitive to glare, overheating, privacy or noise?
- What finished-floor and entry assumptions drive the grade comparison?
- What elements are outside the current scope, such as retaining, drainage or structural sizing?
- What should be held constant in the energy model so candidate results remain comparable?
An architect may reasonably recommend a candidate that does not win the raw score if the score omitted a design dependency or treated an infeasible option as viable. Ask the architect to state the reason and rerun the matrix if the owner’s priorities changed.
Civil, structural and geotechnical handoff
The required roles and scopes vary by property and jurisdiction. Ask the architect to identify which civil, structural and geotechnical services are required. A sloped-lot decision can involve grading, stormwater, foundation, retaining, soil, erosion, access and utility coordination, but this guide excludes design and sizing of those systems.
Bring the candidate sections and ask the professional to identify the information needed to bound the uncertainty. Useful questions include:
- Does a candidate create a meaningful grade, foundation or retaining issue that the score currently treats as a preference?
- What soil, groundwater or drainage information is missing?
- Which candidate keeps water away from the building through a coordinated design, and what remains to be designed?
- Are construction access and temporary staging plausible within the parcel and any recorded rights?
- Which local grading, stormwater, erosion, tree or access reviews must be confirmed with the actual authority?
Do not excavate a test trench, cut a bench, divert runoff or install a retaining feature to “see if it works.” Excavation can expose people to cave-in, falling material, utility strikes and unstable ground. The qualified local professional decides what investigation is appropriate, and the local jurisdiction controls permits and site requirements.
Energy-modeling handoff
Ask the energy modeler to compare the candidate orientation and room-zone assumptions using the project’s location and climate. The modeler needs more than a north arrow. Provide conditioned floor area, number of stories, approximate footprint, window areas by direction, window performance assumptions, overhangs or other shading, existing and future obstructions, thermal-mass assumptions, envelope targets, internal loads, ventilation and mechanical-system assumptions.
Ask for a comparison that identifies:
- annual heating and cooling energy under clearly stated assumptions;
- peak or design-relevant heating and cooling effects where the model supports them;
- room or zone overheating, if the tool can evaluate it;
- the contribution and limitation of south-facing solar gain;
- sensitivity to east/west glass, SHGC, shading, overhangs, and obstruction assumptions;
- what the model does not represent, such as future tree growth, occupant behavior, unusual weather, glare or construction variation.
The purpose is not to ask for a false precision. It is to find whether the leading candidate remains acceptable when the most important assumptions change. PNNL’s statement that building modeling is essential for passive-solar design supports this handoff, but it does not prescribe a particular software package or report format.
Verification gate before schematic design approval
Use this gate as a checklist. Mark each item verified, open with owner, or not applicable with reason.
| Gate | Minimum record | Responsible reviewer | Stop condition |
|---|---|---|---|
| North and site geometry | Common north reference and usable topographic base | Surveyor / architect | Candidates use different orientation or grade assumptions |
| Hard constraints | Current parcel, access, easement and jurisdiction questions identified | Owner / architect / local professionals | A candidate may be prohibited or cannot access the site |
| Solar access | Dated obstruction record plus professional solar or shading review | Architect / energy modeler | The leader depends on unverified winter access |
| Summer control | Window, shading, roof and room assumptions tested for the project climate | Architect / energy modeler | A high-solar option has no credible control strategy |
| Slope feasibility | Concept sections and appropriate civil, structural or geotechnical scope | Qualified local professionals | Earthwork or foundation risk is being treated as a guess |
| Arrival and service | Driveway, entry, deliveries, construction access and utility questions assigned | Architect / civil / utility | Daily or emergency access is unresolved |
| Owner priorities | Weights and hard constraints confirmed by the household | Homeowner | The score reflects someone else’s priorities |
| Sensitivity | Weight and key-rating changes documented | Homeowner / architect | A small reasonable change reverses the recommendation and no choice is made |
| Handoff | Open items have a person, deliverable and due date | Project team | The next phase would have to rediscover the assumptions |
The approval sentence can be simple: “Proceed with Candidate A to schematic design, subject to survey confirmation, local jurisdiction review, conceptual slope and access review, and energy-model testing of winter access and summer control. Keep Candidate C as the fallback if the finished-floor or earthwork review fails.” That is a useful decision because it tells the team what to do next and when to reopen the choice.
Avoid the failure cases that make the brief misleading #
The most common failure is not choosing the “wrong” compass direction; it is mistaking a partial observation or generic rule for a complete design. Use the following failure branches to keep the decision honest.
Failure: the phone compass and the survey disagree
What to observe: the candidate diagrams use different north arrows, or the phone reading changes near metal, vehicles, utilities or structures.
How to interpret it: the candidates are not comparable yet. Do not average the readings.
Safest next step: freeze the score, label the field reading approximate, and ask the surveyor or architect to establish the project drawing reference. Recreate bearings and solar notes against that reference.
What not to infer: a phone reading does not establish true south, a property boundary or a solar-access result.
Failure: the “south” façade is actually southeast or southwest
What to observe: the main glass line points away from true south, or the view requires a diagonal façade.
How to interpret it: the design may still be excellent, but the solar gain, glare and shading pattern differ from a true-south assumption.
Safest next step: record the bearing and ask the energy modeler to use the actual azimuth. Ask the architect to test the room, view and shading reasons for the deviation.
What not to infer: the NREL 30-degree guidance is not proof that every angle inside or outside it will work, nor is it a code requirement.
Failure: winter photos show sun, but the model shows blocked access
What to observe: the observation dates were too few, the photos were taken from the wrong point, or a ridge, neighboring structure or tree canopy blocks low-angle sun at other times.
How to interpret it: the visual record was a screen, not a full solar study.
Safest next step: provide the dates, locations and photos to the architect or energy modeler and request a site-specific shade analysis using the candidate height and obstructions.
What not to infer: one clear photograph or a web map’s sun animation does not establish annual access for a window or room.
Failure: the score rewards a view but ignores overheating
What to observe: the view-first candidate receives high daylight and view ratings but has large east, west or unshaded south glass, especially in a hot or humid climate.
How to interpret it: the matrix is missing the control strategy or has underweighted comfort.
Safest next step: split “view” from “daylight,” add a summer-control criterion, and ask for actual SHGC, shading and room-use assumptions in the model.
What not to infer: a lower SHGC always improves the house. Building Science describes different tradeoffs by orientation and passive-heating intent, and PNNL warns that cooling measures can affect winter heating.
Failure: “thermal mass” is used as a cure-all
What to observe: a candidate adds concrete, tile or masonry without showing where sunlight reaches it, how heat moves, or how overheating is controlled.
How to interpret it: the material has been named but the passive-solar system has not been designed.
Safest next step: ask the architect and energy modeler to identify the absorber, storage location, distribution path, control, and the conditions under which the mass helps or hurts.
What not to infer: more mass automatically balances any amount of glass or guarantees comfort. NREL’s overview identifies mass as one element within a collection, distribution and control system.
Failure: the slope score hides an impossible entry
What to observe: a candidate fits a contour diagram but requires a steep driveway, many steps, a long service route or a grade change that has not been sectioned.
How to interpret it: plan view alone is hiding vertical circulation and access.
Safest next step: require a conceptual section and local professional review of the entry, driveway, construction access and any applicable jurisdictional requirements before treating the candidate as viable.
What not to infer: a line drawn between road and door is not a driveway design, accessible route, emergency-access approval or drainage solution.
Failure: the future tree is doing all the cooling work
What to observe: the option only works if a new or immature tree reaches a certain height, canopy or density.
How to interpret it: the current house may overheat before the landscape matures, and the future performance is uncertain.
Safest next step: score current architectural control separately from future landscape shade. Ask the design team to test the house without the future tree and document maintenance, utility and local-rule constraints.
What not to infer: landscape guidance is not a guarantee of shade at a specified hour or season.
Failure: the driveway or utility route is treated as an afterthought
What to observe: the preferred solar position leaves no clear construction access, service path, utility corridor, septic reserve or maintenance route.
How to interpret it: the candidate may win an energy conversation while failing the whole home-building sequence.
Safest next step: mark the route as a hard or provisional constraint and ask the civil professional, utility and local authority to review it. Re-score if the route changes the footprint or grade.
What not to infer: an aerial line to the road establishes no utility capacity, easement right, construction permission or final cost.
Failure: the owner changes priorities after seeing the sketches
What to observe: the household now cares more about a level entry, private outdoor space, a quiet bedroom or a view than it did when weights were set.
How to interpret it: the matrix has done its job by exposing a real choice.
Safest next step: pause, revise the room-priority and weight tables, rerun the totals and show the sensitivity. Do not preserve the old winner for continuity.
What not to infer: the first score is an objective answer. It is a structured expression of the priorities and evidence available at that time.
Moderate-safety boundaries
A sloped-lot siting decision can lead to hazardous work even when the homeowner is only planning. Do not enter an excavation, cut or fill a slope, remove a tree near utilities, alter drainage, disturb a suspected contaminated area, install a retaining structure, modify electrical service or perform structural work as a field experiment. Excavation, utilities, foundations, retaining, drainage and electrical work belong to appropriately qualified professionals under the requirements of the actual jurisdiction.
The homeowner can safely collect documents, label observations, photograph from stable ground, mark approximate room priorities and compare paper candidates. Stay outside unstable edges and do not trespass to observe a neighbor’s property. A remote review of photos, aerial images or a sketch cannot verify soil, groundwater, boundary, utility location, structural adequacy, code compliance, solar performance or future conditions. State that limitation in the handoff.
Make the next decision and preserve the record #
The next decision is to authorize schematic development of one candidate with explicit fallback conditions, not to claim that the lot has been fully solved. Preserve the base plan, assumptions, ratings, sensitivity results, source links, professional responses and unresolved items so the design team can trace why the choice was made.
The one-page decision summary
End the brief with a short summary that a busy professional can read in two minutes:
Decision requested: Select one candidate for schematic design; retain one fallback.
Property and jurisdiction: Identify the parcel and the actual city, county, state or other authority relevant to open local questions.
Owner’s top priorities: List the three highest-weight priorities and any hard constraints.
Preferred candidate: State the current leader and its total, with the warning that the score is illustrative and provisional.
Why it leads: Name the two or three evidence-based reasons, such as better grade fit, a more controllable east/west exposure, or a better room-to-view relationship.
Main compromise: Name the accepted loss, such as a less direct view, more complex split-level circulation or a smaller winter-solar aperture.
Open verification: List the survey, shading, energy, civil, structural, utility and jurisdiction questions that could change the choice.
Fallback rule: State exactly when to reopen the candidates, such as “If finished-floor review identifies unresolved retaining or access work beyond the project’s agreed scope, compare C again.”
What a good handoff sounds like
Avoid “We want a passive-solar house on the southeast slope.” Use a statement that carries inputs and decisions:
“Using the survey north reference dated [date], the lot falls generally southeast and the principal view is southeast. We compared three equal-program concepts. Candidate A currently leads at 186/225 under the owner’s stated weights because it combines a compact form, a plausible upper-bench grade concept, a service buffer on the west and a controllable living-zone exposure. The southeast view is weaker than Candidate B. Before schematic design is approved, verify finished floors and slope implications, confirm access and utility constraints with the relevant local professionals and authority, and model the actual window, shading and obstruction assumptions for winter access and summer overheating. Candidate C remains the fallback if the A grade or earthwork review fails.”
The numbers in that paragraph are illustrative and should be replaced with the owner’s actual worksheet. The value is the structure: reference, observed condition, candidates, current leader, reason, compromise, verification and fallback.
Originality brief: what this page adds and how to check it
Current answers: DOE, NREL and PNNL explain passive-solar orientation, seasonal access, east/west exposure, shading, thermal mass, controls, wind and climate limits. Building Science explains SHGC and window-area tradeoffs. Those sources do not, by themselves, give a homeowner with a sloped lot a complete pre-schematic sequence for comparing footprint options with arrival, utilities, grade, views and room priorities.
Missing decision: Which of two or three plausible house positions or room-zoning schemes should receive schematic-design effort, and which solar compromise must be professionally modeled before the plan is frozen?
Original contribution: The Slope-and-solar siting worksheet combines a north- and grade-referenced input record, a hard-constraint screen, a 0-to-5 owner-weighted comparison, an illustrative worked example, a sensitivity table and a named handoff list. It makes the compromise visible without pretending that an owner’s score measures energy or build cost.
How to check it: Recreate the totals from the displayed formula, substitute the household’s actual weights and ratings, verify each site input against the survey or dated observation, and ask the assigned architect, surveyor, civil or structural professional and energy modeler to confirm or replace the assumptions within their scopes. Compare the recommendation again if a reasonable weight or key rating changes.
Method: The worksheet uses source-derived design principles to define criteria, records owner-selected weights from 1 to 5, assigns provisional ratings from 0 to 5, calculates Σ(weight × rating), and runs one-factor-at-a-time sensitivity checks by changing one weight within the same 1-to-5 scale. It is a decision aid and handoff record, not original measured data.
Limitations: The modeled example uses invented illustrative values. It contains no site visit, field measurement, interview, simulation output, professional opinion, cost data or permit determination. It does not replace a boundary or topographic survey, solar or energy model, geotechnical or structural review, civil design, utility confirmation, landscape plan or jurisdiction-specific review.
Final checklist
Before you send the brief, confirm:
- The page or drawing uses one stated north reference and identifies whether it is true, survey or approximate field orientation.
- Slope direction, grade units, contours and uncertainty are separated from the view direction.
- Two or three candidates use the same room program and are different in a stated way.
- Winter solar access and summer overheating are separate criteria.
- East and west glazing, south glazing, shading, roof exposure and room use are visible assumptions.
- View, arrival, utilities, service, construction access and outdoor space are scored rather than implied.
- Hard constraints are screened out before weighted scoring.
- Every rating has a reason and a source, observation or next verification.
- The example and all owner estimates are labeled illustrative or provisional.
- Sensitivity shows whether plausible priority changes reverse the order.
- Survey, architect, civil or structural professional and energy modeler each have a defined question.
- Local rules are assigned to the actual city, county, state or other authority; no generic rule is presented as national code.
- No one is being asked to excavate, alter drainage, remove a tree, modify electrical work or perform structural work as a homeowner test.
- The recommendation names a fallback and the condition that reopens the choice.
Once those boxes are checked, the brief has done its job. It has not designed the house. It has made the next design conversation more precise, preserved the reasons behind the choice, and identified the evidence required before a sloped-lot passive-solar compromise becomes part of the schematic plan.
For adjacent homeowner planning decisions, continue with the Brictale blog or browse the learning archive; this guide remains the design-stage worksheet for this specific sloped-lot comparison.
Cite this guide
Brictale. “How to Prepare a Passive-Solar Siting Brief for a Sloped Lot.” Published 2026-09-23; updated 2026-09-23.
https://brictale.com/build/design/prepare-passive-solar-siting-brief-sloped-lot · Read the Markdown version
Original contribution: Slope-and-solar siting worksheet. A homeowner worksheet for comparing two or three candidate house positions or room-zoning schemes on a sloped lot before schematic design.
Sources and scope
Evidence behind this page
- The U.S. Department of Energy describes passive solar design as using orientation, elevation, room layout, materials and surroundings to collect, store, distribute and control solar heat; it identifies aperture, absorber, thermal mass, heat distribution and control as five elements.
U.S. Department of Energy — Guide to Passive Solar Home Design
DOE homeowner guide, October 2010. General passive-solar design guidance for homes; it is not a permit requirement, site survey, structural design or energy prediction for a particular lot.
Accessed · Link to this claim - NREL states that a passive-solar building uses south-facing windows and thermal mass, and that a successful design also needs distribution and control; its orientation guidance places the aperture within 30 degrees of true south and keeps it unshaded from 9 a.m. to 3 p.m. during the heating season.
National Renewable Energy Laboratory — Passive Solar Technology Basics
NREL overview of passive-solar technologies. The 30-degree and 9-a.m.-to-3-p.m. statements are general heating-season guidance, not a universal design target or code rule for every climate, program or room.
Accessed · Link to this claim - PNNL Building America guidance recommends siting to minimize east and west solar exposure, considering shade from trees and land features, orienting an elongated house on an east/west axis when appropriate, minimizing east and west glazing, and considering compact construction and buffers such as non-conditioned spaces.
PNNL Building America Solution Center — Passive and Low-Energy Cooling
PNNL/Building America resource guide for passive and low-energy cooling in U.S. homes. Recommendations interact with climate, building form, views, daylight, access and the specific site; they do not select a footprint or prove comfort.
Accessed · Link to this claim - PNNL says local climate strongly affects passive-cooling effectiveness, that dry and cooler climates generally offer more options than humid and hotter climates, and that passive and low-energy cooling are rarely as controllable as mechanical air conditioning or as effective for dehumidification.
PNNL Building America Solution Center — Passive and Low-Energy Cooling
PNNL/Building America climate and expectation guidance. It is not a comfort guarantee and does not replace a local HVAC design or energy model.
Accessed · Link to this claim - PNNL landscaping guidance says east and west walls and windows receive the most solar heat in midsummer, recommends prioritizing their shade, and directs designers to balance summer cooling shade against winter solar heat gain according to the heating season.
PNNL Building America Solution Center — Landscaping to Reduce Cooling Load
PNNL/Building America landscape-planning guidance. Effects depend on climate, vegetation, maturity, maintenance, obstructions and the building design; no tree-growth or shading performance is assumed here.
Accessed · Link to this claim - Building Science Corporation defines SHGC as the fraction of incident solar radiation that passes through a window and becomes heat indoors, explains that lower SHGC transmits less solar heat, and describes different tradeoffs for south-facing passive-heating windows versus east- and west-facing windows.
Building Science Corporation — BSD-011: Thermal Control in Buildings
Building Science technical digest, with copyright notice through 2026. General envelope guidance; actual glazing selection requires climate, orientation, shading, window data, comfort goals and energy analysis.
Accessed · Link to this claim - DOE envelope guidance says orientation affects daylighting, power production and solar heat gain; it identifies east and west glass as problematic from a solar-heat-gain perspective and says glazing, climate zone, shading, views and other design factors must work together.
U.S. Department of Energy — ZEB Technologies: Building Envelope & Architectural Considerations
DOE building-envelope guidance for zero-energy-building design. The cited orientation ranges and recommendations are design guidance, not a national residential code or a substitute for jurisdiction-specific compliance review.
Accessed · Link to this claim - PNNL-20442 states that passive solar design is complex and building modeling is essential, and explains that views, proximity to neighbors and other practical conditions can make prescriptive glazing and orientation requirements impractical.
PNNL — Integrating Renewable Energy Requirements into Building Energy Codes (PNNL-20442)
PNNL technical report on energy-code options, especially discussion of passive-solar design and residential solar-access constraints. It supports a site-specific modeling handoff; it is not a current local code adoption or a prescriptive home-design standard.
Accessed · Link to this claim - PNNL says wind is valuable for passive cooling but generally does not justify major siting efforts in most U.S. locations because wind direction is variable; it says shading and solar control should usually take priority over facing the home directly into the wind.
PNNL Building America Solution Center — Passive and Low-Energy Cooling
PNNL/Building America guidance for U.S. passive cooling. A coastal, wildfire, severe-weather or unusually wind-exposed site still needs local professional evaluation; this is not a wind or hazard study.
Accessed · Link to this claim - PNNL recommends minimizing heat gain before adding passive-cooling strategies and identifies windows, skylights, roof and east/west exposures as important solar-control priorities; it also warns that some cooling measures can increase winter heating loads in cooler climates.
PNNL Building America Solution Center — Passive and Low-Energy Cooling
PNNL/Building America envelope and solar-control guidance. The priority order is general and must be tested against the project's climate, orientation, shading, room use and energy model.
Accessed · Link to this claim - NREL Home Energy Score documentation models window area and properties by side of the building and uses orientation or azimuth, U-factor and SHGC as window inputs, illustrating why a siting brief should preserve direction and area assumptions for later modeling.
NREL Home Energy Score Documentation — Windows and Skylights
NREL documentation for a home-energy data translation workflow. It describes model inputs and data handling, not a required homeowner worksheet or a guarantee that a future energy model will use the same software.
Accessed · Link to this claim