How to Verify New-Home Window and Door Flashing Before Siding
Use a room-by-room release matrix to verify window and door flashing, WRB laps, photos, inspections, corrections and the siding handoff.
The short answer
Release a window or exterior door for siding only when its installed model, sill or pan, jamb and head flashing, WRB tie-in, drainage exit, sealant compatibility, fasteners and required local inspection record are all identified. If one item is unknown, concealed, damaged or inconsistent with the product manual, mark that opening HOLD, assign the correction owner, and keep cladding away until the responsible professional verifies the repair.How to Verify New-Home Window and Door Flashing Before Siding
Release a window or exterior door for siding only when its installed model, sill or pan, jamb and head flashing, WRB tie-in, drainage exit, sealant compatibility, fasteners and required local inspection record are all identified. If one item is unknown, concealed, damaged or inconsistent with the product manual, mark that opening HOLD, assign the correction owner, and keep cladding away until the responsible professional verifies the repair.
This guide applies to a United States new home after the rough openings, windows or exterior doors, weather-resistive barrier (WRB) and opening flashing are installed, but before siding or another exterior cladding hides them. It is a homeowner quality-control workflow, not an engineering approval, municipal inspection, water test, remote sign-off or substitute for the exact installation manual. The safest homeowner role is to gather documents, identify each opening, request the records, observe from a safe location and make the release decision visible to the builder. A licensed or otherwise qualified professional must resolve structural, product-specific, code, sealant, access and safety questions.
For adjacent planning context, keep this construction decision with the rest of Brictale’s homeowner guides and use the editorial method to understand how evidence and scope are handled.
The practical handoff is simple: one opening, one record, one responsible correction owner and one next decision. A house can look nearly complete while a single reverse lap, missing pan, concealed fastener, incompatible sealant or unrecorded inspection remains buried behind siding. The objective is therefore not to prove that a wall can never leak. It is to make the installed water path, air-seal interface, local checkpoint and accountability visible before concealment.
1. Use a release gate for every opening, not a general impression of the wall #
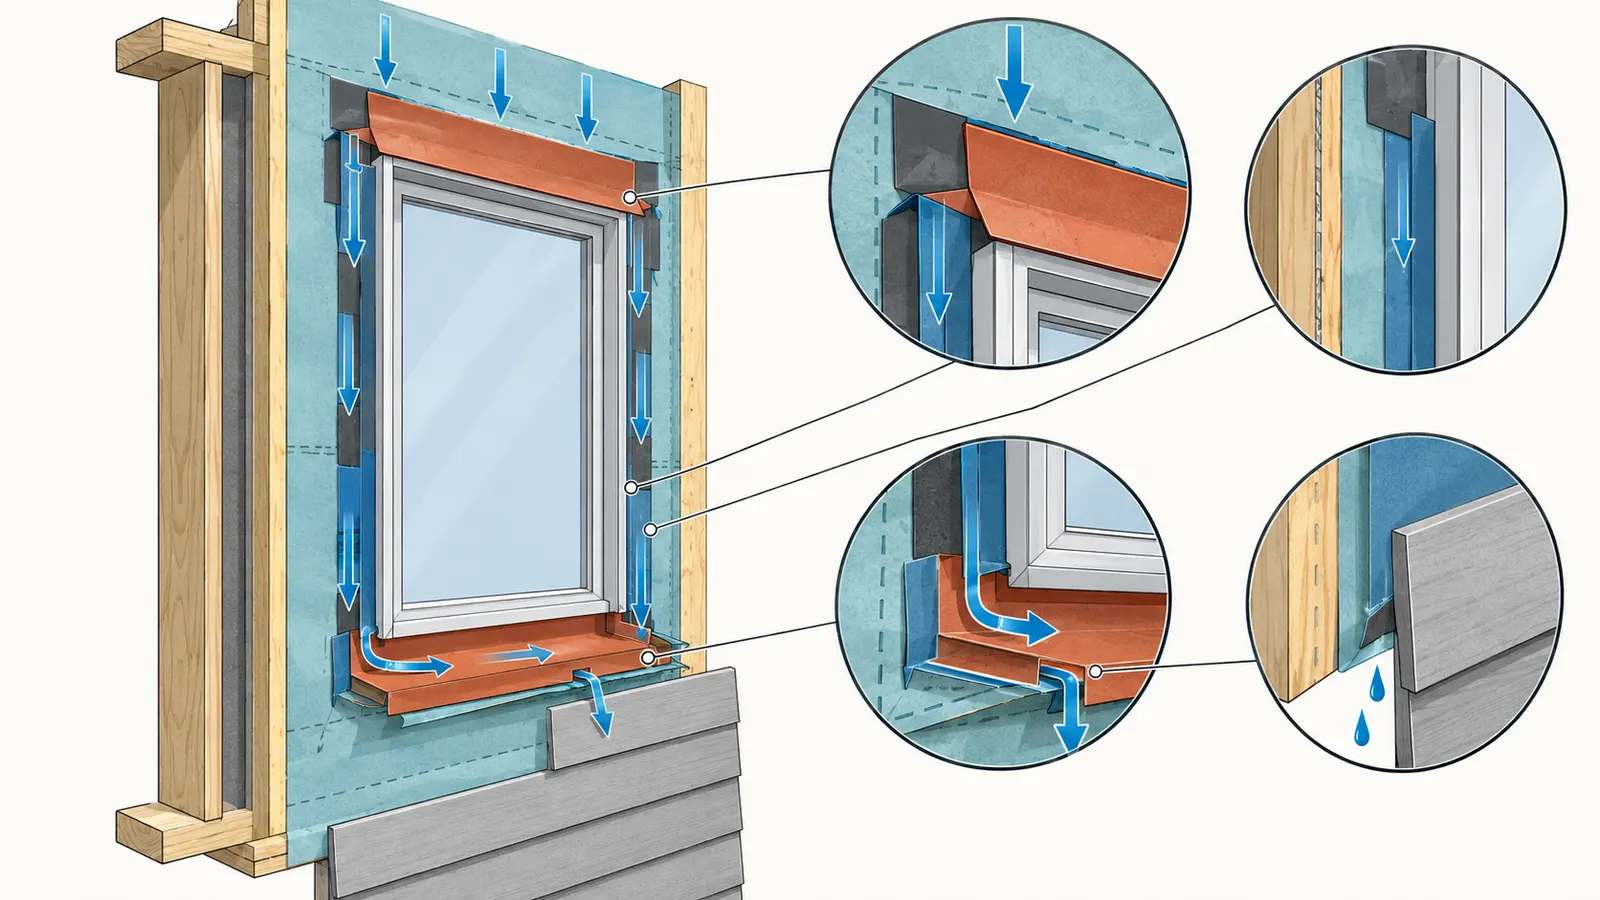
A window or exterior door is ready for siding only when the opening has a complete evidence record and no unresolved hold condition; “the windows are in” is not enough. The water-management sequence described by the Building America Solution Center’s fully flashed opening guide starts with sill or pan flashing, continues through the unit and side flashing, adds top flashing over the side flashing, and integrates the result with the drainage-plane layer. That is the logic behind the release gate in this article.
The three release states
Use three states so an unfinished inspection is not confused with a failed installation.
| State | Meaning | What the homeowner records | Next action |
|---|---|---|---|
| RELEASE | The installed product and opening are identified; the visible water path and WRB tie-in are documented; required local inspection or photo submission is complete; no correction is open. | Opening ID, model, photos, inspection number or approved photo record, installer, date and cladding handoff. | Builder may schedule cladding for that opening, subject to the cladding installer’s own details. |
| HOLD—DOCUMENTATION | The work may be physically complete, but a manual, photo, inspection record, product identity or responsibility is missing. | The exact missing item and the person who must provide it. | Do not cover the opening. Collect the record or ask the permit office what checkpoint applies. |
| HOLD—CORRECTION | The opening shows a missing, damaged, reverse-lapped, incompatible or unverified condition, or the rough opening does not match the installed system. | Defect, evidence photo, correction owner, proposed method and re-verification date. | Keep cladding away. The responsible trade or qualified professional corrects and records the result. |
“Release” does not mean the homeowner has certified code compliance. It means the package is sufficiently visible and documented for the next trade to proceed without intentionally hiding an unresolved question. The city or county may use different words—dry-in, flashing, framing, sheathing, insulation or final—and may require an inspection, photographs, or both. The builder remains responsible for coordinating the permit process and the trades unless the contract assigns a different responsibility in writing.
The U.S. Department of Energy Building Science Education overview is useful for the sequence concept: the opening is treated as a fully flashed assembly before exterior finishes cover the wall. It does not give a homeowner permission to approve an installation without the product manual or local requirements. A city inspector’s approval, where one is required, is also not the same thing as a private quality review. An inspector may check the items within a particular permit checkpoint; an independent reviewer or homeowner can still request photographs, model information and correction records for the home’s long-term file.
What counts as evidence
The evidence for one opening normally has five layers:
- Identity: an opening ID such as W-03 or D-01, room or elevation, opening type, manufacturer, model, size, configuration and installation method.
- Input documents: the exact product installation instructions, the WRB and flashing product instructions, the sealant or tape technical data, the approved plans and the local permit checkpoint.
- Visible condition: rough opening, sill or pan, jambs, head, unit fasteners, WRB laps, corners, penetrations, drainage exit and interior air-seal interface as far as the stage allows.
- Accountability: installing trade, person or company responsible for correction, builder representative coordinating the handoff, and the person who rechecked the work.
- Next handoff: release to siding, hold for a document, hold for correction, or escalation to the builder’s design professional, product representative, building official or another qualified professional.
A photograph is supporting evidence, not a magic substitute for an unseen condition. Take a wide image that locates the opening, a square-on image that identifies it, and close-ups that show each layer. If a layer is behind a flange, trim, foam or another product, write “not visible” rather than “present.” A claim that something exists because it usually exists is weaker than a photo, dated installation record or confirmation from the installer tied to the exact model and method.
Stop conditions that apply immediately
Pause cladding at the opening if any of these conditions is true:
- no one can identify the installed product or the manual used;
- the sill or pan cannot be shown, and there is no reliable installation record or required local photo;
- side flashing is missing, stops short of the sill or appears to drain behind the opening;
- the head flashing or WRB flap is missing, reverse-lapped or not integrated with the drainage plane;
- the installer has covered fasteners that a local inspection must verify;
- the sealant, tape, membrane or WRB is not identified as compatible;
- the rough opening was altered, but the builder cannot explain who verified the change;
- a door threshold, pan, corner, deck, roof intersection or cladding transition will trap water;
- the worker would need an unsafe ladder, roof edge, scaffold or temporary platform to inspect it;
- the municipal checkpoint has been missed and the local office has not explained the available path.
The most useful sentence to send is factual: “Opening W-03 is HOLD—CORRECTION because the jamb-to-sill transition is not visible in the record and the builder has not identified the manual-specific repair. Please name the correction owner, the proposed method and the date for re-verification before siding.” That sentence creates a handoff without pretending to diagnose hidden damage.
2. Gather the inputs and assign responsibility before looking for defects #
The homeowner can make a dependable release decision only after the builder supplies the installed product identity, relevant manuals, wall assembly, permit checkpoint and trade responsibility. Window and door flashing may be installed by framers, insulators, a window vendor or another subcontractor depending on the site workflow; the Building America Solution Center notes that the contract should assign this task to the appropriate trade. A visual review without responsibility data tends to produce arguments about who should fix a problem instead of a repair.
The input packet
Request one packet for the project, plus a row-specific set of details for every opening. Keep the packet with the permit records and home warranty file.
| Input | What to request | Why it changes the release decision |
|---|---|---|
| Opening schedule | ID, room, elevation, width, height, type, swing or operation, egress designation and product model. | A photo cannot be matched to the correct unit if openings are not named. Different products can use different fasteners, flanges and seal interfaces. |
| Exact product manual | Current installation instructions for the installed model and installation method, including masonry, wood buck, nail fin, flange, clips or brackets. | A general diagram cannot replace model-specific requirements. The Pella installation resource distinguishes nail-fin integration with a weather barrier from masonry installation with a wood buck, frame screws or clips and a different sealing interface. |
| WRB information | Product name, technical data, installation guide, permitted tapes and sealants, and the wall assembly location of the drainage plane. | The same word—housewrap, membrane or WRB—can describe products with different bond, exposure and compatibility requirements. |
| Flashing and sealant information | Product names, lot or batch if retained, compatible substrates, primer requirements, temperature limits and sequence. | Sealant that sticks to one surface may not be approved for a particular membrane or finish. Air sealing must not block drainage. |
| Approved plans and changes | Elevations, opening sizes, structural or engineered details relevant to the opening, and written change approvals. | A field change can alter a header, buck, sill slope, flashing path or required inspection. The homeowner should not decide structural adequacy from a tape measure. |
| Local permit record | Permit number, inspection list, required checkpoint, submitted photos, passed inspection number and any correction notice. | A city’s required checkpoint is jurisdiction-specific. “The inspector was here” is not enough without the record and scope. |
| Cladding plan | Siding, brick, stucco, adhered stone or other finish; trim, rainscreen or furring; planned sequence around openings. | Cladding systems change how the WRB drains, what remains visible and whether an additional drainage space or bond-break layer is needed. |
Assign the people, not just the trades
Use names or companies, not a vague field called “builder.” A workable responsibility map has at least these roles:
- Builder or construction manager: controls the schedule, confirms the opening list, coordinates trades, keeps the permit record and prevents siding from covering a hold.
- Window or door installer: confirms the exact model, installation method, fasteners, shims, sealant, flashing and operation; proposes product-correct corrections.
- Framer or opening carpenter: owns the rough opening, buck, sill support, header interface and any framing repair assigned in the contract.
- WRB or cladding installer: confirms how the drainage plane laps over opening flashings and how the future cladding will drain; identifies incompatible penetrations or transition details.
- Building official or permit office: decides the municipal checkpoint and whether the work can proceed under the permit. The official does not become the homeowner’s private quality inspector.
- Independent inspector, architect or building-science professional, if retained: reviews the scope agreed in the contract and reports observations; does not promise that concealed construction will perform indefinitely.
- Homeowner: maintains the question log, requests records, observes only from a safe place, records the next decision and does not direct workers’ fall-protection systems.
The City of Blaine, Minnesota instructions provide a useful example of why this map matters: the page identifies a required picture or inspection path, specifies that instructions should be available for inspections, and says that missing a pre-concealment checkpoint may result in removal of trim and siding for spot checks. The builder should therefore own the schedule and record, while the installer supplies the installation evidence.
Separate three kinds of “approval”
Write the category beside every record:
- Permit inspection status: a municipal record for the items and stage covered by the authority having jurisdiction (AHJ). It may be a passed inspection, approved photo submission, correction notice or instruction to expose work.
- Contract or warranty acceptance: the builder’s confirmation that the work matches the plans, contract and warranty process. It may create a remedy even when a permit inspection passed.
- Homeowner or independent quality review: an observation and documentation exercise. It cannot waive code, engineering, manufacturer or worker-safety requirements.
Do not tell the siding crew that “inspection passed” unless the actual record says what passed and the record belongs to the same project and stage. Do not tell the building official that a private checklist is a code-compliance certificate. If the permit office is unreachable, keep the opening on hold and ask the builder to document the call, permit number, question, official response and any required exposure.
3. Trace the water path from sill to jambs to head and into the WRB #
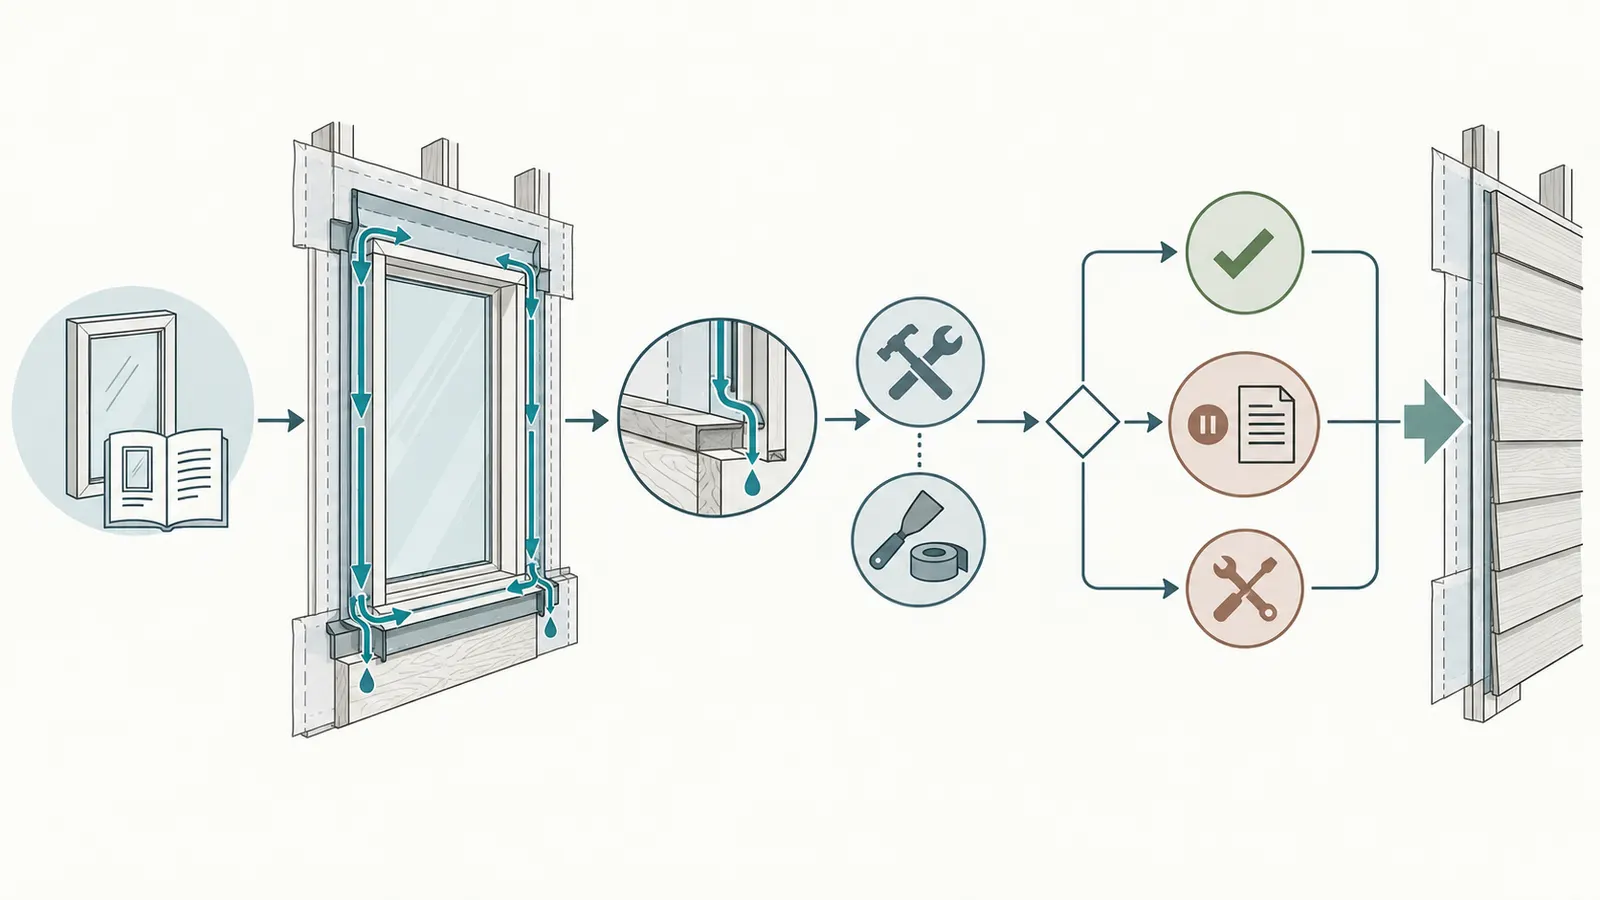
The core verification is a continuous path for incidental water to move out of the wall, not a bead of caulk around a frame. The Building America Solution Center’s sequence calls for sill or pan flashing, the installed unit, side flashing over the pan, top flashing over the side flashing and integration with the drainage plane. The drainage-plane guide explains the larger principle: water-resistant layers should overlap and lap over wall flashings so water moves down and out rather than behind the flashing.
Start at the sill or pan
The sill is the first place to test the logic of the opening. Ask the installer to identify the sill or pan product and show how it creates a path toward the exterior. Depending on the product, it may be a rigid pan, flexible membrane, formed sill, liquid-applied system or a factory feature. The correct detail is the one allowed by the product and wall assembly, not the one that looks most familiar.
Look for the following without pulling apart an installed unit:
- a continuous or properly joined pan across the sill and corners;
- an end condition that prevents water from escaping into the jamb or interior finish;
- an outward drainage direction or a back dam and side dams where that is the approved design;
- no puncture, fishmouth, unbonded corner, torn tape or exposed adhesive that the manual prohibits;
- a relationship between the pan and the exterior face of the WRB or drainage plane;
- for a door, a threshold and sill condition that is supported, drained and compatible with the exterior finish, not merely caulked at its visible edge.
Do not cut a finished membrane or pry a window out to satisfy curiosity. If the sill is hidden, mark it not visible and request the installer’s dated photo, installation checklist or a controlled exposure approved by the builder. A close-up that shows only the top of a pan does not prove that its corners or outer drainage exit are correct.
The Blaine, Minnesota local instructions specifically call for close-up pictures of each window or door pan flashing and exterior flashing/sealing. That is a good record format even in places where the local authority does not ask for those exact photographs. It turns “we flashed it” into a row that can be matched to the opening and reviewed before siding.
Check jambs as overlapping side drainage
Jamb flashing should carry water over the sill or pan, not terminate behind it. Examine both sides of the opening for continuity at the lower corner, full contact where the material is intended to bond, compatible tape or sealant and a clean transition into the WRB. A jamb strip that stops above the pan, is installed behind the wrong layer or is covered by a reverse lap creates an ambiguous water path.
The Pella new-construction installation resource demonstrates why “window flashing” cannot be reduced to a single generic picture: a nail-fin unit on a stud wall is integrated with the weather barrier, while a masonry installation may use a wood buck, frame screws or clips and a different sealing interface. For a flush flange, clip, replacement-style or unusual unit, use the actual product detail. Do not apply a nail-fin sequence to a unit that has no nail fin.
At each lower jamb corner, ask four questions:
- Which layer is above which layer?
- If water reaches this joint, where does it go next?
- Can that path reach the exterior without passing behind the WRB or into the sheathing?
- What photograph or manual step proves the answer?
The first three are physical questions; the fourth is the documentation question. If a worker answers only the fourth—“there is a picture”—but the picture cannot show the path, keep the item open for the installer or reviewer.
Check the head and the WRB flap
At the top, look for a head flashing or equivalent approved detail that extends over the side flashing and ties into the drainage plane. The WRB should not create a pocket that directs water behind the head flashing. The Building America Solution Center drainage guidance says the drainage plane should lap over flashings and warns against reverse shingling; the intended direction is from upper layers over lower layers.
Ask the installer to point out:
- the top of the unit and its required seal or flashing;
- the head flashing or equivalent component;
- the WRB flap, tape or membrane above the head;
- the side transition at both upper corners;
- any planned trim, furring, rainscreen, masonry, stucco or siding layer that will change the drainage exit.
A head photo should include enough wall to show which WRB course is above the head flashing. A tight crop of only a strip of tape is rarely enough. If the top flashing is hidden by trim or a factory component, the exact manual and installer record must identify the hidden step. Never infer that a continuous bead of caulk at the top is equivalent to a properly integrated drainage plane. The Building America guidance explains that typical cladding systems leak and that a drainage approach is more reliable than trying to make a residential wall a perfect sealed barrier with sealants alone.Drainage Plane Behind Exterior Wall Cladding
Verify the exterior exit, not just the layers around the frame
The water path must eventually exit the wall. Check the lower exterior edge, base flashing, trim return, sill projection, rainscreen cavity or other approved outlet. Some openings discharge onto a visible exterior surface; others drain into a wall drainage space that is later covered by cladding. The correct result depends on the wall and cladding system, but “all edges are caulked” is not a universal release criterion.
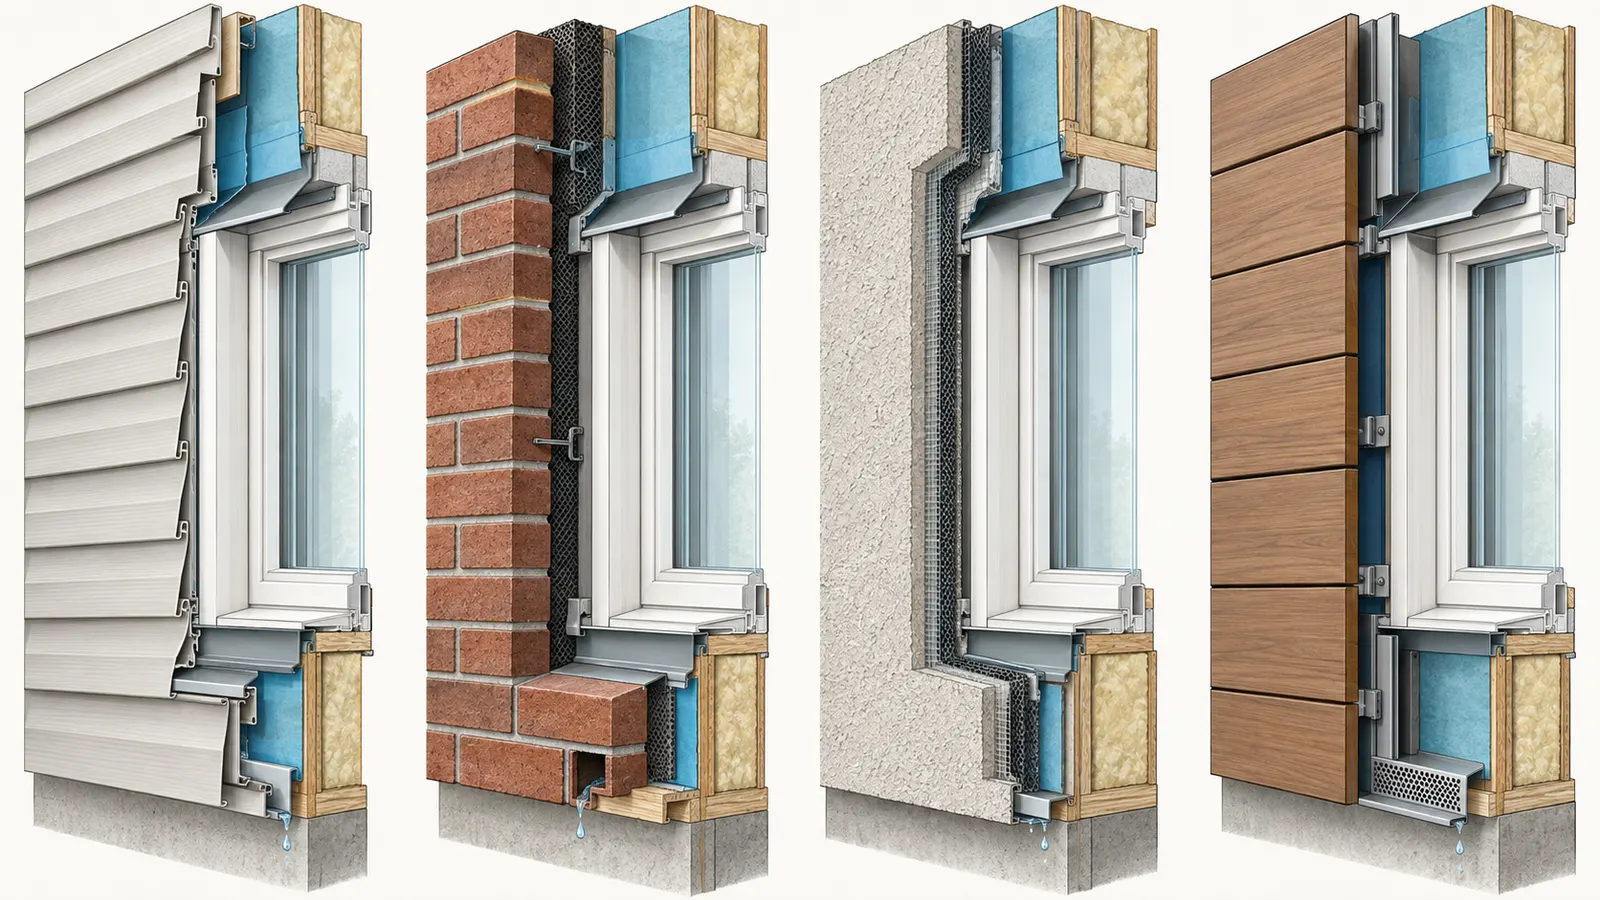
The DOE Building Science Education page frames the opening as a complete assembly before the wall finish closes it. The Building America drainage-plane guidance also says that different claddings can require different preparation and that adhered stone or stucco need an additional bond-break drainage layer. Record the cladding type in the matrix so the next trade cannot assume that a vinyl-siding detail applies to stucco, brick veneer, fiber-cement, metal panels or adhered masonry.
Treat sealant as a compatible component, not a universal fix
Record the brand and product family of each membrane, flashing tape and sealant that forms part of the opening. The Building America drainage-plane guide instructs builders to follow the drainage-plane manufacturer’s recommendations for compatible sealants. Building Science Corporation adds that air sealing at rain-managing enclosure elements must not interfere with drainage and that sealant must be compatible with the materials and any required fire-resistance rating.Info-405: Sealing Air Barrier Penetrations
Do not approve a substitution because it is labeled “exterior,” “waterproof” or “high performance.” Ask for the technical data or written manufacturer confirmation when the installed combination is not listed. Compatibility questions are especially important with asphaltic flashing, butyl or acrylic tapes, liquid-applied membranes, treated wood, PVC or composite frames, masonry, painted surfaces and foam insulation. The right correction may be removal and replacement, an approved primer, a different lap, a backer rod or a revised transition. It is not automatically another bead over the top.
4. Verify rough openings, fasteners, air seals and photos before concealment #
Before siding hides the wall, verify the opening against the exact product instructions and record what cannot be seen. A homeowner may measure and photograph safely accessible conditions, but a qualified installer, engineer or building official must resolve structural adequacy, altered openings, anchor design, large-unit handling and product-specific tolerances. The cited Marvin clad-window instructions show why this matters: for the stated wood-frame method they specify a rough opening 1/2 inch higher and 1 inch wider than the outside frame, require the sill and opening to be level, square, straight and plumb, and direct corrective action before proceeding when those conditions are not met.
Check the rough opening without turning it into structural approval
Use the manual’s inputs, not a generic rule. Record:
- outside frame width and height from the exact model instructions;
- rough-opening width and height at the locations the manual calls for;
- sill level, opening plumb and visible squareness;
- shims, support, buck, fastener type and spacing where visible;
- pan or sill treatment that changes the opening height;
- whether the opening was widened, moved or cut after the approved plans.
For a simple rectangular opening, an illustrative clearance calculation is:
side clearance = (rough-opening width − frame width) ÷ 2
head clearance = rough-opening height − frame height
Illustrative modeled example, not a field approval: suppose an exact manual lists a 35.50 inch frame width and 47.50 inch frame height, and the measured rough opening is 36.50 inches wide and 48.00 inches high. The calculated side clearance is (36.50 − 35.50) ÷ 2 = 0.50 inch per side, and the head clearance is 48.00 − 47.50 = 0.50 inch. If a sill-pan detail consumes 0.25 inch of the available vertical space, the remaining head clearance becomes 0.50 − 0.25 = 0.25 inch; the installer must compare that result with the exact manual rather than assuming the pan can be added without changing the opening. If a measurement is off by 0.125 inch, one side may be 0.375 inch and the other 0.625 inch after the unit is shifted, which can affect shimming and operation even though the total width is unchanged.
The inputs are frame dimensions, rough-opening dimensions and the manual’s pan or clearance requirement. The units are inches. The formula is a simple difference, not an engineering calculation. The sensitivity is visible: a 1/8 inch measurement or installation shift changes one side clearance by 1/8 inch, and a 1/4 inch pan wedge changes the vertical clearance by 1/4 inch. The limitation is equally important: this example does not approve any Marvin or other product, confirm a structural header, establish a tolerance, or replace the installer’s level, square, plumb and manual-based verification.
Check fasteners while they can still be seen
The fastener record should show type, location, quantity or spacing as required by the product instructions, and whether the fastener is seated without damaging the frame or flange. Do not assume that a visible screw or nail is the approved fastener. Large, impact-rated, mulled, bay, bow, masonry or clipped units can use different attachment details.
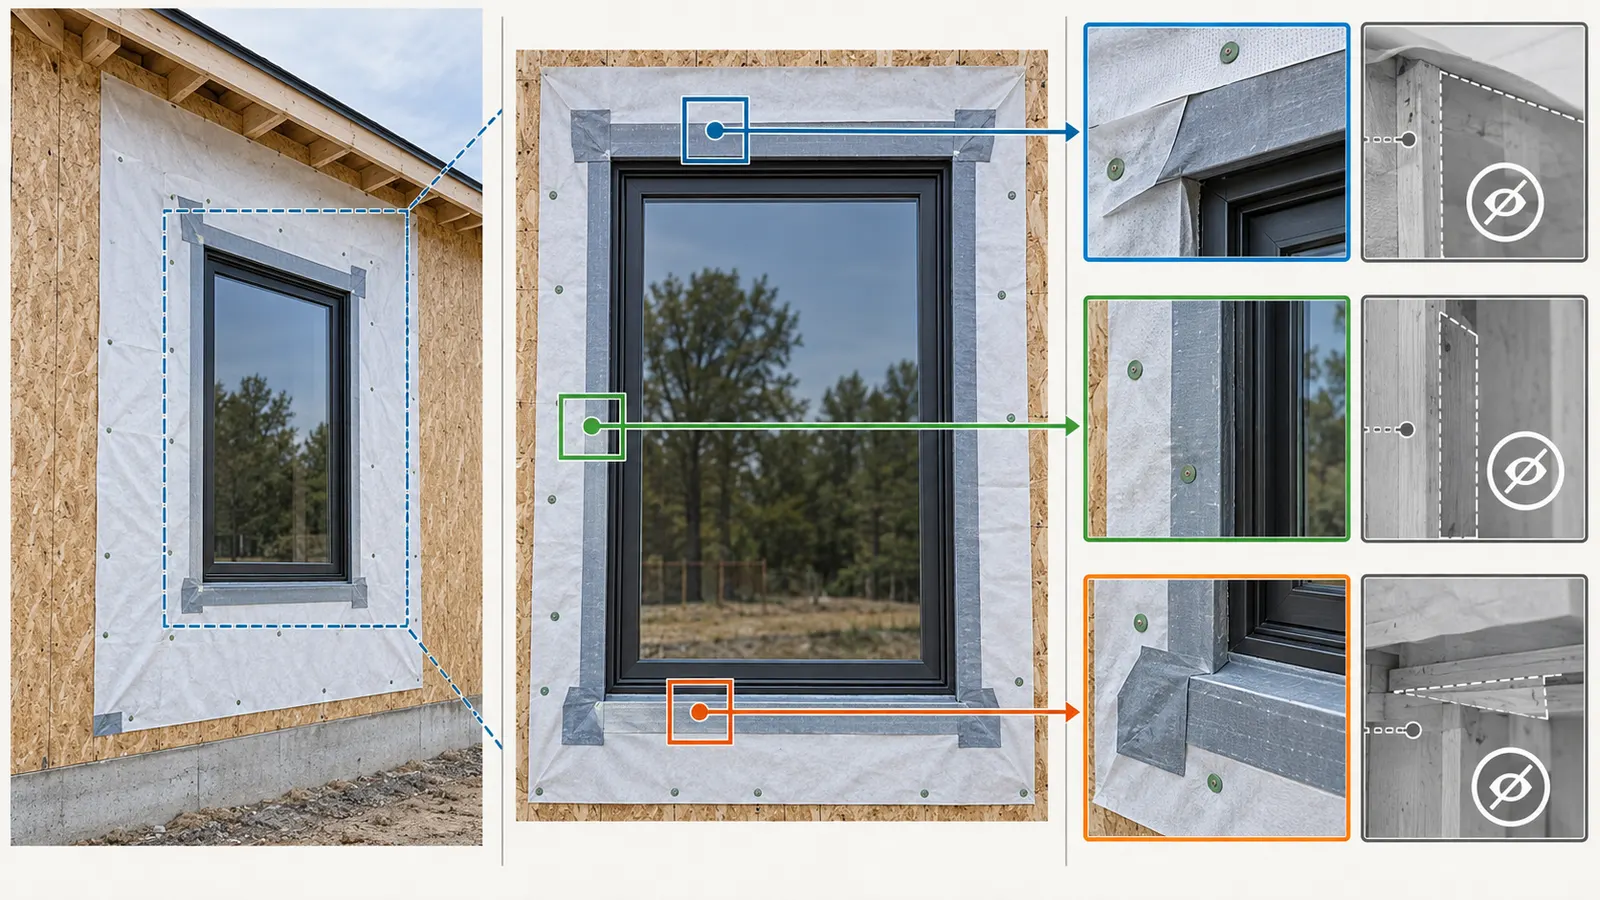
Jacksonville, Florida illustrates a concealment reason for this check. Its residential inspection page says that during its dry-in guidance, thick seal tape should not be installed until window fasteners are inspected unless the fasteners remain visible through the tape; the same page lists windows and doors not installed per engineering, wrong design pressures, oversized jamb gaps, torn or unsealed barriers and wrong flashing among dry-in problems.Residential Inspection — City of Jacksonville That is a Jacksonville inspection rule and guidance context, not a national instruction. In any jurisdiction, ask the permit office what must remain visible and when.
Fastener evidence has two parts: a photo of the visible fastener pattern and the installation manual or approved engineering detail that says what the pattern means. A photograph alone cannot establish wind-pressure compliance or structural attachment. If the fasteners are already hidden, the builder should identify the local authority’s accepted exposure or documentation path rather than asking the homeowner to certify them from the surface.
Check the interior air-seal interface
The interior side is not a reason to fill every gap indiscriminately. Record the chosen air-seal method—low-expansion foam, backer rod and sealant, gasket, membrane or another approved detail—against the window or door frame and the intended air-barrier plane. Check for voids, broken foam, unsealed corners, blocked drainage channels and a sealant that contacts incompatible materials.
Building Science Corporation says that penetrations through enclosure elements that also manage rainwater must be flashed properly and that air sealing must not interfere with drainage. It also calls for compatible materials and attention to required fire-resistance ratings.Sealing Air Barrier Penetrations The practical interpretation is to ask where the air barrier is and where the water-management layer is. They may be close, but they are not the same function. A correction that makes the interior airtight while blocking the exterior drain can be a worse detail.
The City of Jacksonville guide lists foaming around window frames and door casings at its insulation checkpoint. That does not mean any foam amount is correct for every manufacturer or that an insulation checkpoint proves the full opening-flashing assembly. Record the product and stage separately: interior air seal, insulation around frame, exterior flashing and WRB integration.
Make the photo set repeatable
For every opening, capture the same minimum sequence from a safe location:
- Locator: elevation or room, opening ID, address or project identifier and date.
- Rough opening: frame, sill, buck, shims and fasteners before the unit or trim hides them, when accessible.
- Sill/pan: full width and both corners, not just a tape end.
- Left and right jambs: lower transition into the pan and upper transition into the head detail.
- Head: head flashing, WRB flap or membrane above it, both upper corners and planned cladding interface.
- Exterior drainage exit: base, sill projection, trim, furring or cavity as relevant to the wall assembly.
- Interior air seal: frame perimeter and corners before interior finishes hide it, if the stage allows.
- Completed record: the same opening after correction, plus installer, date and correction note.
Use a ruler or reference card only if it can be placed without touching or damaging the work. Do not scratch a membrane to reveal a layer, remove a nail, climb through an unprotected opening or ask a worker to stop using required protective equipment for a better photograph. A missing photo is a documentation hold; it is not permission for a homeowner to expose a hazardous area.
5. Apply the actual jurisdiction’s concealment checkpoint #
The inspection gate belongs to the actual authority having jurisdiction and permit, not to a generic internet checklist. Jacksonville, Florida and Blaine, Minnesota provide two different examples: Jacksonville’s published residential guide describes a dry-in inspection and visibility of specified work, while Blaine’s page gives a photo-submission or pre-concealment inspection route for permitted window and door work. Neither page should be presented as the rule for a project elsewhere in the United States.
Jacksonville, Florida: dry-in visibility is a local example
For a project under the City of Jacksonville, Florida permit process, the cited residential inspection guide describes a dry-in inspection that includes the air infiltration barrier, window and door frame installation and skylights. It says the air-infiltration barrier must be installed for conditioned areas, cuts and tears sealed, and that thick tape should not conceal window fasteners before they can be inspected unless the fasteners remain visible through the tape.Residential Inspection
The same Jacksonville page warns that its document is a general guideline rather than an absolute statement of code or process, says requirements can change and advises project participants to ask the Building Inspection Division, design professional or inspector about specific questions. It also says that if work progresses past the appropriate inspection point, portions may have to be removed so the inspector can see required elements. The page lists missing or unsealed air/moisture barriers, wrong flashing, wrong engineering or design pressures, and windows or doors not installed per engineering among dry-in failures.
For the homeowner, the action is not to memorize Jacksonville’s checklist. It is to ask the builder for the permit’s current inspection card, the exact dry-in or equivalent checkpoint, the passed record and any bulletin or correction notice that changes the sequence. If your Jacksonville project is under a different permitting authority or special jurisdiction, confirm that authority separately. Record the answer in the matrix as “Jacksonville, Florida — permit [number] — checkpoint [name] — status [record].” Do not write “Florida code passed” when the record only shows one city inspection.
Blaine, Minnesota: photos or inspection before concealment
For a project under the City of Blaine, Minnesota instructions, the page asks for clear, site-specific digital pictures uploaded to the permit file. The page lists a front-of-house image, close-ups of each window and door pan flashing, insulation and exterior flashing/sealing, and at least one picture of each exterior wall containing the work. If the required pictures are not submitted, the page says a flashing/insulation inspection must be scheduled during installation and before concealment, with a fee stated on the page.Window and Door Installation — Blaine, Minnesota
Blaine’s page also says the final inspection occurs after required pictures and other inspections, that the installation instructions must be on site, and that if the photos or pre-concealment inspection were missed, removal of trim and siding may be necessary to spot check flashing and insulation. That is a concrete reason to treat a missing pre-cover record as a hold, even if the wall looks neat.
For a Blaine project, record whether each image was uploaded to the correct permit and whether the local inspection status is complete. A folder on the homeowner’s phone is useful but is not the same as the city’s required file. Ask the builder to provide the upload confirmation or permit record. If the project is elsewhere in Minnesota, identify the actual city, township or county authority and current adopted requirements; Blaine’s instruction cannot be generalized statewide.
Municipal inspection is not an independent quality guarantee
A municipal inspector’s role is tied to the adopted requirements and the permit’s inspection stage. The inspector may not review every product-compatibility question, photograph every opening or evaluate the builder’s warranty obligations. Conversely, a builder’s internal checklist may not satisfy an AHJ’s required inspection. Keep the three statuses separate in the matrix:
| Record field | Example value | What it proves | What it does not prove |
|---|---|---|---|
| AHJ status | “Blaine, Minnesota photo set uploaded; permit record dated June 4.” | A local submission path was used for the cited project and stage. | That every hidden corner is correct or that another city uses the same path. |
| Builder status | “Installer’s correction checklist signed by window subcontractor.” | The builder has assigned and documented a trade action. | Code approval, engineering approval or future leak-free performance. |
| Homeowner review | “W-03 photo set matched to model manual; head lap remains not visible.” | The homeowner has identified what is and is not documented. | A remote approval or a substitute for safe exposure by a qualified person. |
If a local office says that an inspection is not required, record the office, date, person or channel, permit number and wording. If the office says the work may proceed at the contractor’s risk, record that too. A release decision can still remain on hold under the contract or homeowner quality process even when no municipal inspection is required.
6. Use the opening-by-opening fenestration release matrix #
The Opening-by-opening fenestration release matrix is a decision record, not a new code checklist. Its purpose is to make the next handoff inspectable: each opening receives an identity, model-specific inputs, a documented water path, a local inspection status, photos, a responsible trade, a correction owner and a next decision. The method is to record model-specific inputs, visible drainage layers, local inspection status, photos, owner and next handoff for every opening. The limitations are explicit: this matrix is a documentation aid, not an engineering approval, code interpretation, water test or remote sign-off.
Matrix fields
Copy the following headings into a spreadsheet or project log. One row is one window or exterior door; do not combine a group of similar openings unless the installer’s record identifies every unit and the local requirement permits a grouped record.
| Field | What to enter | Good evidence or question |
|---|---|---|
| Opening ID | W-01, W-02, D-01; room/elevation and orientation. | Can a person find the opening from the row and photograph? |
| Product/model | Manufacturer, model, size, configuration, flange/fin/clip/buck method. | Does the manual match the installed unit, not just the brand? |
| Rough-opening evidence | Plan size, measured size if safely accessible, level/plumb/square observation, buck or framing note. | Who checked the opening, and was it changed after plans? |
| Sill pan | Type, product, back dam or side dams if applicable, corners, slope or drainage direction, exterior exit. | Which image or manual step shows the complete sill and both corners? |
| Jamb laps | Left/right flashing and how each side overlaps or integrates with the pan. | Where would incidental water go at each lower corner? |
| Head laps | Head flashing, upper corners and WRB flap or membrane above the head. | Does the upper WRB lap over the flashing rather than reverse-lap it? |
| WRB tie-in | WRB product, cut/fold/tape, penetrations and connection to the wall drainage plane. | Which layer is above the flashing and which is below? |
| Drainage exit | Sill, trim, cavity, base flashing or other approved route into exterior. | Is the exit open and compatible with the cladding system? |
| Interior air seal | Method and product at frame-to-air-barrier interface; corners and voids. | Does the air seal preserve the exterior drainage path? |
| Compatible sealant | Product names, substrate, primer or manufacturer confirmation if needed. | Does the manual or data sheet approve the combination? |
| Fastener visibility | Fastener type/pattern/spacing, photo status, inspection visibility. | Can the required reviewer see what must be checked before cover? |
| Local inspection status | AHJ, permit, checkpoint, date, record number, photos uploaded or exposure required. | Is this the actual jurisdiction and stage? |
| Photos | Locator, sill, jambs, head, drainage exit, interior air seal, correction. | Are images dated, legible and matched to the ID? |
| Responsible trade | Installer, framer, WRB/cladding trade, builder coordinator. | Who performed or documented the step? |
| Correction owner | Named company/person, defect, proposed method, due date and recheck. | Who must act before siding? |
| Next handoff | Release to cladding, document hold, correction hold, AHJ question or professional review. | What exact event changes this row to RELEASE? |
Matrix example with illustrative rows
The following is a modeled documentation example, not a record from a real project and not evidence that either opening is installed correctly. It shows how a homeowner should preserve uncertainty instead of filling gaps with assumptions.
| ID | Product/model | Water-path status | Documentation status | Owner and next handoff |
|---|---|---|---|---|
| W-03, south bedroom | Manufacturer/model recorded; nail-fin detail selected | Sill photo shows pan center but not the right corner; jamb and head photos present; WRB product recorded | Jacksonville, Florida dry-in record pending; fasteners visible; interior air-seal photo present | Window installer owns right-corner verification. HOLD—DOCUMENTATION until permit status and corner evidence are attached. |
| D-01, front entry | Exterior door model recorded; threshold and rough opening changed from plan | Pan product not identified; lower exterior return is covered by temporary trim; sealant product listed but compatibility not confirmed | Builder says “framing passed,” but no opening-specific photo | Builder coordinates door installer and design professional. HOLD—CORRECTION until threshold/pan and altered opening are verified. |
| W-07, garage side | Exact model manual and WRB guide attached | Pan, both jambs, head, WRB lap and exterior exit visible; no reverse lap observed in photos | Blaine, Minnesota photo set uploaded to permit; installer checklist attached | RELEASE to cladding, subject to siding installer’s interface detail. |
The first row is not a failed installation. It is a record with a missing decision input. The second row has enough information to send a correction question because the opening changed and a water-management component is unidentified. The third row is a release example only because the table says why the row can proceed; it is not a universal pass criterion.
How to review a row in five minutes
Use this order so a polished photo set does not distract from a missing basic input:
- Locate: match the row, photo, room, elevation and opening.
- Identify: match model, size and installation method to the manual.
- Trace: follow water from head to jamb to sill to exterior exit.
- Connect: follow the WRB or drainage plane into the flashing, and separately follow the interior air barrier to the frame.
- Check visibility: confirm fasteners and local inspection items were available before concealment.
- Assign: name the responsible trade and correction owner for every gap.
- Release: choose RELEASE, HOLD—DOCUMENTATION or HOLD—CORRECTION and write the next handoff.
This order is intentionally conservative about unknowns. A homeowner does not need to know the answer to every technical question to identify that the answer is missing. The builder’s next action may be to supply a record, bring the installer back, ask the AHJ, expose a small area under a controlled plan, or engage a qualified professional.
7. Route common failures to the right correction owner #
The safest response to a flashing concern is to preserve the evidence, stop concealment at the affected opening and ask the responsible professional for a product-correct repair and recheck. Do not direct a worker to add a strip, drill a hole, cut a WRB flap or remove a window from an unsafe position based on a generic online sequence. The Marvin installation instructions, for example, say corrective action is required before proceeding when the stated opening conditions are not met; that instruction is model-specific and shows why an installer must own the repair.
Missing or unidentifiable sill pan
Observation: The unit is installed, but there is no image, product record or accessible evidence of the pan or sill detail.
Do not infer: A nail fin, perimeter seal or exterior caulk proves a pan exists. A neat interior trim line proves nothing about the exterior water path.
Correction owner: Window or door installer, coordinated by the builder; a design professional or product representative may be needed for a concealed or atypical detail.
Next action: Mark HOLD—DOCUMENTATION. Request the manual-specific installation record and dated sill/corner photographs. If the record cannot be supplied, ask the builder to propose safe, controlled exposure or removal and reinstallation as appropriate. The homeowner should not pry the unit or cut membrane.
Jamb flashing stops at or behind the pan
Observation: The photo shows a side strip, but it appears to stop short of the pan or sit underneath a layer that should drain over it.
Do not infer: More sealant on the lower corner will recreate a shingle-style lap. The Building America fully flashed opening guidance places side flashing over the pan in its described sequence.
Correction owner: Installer who selected and installed the opening flashing, with the WRB/cladding trade coordinating the wall layer.
Next action: Preserve the image and ask for the exact manual step and proposed correction. Keep the cladding off until the installer demonstrates the corrected lap and drainage exit in a new photo set.
Head flashing or WRB is reverse-lapped
Observation: The upper membrane appears to terminate behind the head flashing, or a lower layer sits above an upper layer so water could run behind it.
Do not infer: Tape at a seam changes the direction of a reverse lap. The drainage-plane guide says layers should overlap, not underlap, and that the plane should lap over wall flashings.Drainage Plane Behind Exterior Wall Cladding
Correction owner: WRB or window installer depending on the detail; builder coordinates the repair sequence so one trade does not cut off another trade’s drainage path.
Next action: Hold the opening and any connected cladding area. Request a written correction sketch or manufacturer-approved sequence. Re-photograph the full head and both upper corners after repair.
Incompatible tape, sealant or membrane
Observation: A product is identified, but the manufacturer data does not list the substrate or adjacent membrane, or workers used a substitute without documentation.
Do not infer: “Exterior grade,” “waterproof” or “sticks well” equals compatibility. Building Science Corporation specifically says materials must be compatible and air sealing must not interfere with drainage.Sealing Air Barrier Penetrations
Correction owner: Installer and builder; manufacturer technical support or a qualified envelope professional may be needed for a written determination.
Next action: Mark HOLD—CORRECTION or HOLD—DOCUMENTATION depending on whether the combination is physically wrong or merely unsupported. Record product names and substrates. Do not authorize a new product over the old one without written compatibility or a removal plan.
Fasteners are covered before the required check
Observation: Tape, thick membrane, trim or siding hides the fasteners that the local checkpoint or product detail requires the reviewer to see.
Do not infer: The installer’s statement that “we used the normal nails” replaces the required record. Jacksonville’s guide is explicit about the visibility issue in its dry-in instructions.Residential Inspection — Jacksonville, Florida
Correction owner: Builder and installer, with the AHJ deciding the permit path.
Next action: Ask whether photographs, a spot exposure or another local procedure is accepted. Keep the row on hold until the actual authority or responsible professional documents the remedy. Do not remove the tape yourself.
Rough opening or framing changed
Observation: The opening was widened, moved, cut into masonry or adjusted for a pan, but the plans, manual and installation record do not agree.
Do not infer: A unit that operates is structurally approved. A tape measure cannot validate a header, buck, anchor, wind design pressure, egress requirement or masonry connection.
Correction owner: Builder’s framing trade and design professional or engineer where the change affects structure or approved plans; installer verifies the product interface.
Next action: Hold. Record original and current dimensions, the reason for the change and any change order. Ask the responsible professional to confirm the opening, support and product installation before flashing is concealed.
Door threshold or exterior transition is unclear
Observation: The entry door looks sealed at the visible threshold, but the pan, end dams, exterior return, deck/stoop connection or cladding transition is not documented.
Do not infer: A door is just a larger window. Door traffic, threshold support, accessibility, exterior hardscape and water accumulation can change the detail.
Correction owner: Door installer and builder; deck, masonry, waterproofing or cladding trade may own adjacent interfaces.
Next action: Keep trim or siding away from the transition. Ask for a section or product detail showing the full sill and adjacent wall drainage. If the exterior grade, porch or deck will direct water toward the threshold, escalate before finishes hide the condition.
Safety or access prevents a close inspection
Observation: The only view is from a roof, scaffold, lift, ladder, upper story or an unguarded edge.
Do not infer: A homeowner can safely repeat a worker’s access method. The OSHA construction fall-protection standard generally requires protection for employees on walking or working surfaces 6 feet or more above lower levels, with conditions and exceptions in the rule. State-plan requirements may differ or be more stringent.
Correction owner: Employer and qualified site supervisor for worker access; builder schedules the safe inspection. The homeowner does not design or direct the fall-protection system.
Next action: Take the safe ground-level evidence, mark the upper condition not observed and ask the builder to arrange a qualified, safe inspection or provide an appropriate record. Never trade a better photograph for an unsafe climb.
8. Make the final cladding handoff and preserve the record #
The final release is a documented handoff from the opening installer and builder to the cladding trade, with the permit status and unresolved exceptions visible. Siding can proceed at an opening only after the row says RELEASE, the builder confirms the next trade’s interface and the local checkpoint is satisfied or explicitly documented as not required. The decision is per opening and per wall assembly; one passed window does not release every window or door.
The release-day sequence
Use this sequence in the project meeting or written handoff:
- Freeze the opening list. Compare the opening schedule to the plans and walk the exterior. Add any field opening, removed unit, changed size or temporary opening before starting the review.
- Match every row to a physical location. Confirm ID, room/elevation and product/model. Rename ambiguous photos before they are uploaded.
- Check document dependencies. Attach the exact product manual, WRB/flashing guidance, compatible sealant information, approved changes and local inspection record.
- Review the water path. Start at head, follow jambs, reach sill/pan and exterior exit, then confirm how the WRB/drainage plane laps into the path.
- Review the air-seal path. Confirm the interior frame-to-air-barrier method without blocking exterior drainage or violating the product detail.
- Review visibility. Confirm fasteners, rough opening and any required insulation or flashing elements were visible at the AHJ checkpoint or are covered by an accepted record.
- Resolve holds. Each hold gets one correction owner and a next verification event. “Builder to fix” is not an owner until a company or person and due action are recorded.
- Release only complete rows. Sign or date the row as a project handoff, not a code certificate. Give the cladding installer the opening list, relevant detail and exceptions.
- Photograph the handoff. Capture the last pre-cladding condition and keep the matrix, corrections, inspection records and plan changes together.
Account for cladding-specific interfaces
Siding, brick veneer, stucco, adhered stone, metal panels and rainscreen assemblies do not all use the same opening finish. The Building America drainage-plane resource says cladding systems can require different preparation and identifies an additional bond-break drainage plane behind adhered stone or masonry veneer or stucco assemblies. Before release, ask the cladding installer to identify:
- where the WRB or drainage plane remains continuous;
- where window and door head flashing drains into or over that plane;
- whether furring or a drainage cavity is required;
- how trim, J-channel, brick mould, casing or metal flashing changes the water exit;
- whether fasteners or cladding penetrations need compatible sealant;
- what remains accessible for future repair;
- who owns the transition at roofs, decks, porches, sills and grade.
This is a handoff question, not a request for the homeowner to design the cladding. If the cladding installer says the opening detail conflicts with the siding system, return the issue to the builder before the finish covers it. A beautiful trim profile does not cure a missing drainage exit.
Keep a durable home record
Store the final matrix and supporting records in at least two project locations controlled by the homeowner and builder as agreed. Preserve the product manual version, photos, permit evidence, correction notes, written manufacturer answers, change orders and installer contact. Include the opening ID in filenames, for example W-03-sill-before-cladding-2026-09-07.jpg. Avoid editing original photos in a way that removes date or context; crops can be copies with the original retained.
Record the final condition honestly:
- Observed: what the image or person actually saw;
- Documented but not observed: what the installer record or manual-specific checklist says happened but was concealed;
- Not observed: what was inaccessible, unsafe or absent from the record;
- Corrected: the original issue, correction method, responsible trade and recheck evidence;
- Open: the next owner and event required before or after cladding.
This language is more useful at warranty time than “checked.” If a leak appears later, the record helps the builder and professional trace which opening, layer, transition and repair history is involved. It does not prove the cause in advance, but it reduces the chance that no one can identify what was installed.
What changes after siding
Once cladding covers the opening, the homeowner’s decision changes from pre-cover release to observable performance and maintenance. Watch for staining, swelling, failed sealant, soft trim, persistent interior drafts, condensation, water at thresholds, damaged screens, operation changes and signs of movement. Do not drill through flashing or remove trim to investigate without a plan; water testing, destructive exposure and repair sequencing belong to qualified professionals.
The drainage-plane guide notes that sealants used on exterior cladding will not last as long as the cladding and may need periodic renewal.Drainage Plane Behind Exterior Wall Cladding That does not mean homeowners should caulk every joint. Follow the window, door, WRB, trim and cladding maintenance instructions, and preserve the original release record so a later repair does not accidentally block a designed drain.
Originality brief: how to check this contribution
Current answers are scattered among manufacturer diagrams, building-science guidance and local inspection pages. They explain pieces of flashing or list inspection requirements, but they are usually written for installers, inspectors or a single jurisdiction. The missing decision is whether a homeowner can release each specific window or exterior door for siding while knowing who owns an unresolved correction, what evidence exists and what local checkpoint applies.
The original contribution is the Opening-by-opening fenestration release matrix. It can be checked by taking one real opening, matching its model to its manual, tracing the sill-to-jamb-to-head-to-WRB path, checking the jurisdiction record, reviewing the photo set and confirming that the responsible trade and next handoff are explicit. It should produce a different result for two openings when their evidence differs; that is the point of a matrix rather than a generic checklist.
Its method is to record model-specific inputs, visible drainage layers, local inspection status, photos, owner and next handoff for every opening. Its limitations are that this matrix is a documentation aid, not an engineering approval, code interpretation, water test or remote sign-off. It does not claim that a visual review guarantees a watertight wall, predict an inspection outcome or replace a licensed professional, building official, product representative or safe site supervisor.
The next decision
After the matrix is complete, choose one next decision for each row: release that opening to the cladding trade, hold it while a missing record is supplied, hold it for a correction, ask the actual permit office for the local path, or engage a qualified professional for a product, structural, enclosure or safety question. That decision is the handoff. Do not let a calendar date, a siding crew’s arrival or a general statement that “the house is dried in” convert an unresolved opening into hidden work.
For a new-home homeowner, the strongest release record is modest and specific: the exact opening, the exact product, the observed and unobserved layers, the local status, the photographs, the responsible people and the next event. It does not promise perfection. It makes the last safe moment for correction visible.
Cite this guide
Brictale. “How to Verify New-Home Window and Door Flashing Before Siding.” Published 2026-10-05; updated 2026-10-05.
https://brictale.com/build/construction/verify-new-home-window-door-flashing-before-siding · Read the Markdown version
Original contribution: Opening-by-opening fenestration release matrix. A homeowner record for deciding whether each opening is ready for cladding.
Sources and scope
Evidence behind this page
- The Building America Solution Center describes a fully flashed opening as a sill pan or sill flashing, a window or door, side flashing that extends over the pan, top flashing that extends over the side flashing, and integration with the drainage-plane layer.
Windows and Doors are Fully Flashed
Building America Solution Center guidance for new residential window and door openings; use as building-science guidance and reconcile with the installed product manual and adopted local requirements.
Accessed · Link to this claim - The Building America Solution Center says the drainage plane should lap over exterior wall flashings and that layers should overlap rather than underlap so water is directed down and out; it also says compatible sealants should follow the drainage-plane manufacturer recommendations.
Drainage Plane Behind Exterior Wall Cladding
Building America Solution Center guidance for drainage planes behind exterior cladding in residential wall assemblies; not a project-specific code determination.
Accessed · Link to this claim - The City of Jacksonville, Florida residential inspection guide lists a dry-in inspection for the air infiltration barrier, window and door frame installation and skylights; it says window fasteners must remain verifiable before thick seal tape conceals them, and lists missing or improperly sealed barriers and wrong flashing among dry-in failures.
Residential Inspection — Building Inspection Division
City of Jacksonville, Florida and its Duval County inspection guidance as displayed on the cited page; the page itself warns that the guide is not absolute and requirements can change.
Accessed · Link to this claim - The City of Blaine, Minnesota requires site-specific photos of window and door pan flashing, insulation, exterior flashing and sealing, or a flashing/insulation inspection during installation before concealment; if the checkpoint is missed, removal of trim and siding may be necessary for spot checks.
City of Blaine, Minnesota permit and inspection instructions for window and door installation; it is a local example, not a nationwide requirement.
Accessed · Link to this claim - The cited Marvin clad-window installation instructions specify for the shown wood-frame new-construction method that rough openings should be 1/2 inch higher and 1 inch wider than the outside frame measurement, require a level, square, straight and plumb sill/opening, and direct the installer to correct the opening before proceeding when conditions are not met.
Clad Window Installation Instructions 19970017
Marvin instructions for the specific clad-window, wood-frame new-construction installation method in the cited PDF; do not generalize dimensions to another brand, model, opening type or door.
Accessed · Link to this claim - Building Science Corporation says penetrations through enclosure elements that manage rainwater must be properly flashed and that air sealing must not interfere with drainage; it also says sealant must be compatible with the materials and any required fire-resistance rating.
Info-405: Sealing Air Barrier Penetrations
Building Science Corporation information sheet on air-barrier penetrations; apply the principle to the project’s actual enclosure details and product requirements.
Accessed · Link to this claim - OSHA construction rule 29 CFR 1926.501 generally requires employees on walking or working surfaces 6 feet or more above lower levels to be protected from falls by a guardrail, safety net or personal fall-arrest system, subject to the rule’s conditions and exceptions.
29 CFR 1926.501 — Duty to have fall protection
Federal OSHA construction standard for employees; state-plan requirements may differ or be more stringent, and a homeowner should not direct workers’ safety systems.
Accessed · Link to this claim - Pella’s new-construction installation resource separates installation approaches, including nail-fin installation integrated with the weather barrier and masonry installations using a wood buck, frame screws or clips and a different sealing interface; the selected approach must match the actual product and wall condition.
New Construction Window Installation
Pella professional installation resource describing product and wall-condition variants; it is not a substitute for the exact model instructions supplied with the installed unit.
Accessed · Link to this claim - The U.S. Department of Energy Building Science Education page treats windows and doors as fully flashed openings when the installed water-management layers form a complete, properly integrated opening before the wall is closed by exterior finishes.
Windows and Doors are Installed: Fully Flashed Window and Door Openings
U.S. Department of Energy Building Science Education overview; use for the sequence concept, not as a local inspection approval or product-specific installation instruction.
Accessed · Link to this claim