How to Verify Temporary Weather Protection Before a New-Home Construction Shutdown
A homeowner worksheet for checking a framed new home before a pause: weather paths, materials, hazards, local inspections, owners, evidence and restart gates.
The short answer
Release a framed or partly enclosed home for a planned pause only after the builder records the stage, forecast window, every roof and wall opening, drainage route, stored-material risk, product exposure limit, site hazard, inspection hold, responsible trade, and photo evidence. Temporary protection is not permanent weather-tightness. The builder or qualified trades must correct failed rows, and the authority having jurisdiction still controls inspections.How to Verify Temporary Weather Protection Before a New-Home Construction Shutdown
Release a framed or partly enclosed home for a planned pause only after the builder records the stage, forecast window, every roof and wall opening, drainage route, stored-material risk, product exposure limit, site hazard, inspection hold, responsible trade, and photo evidence. Temporary protection is not permanent weather-tightness. The builder or qualified trades must correct failed rows, and the authority having jurisdiction still controls inspections.
1. Make the release decision from the actual stage, not from the word “dried-in” #
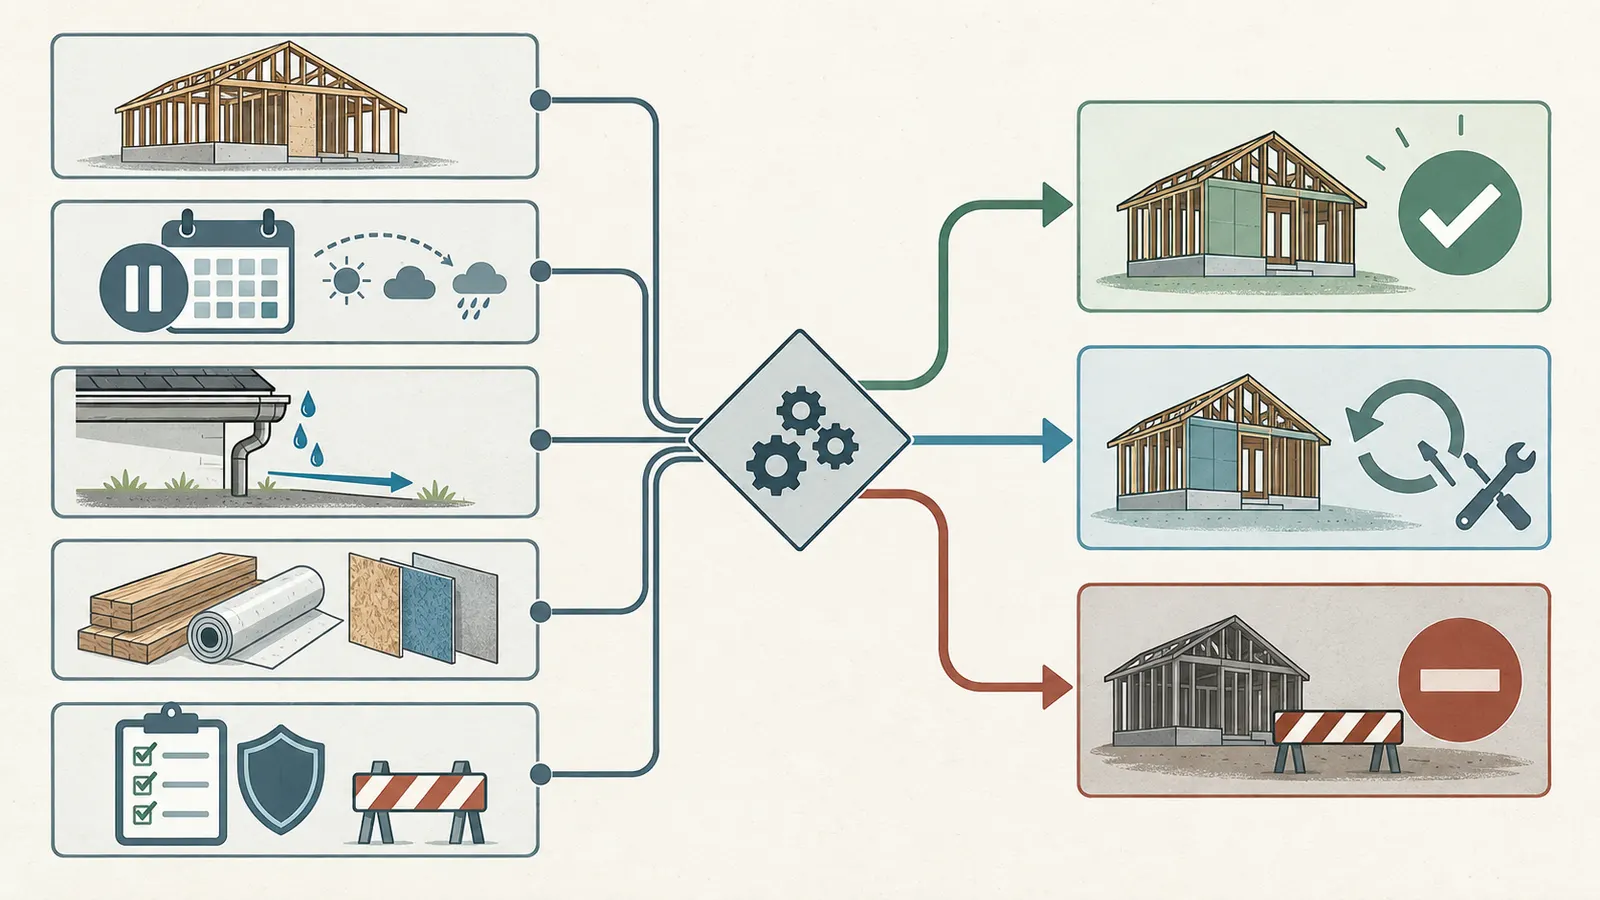
A new home is ready for a planned shutdown only when the responsible builder can show that the installed temporary measures match the construction stage, the expected exposure window, the product instructions, the approved plans and the local inspection sequence. “Dried-in,” “weather-tight,” “wrapped,” and “covered” are useful project terms, but they are not interchangeable guarantees. Ask the builder to define each term on this site, identify what remains open, and state what will be checked after the pause.
The homeowner’s decision is not “Does the house look covered?” It is:
Can this particular building, at this particular stage, remain protected for this particular number of hours or days, with every water path and safety hazard assigned to someone who can correct it, while preserving required inspections and a restart record?
That decision has three possible outcomes:
| Release result | What it means | Required next action |
|---|---|---|
| Release to planned pause | The builder has documented continuous temporary protection, no unresolved red-flag hazard, a responsible monitor, and a restart plan. | Sign the project’s own handoff record, keep the evidence package, and do not treat the release as a permanent weather-tightness approval. |
| Conditional release | The pause may be possible only after a named correction, such as sealing a window opening, moving gypsum board, clearing a drain, adding a pump or resolving an inspection hold. | Keep the release open. The responsible trade records the correction, date, photo and verification before people leave. |
| No release | A roof edge, opening, drainage route, product exposure clock, stored material, structural condition, electrical condition, or worker-access hazard cannot be verified or safely corrected in time. | Escalate to the builder or qualified trade. Stop the homeowner’s observation. Follow the project emergency plan and leave the site when directed. |
The evidence should be proportional to the pause. A 24-hour pause with a complete roof and installed windows may need fewer interventions than a 72-hour pause with open window rough openings, wet-applied insulation, an unfinished roof, forecast wind, or a weekend when no qualified person can return. The longer the pause, the more the release depends on durable control of drainage, movement, exposure clocks and access—not on a last-minute photograph.
EPA’s moisture-control guidance is useful because it treats moisture as a whole-building system involving site drainage, foundations, walls, roofs, ceilings, plumbing and HVAC, and it includes verification methods rather than only design advice. Use that whole-building frame for the worksheet below, then narrow each row to the actual installed assembly and manufacturer manual. EPA’s Moisture Control Guidance for Building Design, Construction and Maintenance is professional guidance, not an approval for this home.
What the homeowner can decide
You can decide whether the builder’s release record is complete enough to ask informed questions, whether a stated protection period conflicts with a product manual, whether the next inspection could be blocked by premature covering, and whether the restart evidence is specific or merely reassuring language. You can also refuse to treat “we will check it later” as a completed handoff when the contract or project process requires a pre-shutdown condition record.
You cannot approve a roof, wall, shoring, temporary structure, structural repair, electrical isolation, fall-protection system or code inspection from a remote view. You cannot infer that a house is safe to enter because a photo shows a dry floor. You cannot infer that a leak is harmless because the water is not visible. The builder, employer, qualified trade, design professional and authority having jurisdiction retain the responsibilities assigned by the contract, permit, safety program, code and product instructions.
Current answers, missing decision and how this page can be checked
Current answers usually separate the problem into storm preparation, moisture control, job-site storage, worker safety, inspection sequencing, or a particular wrap and underlayment manual. Those pieces are valuable but do not normally tell a homeowner how to release one unfinished home for a defined pause and reopen it with a documented handoff.
The missing decision is a stage-aware release gate that connects the forecast and pause duration to open water paths, drainage and pumps, stored materials, product exposure clocks, temporary closures, hazards, inspection holds and restart ownership. The practical test is reproducible: another person should be able to read the record, inspect the same locations, trace each source claim and see why a row passed, failed or was deferred.
The specific contribution here is a temporary-weather-protection shutdown release worksheet. It is a source-linked record rather than a new building-science standard. It makes the person responsible, evidence, failure reason and next decision visible for every control that matters to a pause.
Use this page alongside the project’s own dry-in definition and inspection-readiness record, because “dry-in” is a sequence decision rather than a universal label. When inspection visibility is the immediate constraint, keep the permit hold and the weather-pause release in the same project record; this page adds the pause and restart release gate.
This guide belongs to Brictale’s construction journey within the homeowner blog. Those routes provide the wider sequence around this narrow pause decision; they do not turn a category page into an inspection, engineering approval or contractor instruction.
The handoff sequence in one page
Use this order, even when the forecast is changing:
- The builder identifies the stage and the exact pause window.
- The builder or site supervisor checks the forecast, site access and emergency contact plan.
- The framing, roofing, window, envelope, plumbing, electrical, mechanical and site trades report what is complete and what remains exposed.
- The builder walks the structure from roof to grade, tracing water downhill and looking at openings, penetrations, edges, low points, drains, pumps and stored materials.
- The builder checks safety controls and prevents unauthorized entry.
- The builder compares each temporary product with its current manual, including exposure, fastening, overlap, slope, ventilation and repair limits.
- The builder checks the permit record and asks whether any inspection or hold must occur before covering or before the pause.
- The builder records photos, measurements, defects, responsible trades, correction deadlines and the restart owner.
- The builder either releases, conditionally releases or refuses the pause.
- On restart, the owner and builder compare the same locations, document new water or movement, dry and test materials where applicable, and decide whether work can resume, must be repaired, or needs an authority or design professional.
The order matters. A photo taken before a roof edge is secured does not prove the edge remained protected. A material moisture reading taken in one dry stud does not clear the wet bottom plate, sheathing seam, insulation, flooring bundle or concealed cavity. A city inspection status does not prove temporary weather protection, and temporary weather protection does not replace a required inspection.
2. Freeze the inputs: stage, forecast window, exposure clock and responsibility #
The first verification step is to write down the inputs that define the decision: the construction stage, the time people leave, the earliest qualified return, the forecast hazard and pause duration, the exact products installed, and the person empowered to correct a failed condition. If any input is unknown, the release is incomplete rather than optimistic.
Record the construction stage in observable terms
Do not record only “framing” or “dry-in.” Use a stage description that another person can recognize. For example:
- foundation and floor framing complete; exterior walls erected; roof sheathing 80% complete;
- wall sheathing complete; WRB installed on the west and south elevations; window units not yet installed;
- roof sheathing complete; synthetic underlayment installed; roof covering not installed;
- windows and exterior doors installed; rough plumbing and electrical underway; open floor penetrations remain;
- insulation installed in the attic but not enclosed; drywall stored inside; permanent power not yet available.
The stage affects both water risk and inspection risk. A framed wall with no sheathing has different wind and rain paths from a sheathed wall with a taped WRB. An installed underlayment has a different product clock from shingles. A house with rough-in materials in open walls may need dry conditions, access and inspection before insulation or drywall. A floor opening is both a water path and a fall hazard; its protection must work for people and for weather.
Set the pause window as a range, not a wish
Record four times:
| Input | Example entry | Why it matters |
|---|---|---|
| Last qualified person leaves | Friday, 4:30 p.m. | Establishes when the site stops being actively managed. |
| Planned restart | Monday, 8:00 a.m. | Defines the nominal pause. |
| Earliest safe access after an event | Monday, 10:00 a.m. or later | A storm, flooding, utility outage or authority direction may delay entry. |
| Maximum unmanaged exposure considered | 72 hours | A protection plan that works for 24 hours may not work for three days. |
The useful duration is not simply restart minus departure. Add the time during which the site may be inaccessible, the time needed for an inspection or correction, and the time required for materials to dry before covering. If the builder says a person will “check it after the storm,” ask who, with what training, under what site-access rule, and what happens if that person cannot enter.
Use a forecast as an input, not as a warranty
Record the forecast source and time, precipitation type, expected rainfall if available, wind concern, temperature, freezing risk, lightning risk, tropical or severe-weather alert, and the period over which the forecast could change. A forecast does not establish a safe wind load for an incomplete structure and does not authorize entry during a warning or evacuation. The project’s emergency plan and local authority directions control.
For a named local example, the City of Miami Beach, Florida tells construction teams to designate a weather monitor after a tropical storm watch, secure loose materials when a hurricane watch is issued, remove or tie down equipment, and evacuate when local authorities direct. Its page also lists pumps, plastic sheeting, netting, rope, ground anchors, shoring and bracing among preparation resources. That is a Miami Beach example, not a universal trigger for Seattle, Washington, Portland, Oregon or another jurisdiction. Use Miami Beach’s construction-site hurricane preparedness guidance as a prompt to ask for the project’s own action thresholds.
Name the person who can say “no release”
The homeowner should not become the default storm supervisor simply because the home is theirs. Put a name and phone number beside each responsibility:
| Responsibility | Usually accountable | Evidence or handoff |
|---|---|---|
| Release decision and site log | Builder, general contractor or designated site supervisor | Signed or dated release record with unresolved items visible |
| Roof, edge and underlayment correction | Roofing trade or builder’s qualified crew | Product-specific repair, fastening and exposure record |
| Window, door and wall-opening closure | Window/envelope trade or builder | Photos of each opening, flashing/closure status and exceptions |
| Temporary bracing or structural correction | Builder and the responsible design professional when needed | Written direction or approved detail; no improvised homeowner repair |
| Pumps, drains and discharge | Site contractor or designated qualified person | Pump location, power/fuel, discharge route and test record |
| Electrical isolation and generator safety | Electrical trade or qualified responsible person | Written site procedure; no wet-area improvisation |
| Worker fall and access controls | Employer/site supervisor | Guardrail, cover, barricade or other applicable control record |
| Permit and inspection status | Builder or permit holder | Permit number, inspection result, hold and next request |
| Restart release | Builder with affected trades | Before/after comparison, drying or repair record and next sequence |
If the contract places a different responsibility on the architect, owner-builder, construction manager or trade, record the actual contract responsibility. Do not use a matrix to transfer a legal, safety or inspection duty to a homeowner.
Track an exposure clock for every installed temporary product
An exposure clock begins when the product is installed or exposed, depending on the manufacturer’s instructions. Record the date and time, product name, model or manual revision, lot information if the builder keeps it, applicable exposure period, remaining margin and required next covering.
For example, DuPont lists a 120-day UV exposure limit for Tyvek HomeWrap and says that an overexposed WRB may require another layer or replacement integrated with window and door flashing; it also notes that a second layer changes permeability. That is not permission to leave an unflashed or incomplete wall open for 120 days. It is a product-specific exposure limit within an installed wall system. DuPont’s Tyvek HomeWrap product page is the source to check for this product family; the builder should check the manual for the actual WRB and installation detail.
GAF’s Quix Underlayment instructions are an even sharper warning against shortcut language: the named product is described as water-resistant, not waterproof; its 60-day period concerns UV resistance; it must be covered by asphalt shingles within that period; and the instructions say not to use it as a temporary roof to protect property or possessions. The Quix Underlayment installation instructions therefore cannot be summarized as “the roof is safe for 60 days.” If the installed material is a different underlayment, use its manual and do not borrow Quix’s clock.
3. Trace every water path from roof to grade before you look at finishes #
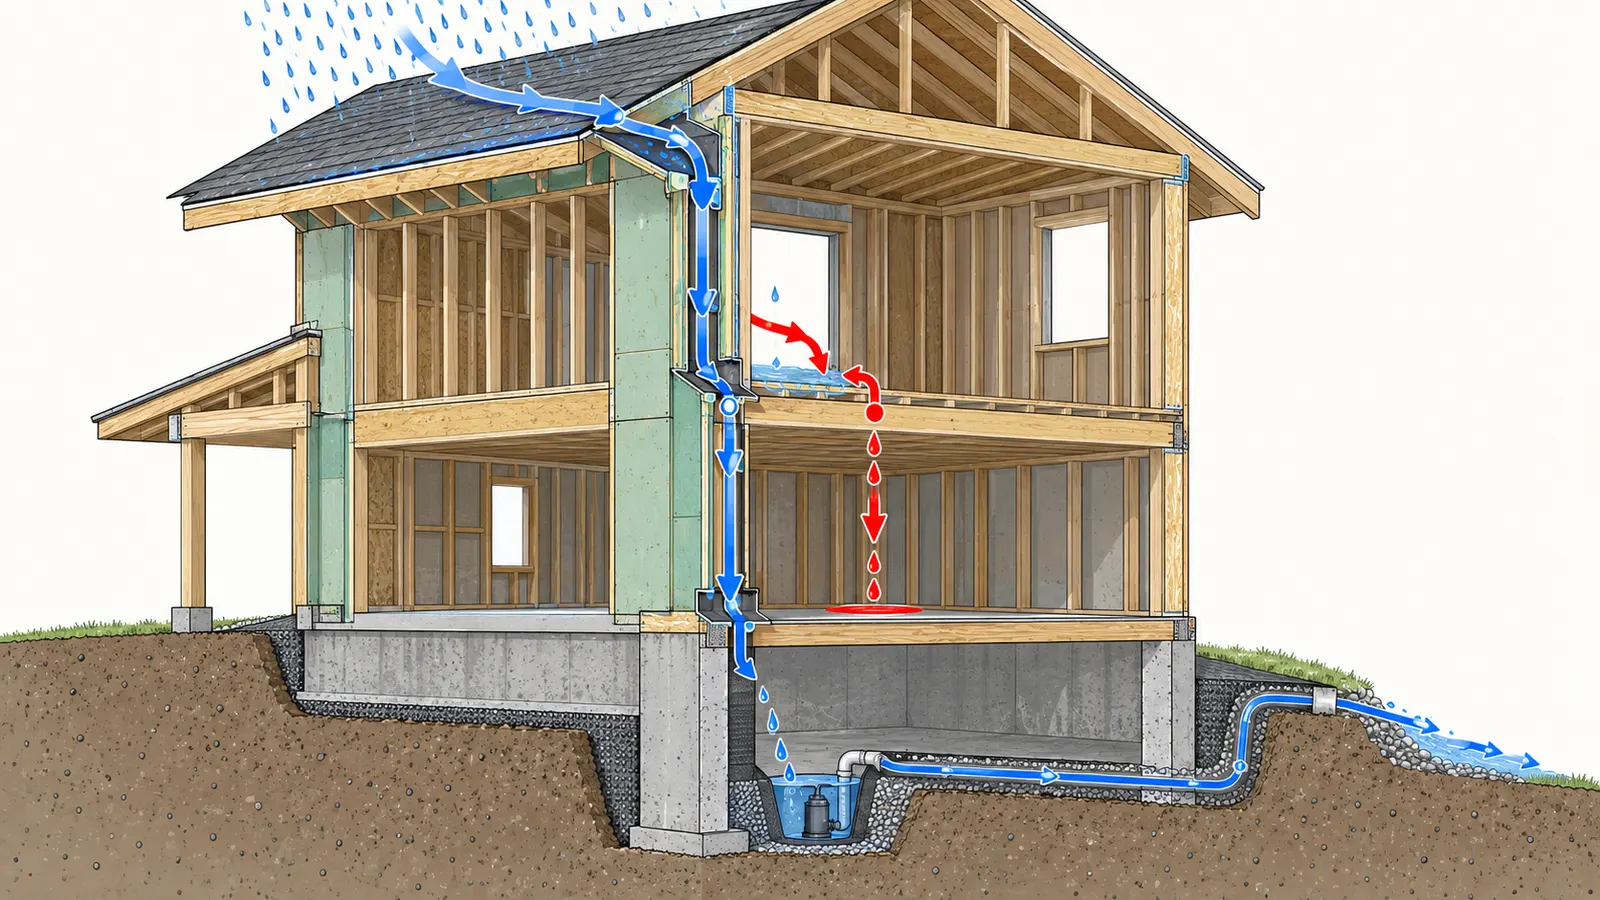
The second verification step is a physical water-path walk: start at the highest exposed surface, follow every place water can enter, then follow every place it can collect, bypass, discharge or become trapped. The builder should walk this route with the worksheet, not rely on a general statement that the building is “covered.”
Roof: check the assembly, edges and penetrations separately
Ask the roofing trade or builder to identify:
- roof sheathing that is missing, loose, damaged, visibly wet or unsupported;
- roof edges, rakes, eaves, valleys, hips, ridges and low-slope transitions;
- temporary underlayment, leak barriers, caps, tapes, sealants and fasteners;
- chimneys, vents, pipes, skylights, dormers and other penetrations;
- any opening around a roof-to-wall transition;
- whether the temporary layer is intended to shed water, resist UV, or actually serve as a waterproof component;
- locations where wind can lift a lap, roll an edge, pull a fastener or drive water beneath the layer;
- whether a temporary covering blocks designed ventilation or traps condensation;
- whether ladders, tools, materials or foot traffic have scuffed, punctured or displaced the layer.
Do not interpret an intact-looking sheet as a complete roof. The water path includes the edge detail, lap direction, seam, flashing, penetration and discharge. A sheet that sheds rain in the middle of a roof may still send water behind a wall wrap at a rake or into a valley. An underlayment manual may distinguish UV exposure from resistance to water, snow or wind. The GAF Quix instructions, for example, explicitly make that distinction and say a design professional must address possible moisture entrapment and ventilation. Review the product instructions at the point of the roof decision, including the actual product name, slope and installation notes.
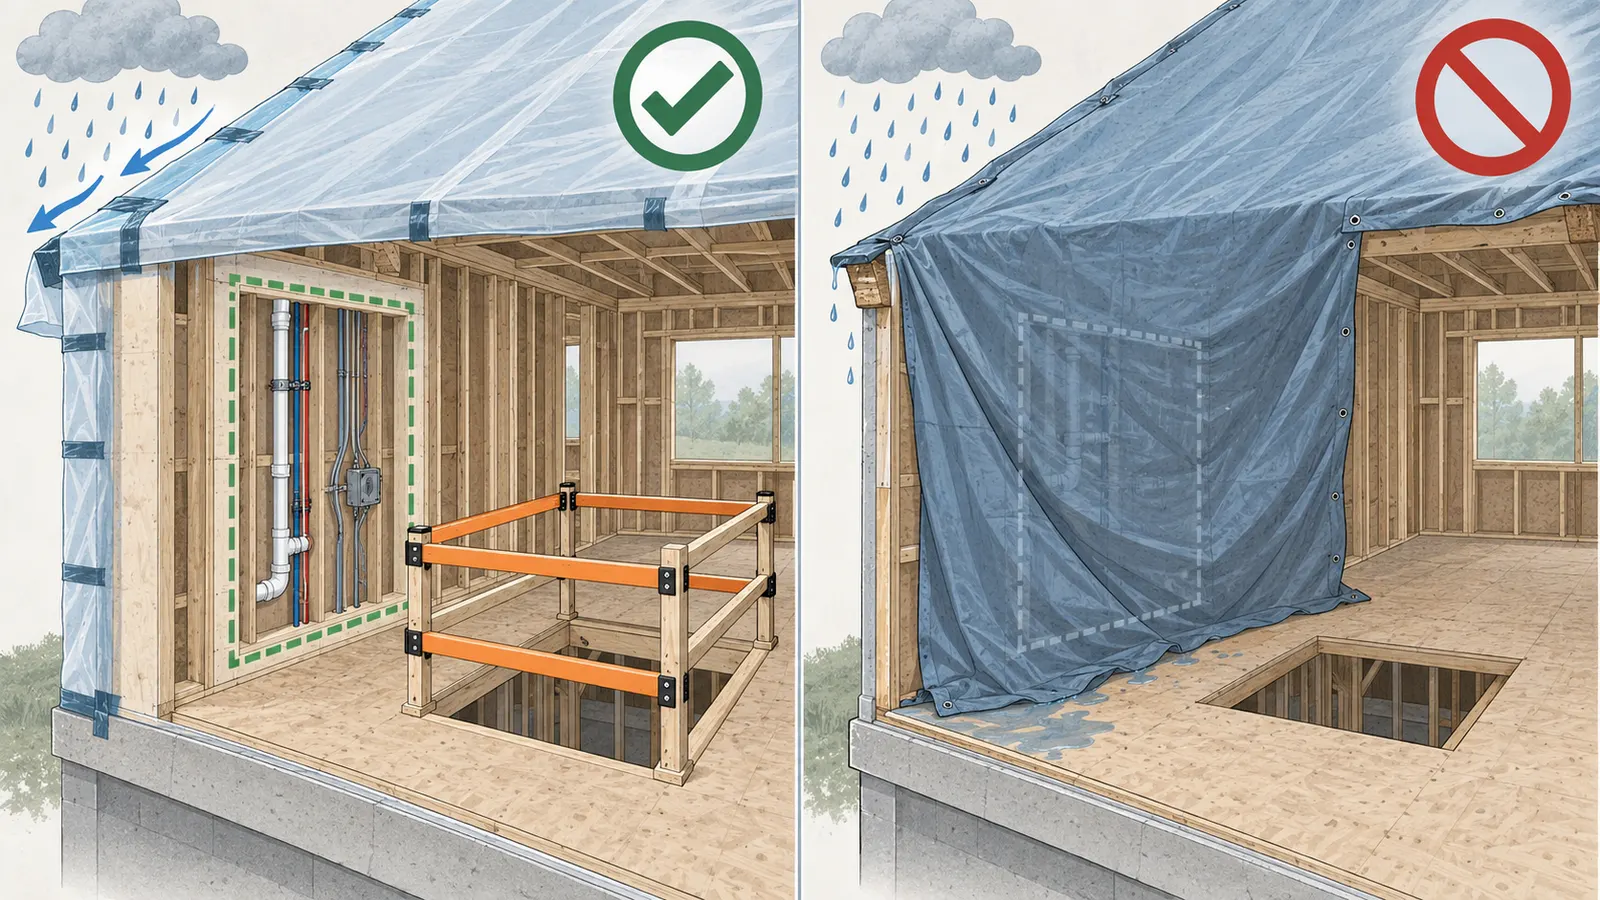
If the roof is incomplete, ask the builder to state whether the safest correction is to finish a permanent portion, install a product-approved temporary closure, change the pause timing, or use a qualified roofing contractor. The homeowner should not climb a roof, add fasteners, move roof materials or install a tarp. Brictale will not treat a homeowner-installed tarp as an approved correction because its design, attachment, drainage and access controls have not been reviewed against the actual roof, forecast or product instructions. The builder’s correction record should name the responsible trade and the method, not say “tarped.”
Wall sheathing and WRB: verify continuity, not just coverage
For each elevation, record the condition of the wall surface, from the foundation or lowest wall edge to the roof intersection. Look for missing sheathing, exposed joints, open corners, unsealed penetrations, damaged panels, unprotected bottom edges, disconnected laps, loose wrap, window and door openings, and places where water can run behind the drainage plane.
A water-resistive barrier is part of an assembly. It does not by itself make an open wall weather-tight. Before a window or door is installed, the opening may need a project-specific rough-opening protection or closure. After installation, flashing, sill drainage, jamb and head integration, sealants, fasteners and the WRB sequence must follow the approved detail and product instructions. A photo of wrap on a wall does not show that the bottom edge drains, that a penetration is integrated or that the product is within its exposure clock.
If the WRB has been exposed longer than the manufacturer allows, do not accept “it still looks good” as verification. DuPont’s product information describes a 120-day limit for the named Tyvek products and says an overexposed layer may need replacement or a new layer integrated with flashing; it also warns that the two-layer arrangement changes permeability. Use DuPont’s overexposure guidance only for the named product family and ask the builder for the installation guide for the actual wall system.
Windows, doors and service penetrations are individual open paths
List every opening rather than counting “all windows.” Give each one an identifier tied to a plan location: north bedroom window, west patio door, garage service door, temporary opening at the stair landing, plumbing sleeve at the east wall, electrical service penetration and roof vent. For each, record:
| Opening record | Pass evidence | Common failure |
|---|---|---|
| Window or door installed | Unit is present, secured, protected from direct water, and integrated according to the approved detail and manual | Unit is installed but head, sill, jamb, flashing or WRB transition is incomplete |
| Rough opening not yet closed | Builder-installed temporary closure is taut, secured, drained and rated for the expected exposure | Plastic is loosely taped, water can collect at the sill, wind can pull it loose, or it blocks a required inspection |
| Service penetration | Penetration is capped or closed by the responsible trade with a compatible detail | Pipe, conduit or cable sleeve is open, unsupported or sealed with an unapproved material |
| Large opening or garage | Closure and anchorage are appropriate to the opening and wind exposure | A temporary panel can flex, blow inward, trap water or become a falling object |
| Floor or stair opening | Guard, cover or barricade is installed for people and material movement | A sheet of plastic is mistaken for a fall-protection cover |
Do not seal a required inspection out of existence. Portland, Oregon tells permit holders not to cover permitted work without inspection and says rough electrical, plumbing and mechanical inspections must be approved before its framing inspection. Its structural frame sequence also includes roof, wall and floor sheathing plus windows and doors, while its insulation guidance requires weather protection before insulation and warns against covering substantially wet wood without adequate drying provisions. Portland’s residential inspection guide is a local example of why a shutdown closure and an inspection hold must be recorded in the same decision surface.
Floors, foundations, crawl spaces and low points
Walk the lowest level before walking the walls. The water entering through a roof or wall will often show up at a sill, stairwell, slab edge, crawl-space opening, elevator or shaft, not at the original entry point. Record:
- unfinished foundation penetrations and sleeves;
- window wells, crawl-space access, basement stairs and slab depressions;
- open plumbing or electrical penetrations through the floor;
- floor drains, temporary sumps, trench drains, swales and discharge points;
- seams or edges where water could move beneath a temporary barrier;
- pump location, power source, backup plan, discharge route and test evidence;
- soil softened by water, excavation edges, undermined paths or standing water;
- materials sitting directly on concrete or the ground;
- any water or mud that could hide a hole, sharp object, cable, contamination or unstable footing.
The City of Miami Beach, Florida’s local construction-storm guidance specifically prompts teams to plan pumps, drying equipment, discharge and safe return after severe weather. It also warns that standing water can soften ground and compromise stability. Use the Miami Beach page to ask whether the project’s own pump and discharge plan is ready; do not assume its equipment list establishes a legal discharge method for another city or site.
Use the “follow water downhill” test
At a safe ground-level vantage point, ask the builder to show the intended route for water at each elevation. The test is conceptual and visual; it is not a substitute for a hose test, engineering analysis or a product-required test.
- Pick one roof plane and point to where rain lands.
- Trace the slope to an eave, valley, drain, edge or temporary discharge.
- At each lap, penetration and edge, state what keeps water on the intended side.
- Trace the wall plane to a sill, base, flashing or drainage outlet.
- Follow water past the foundation to a swale, pump, drain or approved discharge.
- Identify any place the route stops, turns inward, ponds or depends on a person being present.
- Photograph the transition and write the correction or owner beside it.
If the route cannot be explained, the row fails verification. The next decision is not “can the homeowner add tape?” It is whether the builder should complete a qualified correction, change the pause, protect the material under the manual, or call a design professional or authority.
4. Check materials, drying and temporary product limits before they are trapped #
The third verification step is to protect material condition, not merely the building shell. A pause can create damage even when rain does not enter a room: wet lumber can move, wet insulation can stay trapped, drywall can wick water from a slab, a covered pile can condense, and a temporary barrier can slow drying.
Separate “not visibly wet” from “dry enough to enclose”
PNNL’s Building America Solution Center says not to install drywall over damp framing or insulation and identifies lumber at 18% moisture content or less as an ENERGY STAR recommendation before enclosure. It also directs builders to follow manufacturer drying and curing specifications for wet-applied insulation and other materials. Read the PNNL guidance on high-moisture materials for the scope and measurement cautions.
That threshold is not a universal pass/fail number for every product, wood species, assembly or jurisdiction. It is a useful benchmark in the source’s scope. Ask the builder to identify the project’s actual enclosure criterion, the meter type and settings, the materials tested, the locations, the date and the person who interpreted the readings.
For a repeatable record, use this measurement procedure:
- Identify material, member, location, orientation and whether the area was recently wet.
- Confirm the meter is appropriate for the material and set for the relevant species or product when the instrument permits.
- Test multiple points along the member, including lower edges, corners, joints and locations near an opening or leak—not only the end grain or the driest visible face.
- Record the reading with units or percent, the instrument and the time.
- Compare with the project’s acceptance criterion and the product instructions.
- If the reading is above the criterion or varies sharply, identify drying and retest responsibility.
- Do not close the cavity until the builder confirms that the material and any wet-applied product meet the applicable drying or curing requirement.
PNNL explains that a moisture meter measures only the material between its probes and recommends multiple locations; it also describes probes inserted into the wood rather than testing the end. That makes a single homeowner reading weak evidence. It is appropriate to ask for the builder’s record and for a qualified professional to resolve a disputed or unusual reading.
EPA’s flooded-home guidance makes the same restart principle in a different context: before refinishing or replacing walls and floors, the home should be completely dry to reduce future mold growth and preserve structural integrity. EPA’s drying guidance is not a construction-enclosure specification, but it supports the conservative handoff rule: water exposure creates a drying and condition-verification task before concealed work resumes.
Store materials so a pause does not create a second water path
PNNL recommends visual inspection, dry storage, elevation off the ground, weather protection and air circulation for building materials; it also says not to install lumber, plywood or other materials showing visible water damage or mold. The PNNL material-storage guide explains why a covered bundle can still be a problem if it sits on a wet slab, has torn packaging, traps water or blocks air.
Create a material register with three levels:
| Material class | Pause risk | Verification before release | Restart decision |
|---|---|---|---|
| Lumber, engineered wood, plywood or OSB | Rain, ground moisture, swelling, warping, delamination or fastener changes | Elevated support, breathable cover where appropriate, no visible damage, targeted moisture readings after exposure | Use, dry, repair or replace under builder and product criteria |
| Drywall, paper-faced board and finish-sensitive products | Edge wicking, staining, loss of finish quality and hidden moisture | Keep indoors only if the building is protected; raise off slab; inspect edges and bundles | Do not install until dry and accepted by builder |
| Fiberglass or other dry insulation | Saturation, loss of performance, contamination or compression | Keep dry, protected and supported; inspect before placement | Replace or accept only under product instructions and builder procedure |
| Wet-applied insulation, fluid-applied flashing or cementitious products | Incomplete cure, trapped water or altered performance | Record installation time, cure requirement, temperature/humidity conditions when required, and manufacturer instruction | Wait, dry or obtain qualified product-specific decision |
| Doors, windows, cabinets or equipment | Water intrusion, corrosion, damage and theft | Store on support, sealed from weather, with manufacturer handling limits | Inspect before installation and document damage |
| Adhesives, sealants and tapes | Temperature, shelf-life, contamination or loss of bond | Keep within storage conditions and check package/manual | Do not substitute an unapproved tape or sealant |
Do not drape a tarp tightly over a wet pile and call it dry storage. The PNNL guide advises that outdoor covers protect from rain and snow while allowing air circulation, and it notes that protective coverings can tear or trap water. The builder should use the actual material and product instructions to choose the cover, support and ventilation arrangement.
Respect product clocks and product boundaries
An exposure clock is not a weather guarantee. It usually describes a limited property such as UV resistance, not how long an incomplete assembly will tolerate wind-driven rain, ponding, snow, foot traffic, condensation or a tropical storm. Record those distinctions explicitly.
For a product row, write:
- product and exact name;
- installed date and time, if known;
- surface and assembly where installed;
- exposure limit and what the limit measures;
- environmental or slope limits;
- required covering;
- allowed repair method;
- inspection hold before covering;
- responsible trade;
- remaining margin at planned restart;
- action if the margin is consumed during the pause.
The GAF Quix manual says its 60-day exposure period concerns UV resistance and does not describe how long it can withstand water, snow or wind. It also says the material is not waterproof and not to use it as a temporary roof for property or possessions. That means a 24-hour weather forecast cannot turn Quix into a roof, and a 72-hour pause cannot be approved merely because 60 days remain. Cite the GAF manual when documenting this distinction.
The manual also warns that underlayment can retard vapor movement and that humid attic air may condense beneath it; it directs a design professional to address moisture entrapment and ventilation. It specifies installation details such as corrosion-resistant fasteners, penetration depth and flush placement. Those are reasons to compare the installed roof with the manual and approved plans, not reasons for a homeowner to climb up and make repairs. The same GAF instructions are the product boundary.
Use a failure rule for wet or damaged material
The release worksheet should never say only “materials checked.” Use a failure rule:
- If visible mold or water damage is present, isolate the material and ask the builder or qualified professional whether cleaning, testing or replacement is appropriate. PNNL says visibly damaged or mold-affected material should not be installed, while also distinguishing some stains and sap-stain conditions; do not turn a visual label into a structural judgment.
- If a material is wet but not visibly damaged, record where it is wet, how it will dry, who will retest it and what prevents enclosure before acceptance.
- If wet-applied insulation or flashing is not cured, keep it accessible and follow its manual. Do not cover it to make the interior look finished.
- If a board is swollen, delaminated, warped or has compromised fasteners, ask the builder to assess the installed assembly and repair or replace it as required.
- If the homeowner cannot tell whether a material is damaged, stop at observation and ask the builder; do not scrape mold, sand treated material, handle contaminated water or remove suspected hazardous material.
5. Preserve worker safety and inspection holds while you close the building #
The fourth verification step is to treat safety and inspection status as release gates, not administrative details. Weather protection that creates an unguarded opening, blocks a required inspection, overloads a temporary brace, or encourages an owner to enter an unsafe site has failed its purpose.
Protect people before protecting finishes
OSHA’s residential fall-protection guidance addresses workers at elevations six feet or more above a lower level and describes fall hazards from roof work, unprotected sides, wall openings and floor openings. It is employer guidance and does not itself create new legal obligations, but it is a strong prompt to keep the site under the employer’s safety program and applicable OSHA or state-plan requirements. OSHA’s Fall Protection in Residential Construction guidance should be reviewed by the builder or employer responsible for the work.
The homeowner’s walk should be from a safe location and under the builder’s site-access rules. Do not walk a roof, climb scaffolding, step over a floor opening, move a guardrail, remove a cover, enter a flooded area, touch temporary electrical equipment, approach a leaning wall or operate a pump or generator unless the qualified responsible person instructs and authorizes it.
Do not enter a crawl space, shaft, pit, unfinished basement with restricted access, or any other confined or unknown-atmosphere area to perform this check. Remote review and homeowner observation cannot clear confined-space, air-quality, contamination, oxygen-deficiency, toxic-gas, engulfment or entry hazards. OSHA identifies crawl spaces among construction confined-space examples and says physical and atmospheric hazards must be addressed before entry. Read OSHA’s confined-spaces-in-construction overview. The responsible employer, site supervisor or qualified professional must classify the space as applicable, control access and establish the required assessment, monitoring, ventilation, attendant or rescue measures before anyone enters. If those controls are not documented, mark the row “no release” and stay out.
Check the record for:
- roof edges and leading edges;
- stairwells, shafts, skylights and floor holes;
- unguarded wall openings and high window openings;
- ladders, scaffolds, platforms and temporary walkways;
- bracing, shoring, jacks, trusses and loose framing;
- falling-object exposure from stored material or loose coverings;
- standing water, mud, sharp debris, exposed wiring and unstable ground;
- fuel, generators, pumps and exhaust or electrical hazards;
- unauthorized entry controls, signs, fencing, locks and emergency contacts.
Temporary closures must not be evaluated only for water. A plywood panel over a floor opening might keep out rain but fail if it cannot support the expected load, is not secured, or creates a trip edge. A plastic barrier at a wall opening may reduce rain but does not provide fall protection. A strap across a doorway may keep a child out but may not control worker access or wind.
The correct response to a failed safety row is to keep people out and notify the builder or employer, not to improvise a homeowner repair. If there is immediate danger, follow emergency services and site emergency instructions. If water contacts electrical equipment, do not enter or reset equipment until a qualified person makes the area safe.
Pressure hazards need a separate boundary. A homeowner cannot diagnose or alter a pressurized temporary water line, air line, pump, pressure tank, hose, accumulator, hydrant connection or similar system from a remote photo, video call or message, and should not do so on site. Do not open a valve, loosen a fitting, bleed or depressurize a line, bypass a control, change a pressure setting, connect power, move a pump or restart equipment to test a theory. Pressure can release suddenly, move equipment, spray contaminated water or create electrical and mechanical hazards. Record only what can be observed from a safe location, keep people away, and route the condition to the responsible builder, site supervisor or qualified plumbing, mechanical, electrical or pump professional under the project safety plan. If the responsible person cannot verify the system and its discharge path, mark the row “no release.”
Compare the pause with the inspection sequence in the actual jurisdiction
Local inspection pages are examples of variation, not a national sequence. Use the project’s permit portal, approved plans and authority having jurisdiction as the controlling record. The three named examples illustrate why the worksheet needs a jurisdiction field.
Seattle, Washington. Seattle’s residential inspection quick sheets list a structural inspection before covering the outside sheathing, a framing inspection before insulating or covering framing, and a final inspection after construction and related permits have received final inspections. Seattle’s residential inspection quick sheets do not authorize a homeowner to decide that a temporary cover can replace an inspection. If the project is in Seattle, record which inspection is pending, whether the structure can be temporarily protected without covering it, and who will request or reschedule the inspection.
Portland, Oregon. Portland tells owners not to cover permitted work without inspection, says rough electrical, plumbing and mechanical inspections must be approved before the framing inspection, and lists a sequence that includes sheathing, windows and doors. Its guide states that weather protection must be provided before insulation and that substantially wet or soaked wood should not be covered by vapor barriers without adequate drying provisions. Portland’s residential inspection guide also says a consultation is not an approved inspection. If the project is in Portland, a storm pause is not a reason to skip the inspection hold; it is a reason to keep work accessible and record the revised sequence.
Tampa, Florida. Tampa’s common residential inspection list says wall and roof sheathing is inspected before dry-in. It lists framing conditions that include approved plans, framing and bracing, a weather-tight building, a dried-in roof, installed windows and doors, and completed tested concealed systems. The city also cautions that the list may not include every inspection on a project. Tampa’s residential inspection page is therefore a local example of a dry-in and framing relationship, not a national definition of “weather-tight.”
The practical record for any jurisdiction should include:
| Inspection question | Record this | Do not infer |
|---|---|---|
| What authority has jurisdiction? | City, county, state or other named authority; permit number | That a neighboring city’s sequence applies |
| What work is complete? | Stage, plan sheet, trade and inspection code if available | That a photo or builder label equals approval |
| What is still open? | Sheathing, rough-in, flashing, windows, doors, insulation, fire blocking, floor openings | That temporary closure eliminates the hold |
| What must remain accessible? | Specific areas and systems, approved plans on site, access route | That a remote video, photo or consultation is the same as approval |
| Who requests the inspection? | Permit holder, builder or designated trade | That the homeowner can schedule or pass it without the responsible party |
| What is the restart dependency? | Correction, reinspection, drying, test, approval or design direction | That construction can resume because the storm ended |
Keep temporary protection from hiding a defect
Before a closure is installed, photograph the condition that will become hidden. Include a scale or location reference, not because a photo proves compliance, but because it lets the builder compare before and after. Record fastener or seam locations only when the builder can safely and accurately document them. Keep the approved plans, shop drawings, product manuals and inspection results with the record.
Never cover an unverified leak, damaged sheathing, wet cavity, untested rough-in, open electrical splice, unbraced wall or failed inspection in order to “get through the storm.” The safest sequence may be to protect the opening while preserving access, move the material to a dry location, install a qualified temporary brace, request an inspection, or stop the work. The release should state which condition remains open and why the builder accepts or rejects the pause.
6. Complete the temporary-weather-protection shutdown release worksheet #
The temporary-weather-protection shutdown release worksheet is a structured handoff, not an official inspection form. Complete it with the builder or site supervisor, using one row per opening, water path, material group, product clock, hazard, inspection hold and restart task. A blank or “not checked” row is not a pass.
Temporary-weather-protection shutdown release worksheet
Project identity
| Field | Entry |
|---|---|
| Project address and jurisdiction | |
| Permit number and inspection portal | |
| Homeowner | |
| Builder/site supervisor | |
| Qualified trades notified | |
| Last qualified person on site | Date/time: |
| Planned restart window | Date/time: |
| Maximum unmanaged exposure considered | Hours/days: |
| Forecast source and time checked | |
| Weather concern | Rain / wind / snow / freeze / heat / tropical or severe weather / other |
| Site-access rule after event | |
| Emergency contact and evacuation direction |
A. Stage and prerequisites
| Check | Record observation, owner and evidence | Result |
|---|---|---|
| Construction stage is stated in observable terms | Framing, sheathing, roof, WRB, windows, doors, rough-in, insulation, drywall and other installed work | Pass / correction / no release |
| Approved plans and current product manuals are available | Location or digital record; manual revision/date | Pass / correction / no release |
| Pause window is defined | Departure, earliest qualified return and worst-case access delay | Pass / correction / no release |
| Builder has named the release decision-maker | Name, role and phone | Pass / correction / no release |
| All active trades have reported exposed work | Trade, location and open item | Pass / correction / no release |
| Inspection holds are listed | Authority, inspection, prerequisites and next request | Pass / correction / no release |
B. Open-path inventory
| Location or ID | Water entry or collection path | Temporary control | Owner | Photo/record ID | Result |
|---|---|---|---|---|---|
| Roof plane / edge | |||||
| Valley / penetration / vent | |||||
| Wall elevation / sheathing seam | |||||
| Window rough opening | |||||
| Door / garage opening | |||||
| Service penetration | |||||
| Floor opening / stair / shaft | |||||
| Crawl space / foundation / slab edge | |||||
| Low point / drain / sump / pump | |||||
| Site grade / excavation / discharge |
For every row, describe what the water is supposed to do next. “Covered” is not enough. Write “water drains outside over the sill flashing to the west elevation,” “pump discharge runs to the approved outlet,” or “this opening remains accessible for the scheduled rough-in inspection and has a builder-installed temporary closure.” If no one can describe the next destination, mark the row for correction.
C. Materials and condition
| Material or area | Exposure or condition observed | Measurement or manual criterion | Storage/drying action | Responsible person | Result |
|---|---|---|---|---|---|
| Framing / sheathing | Moisture criterion, readings and locations | ||||
| Insulation | Dry/cure requirement | ||||
| Drywall / finish materials | Edges, elevation and visible condition | ||||
| Wet-applied product | Install time, cure time and manual | ||||
| Lumber / panels stored outdoors | Elevation, cover and air circulation | ||||
| Adhesives / sealants / tapes | Storage and temperature limits | ||||
| Doors / windows / equipment | Packaging and water damage check |
If using a moisture meter, record the material, instrument, settings, units, reading locations, date, time and person who interpreted the result. A row marked “dry” without that context is a visual opinion, not a useful restart record.
D. Exposure-clock register
| Product and location | Installed/exposed | Limit and what it measures | Pause-end margin | If exceeded | Owner |
|---|---|---|---|---|---|
| WRB / wall wrap | |||||
| Roof underlayment | |||||
| Temporary membrane or cover | |||||
| Sealant, tape or flashing | |||||
| Wet-applied product |
Write the actual manual limit, not a generic number. For Tyvek HomeWrap, the manufacturer’s listed 120-day UV limit is product-specific and does not mean an unfinished wall can remain unflashed or open for that whole period. For Quix Underlayment, the 60-day period is a UV-resistance statement, not a waterproofing, wind or snow duration, and GAF says the product is not a temporary roof. DuPont’s product information and GAF’s manual belong in the record for those named products only.
E. Hazard and access gate
| Hazard | Control or exclusion | Responsible employer/trade | Evidence | Result |
|---|---|---|---|---|
| Roof edge / leading edge | ||||
| Wall opening / window opening | ||||
| Stair, shaft or floor hole | ||||
| Temporary brace / shoring | ||||
| Ladder / scaffold / platform | ||||
| Standing water / mud / unstable ground | ||||
| Temporary electrical / generator / pump | ||||
| Loose material / falling object | ||||
| Chemical, fuel or contaminated water | ||||
| Unauthorized entry |
OSHA’s guidance is employer-facing, so the homeowner should record whether the builder has closed the site and who controls access, rather than create a private fall-protection system. OSHA’s residential fall-protection guidance supports treating wall openings, roof edges and floor holes as explicit rows.
F. Local inspection and permit hold
| Question | Answer for this project |
|---|---|
| Named authority having jurisdiction | |
| Current inspection sequence or quick sheet | |
| Last passed inspection | |
| Next required inspection | |
| Work that must stay visible | |
| Work that must not be covered | |
| Inspection request owner | |
| Corrections or reinspection needed | |
| Does temporary protection preserve access? | Yes / no, explain |
| Is any local consultation being mistaken for approval? | Yes / no, explain |
Use the Seattle, Portland or Tampa pages only if the project is actually in that jurisdiction, and then verify the current permit instructions. For another location, write the actual city, county, state or other authority instead of copying one of those sequences.
For the broader sequence after a hold, use the project’s restart procedure and permit record. The worksheet here remains the record for this particular weather pause.
G. Release and restart record
| Decision | Required entry |
|---|---|
| Release status | Release / conditional release / no release |
| No-release reason or open correction | Specific location and failed criterion |
| Responsible person | Name, role and phone |
| Correction deadline | Date/time or “before anyone leaves” |
| Evidence required | Photo, measurement, test, inspection result, manual review or written direction |
| Restart owner | Name and role |
| Restart comparison points | Same openings, roof edges, low points, materials and hazards as release walk |
| Escalation trigger | Water entry, movement, damage, wet material, missing control, power issue, authority direction or other |
| Builder sign-off | Signature/date according to project process |
| Homeowner receipt | Receipt of record, not approval of construction or safety |
The last line matters. A homeowner’s receipt can show that the record was delivered. It should not be phrased as an owner’s engineering approval, code inspection or guarantee that no damage will occur.
Originality brief
Current answers: Federal moisture and safety guidance, local inspection pages, storm checklists, cleanup instructions and product manuals answer separate parts of the problem.
Missing decision: Whether this unfinished new home can pause for a defined exposure window and restart with the same conditions verified, without hiding inspection holds or unsafe access.
Original contribution: The temporary-weather-protection shutdown release worksheet connects stage, forecast, open paths, drainage, materials, exposure clocks, hazards, local inspection holds, responsible trades, photos and restart ownership in one auditable handoff.
How it can be checked: A builder, homeowner and later restart owner can compare the same row IDs and photos, read the cited manuals and government pages, confirm the actual jurisdiction and permit, inspect the listed locations, and identify why every row passed, failed or remained open. The method is transparent and the inputs are recorded rather than presented as measured Brictale field data.
The worksheet’s method is: Record the construction stage, forecast window, open water paths, drainage, material sensitivity, product exposure clocks, hazards, responsible trade, photos, inspection holds, and restart checks; release only when every row has an owner, evidence, and a next action.
Its limitations are: This is an illustrative planning and handoff tool, not a weather guarantee, engineering approval, official inspection, remote sign-off, or substitute for the permit, approved plans, local authority, worker-safety program, or installed-product instructions.
7. Work the illustrative 24-hour and 72-hour pause example #
A 72-hour pause needs a larger release margin than a 24-hour pause because unmanaged exposure includes the planned pause, possible access delay, and correction or reinspection time. The following worked example is illustrative: it is a planning model, not a weather guarantee, engineering approval, measured field result or promise that a pause will be safe. Its purpose is to show how a longer pause changes the release gate even when the building does not change.
Example inputs
Assume a two-story wood-framed home in a U.S. jurisdiction not named in the example. The builder reports:
- wall framing complete;
- roof sheathing complete on the main roof, with one porch roof plane incomplete;
- WRB installed on three elevations, but two window openings remain open;
- rough plumbing and electrical started in portions of the first floor;
- no drywall installed;
- 12 sheets of drywall stored inside on pallets, 150 mm above the slab;
- framing visually dry in most locations, but the west wall sill and a lower roof-edge panel need readings;
- a temporary roof underlayment is installed on the main roof; the exact product manual must be checked;
- one floor opening remains near the stair; the builder controls the guardrail and access;
- a forecast window with intermittent rain, no stated guarantee of wind conditions, and possible site-access delay after the event.
The builder proposes a 24-hour pause. The homeowner asks whether the same release would support 72 hours.
Simple exposure calculation
Use this planning equation:
unmanaged exposure = planned pause + access delay + correction/reinspection time
For the 24-hour proposal, assume:
- planned pause = 24 hours;
- possible access delay = 6 hours;
- correction or reinspection allowance = 6 hours.
24 + 6 + 6 = 36 hours of planning exposure
For the 72-hour proposal:
- planned pause = 72 hours;
- possible access delay = 12 hours;
- correction or reinspection allowance = 12 hours.
72 + 12 + 12 = 96 hours of planning exposure
These are not weather predictions. They are the durations the release record should survive before a qualified person can correct a problem. If the temporary roof or wrap has a product clock with less remaining margin than the planning exposure, the row cannot pass. If the material is wet and needs drying, the drying time is a restart dependency, not a reason to hide the reading.
Sensitivity table
| Variable | 24-hour pause model | 72-hour pause model | Decision effect |
|---|---|---|---|
| Planned pause | 24 h | 72 h | Longer period increases reliance on durable closure and monitoring. |
| Access delay assumption | 6 h | 12 h | Site may remain unchecked after an event. |
| Correction/reinspection allowance | 6 h | 12 h | A failed row may prevent restart even after weather clears. |
| Planning exposure | 36 h | 96 h | Compare with actual product and material limits. |
| Open windows | 2 | 2 | Same openings, but more time for water entry and wind damage. |
| Unfinished porch roof | 1 plane | 1 plane | The same incomplete plane remains the dominant risk until corrected. |
| Indoor drywall | Elevated and covered | Elevated and covered | Must remain dry; longer pause increases consequence of a leak or slab moisture. |
| Restart inspection | One same-day walk if safe | Full repeat walk plus drying/inspection contingency | 72-hour plan needs a broader restart record. |
The model’s most important insight is not that 72 is three times 24. It is that unmanaged exposure, correction time and restart obligations grow together. A builder may be able to make a 72-hour pause acceptable by completing the porch roof, closing the openings with approved temporary measures, relocating the drywall, confirming drainage, and assigning a qualified monitor. Or the builder may correctly reject it because the building or product cannot support that exposure. The worksheet makes the reason visible.
Example release decision
For 24 hours, the builder might reach a conditional release only if all of the following are completed before departure:
- the porch roof is protected by an assembly and temporary measure selected by the roofing trade;
- both window openings have builder-installed closures that shed water and preserve required inspection access;
- the product manual, exposure date and remaining margin are recorded;
- the drywall is elevated, protected from direct water and moved if the closure could leak;
- the west sill and roof-edge panel have readings recorded against the project’s criterion;
- the stair opening and roof access are secured under the site safety program;
- the floor drains, pump and discharge route are identified and tested by the responsible person;
- the permit record shows what remains visible and which inspection is next;
- the builder names the restart owner and required evidence.
If a qualified person cannot complete those rows, the 24-hour proposal is not released. It may become a no-release decision or a different scope after correction.
For 72 hours, the same rows are not enough by themselves. The builder should also consider whether the weather system could exceed the temporary measure’s assumptions, whether the product exposure clock will be consumed, whether stored material can dry before restart, whether a pump has reliable power and a safe discharge, whether the site can be reached, and whether local inspection timing will change. A 72-hour pause that depends on a person climbing a wet roof during a storm is not a robust plan.
Example no-release branches
Branch 1: the roof cover is water-resistant but not a temporary roof. The product manual says the underlayment is not waterproof and not to use it as a temporary roof. The builder must use a different approved protective approach, complete more permanent roof work, or change the pause. The homeowner should not reinterpret the manual.
Branch 2: the west sill reads above the project criterion. The builder identifies drying, retesting and possible material assessment as a restart condition. The wall is not enclosed to make the reading disappear. If damage or structural impact is suspected, the builder obtains the appropriate qualified evaluation.
Branch 3: a window opening is closed but the inspection hold would be hidden. The closure is redesigned or the inspection is scheduled before closure. Portland’s local guidance shows why this sequence matters in Portland, Oregon; another jurisdiction may use a different process.
Branch 4: the homeowner sees a dry photo but the site is not safe to enter after a storm. The photo does not authorize entry. The builder follows the emergency plan, waits for authority or employer clearance, and conducts a safe assessment when permitted.
Branch 5: the pump has no reliable power. The row fails. The builder decides whether a qualified person can implement a safe backup, improve drainage, remove water exposure or change the plan. The homeowner does not connect a generator or enter a wet electrical area as an experiment.
8. Restart with a second release gate, not a quick visual tour #
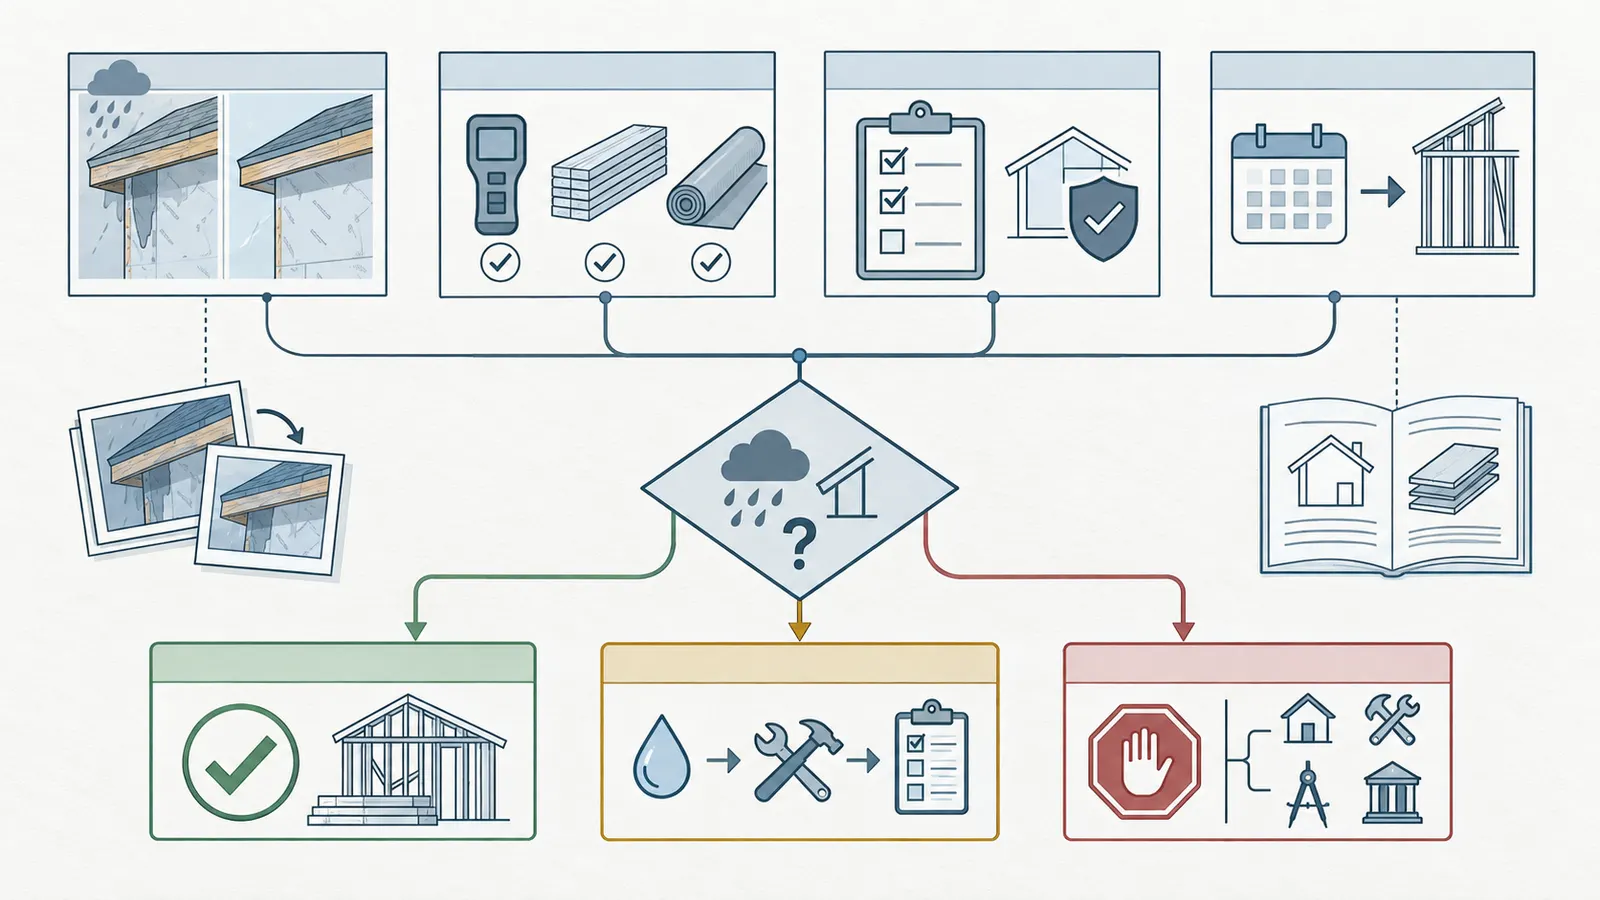
Restart is allowed only after a qualified responsible person confirms that the site is safe to access, the temporary controls remain in place or have been corrected, materials are suitable for the next work, and inspection and product requirements are still satisfied. A storm ending is not a restart approval.
Start outside and repeat the release route
Use the same route and identifiers from the shutdown record:
- Confirm local authorities, site emergency directions and the builder’s access authorization.
- Walk the perimeter from a safe ground-level position before entering.
- Look for displaced roof layers, lifted edges, missing panels, loose wrap, damaged closures, broken windows, leaning framing, standing water and new openings.
- Check whether water flowed where expected or bypassed a seam, sill, edge or penetration.
- Check pumps, drains, discharge, power, fuel and ground conditions through the responsible person.
- Enter only when the builder or employer says the site is safe and the route is controlled.
- Compare every open-path, material, product-clock and hazard row with the before-pause record.
- Photograph changes and record no-change observations without claiming that no hidden damage exists.
The first restart question is “what changed?” The second is “what must be verified before covering or resuming?” The third is “who is responsible for the next action?” If the answer to any is unclear, work pauses at that dependency.
Triage observed conditions
| Observation after pause | What it may mean | Safest next step |
|---|---|---|
| Cover is displaced or torn | Water path, wind damage or product failure may have occurred | Keep access controlled; builder or qualified trade assesses and repairs |
| Standing water or mud | Drainage, pump, ground stability or contamination issue | Do not enter until responsible person makes access safe; document depth/location without disturbing it |
| Wet framing, sheathing or insulation | Drying, material condition and enclosure decision required | Record readings and locations; keep open; follow PNNL, project and product criteria |
| New stain or odor | Possible water movement or material exposure, but not proof of hidden mold | Trace source; qualified builder/professional evaluates before covering |
| Damaged or swollen panel | Fit, fastening, bond or structural condition may be affected | Builder evaluates repair/replacement; do not conceal it |
| Exposed wire, wet electrical equipment or downed service | Shock, fire or electrocution hazard | Keep out; electrical professional or emergency utility response controls it |
| Leaning wall, shifted brace or damaged truss | Structural instability possible | Keep out and escalate to builder/design professional; no homeowner bracing |
| Guardrail or cover missing | Fall hazard and falling-object risk | Stop access; employer/site supervisor restores control |
| Product clock exceeded | Manufacturer’s stated property or installation condition may no longer apply | Use current manual and qualified trade decision; do not assume appearance proves performance |
| Inspection or permit result changed | Next work may be blocked or sequence may change | Permit holder contacts authority and records correction/reinspection |
EPA says that drying must be complete before rebuilding after water exposure, and PNNL advises against enclosing damp framing or insulation. These sources do not give the builder permission to declare a wall dry from a photograph. Use EPA’s drying guidance and PNNL’s enclosure guidance to support the question, then apply the actual project and product criteria.
Verify what can be covered and what cannot
Before the next trade resumes, the builder should reconcile four records:
- condition: what changed and what was wet, displaced, damaged or untouched;
- measurement: moisture readings, pump status, material inspection, test or other applicable evidence;
- authority: inspection result, correction, reinspection or design direction;
- sequence: what can proceed, what must remain open and who owns the next handoff.
Do not cover a wet cavity, failed inspection, untested rough-in, damaged sheathing, unverified flashing or unresolved structural movement. Do not treat a successful temporary cover as proof that the permanent roof, wall or window installation is complete. The restart record should retain the reason for any repair, the actual product or material used, the responsible person and the next inspection or verification.
Handoff back to the homeowner
The builder’s handoff can be concise but should answer these questions:
- Was the site released for work, conditionally released or held?
- What locations were checked, and when?
- Which source documents, manuals, plans or local inspection instructions controlled?
- What photos, readings, tests or inspection reports are attached?
- What damage or moisture was found, if any?
- What remains open and who owns it?
- What work is authorized next?
- What must remain accessible?
- What should the homeowner not do or enter?
- When is the next decision or inspection?
The homeowner should store this record with the construction log, not in a separate storm folder that future trades cannot find. It becomes useful later when a wall is enclosed, a finish defect appears, a warranty question arises, or a future owner asks what happened during an unfinished period. It does not replace the contract, permit file, inspection record, warranty or professional evaluation.
Final release rule
Release the pause when the builder can point to a complete record and say, for every material row: what is installed, what exposure it is expected to withstand, where water goes, what hazard is controlled, what inspection remains, who owns the next action, and what evidence will be checked at restart. If one of those answers is missing for a consequential condition, the correct next decision is correction or qualified escalation—not homeowner approval by optimism.
Temporary weather protection is a time-bounded construction control. It protects a stage of work while the project moves to the next handoff. Permanent weather-tightness, structural adequacy, code compliance and safe worker access remain separate decisions made by the people and authorities responsible for them.
Cite this guide
Brictale. “How to Verify Temporary Weather Protection Before a New-Home Construction Shutdown.” Published 2026-09-25; updated 2026-09-25.
https://brictale.com/build/construction/verify-new-home-temporary-weather-protection-before-shutdown · Read the Markdown version
Original contribution: Temporary-weather-protection shutdown release worksheet. A source-linked record for deciding whether a framed or partly enclosed new home can pause safely, what must be corrected first, and what evidence the builder should hand back before restart.
Sources and scope
Evidence behind this page
- EPA's Moisture Control Guidance covers site drainage, foundations, walls, roof and ceiling assemblies, plumbing, HVAC, and methods for verifying implementation during design, construction and maintenance.
Moisture Control Guidance for Building Design, Construction and Maintenance
U.S. EPA guidance for building professionals; used here to support a whole-building verification record, not a site-specific approval or code determination.
Accessed · Link to this claim - EPA says materials should be completely dry before refinishing or replacing walls and flooring after water exposure to help prevent mold and loss of structural integrity.
U.S. EPA flooded-home recovery guidance; applied conservatively to restart and enclosure decisions after a construction weather event, not as a measurement protocol.
Accessed · Link to this claim - PNNL's Building America Solution Center says not to install drywall over damp framing or insulation and identifies lumber moisture content of 18% or less as the ENERGY STAR recommendation before enclosure; it also says to follow product drying and curing instructions.
Building Materials with High Moisture Content Not Enclosed
PNNL/DOE Building America guidance for checking wall materials before enclosure; 18% is presented as a recommended benchmark, not a universal acceptance criterion for every material or jurisdiction.
Accessed · Link to this claim - PNNL recommends visually inspecting materials, keeping them off the ground, protecting outdoor bundles from weather while allowing air circulation, and not installing materials with visible water damage or mold.
No Visible Signs of Water Damage or Mold on Materials
PNNL/DOE Building America job-site material handling guidance; product-specific storage instructions and builder quality procedures still control.
Accessed · Link to this claim - OSHA's residential construction guidance addresses fall protection for workers six feet or more above a lower level and describes hazards at wall openings, floor openings, roof edges and other unprotected sides; the guidance does not itself create new legal obligations.
Fall Protection in Residential Construction — OSHA Guidance Document
U.S. OSHA employer guidance for residential construction; the builder/employer must determine applicable OSHA or state-plan requirements and control site access.
Accessed · Link to this claim - OSHA's confined-spaces-in-construction overview identifies crawl spaces among examples of confined spaces and says these spaces can present physical and atmospheric hazards that should be addressed before entry.
Confined Spaces in Construction - Overview
U.S. OSHA construction safety overview; used to set a no-homeowner-entry boundary and to route any required entry assessment to the responsible employer or qualified professional, not as a site-specific hazard classification.
Accessed · Link to this claim - The City of Miami Beach, Florida construction-site hurricane guidance gives a local example of assigning a weather monitor, securing loose materials, covering materials, using pumps and drying equipment, documenting contacts and plans, and evacuating when authorities direct.
Building Hurricane Preparedness for Construction Sites
City of Miami Beach, Florida guidance for construction sites and hurricanes; it is a named local example, not a nationwide rule or a substitute for the project's emergency plan.
Accessed · Link to this claim - Seattle, Washington residential inspection quick sheets list structural inspection before covering outside sheathing, framing inspection before insulating or covering framing, and final inspection after construction and related permits are complete.
Residential Inspection Quick Sheets
City of Seattle, Washington residential inspection sequence; the project's permit, approved plans and current city instructions control.
Accessed · Link to this claim - Portland, Oregon says permitted work should not be covered without inspection, requires rough trade inspections before the framing inspection, and states that weather protection must be provided before insulation; its structural frame sequence includes roof, wall and floor sheathing plus windows and doors.
Residential Inspections: The Start-to-Finish Guide
City of Portland, Oregon residential inspection guidance; consultation is not approval and project-specific inspection requirements may differ.
Accessed · Link to this claim - The City of Tampa, Florida says wall and roof sheathing is inspected before dry-in and its listed framing inspection includes a weather-tight building, dried-in roof, installed windows and doors, approved plans, and completed tested concealed systems; it notes the list may not include every inspection.
City of Tampa, Florida common residential inspection list for one- and two-family dwellings; not a complete permit-specific checklist or national rule.
Accessed · Link to this claim - DuPont lists a 120-day UV exposure limit for Tyvek HomeWrap and says that if the limit is exceeded, the WRB can require an added layer or replacement integrated with window and door flashing; adding a layer reduces permeability.
DuPont product-specific information for Tyvek HomeWrap, Tyvek StuccoWrap and Tyvek DrainWrap; the installed product, edition of instructions and project details control.
Accessed · Link to this claim - GAF's Quix Underlayment instructions state that Quix is water-resistant rather than waterproof, has a 60-day UV-resistance exposure period, must be covered by shingles within that period, and must not be used as a temporary roof to protect property or possessions.
Quix Underlayment — Installation Instructions
GAF/Quix product instructions for the named underlayment; do not generalize the 60-day clock to another roof product or treat it as a wind, snow or waterproofing rating.
Accessed · Link to this claim - GAF's Quix instructions warn that underlayment can retard vapor movement and create condensation risk, direct a design professional to address moisture entrapment and ventilation, and specify product installation details such as fastener type, depth and flush placement.
Quix Underlayment — Installation Instructions
GAF/Quix product instructions; the article uses this to require manual review and qualified design or trade input, not to prescribe a universal roof assembly.
Accessed · Link to this claim