How to Verify New-Home Stucco Lath, Weather Barrier, and Weep Screed Before Plaster
A homeowner release check for stucco WRB, flashing, drainage, weep screed, lath, local inspection, corrections, and the plaster handoff.
The short answer
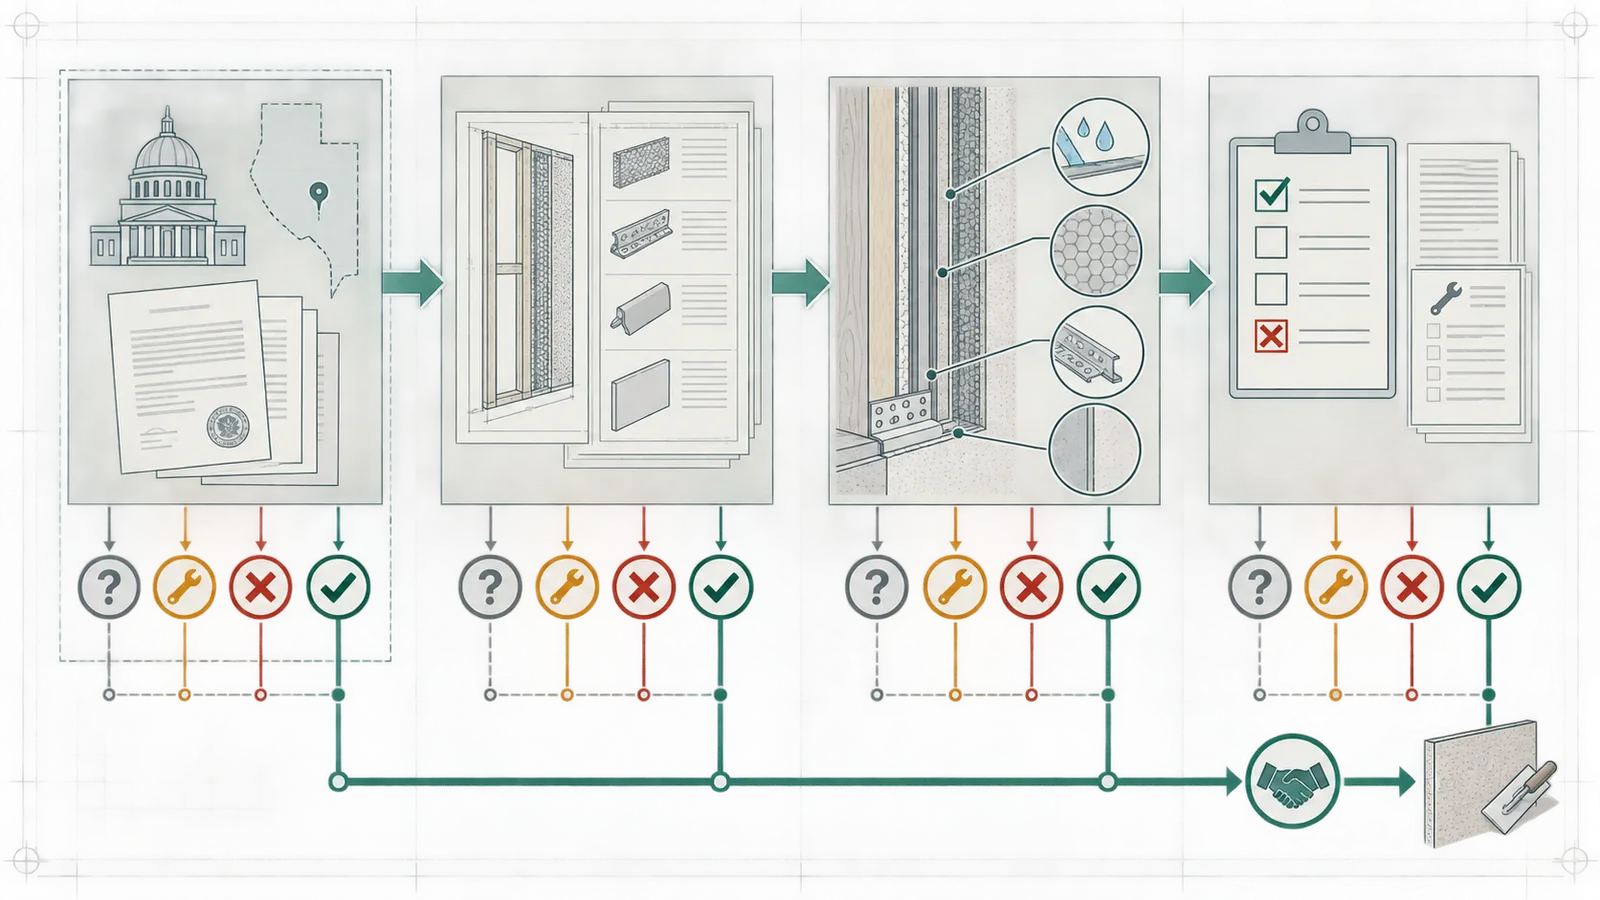
Allow plaster to proceed only after the approved assembly is identified, the WRB-to-flashing-to-weep-screed drainage path is visibly continuous, lath and accessories match the approved details, and the authority having jurisdiction has released the required inspection. Record photos, open corrections, responsible trades, and the next handoff. If anything is concealed, damaged, or jurisdictionally unclear, pause the plaster handoff and ask the builder or design professional to resolve it.How to Verify New-Home Stucco Lath, Weather Barrier, and Weep Screed Before Plaster
Allow exterior plaster to proceed only when the approved stucco assembly is identified, the visible water path from WRB through flashing, drainage space and weep screed is continuous, lath and accessories match the approved details, and the authority having jurisdiction has released the required inspection. Record the result, photos, open corrections, responsible trade and next handoff. If a critical layer is concealed or damaged, pause plaster and escalate to the builder or design professional.
The release decision is “ready for this jurisdiction’s handoff,” not “looks covered” #
The wall is ready for a plaster handoff only when four separate questions have documented answers: which jurisdiction and adopted code apply; which approved or listed wall assembly is being installed; whether every moisture-management and lath checkpoint that must remain visible is complete; and whether the required local inspection has actually been released. A clean-looking wall can still fail the decision if a window transition cannot drain, a fastener missed framing, the weep screed is too low for the approved detail, or the permit calls for an inspection that has not occurred.
This guide is for a homeowner managing a permitted new conventional wood-framed home in the United States with Portland-cement stucco or a listed synthetic-stucco system. It covers what you can identify, photograph, measure and record from a safe location. It does not perform structural engineering, approve a product substitution, sign an inspection remotely, or predict what an inspector will do. The builder, stucco contractor, window installer, design professional, building official and product manufacturer retain their respective responsibilities.
The most useful release status is not a binary “good” or “bad.” Use one of these four states:
| Release state | What it means | What happens next |
|---|---|---|
| Not ready—information missing | The jurisdiction, adopted code, approved assembly, product revision or inspection type is not identified. | Builder or design professional supplies the controlling documents before a field release is attempted. |
| Not ready—correction required | A visible installation does not match the approved detail, manufacturer instruction or local checkpoint, or a required transition cannot be verified. | The responsible trade corrects the work; the builder records the correction and provides new evidence. |
| Inspection pending or failed | The work may be physically complete, but the required local inspection has not been released or has an open correction. | Keep the wall open, follow the authority’s reinspection process and do not let plaster cover the checkpoint. |
| Released for plaster handoff | The local result is recorded, visible checks are complete, corrections are closed, and the next trade accepts the handoff. | Stucco contractor proceeds under the approved sequence and weather/curing requirements. |
The baseline is useful, but it is not a universal permit. The 2024 International Residential Code Chapter 7 reference describes exterior wall-covering, weather-resistant-envelope, WRB, flashing and exterior-plaster provisions. The code edition adopted for your permit may differ, and a jurisdiction may amend it. Treat the IRC as a question source until the permit, approved details and local inspection card establish what applies.
Do not treat an inspector’s release as a warranty of future leak-free performance. An inspection is a point-in-time regulatory checkpoint. Your record should still preserve the assembly identity, photos and responsible-trade sign-off because later siding, trim, decks, roof work or service penetrations can disturb the drainage path. Conversely, do not treat a contractor’s photograph as an inspection approval. It is evidence of what was visible at one time, not an official release.
The homeowner’s safest role is coordination and observation: collect the permit and details, ask for the product and revision, compare visible work with the documents, take photographs from the ground or an approved access area, and keep the plaster handoff conditional. The homeowner should not climb an unguarded scaffold, walk a roof, remove lath, pull fasteners, cut the WRB, test structural attachment or direct a worker’s fall-protection method.
Confirm the jurisdiction, adopted code, assembly, and inspection checkpoint first #
Before anyone calls the wall ready, make a one-page control record containing the permit number, site jurisdiction, adopted code edition, approved stucco or synthetic-stucco detail, product names and revisions, responsible trades, and inspection names or codes. This prevents a common failure: applying a plausible checklist from a different city, climate, permit type or product system to the wall in front of you.
Start with the authority having jurisdiction
The actual jurisdiction may be a city, county, special building department or another delegated authority. “California,” “Colorado,” or “the IRC” is not specific enough for the inspection decision. Record the authority’s name and the site address, then open the permit record or inspection signature card. Ask the builder or permit holder:
- Which code edition and amendments are listed on this permit?
- Is this an exterior lath inspection, a moisture-barrier or dry-in inspection, a combined inspection, or another local name?
- Which work must be installed before the inspector arrives?
- Which work must remain visible afterward?
- What is the inspection result, correction number, reinspection status and release date?
- Does the permit require a separate inspection for sheathing, WRB, lath or stucco?
The answer is jurisdiction-specific. In unincorporated Douglas County, Colorado, the county’s inspection page lists a Weather Resistive Barrier checkpoint as IVR Code 132. Its description calls for house wrap, air barrier or suitable film to follow manufacturer recommendations, including overlaps, inside corners and taping, with penetrations sealed and window and door flashing installed to the manufacturer’s specifications. The same page tells the permit holder to use the inspection signature card for the complete list because some typical inspections may not apply and other inspections may be required. Record that scope as a Douglas County example, not a national rule: Douglas County building inspections.
Douglas County separately lists Exterior Lath as IVR Code 33, performed before stucco or synthetic stucco. The county says building paper, lath and all flashing, including weep screed, are installed before that inspection. A Douglas County homeowner should therefore not assume that a passed WRB inspection alone releases plaster; the permit record may still require the exterior-lath checkpoint. Cite the county’s Exterior Lath description in the project record and write the actual inspection outcome, not merely “called in.”
Other local sequences demonstrate why this matters. The City of Tampa’s residential siding and stucco guide lists a combined BLD-Stucco/Dry-In/Lath inspection and a final inspection. The City of Sacramento’s housing construction guide says a conventional wood-frame project may require a miscellaneous Stucco Lath inspection before final inspections and occupancy. Neither page changes a Douglas County permit or any other authority’s permit. Together, they prove the practical point: record the local checkpoint that controls your permit. For the broader dependency sequence around permits, inspections and handoffs, continue with Brictale’s construction decision guides.
Identify the actual wall assembly
“Stucco” is a finish description, not enough information to verify the wall. Request the wall section, exterior elevations, window and door details, penetration details, base-of-wall detail, control-joint layout, product data, evaluation report or listing if applicable, and the stucco contractor’s scope. Mark the exact assembly used at each condition:
- Wood structural sheathing or another substrate.
- Air or moisture barrier, if the selected system includes one.
- One or more water-resistive barrier layers.
- Flashing at openings, wall bases, roof-to-wall intersections, decks and penetrations.
- Drainage mat or other required drainage space.
- Weep screed and other base termination components.
- Metal lath or listed alternative, fasteners and accessories.
- Portland-cement stucco or listed synthetic-stucco coats.
The order may change by system. A manufacturer’s guide specification can describe one acceptable system while another listed system uses different products, laps, fasteners or drainage components. For example, Sto’s StoPowerwall DrainScreen MVES guide specification describes a portland-cement stucco/adhered-masonry-veneer assembly with air/moisture barrier, WRB and drainage mat. It is not permission to substitute that assembly for the one in your permit.
Record product identity as a controlled input: manufacturer, product name, lot or batch if provided, technical data or evaluation-report number, document revision date, and the installer’s current instruction set. A later revision can change a detail or allowable accessory. If the installed product does not match the approved submittal, stop at the document-control question. Ask the builder and design professional whether the substitution is approved and whether the authority must review it before concealment.
Define the boundary of homeowner verification
The homeowner can verify the presence of documents, visible continuity, photographs, labels, local inspection results and open corrections. The homeowner cannot reliably infer from a photograph that a nail penetrated framing, that a flashing membrane is compatible with a window flange, that a product has the required drainage efficiency, that a wall meets wind design, or that an inspector will approve concealed work.
Use three labels in your notes:
- Observed: directly visible from a safe location, such as an intact lower WRB lap or an unobstructed weep opening.
- Documented: supported by a permit record, approved drawing, manufacturer instruction, product label, inspection result or responsible-trade statement.
- Professional confirmation required: a question that depends on engineering, code interpretation, concealed attachment, compatibility, product listing, or an official inspection.
That vocabulary prevents overclaiming. “I saw the paper” is not the same as “the wall complies.” “The contractor said it is fine” is not the same as “the local inspection is released.” The release worksheet should contain both kinds of evidence and identify the gap.
Trace one continuous drainage path from the wall top to the weep screed #
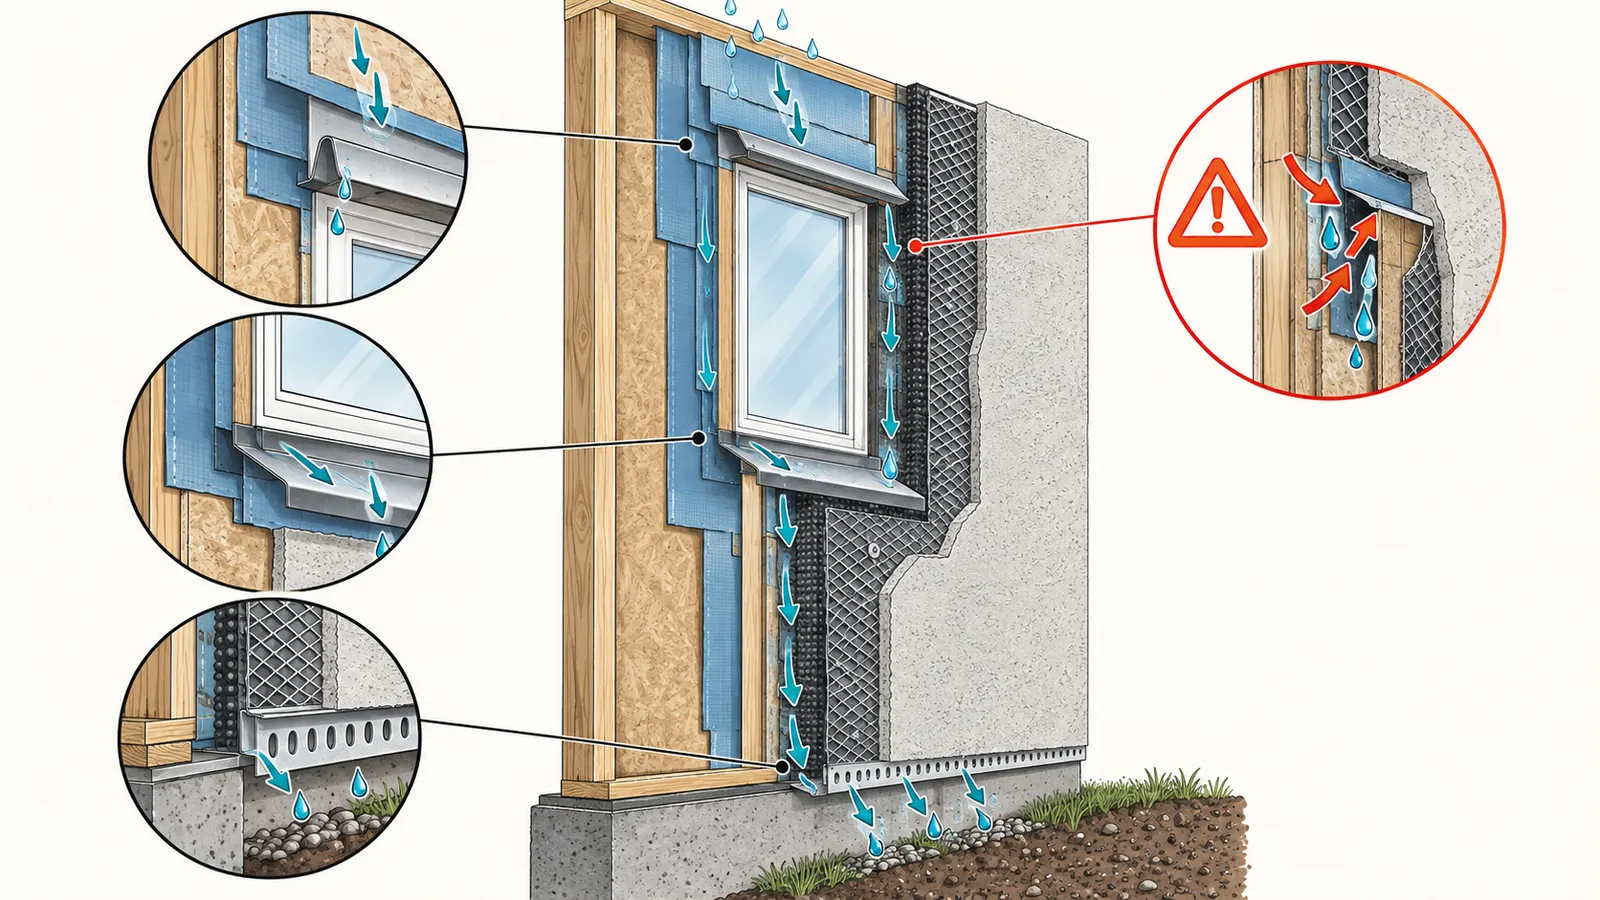
The moisture check is ready only when you can explain, in the approved assembly, how incidental water at a crack, opening or penetration gets to the exterior without being redirected into the wood framing. Check the path in the direction water should travel: upper wall and roof intersections, windows and doors, penetrations, horizontal transitions, drainage space, lower wall and weep screed. “The paper is there” is not enough; the layers must be integrated.
The building-science principle is simple. The U.S. Department of Energy Building Science Education water-managed-wall guidance says a water barrier should drain water away from the wall, describes lapping housewrap over flashing at doors, windows and wall bases or tops, and calls for an additional bond-break drainage-plane layer behind stucco and nonstructural masonry cladding. That principle is the inspection question: can water move down and out at every transition?
Begin at the substrate without disturbing it
The sheathing or other substrate should match the approved wall section and be in a condition that the system permits. Look for missing panels, damaged edges, unapproved openings, wet or visibly deteriorated areas, exposed fasteners, and service penetrations that were added after the approved details. Do not probe or remove material to create your own test. Photograph the condition and send the question to the builder or design professional.
For a wood-framed home, the substrate is part of a larger assembly. It is not a substitute for the WRB. Conversely, a continuous WRB cannot correct a structural sheathing or framing problem. If the wall is out of plumb, flexes unusually, has an unresolved framing correction or has a missing shear inspection, route that issue to the builder and design professional before evaluating plaster readiness. The assigned decision here is envelope and lath release; it does not authorize structural sign-off.
Verify the WRB layers and shingle laps
Read the approved detail first, then inspect visible laps. A typical paper-based layer should shed water from upper courses over lower courses. At a vertical transition, the upper layer should not create a funnel toward the wall. At a base, the drainage layer should terminate in a way that leads to the exterior through the approved weep-screed assembly. At an opening, the flashing and WRB should be integrated rather than simply placed beside each other.
Do not convert a manufacturer’s typical dimensions into a universal code rule. Sto’s guide specification says its sheet WRB is lapped over a foundation weep-screed attachment flange, floor-line flashing and window or door head flashing. It gives typical paper laps of 2 inches horizontally and 6 inches vertically, while expressly noting that code requirements may vary. Read the Sto WRB sequencing section with the exact product and approved detail in hand.
Local checklists and manufacturer instructions may use different lap dimensions or describe different assembly conditions. That is not necessarily a contradiction; it shows why the project’s adopted code, approved assembly and manufacturer instruction must be reconciled. Record which source controls your installation and ask the builder to resolve any difference before the wall is covered. Never select the most convenient dimension from two sources.
Check openings, roof lines, decks, and service penetrations as transitions
Brictale inspection-prioritization recommendation: start with transitions before scanning the broad field of the wall, because a transition check can reveal a missing handoff between otherwise separately installed layers. Make a location list before the inspection walk:
- Every window and exterior door, including unusual shapes and grouped openings.
- Head, jamb and sill conditions, including pan flashing or the approved equivalent.
- Hose bibs, gas vents, electrical conduits, HVAC lines, dryer vents, exterior lights, cable penetrations and other pipes or boxes.
- Roof-to-wall intersections, step flashing, kick-out flashing, parapets and wall caps.
- Deck ledgers, balconies, porches, roof projections and floor-line transitions.
- Chimneys, masonry returns, dissimilar substrates, changes in height and changes in plane.
- Wall bases, garages, slab edges and raised foundations.
At each location, ask where water enters the visible drainage plane and where it exits. If the answer requires water to flow uphill, behind a head flashing, through an unsealed cut, into a discontinuity in the mat, or behind the wrong layer, the path is not ready for release. The Building America common-flashing guide describes head flashing as directing water away from openings with positive slope and lateral extension. It also states that flashing at penetrations should direct water out over the cladding or drainage plane without openings that turn water back into the wall.
At a window, do not use a single photograph to claim that the entire transition is correct. Photograph the sill, jamb, head, adjacent WRB and any drainage mat or accessory from multiple angles. Ask who installed the window, who installed the flashing, and who owns the stucco transition. If the window manufacturer’s instructions govern the flashing, keep that document with the release record. Sto’s guide says windows and doors are typically installed after the air/moisture barrier and that the window manufacturer should be consulted for head, jamb, sill flashing and perimeter sealant requirements. That is a sequencing instruction for Sto’s system, not permission to ignore the actual window instructions.
Verify the lower edge and weep-screed relationship
At the base of the wall, verify that the selected weep screed is the approved component, is secured to the intended substrate, has an unobstructed path for drainage, and sits at the elevation required by the adopted code, approved detail and local checklist. Do not measure from an arbitrary temporary pile of soil or unfinished paving and call the result permanent; record the reference surface and whether final grade is established.
Sto’s guide specification describes a foundation weep-screed nosing at least 4 inches above earth grade and 2 inches above finished paved surfaces, and says the WRB and drainage mat lap over the attachment flange. Those are system-specific instructions, not a national promise that every home uses those exact numbers. Compare them with the permit, adopted code, local inspection instructions and selected system.
Measure the same location twice if the reference is changing. One measurement can be from the bottom of the weep-screed nose to the observed earth or concrete; the second can be from the attachment flange or another datum shown on the detail. Write both the location and datum. A number without its reference surface is not reproducible.
Look for common drainage obstructions: stucco or mortar packed into the weep opening, WRB folded over in a way that blocks discharge, drainage mat cut short above the opening, sealant bridging the exit, soil or concrete placed too high, and accessories that close the path. Do not clear an obstruction yourself if doing so would damage the WRB or lath. Photograph it, mark the grid location and assign it to the stucco or responsible trade.
Verify drainage space, lath, accessories, and attachment as separate checks #
The lath release is complete only when the drainage space, lath orientation, overlaps, fasteners, accessories and joints are checked independently. A visible metal mesh field can hide a missing drainage layer, a cut WRB, a wrong fastener or a control-joint discontinuity. Treat each as a separate row in the record, and use the product’s instructions and approved detail rather than a generic photograph of another stucco house.
Confirm the drainage space or mat belongs to the system
First identify whether the approved assembly uses two WRB layers, a drainage mat, a drainage space, a non-water-absorbing layer, foam sheathing or another listed approach. Then verify its continuity and direction. If the wall is in a climate or jurisdiction with an additional drainage requirement, record the exact requirement and the product or assembly evidence used to meet it.
The 2024 IRC reference describes different stucco WRB approaches for dry climate zones and moist or marine climate zones, including drainage-space or drainage-material options. It therefore supports the need to identify climate zone and adopted code, not an assumption that one paper layer or one mat works everywhere. See the IRC exterior-plaster and WRB provisions, then reconcile them with the local code and approved assembly.
For Sto’s DrainScreen MVES example, the guide lists nominal 6 mm and 10 mm drainage mats and says some jurisdictions require the 10 mm option. Its installation section places the mat over the air/moisture barrier, starts at base flashing or weep screed, shingle-laps it over flashing, avoids fastening through flashing, trims around penetrations and calls for prompt lath and stucco coverage. Use the Sto drainage-mat instructions only for a matching Sto assembly and revision.
The homeowner can observe whether the mat exists, whether its fabric faces the specified direction where visible, whether it reaches the base and whether it is interrupted at a penetration. The homeowner cannot establish drainage efficiency by looking at it. If the listing, evaluation report or local code requires a tested drainage efficiency, obtain the product documentation and ask the builder or design professional to confirm that the installed product is the listed one.
Check lath direction, laps, and fastening without inventing an engineering test
Confirm the lath type, weight or designation, corrosion protection, orientation, side laps, end laps, edge conditions, fastening pattern and relationship to framing. Check that the lath terminates at control or expansion joints when the system requires discontinuity, that it is not bridging a movement joint in a way the detail prohibits, and that corners are reinforced as specified.
The Sto guide’s example calls for diamond-mesh metal lath conforming to ASTM C1063, with the long dimension at right angles to structural framing. It gives minimum side and end overlaps and a system-specific fastener pattern, then warns that the selected fastener, layout and withdrawal value must be verified against design wind loads and local code by the project engineer or architect. It also warns that fasteners through the WRB should land in framing supports and that fastening methods must not damage the air or water barrier. Review the Sto lath section.
Your authority’s checklist may turn lath laps, attachment, corner reinforcement and joint treatment into observable inspection items. Use those local instructions as the controlling checkpoint for the actual permit, not as a universal specification for a different assembly. If the checklist, approved detail and product instructions disagree, keep the work open and route the conflict to the builder, design professional or building official.
Do not perform a pull-out test, remove a fastener, bend the lath or cut the WRB to investigate. Those actions can damage the assembly and may create a new correction. Instead, use the installer’s installation record, the approved fastening schedule and photographs taken before lath concealed the substrate. If a fastener appears to miss framing, if the pattern differs from the detail, or if the wall uses a different lath than the submittal, assign professional confirmation.
Check beads, joints, terminations, and dissimilar materials
Accessories are part of the water and movement strategy, not decorative trim. Verify casing beads at stucco terminations, corner beads or corner reinforcement, control or expansion joints, stop ends, transitions at windows and doors, and joints at dissimilar materials. Ask where each accessory’s flange sits relative to the WRB and drainage path. A bead installed in front of a torn barrier or a joint that interrupts lath but not the moisture layer is not a complete detail.
Sto’s guide calls for casing beads at doors, windows and other through-wall penetrations and expansion joints or back-to-back casing beads at changes in substrate, building height, floor lines, columns and cantilevered areas as directed by the architectural drawings. It also says moisture protection must remain continuous behind joints and accessories. See the Sto accessory sequence.
Compare the installed joint layout with the approved elevation, not with a rule of thumb. Joint spacing, panel geometry and substrate changes can be design-specific. If a joint is missing, moved or cut through a window transition, record its location and route it to the design professional or qualified stucco professional. Do not ask the plaster crew to “make it work” after the lath inspection unless the correction is documented and accepted by the responsible parties.
Use a visual grid rather than a wandering walk
Divide the exterior into elevations and grid references: north A1-A4, east B1-B4, south C1-C4, west D1-D4, or another clear system. Create an opening and penetration index. For every row, record the observation, source document, photograph numbers, responsible trade, status and next action. This keeps a broad field of intact lath from distracting you from one failed sill, roof intersection or service penetration.
At minimum, take one establishing photograph per elevation, one photograph per opening or penetration, close-ups of the base and weep screed at representative locations, close-ups of laps and accessories, and photographs of every correction before and after repair. Include a scale only when it can be placed without touching or damaging the wall. A ruler in a photograph is a visual aid, not an official measurement or compliance certificate.
Coordinate the inspection, handoffs, and responsibility before plaster is scheduled #
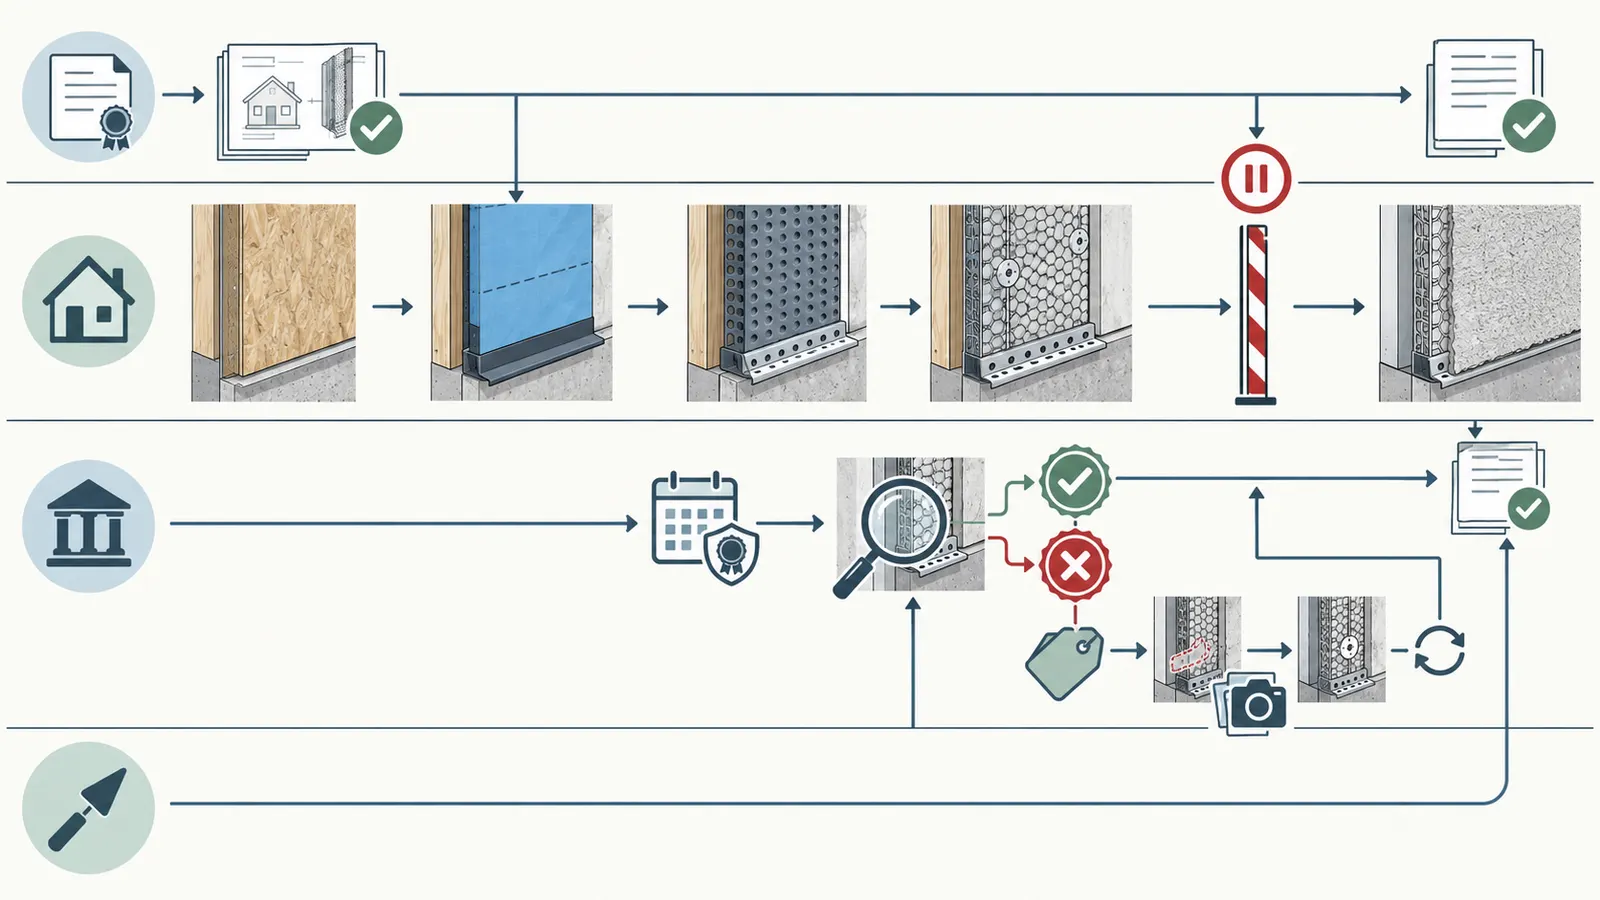
The responsible handoff is from the party that installed and documented the visible assembly to the authority that performs the required inspection, then to the stucco crew that will conceal it. The homeowner should not become the inspector of record. Make the handoff explicit: builder or permit holder schedules the inspection; the authority records the result; the responsible trade corrects any defect; the builder closes the correction; and the stucco contractor confirms it will not cover open work.
Map the sequence of work
A typical dependency sequence for a conventional wood-framed stucco wall is:
- Approved framing, sheathing and relevant structural or rough inspections are complete.
- Openings, roof-to-wall conditions, decks and service penetrations are installed or coordinated.
- Air/moisture barrier and WRB layers are installed with approved flashing integration.
- Drainage mat or required drainage space is installed.
- Weep screed and base transitions are installed at the required elevation and integrated with the lower layers.
- Lath, casing beads, corners, joints and other accessories are installed.
- The local inspection or inspections are scheduled while required work remains visible.
- Corrections are assigned, repaired and re-inspected where required.
- The release record is closed and the plaster trade accepts the handoff.
- Stucco coats, curing, protection and later finish work proceed under the approved product sequence.
That sequence is a coordination model, not a national inspection schedule. Sto’s guide, for example, says the drainage mat should be followed immediately by lath installation and calls for cover by stucco within 30 days in that system. It also says the air/moisture barrier should be protected promptly and not remain exposed more than 180 days in that guide. Those are manufacturer instructions for that product system; climate, site conditions and a different listed system may change the timing. The Sto guide specification should be attached to the actual submittal record.
The inspection sequence can be grouped, separated or named differently locally. Douglas County lists WRB and exterior lath as separate example checkpoints. Tampa lists one combined stucco/dry-in/lath checkpoint. Sacramento describes stucco lath as an inspection that may apply within a broader conventional wood-frame sequence. Record the actual permit workflow and avoid telling a trade that a different city’s schedule is controlling.
Assign responsibilities using “install, inspect, correct, release”
| Task | Normal accountable party | Homeowner evidence to request | What the homeowner should not infer |
|---|---|---|---|
| Confirm permit, code and inspection type | Builder or permit holder | Permit, approved plans, inspection card, local result | A generic online checklist controls the project. |
| Provide wall section and product revision | Builder, design professional or stucco contractor | Approved detail, submittal, listing or manufacturer instruction | A product with a similar name is interchangeable. |
| Install WRB and flashing | Assigned envelope, window or framing trade under builder coordination | Installation record and photographs before concealment | A visible paper sheet proves every transition works. |
| Install drainage mat or drainage space | Stucco/envelope trade as specified | Product identity, direction and continuity photos | A mat automatically meets the local drainage requirement. |
| Install weep screed and base termination | Stucco/envelope trade | Elevation record, detail reference and unobstructed-drainage photos | One measurement at unfinished grade proves final clearance. |
| Install lath and accessories | Stucco/lath trade | Lath type, fastener schedule, joint layout and photos | A homeowner can prove framing penetration by sight. |
| Schedule inspection | Permit holder or builder | Inspection date, code/type, result and correction notice | “Inspection requested” means “inspection passed.” |
| Correct failed or uncertain work | Trade assigned by builder; design professional if detail changes | Before/after photos, written response and reinspection result | The next trade should cover an open correction. |
| Release to plaster | Builder after required releases; plaster contractor accepts scope | Closed worksheet and handoff acknowledgment | The homeowner can sign an official release. |
If a trade says another trade owns the correction, leave the row open but record the routing. Responsibility disputes are exactly why the worksheet includes a correction owner and next handoff. The homeowner can ask the builder to assign one accountable coordinator even when several trades contributed to the condition.
Define what “inspection passed” means in the record
Capture the authority, inspection type or code, date, result, inspector note if provided, correction notice number, reinspection date and release condition. “Passed with comments,” “partial,” “approved,” “not ready,” and “correction required” should not be collapsed into one checkbox. If the authority provides an online result, save the permit record or permitted project record according to the builder’s document-retention process. If the result is verbal, ask the permit holder how it will be documented in the official system.
For Douglas County, the inspection page says permit and inspection information is available through its building-services system and says the county’s inspection signature card controls the complete list. In any other jurisdiction, retain the applicable local guideline and permit result together. The homeowner should not represent a contractor’s internal quality-control sign-off as a government inspection.
Inspect and photograph from a safe boundary; do not turn the walkthrough into a work method #
The homeowner’s field review should happen from ground level or a platform that the builder has provided and controlled as a safe access area. Do not climb an unguarded scaffold, ladder, roof, framing member or window opening to reach a better angle. Ask the builder to provide safe access or ask the qualified trade to supply the close-up photographs and measurements.
OSHA’s residential-construction guidance states that workers 6 feet or more above lower levels generally need conventional fall protection or another permitted method, and it discusses scaffolds and aerial lifts for exterior finishing such as siding and stucco. The OSHA guidance is guidance for employers and workers, not a homeowner authorization to enter a work platform; OSHA also says the guidance itself is not a standard and creates no new legal obligations. Keep the boundary clear: the employer and qualified person select and manage the work method.
Use a safe observation protocol
Before the walk, tell the builder that your purpose is record review and coordination. Agree on the safe route, no-go areas, active work zones, overhead hazards, sharp lath edges, protruding fasteners, unstable ground, open trenches, temporary electrical equipment and chemical or sealant exposure. Wear site-required personal protective equipment when the builder permits you to enter. Keep children and unapproved visitors out.
From the safe boundary:
- Photograph the entire elevation with an identifier and date.
- Photograph the base, top, corners, openings and penetrations.
- Record what is visible and what is concealed.
- Measure only from the safe position and only where the builder permits it.
- Ask the responsible trade to expose no material solely for a homeowner check.
- Mark uncertainty as “professional confirmation required.”
- Request corrections in writing through the builder.
- Return after correction for photographs and the official result.
Sharp lath can cut skin and clothing; protruding fasteners can snag; wet stucco materials can irritate skin or eyes; and moving scaffolds, lifts and material handling create struck-by and fall hazards. These are reasons to use a controlled observation window, not reasons to improvise personal protective equipment or direct the crew. If you see an immediate unsafe condition, leave the area and notify the builder or site safety contact.
Keep photographs useful and honest
Use a file naming convention such as 2026-09-08_North_A2_window-head_before.jpg. In the worksheet, connect every important conclusion to a photograph number. Photograph the surrounding condition before a close-up so a future reader knows where it is. Include a ruler only as an illustrative scale, and write the actual measurement in the notes with the datum, instrument and person who measured it.
Do not crop out tears, overlaps, framing, accessories or the ground relationship. Do not label a photo “compliant.” Label it “observed—weep screed at north wall, 4 inches to observed earth, datum and finish grade unconfirmed.” That phrasing preserves the useful fact without making an engineering or legal conclusion.
The inspection record should also say what cannot be seen. Examples include “window sill flashing concealed by installed window,” “fastener penetration not visually verifiable,” “drainage mat continuity hidden behind lath,” or “final grade not established.” An honest gap is a release input. It is not a failure to complete the worksheet.
Use the Stucco Close-Up Release Worksheet to make the next decision reproducible #
The Stucco Close-Up Release Worksheet is the original contribution in this guide. It is a source-derived homeowner coordination worksheet, not an official government form. Method: The worksheet converts the 2024 IRC baseline, named local inspection guidance, manufacturer sequencing, building-science drainage principles, and OSHA fall-protection boundaries into observable checkpoints with an owner, evidence record, correction path, and next handoff. Limitations: It is an illustrative homeowner coordination tool, not an official inspection form, engineering review, remote sign-off, code interpretation, product approval, or promise that an inspector will pass the work. The permit, adopted code, approved plans, listed assembly, local inspector, design professional, and manufacturer instructions control.
Worksheet header and status legend
Print or copy this table into the project record. Complete one worksheet for each assembly or inspection release that the builder treats separately. Use O for observed, D for documented, P for professional confirmation required, C for correction open and R for released by the authority. A row may have more than one status.
Project: ____________________ Address: ____________________ Permit: ____________________
Jurisdiction: ____________________ Inspection authority: ____________________
Adopted code/edition: ____________________ Inspection type/code: ____________________
Date walked: __________ Builder coordinator: ____________________ Next trade: ____________________
| Row | Checkpoint | What to record | Status / evidence |
|---|---|---|---|
| 1 | Jurisdiction and adopted code | City/county/authority, permit number, code edition, amendments, climate or local condition used by the detail, inspection name/code | ____________________ |
| 2 | Approved assembly and product revision | Wall section, elevation/detail number, stucco or synthetic-stucco system, WRB, drainage product, lath, accessories, revision dates and listing/report | ____________________ |
| 3 | Substrate | Sheathing or other substrate, visible damage, openings, framing or structural questions routed to professional, related inspection result | ____________________ |
| 4 | WRB layers and laps | Layer count/type, horizontal and vertical laps required by the controlling source, inside corners, tears, fish mouths, cap or base transitions | ____________________ |
| 5 | Window and door transitions | Sill, jamb, head flashing, perimeter transition, WRB lap, manufacturer detail, photo numbers, installer and correction owner | ____________________ |
| 6 | Service penetrations | Pipe, conduit, box, vent, light, hose bib, HVAC and cable transitions; flashing/sealant/detail; photo numbers | ____________________ |
| 7 | Roof, deck and floor-line transitions | Step/kick-out or head flashing, ledger/balcony, floor-line drainage, wall-to-roof and wall-to-foundation continuity | ____________________ |
| 8 | Weep-screed elevation | Component identity, measurement, units, datum, observed earth/concrete/finish-grade condition, unobstructed opening | ____________________ |
| 9 | Drainage space or mat | Product and thickness if specified, direction, bottom start, shingle laps, cuts around openings, mat-to-flashing relationship, visible obstructions | ____________________ |
| 10 | Casing beads and control joints | Terminations, outside/inside corners, expansion or control joints, dissimilar substrates, approved locations and continuity behind accessories | ____________________ |
| 11 | Lath type and orientation | Product/type, corrosion protection, long dimension, termination at joints, edge and corner reinforcement | ____________________ |
| 12 | Lath laps and fasteners | Side/end laps, stagger, fastener type, spacing, framing penetration evidence, wire ties, damaged WRB or substrate | ____________________ |
| 13 | Local inspection result | Authority, date, inspector/record reference, passed/partial/correction, reinspection needed, official release condition | ____________________ |
| 14 | Photos and documents | Establishing photos, close-ups, file names, approved detail, product instruction, correction notice and inspection record | ____________________ |
| 15 | Correction owner | Exact location, defect or missing evidence, assigned trade, builder coordinator, due date, professional/design review if needed | ____________________ |
| 16 | Correction closeout | Before/after photos, written response, new measurement, replacement product or detail approval, reinspection result | ____________________ |
| 17 | Next trade and handoff | Plaster crew, accepted scope, documents transferred, weather/curing constraints, no open concealed-work items | ____________________ |
The rows deliberately separate “local inspection result” from physical checks. An inspector may focus on the adopted code checkpoint while the homeowner’s record also preserves manufacturer and coordination evidence. The worksheet does not authorize a homeowner to make the inspector’s decision; it makes the decision traceable.
Illustrative measurement example: record units, datum, and sensitivity
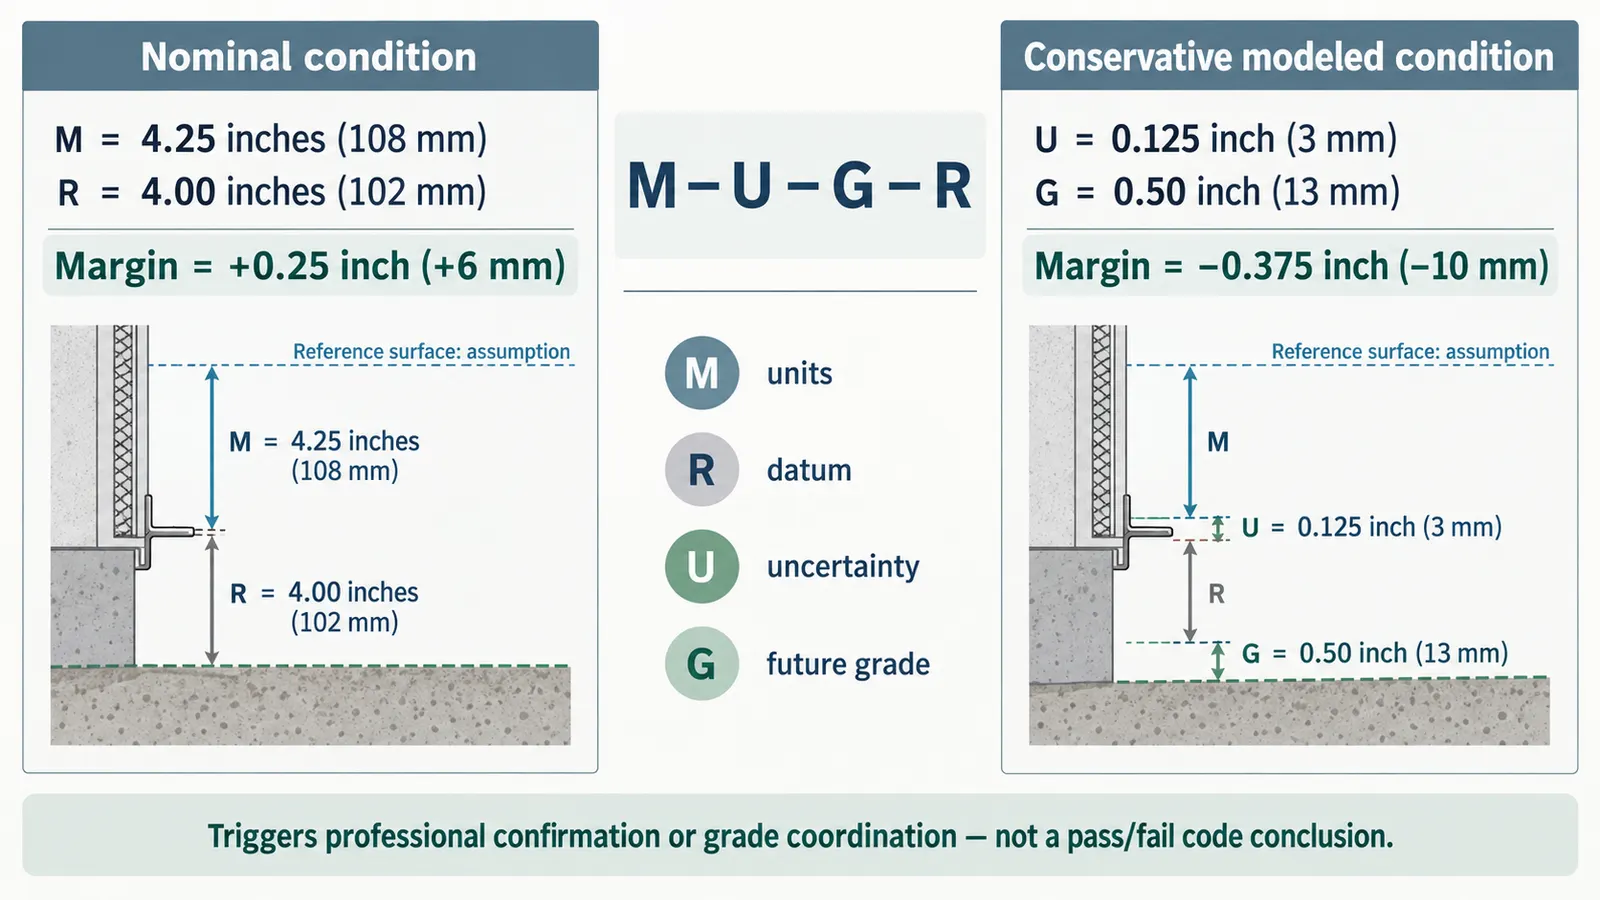
The following is a modeled, illustrative example, not a measurement from a real home and not a recommendation to use these values without checking the controlling documents.
Suppose the approved detail and applicable local checklist both call for the weep-screed nose to be at least 4 inches above observed earth at a location where earth is the controlling reference. The homeowner, standing at a safe ground position, observes a measured vertical distance of 4.25 inches from the bottom of the weep-screed nose to the current earth surface. The tape has a stated reading uncertainty of plus or minus 0.125 inch, and final grading may raise the surface by 0.50 inch.
Inputs:
- Required clearance, R = 4.00 in = 101.6 mm.
- Observed current clearance, M = 4.25 in = 107.95 mm.
- Illustrative measurement uncertainty, U = 0.125 in = 3.175 mm.
- Possible grade change, G = 0.50 in = 12.7 mm.
Current nominal margin:
Margin_current = M - R = 4.25 in - 4.00 in = 0.25 in0.25 in × 25.4 mm/in = 6.35 mm
Conservative margin after uncertainty and modeled grade change:
Margin_conservative = M - U - G - R= 4.25 in - 0.125 in - 0.50 in - 4.00 in= -0.375 in = -9.525 mm
The modeled result is not “fail code” and not “pass code.” It is a decision to hold the release for professional confirmation or grade coordination because a small nominal margin disappears when the reference surface changes. The next action is to ask the builder which surface the approved detail uses—earth, finished grade, concrete or paving—whether final grade is established, and who controls the elevation. If the detail uses 2 inches above finished concrete instead, calculate that condition separately; do not substitute the earth rule.
Sensitivity is the point of the example. A 0.25-inch nominal margin looks comfortable if the observer ignores uncertainty and future grade. It is not comfortable when the modeled grade change is twice the nominal margin. The example also shows why a measurement must carry units, a datum, a date and assumptions. A single number copied into a checklist without those inputs cannot be independently checked.
Use the worksheet to classify evidence, not to self-certify
At the end of the walk, each row should have one of three next actions:
- Release evidence complete: observation and controlling document agree; local result is recorded or the builder confirms the scheduled inspection path.
- Professional confirmation: the question involves concealed attachment, product listing, structural framing, code interpretation, compatibility, final grade or an unapproved substitution.
- Correction and recheck: a visible defect, missing component, wrong location, obstruction, damaged WRB or open inspection correction exists.
Do not use “looks acceptable” as a fourth release action. It hides whether the issue was observed, documented, professionally confirmed or simply overlooked. The worksheet earns its value by exposing the missing decision.
Resolve failure branches before allowing plaster to cover the evidence #
The safest next decision is to hold plaster whenever the approved assembly, drainage path, lath/accessory installation or required local release is uncertain. The specific correction depends on the failure, but the record should always identify the exact location, likely responsible party, evidence needed, and whether the authority or design professional must be involved before repair.
If the WRB is torn, cut, loose, or lapped the wrong way
Do not tape or patch it casually from the exterior based on a generic product. Photograph the tear with its grid location, identify what caused it, and ask the builder or envelope trade for the manufacturer-approved repair. If the tear affects a window, door, flashing, roof-to-wall condition or drainage path, route it to the party responsible for that detail and ask whether the design professional or inspector must review it.
The correction record should name the repair product, preparation, overlap or lap direction, required curing time, and before/after photographs. If the installed material is no longer the product in the submittal, record the substitution question separately. A patch that seals a visible hole but blocks drainage is not a complete correction.
If flashing is missing, reversed, discontinuous, or concealed too early
Hold the handoff. Flashing is supposed to direct water out, not create a sealed pocket behind the stucco. Ask the builder to provide the approved detail and the window, door or penetration manufacturer’s installation requirements. If the detail cannot be verified because lath or stucco has covered it, ask the builder and design professional how the condition will be verified or repaired; do not direct the crew to cut an opening without a repair plan.
The Building America flashing guidance describes the basic “down and out” logic and shingle-style integration. It is a useful explanation for the question, but the exact flashing component, sealant and attachment remain system-specific. Record whether the correction will be visible to the authority and whether a reinspection is needed.
If the weep screed is too low or the opening is blocked
Do not solve an elevation conflict by adding soil later, smearing sealant over the opening, or asking the plaster crew to bury the component. Verify the reference surface and approved detail first. If the screed is physically misplaced, the stucco or envelope trade and builder should propose the correction. If final grade or paving controls the result, the site or grading trade may be responsible for maintaining the clearance. If the wall base detail is ambiguous, ask the design professional or building official before concealment.
The correction needs a new measurement with the same datum, not a statement that the screed “looks higher now.” If the lower opening is packed with material, record whether the repair can be made without damaging the WRB or drainage mat and who is qualified to do it.
If the drainage mat is missing, wrong, cut short, or installed over flashing incorrectly
Compare the installed product and thickness with the approved assembly and local requirement. Do not substitute a visually similar mesh or rely on a supplier’s generic product family name. If the mat is cut around a penetration, verify that the approved detail preserves a drainage path and transition. If the mat is fastened through a flashing component, ask the manufacturer or design professional whether the condition is acceptable and how it is repaired.
Sto’s guide provides an example of starting at the base, lapping over flashing, avoiding fasteners through flashing and trimming around penetrations. Those details are valuable for a matching Sto system but not a blanket approval for other products. Mark the worksheet “P” until the correct product and detail are documented.
If lath laps, direction, accessories, or fasteners do not match
Do not pull out fasteners, bend lath, or rework a large area without the stucco trade’s repair method. Metal lath can have sharp edges, and repairs can damage the WRB or create an unapproved fastener pattern. Ask the stucco contractor to identify the lath type, approved overlap and fastening schedule, then ask the builder or design professional to resolve any design-load or code question.
If the lath is missing at a joint, continuous where it should be discontinuous, or not integrated with a casing bead, record the exact joint and elevation. The correction may require removal and reinstallation, a manufacturer-approved detail, or professional confirmation. It is not safe to assume that the first plaster coat will make a wrong accessory disappear without consequences.
If the inspection is failed, partial, or not found
Stop the plaster handoff. “The inspector was here” is not a result. Ask the permit holder for the official status, inspection type, correction notice, and reinspection process. If the work passed one checkpoint but another is pending, keep the latter visible. If the authority allowed a correction to be made without reinspection, record that instruction through the official permit channel or builder’s record.
Do not argue from a different city’s inspection page. Local rules and adopted code control the permit. The Douglas County, Tampa and Sacramento examples in this guide are intentionally different because the homeowner needs to ask the local question rather than assume a national sequence.
If the product or system changed after approval
Hold release until the change is documented. A “synthetic stucco” label can conceal different base coats, mesh, WRB, drainage paths, accessories and evaluation reports. A Portland-cement stucco system can also have system-specific lath, flashing and curing requirements. Request the revised product data, approved substitution, updated detail and any authority review required. Keep the original and new documents in the project file so the change is auditable.
If the builder says the replacement is equivalent, ask “equivalent under which listing, approved detail, code provision, or manufacturer statement?” A generic equivalence assertion is not enough for a high-consequence concealed transition.
Close the record, then make the plaster handoff conditional and explicit
Release the wall to plaster only after the worksheet shows the controlling documents, visible checks, official inspection result, corrections and next trade. The final action is a handoff record, not a homeowner certification: the builder confirms that the work is ready under the permit and approved assembly, the responsible trade confirms its scope, and the plaster contractor accepts the conditions for beginning work.
The final release gate
Use this short gate at the bottom of the worksheet:
- Jurisdiction, permit, adopted code and inspection type are recorded.
- Approved wall assembly and current product revisions are attached.
- Substrate and related structural or rough-inspection questions are routed and closed.
- WRB layers, laps, corners and penetrations are documented.
- Window, door, roof, deck, floor-line and service transitions have evidence.
- Weep screed component, reference surface, measurement and drainage opening are recorded.
- Drainage space or mat is identified and its continuity is documented.
- Casing beads, corners, control joints and dissimilar-substrate transitions match the detail or have an approved correction.
- Lath type, orientation, laps, fasteners and accessories are documented; concealed questions are professionally confirmed.
- Required local inspection result is recorded, including open or closed corrections.
- Every correction has an owner, due date, before/after evidence and reinspection status where required.
- The plaster crew has the approved sequence, weather/curing requirements and open-condition list.
- Builder coordinator records the next trade and handoff date.
If any box is blank because the information is unavailable, the release status is not ready—information missing, not “probably ready.” If a box is marked professional confirmation required, do not convert it to ready by taking another photograph. If a correction is open, keep the wall visible until the correction and required reinspection are closed.
Explain what the record can and cannot prove
The record can show what documents were reviewed, what was observed from a safe boundary, what measurements were taken, what the authority recorded, who owned each correction and what evidence closed it. It cannot prove the future absence of leaks, validate concealed framing penetration, replace engineering, bind the local authority, guarantee a plaster appearance, or guarantee warranty coverage.
This distinction is especially important for a homeowner who is not performing the work. Your leverage comes from timing and documentation: ask for the release before concealment, keep the builder’s response attached, and make the next trade’s start conditional on the open items being closed. The goal is not to turn the homeowner into a contractor. The goal is to prevent a missing decision from becoming an inaccessible wall.
Compact originality brief
Current answers: The IRC provides baseline provisions; local authorities publish inspection checkpoints or checklists; manufacturers describe their own assemblies; and building-science sources explain drainage planes. These materials are useful but split across code, permit and installation contexts.
Missing decision: A homeowner needs to decide whether this specific wall is ready for its actual local lath or moisture-barrier inspection and plaster handoff, while preserving the exact correction and responsible trade if it is not.
Original contribution: The source-derived Stucco Close-Up Release Worksheet joins jurisdiction, assembly identity, drainage-path continuity, lath/accessory verification, inspection result, safe evidence, correction ownership and next trade in one reproducible record. The illustrative measurement example adds units, datum, formula and sensitivity rather than presenting an unsupported pass/fail number.
How it can be checked: Compare each worksheet row with the project permit, adopted code, approved wall section, product revision, local inspection result, manufacturer instructions and dated photographs. Verify that each evidence ID in the package resolves to the cited source, that local examples are not generalized, and that any concealed or professional question remains labeled for qualified confirmation.
The next decision is therefore simple to state and difficult to fake: is the documented, jurisdiction-specific assembly released for plaster, or is there a named correction owner and a required professional or official check before the evidence disappears? If the answer is not recorded, the wall is not ready for the handoff.
Cite this guide
Brictale. “How to Verify New-Home Stucco Lath, Weather Barrier, and Weep Screed Before Plaster.” Published 2026-10-07; updated 2026-10-07.
https://brictale.com/build/construction/verify-new-home-stucco-lath-weather-barrier-before-plaster · Read the Markdown version
Original contribution: Stucco Close-Up Release Worksheet. A jurisdiction-aware record for deciding whether the approved stucco wall assembly is ready for its local lath or moisture-barrier inspection and for the plaster handoff.
Sources and scope
Evidence behind this page
- The 2024 International Residential Code treats exterior wall coverings as part of the wall-covering chapter and requires a weather-resistant exterior wall envelope, with water-resistive barriers and flashing provisions applying to wood-frame exterior wall assemblies; the adopted code and local amendments control the permitted project.
2024 International Residential Code, Chapter 7 Wall Covering
2024 IRC reference text, including Chapter 7 provisions for exterior wall covering, water-resistive barriers, flashing, and exterior plaster. It is a baseline reference, not proof that a jurisdiction adopted this edition unchanged.
Accessed · Link to this claim - The 2024 IRC provisions summarized for stucco distinguish dry climate-zone approaches from moist or marine approaches and include drainage-space or drainage-material options; the required stucco WRB assembly therefore cannot be selected from a generic national checklist alone.
2024 International Residential Code, Chapter 7 Wall Covering
2024 IRC Section R703.7.3 and related exterior-plaster provisions as displayed in the ICC reference page. Climate zone, adopted edition, amendments, approved plans, and listed assemblies may change the applicable path.
Accessed · Link to this claim - For unincorporated Douglas County, Colorado, the county lists a Weather Resistive Barrier inspection, IVR Code 132, and describes house-wrap, air-barrier or suitable-film installation with manufacturer-consistent overlaps, sealed penetrations, and window and door flashing.
Inspections (Building) - Douglas County
Douglas County, Colorado Building Division inspection descriptions for typical permitted residential work. The county says the permit inspection signature card controls the complete list and that the page is not a universal inspection schedule.
Accessed · Link to this claim - For unincorporated Douglas County, Colorado, the county lists Exterior Lath inspection, IVR Code 33, before stucco or synthetic stucco, and says building paper, lath, and all flashing, including weep screed, are installed before that inspection.
Inspections (Building) - Douglas County
Douglas County, Colorado Building Division description for IVR Code 33. It applies only within the county inspection authority described and does not establish the sequence in other jurisdictions.
Accessed · Link to this claim - Sto's StoPowerwall DrainScreen MVES guide specification says sheet WRB is lapped over foundation weep-screed attachment flanges, floor-line flashing, and window or door head flashings; it gives typical paper laps of 2 inches horizontally and 6 inches vertically while warning that code requirements may vary.
Sto Guide Specification 6800 - StoPowerwall DrainScreen MVES
StoPowerwall DrainScreen MVES manufacturer guide specification, Revision 002, February 2022. The dimensions are typical instructions in that guide and are not a universal requirement for every stucco system.
Accessed · Link to this claim - Sto's guide specification places the drainage mat over the air/moisture barrier, starts at base flashing or weep screed, shingle-laps it over flashing, avoids fastening through flashing, trims around penetrations, and calls for prompt lath and stucco coverage; it also lists nominal 6 mm and 10 mm mat options and says local code may require the 10 mm option.
Sto Guide Specification 6800 - StoPowerwall DrainScreen MVES
StoPowerwall DrainScreen MVES manufacturer guide specification, including Sections 2.4, 3.5 and 3.6. Product revision, listed assembly, local code and approved details control the actual material and sequence.
Accessed · Link to this claim - Sto's guide specification calls for diamond-mesh lath conforming to ASTM C1063, gives system-specific side and end overlaps, fastener spacing and wire-tie spacing, and says the selected fastener layout and withdrawal value must be verified against design wind loads and local code by the project engineer or architect.
Sto Guide Specification 6800 - StoPowerwall DrainScreen MVES
StoPowerwall DrainScreen MVES manufacturer guide specification, Sections 2.5 and 3.7. These figures are system-specific examples and cannot replace the approved assembly or structural fastening design.
Accessed · Link to this claim - The U.S. Department of Energy Building Science Education page explains that a water barrier should drain incidental water away from the wall, that housewrap or another WRB should be lapped over flashing at openings and wall bases or tops, and that an additional bond-break drainage plane is used behind stucco and nonstructural masonry claddings.
Water Managed Walls - Building Science Education
U.S. Department of Energy Building Science Education principles for water-managed walls. The page explains drainage-plane logic but does not approve a project-specific product, detail or inspection result.
Accessed · Link to this claim - The Building America flashing guide describes head flashing as directing water away from openings with positive slope and lateral extension, and says flashing at penetrations must direct water out over the cladding or drainage plane without openings that turn water back into the wall.
BSC Information Sheet 303 - Common Flashing Details
Building America / U.S. Department of Energy common flashing details for all climates. It is a building-science reference and not a substitute for the approved window, door, stucco or flashing detail.
Accessed · Link to this claim - The City of Tampa, Florida lists a BLD-Stucco/Dry-In/Lath inspection and a BLD-Final inspection for its residential siding and stucco permit guide, while noting that additional information may be required.
Residential Siding & Stucco - City of Tampa
City of Tampa, Florida residential siding and stucco permit guide. It illustrates a combined local checkpoint and does not govern Douglas County, Colorado, or any other jurisdiction.
Accessed · Link to this claim - The City of Sacramento's construction guide places stucco lath among miscellaneous inspections that may apply to a conventional wood-frame housing project, followed by final building, plumbing, mechanical and electrical inspections and occupancy after final approvals.
Step-by-Step Guide to Construct Your Housing Project - City of Sacramento
City of Sacramento, California general housing-project guide. It says projects vary and gives a general sequence, so the project's permit and inspection record control.
Accessed · Link to this claim - OSHA states that workers in residential construction 6 feet or more above lower levels generally need conventional fall protection or another permitted method, and its guidance discusses stable scaffolds and aerial lifts for exterior finishing such as siding and stucco; the OSHA guidance itself is not a standard and creates no new legal obligations.
Fall Protection in Residential Construction - OSHA Guidance Document and FAQ
Federal OSHA guidance for employers and workers in residential construction. State-plan rules, site conditions, employer safety plans and the applicable OSHA standards control; homeowners should not direct workers' fall-protection methods.
Accessed · Link to this claim