How to Verify Siding Drainage Openings Before Cladding Release
Use an elevation-by-elevation record to verify drainage exits, screens, openings, trim blocks, transitions, and clearances before a new home's cladding is released.
The short answer
Release a cladding elevation only when the builder can identify the exact product detail, show how incidental water reaches an exterior exit, preserve any required screened opening or cavity, document openings and transitions, and resolve exceptions with the responsible trade. A homeowner can record ground-level evidence and request records, but cannot certify concealed WRB continuity, code compliance, or elevated work from photographs.How to Verify Siding Drainage Openings Before Cladding Release
Release an exterior-cladding elevation only when the builder can identify the exact cladding and trim instructions, show how incidental water reaches an exterior exit, preserve any specified screened cavity or opening, document openings and transitions, and close every exception with a named responsible trade. You can collect safe ground-level evidence and request records; you cannot certify concealed WRB continuity, code compliance, or elevated work from photographs.
1. Set the release boundary before anyone covers the wall #
The correct homeowner decision is whether an elevation is ready for the builder's documented release, not whether a photograph looks finished. A release is reasonable only when the construction team has identified the assembly, the applicable jurisdiction, the controlling product instructions, the drainage route, the responsible people, and the evidence needed to close exceptions.
This distinction matters because “siding” may describe very different systems. A wall might use vinyl panels over a WRB, fiber-cement lap siding over a drainage mat, wood siding over furring, stucco over a drainage layer, brick veneer with flashing and weeps, metal panels over a cavity, or a manufacturer's integrated trim-and-flashing system. A visible opening in one system can be a required weep; in another, it can be an unfinished joint, an intentionally open end, a blocked cavity, or a defect. No universal homeowner rule can tell you to caulk every gap, drill every trim piece, or leave every opening open.
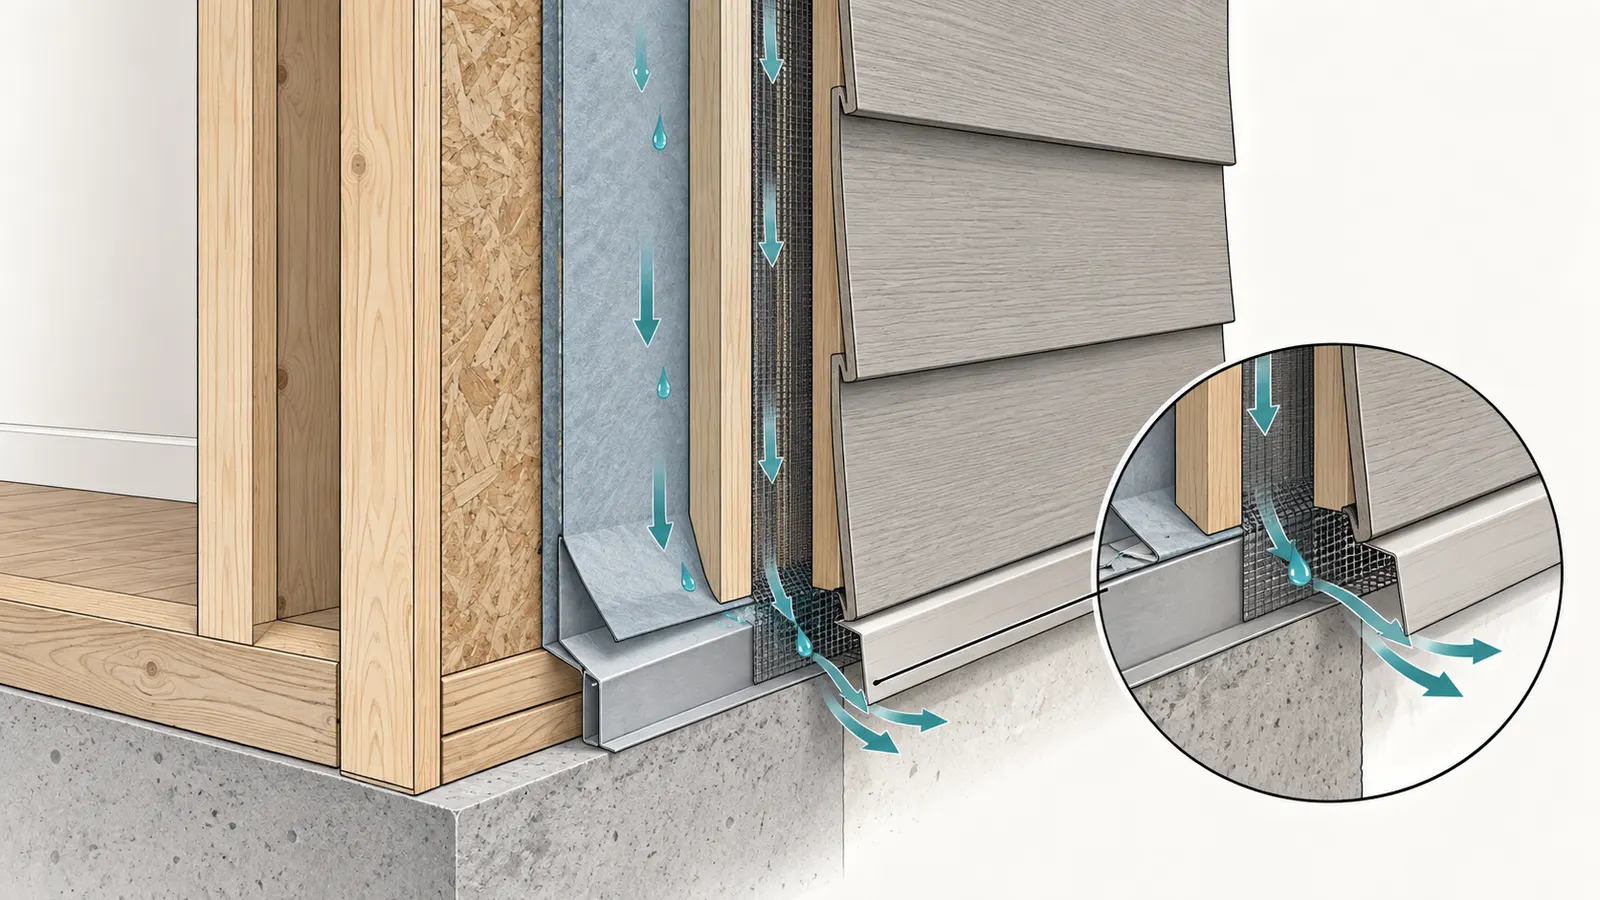
The most useful reference model is a water-managed wall: the cladding screens the wall, a water-resistive barrier or other drainage plane receives incidental water, a gap or cavity may provide a capillary break and drying space, flashing changes vertical flow to outward flow, and an opening lets water leave. Building America describes this drainage approach as a water-resistant layer behind cladding that lets incidental water run down and out. Building Science Corporation lists the layers as separate components of a functional drained wall, which is why a visible weep by itself is not proof that the wall drains. Its technical report describes the cladding, drainage plane, gap, flashing, and drain openings as a system, not as interchangeable parts.
What is inside the release
For this article, an elevation is one continuous exterior face or a clearly bounded portion of a face that can be assigned to a drawing, elevation name, or photo location. Record north, south, east, west, or the project drawing label; do not use “front” if the plan has more than one front-like face. Split an elevation when a change in cladding, cavity, height, or responsible trade creates a different drainage path. A long face with a lower masonry veneer, upper siding, and a roof return should normally have separate rows for the base, transition, and roof interface even if the camera shows them in one frame.
The release decision covers what can be checked before final concealment or before the builder accepts the cladding scope:
- the named cladding family, product, profile, finish, and revision of the installation instructions;
- the wall section showing the sheathing, WRB or other water-control layer, drainage gap or mat, furring or strapping, flashing, cladding, and trim;
- the base drainage opening, weep, weep screed, starter, screen, closure, or other exit identified by the design or product detail;
- windows, doors, vents, spigots, outlets, lights, HVAC line sets, hose bibs, trim blocks, and other penetrations;
- roof-to-wall, deck-to-wall, foundation-to-wall, cladding-to-cladding, and cladding-to-masonry transitions;
- ground, roof, deck, and hardscape relationships that affect clearance and splash exposure;
- photo IDs, records, trade ownership, exceptions, and the next handoff.
It does not include structural attachment design, engineering of a support condition, opening a finished wall, elevated DIY inspection, destructive testing, remote sign-off, or a determination that an installation meets a local law. If the question is hidden, structural, electrical, or beyond safe ground-level observation, turn it into a builder request or professional inspection request.
Safety and the limit of a remote review
Stay at grade or on a permanent, complete, guarded walking surface that the builder has opened for observation. Do not climb a roof, scaffold, temporary platform, stacked materials, ladder, deck edge, or unfinished floor to reach a base, eave, trim block, or upper transition. Do not remove siding, flashing, trim, screens, sealant, electrical devices, or fasteners. Do not probe a cavity or drill a hole to see whether it drains. OSHA identifies siding, windows, doors, and gutters as exterior-finishing work that can pose fall hazards and discusses stable platforms and fall protection for workers; its guidance is for construction employers and is not a homeowner climbing authorization. Read the OSHA residential fall-protection guidance before entering an active exterior-finishing area.
Keep clear of workers, suspended loads, cutting stations, dust, nail guns, temporary power, open wall edges, excavations, and moving equipment. If the cladding is being cut or drilled, the responsible contractor must control dust and follow the product's safety instructions. If a light, receptacle, heat pump line, gas vent, or other service is involved, do not touch it or assume it is de-energized; ask the builder to assign the electrical, mechanical, or plumbing verification to the qualified trade.
Do not spray, hose, pressurize, depressurize, smoke-test, or use blower or other test equipment on the wall yourself. A water or air test belongs in a defined scope with the builder or a qualified professional; an improvised test can drive water into the assembly, disturb finishes, or produce a result that does not establish code or product compliance. Do not enter a wall cavity, chase, crawlspace, attic, or other confined or enclosed space to follow the path, and do not remove materials to create access. If you see or suspect mold, droppings, nesting, sewage, unknown residue, or contaminated debris, do not touch, sweep, vacuum, or bag it. Leave the area undisturbed and ask the builder to arrange qualified assessment and, if needed, remediation.
A remote photo review can sort evidence into “visible,” “not visible,” and “needs records.” It cannot prove that a WRB continues behind a trim block, that a membrane is lapped in the correct direction, that a fastener hits the required support, that sealant is compatible, or that a hidden cavity is clear. The safest remote conclusion is therefore a handoff: “The image shows a possible blocked exit; builder to identify the detail and provide an approved correction or confirm the product-specific open path.”
The jurisdiction question comes first
The United States has no single nationwide cladding-release checklist that replaces the permit record. Ask the builder or permit coordinator for the actual authority having jurisdiction (AHJ): the city, county, township, state, tribal, or other office that issued or administers the permit. Record the project address, permit number, adopted residential or building code edition, local amendments, and any approved alternative or tested wall assembly. Then ask which requirements govern this elevation and whether the inspection record includes the exterior wall envelope before concealment.
The 2024 International Residential Code is a model-code reference. Its Chapter 7 text says an exterior wall envelope should prevent water accumulation by using a WRB behind cladding and a means of draining water that enters the cladding, but the model text is not automatically the law in every U.S. jurisdiction. Use the ICC text as a question source, then verify the adopted edition and amendments with the actual AHJ. A builder may also be using a tested assembly or an approved product system with details that differ from a generic code illustration. Do not tell a builder that an ICC model-code sentence is a local order until the AHJ confirms adoption.
Compact originality brief
Current answers usually explain one siding product, one flashing condition, or the general idea that a wall needs a WRB. They do not give a neutral homeowner release sequence for tracing a complete elevation through the base, screens, openings, trim blocks, transitions, clearances, records, and handoffs. The missing decision is whether the installed cladding still has a deliberate drainage and drying path, and whether each exception has an owner before the elevation is released.
The original contribution is the Elevation-by-Elevation Cladding Release Worksheet. Its method is to identify the exact product and jurisdiction, trace water from the upper wall to an exterior exit, inspect safe visible conditions, connect each row to a document or photo ID, assign responsibility, and require a hold, correction, or release decision. It can be checked by comparing every row with the approved wall section, the exact manufacturer manual, the permit jurisdiction's adopted requirements, and the builder's close-up record.
The worksheet's declared method is: For every elevation, identify the cladding family and exact installation manual, record the WRB or drainage-plane path, inspect only safe ground-level conditions, link each observation to a photo or document ID, assign the detail to the responsible trade, and mark release only after the builder resolves every hold; use product limits and the permit jurisdiction's adopted requirements as the controlling inputs. Its declared limitations are: This is a homeowner coordination and evidence worksheet, not a code inspection, engineering review, water test, air test, warranty determination, or certification that a concealed wall is dry; photographs cannot prove hidden continuity, and the builder, qualified trades, design professional, and permit authority retain responsibility for their work and jurisdiction-specific decisions.
The rest of the guide explains how to fill the worksheet and how to hand it back to the builder without converting a homeowner observation into a construction command.
2. Assemble the controlling documents and people before inspecting #
Before looking for a blocked opening, collect the documents that define what the opening is supposed to do and name the person who can answer for it. The homeowner's first verification is not a measurement; it is a complete input set.
Inputs to request
Request one organized packet, even if the builder supplies it in several files:
- The exterior elevations, wall sections, details, and finish schedule, with revisions and dates.
- The cladding product name, profile, thickness, color or finish, accessory family, and manufacturer's installation manual that applies to the actual product.
- Details for the starter, base trim, vent, weep, weep screed, insect screen, closure, furring, drainage mat, or other cavity termination.
- The WRB or water-control product, seam tape, flashing membrane, sealant, and accessory records, including compatibility information where available.
- Window, door, vent, light, hose bib, HVAC, electrical, and trim-block details that show how each penetration meets the drainage plane and cladding.
- Roof, deck, balcony, foundation, grade, masonry, and cladding-transition details.
- The permit number, AHJ, adopted code edition, amendments, inspection sequence, and any approved alternate method or tested wall assembly.
- The builder's quality-control or close-up checklist, photo log, inspection reports, and open-item list for the elevation.
If the builder says the detail is “standard,” ask which standard: the product manual, the approved plan, the architect's detail, the trade's written scope, an AHJ-approved alternative, or an internal company practice. Record the answer. “Standard” without a source is not a usable input because multiple cladding families use similar-looking trim with different drainage rules.
Assign responsibility by detail, not by general trade name
The siding installer may own the visible panel and trim, while the framer owns backing, the WRB installer owns membrane laps, the window installer owns the window interface, the roofer owns step and kickout flashing, the deck contractor owns the ledger or deck-wall condition, and the electrician or HVAC installer owns a service penetration. The builder or construction manager is the handoff owner who must coordinate them when one detail crosses trades.
For every row, write both “responsible trade” and “release owner.” The responsible trade answers how the part was installed. The release owner decides whether the builder will hold the elevation until the answer is documented. These can be different people. A siding installer should not be expected to certify a concealed window pan, and a homeowner should not be expected to decide whether a structural trim block has adequate support.
Use a simple responsibility request:
Please identify the approved detail and responsible trade for Elevation __, location __. The visible condition is __. The question is whether __ is an intentional drainage opening, screen, closure, or sealant condition, and whether it remains open to the exterior. Please reply with the manual or drawing reference, the correction or confirmation, the photo or inspection record, and the next release owner.
That wording makes the issue answerable. It does not prescribe a repair from a photograph.
Separate four kinds of evidence
Use four labels in notes and filenames:
- DOC: approved drawing, product manual, change order, permit record, inspection report, or written trade response;
- OBS: safe ground-level observation of a visible condition, such as an opening that appears continuous or a screen that appears covered;
- PHOTO: an image tied to elevation, location, direction, date, and view; a photo is evidence of what it shows, not of what it cannot show;
- HOLD: an unresolved conflict, missing record, inaccessible condition, blocked path, damaged material, or jurisdiction question.
Do not mark “verified” just because a worker says “we always do it that way.” Convert the statement into a DOC record if it determines release. Do not mark “failed” when the detail is merely not visible; use “not observable—records or qualified inspection required.” This protects the homeowner from both false reassurance and an unsupported accusation.
Build a photo plan before walking
Take a wide image for the whole elevation, then medium images for each drainage zone and close images for each exception. A useful file name is E2-south-base-left-2026-09-08-OBS-01, followed by E2-south-window-2-head-... and E2-south-deck-transition-.... Keep the original files. Do not edit out sealant, openings, debris, or workers. Include a scale only if it can be placed safely and without touching the assembly; never use a ruler in a way that requires climbing or probing.
Photograph from a position that shows the relationship between the cladding and the exit. A close-up of a hole without the adjacent flashing or trim is weak evidence. A wide shot without a legible opening is also weak. Use a note that says “visible from grade,” “partly obscured,” “behind completed trim,” or “not accessible without elevated work.” The limitation is part of the record.
3. Trace the base drainage and ventilation path from wall to exterior #
The base check passes only when the builder can identify where water entering behind the cladding travels, what supports the path, and where it exits without being blocked by a starter, flashing, screen, trim, soil, sealant, or debris. A drain path and a ventilation path may overlap, but they are not automatically the same.
Start with the wall section, not the visible hole
On the approved detail, mark these layers in order from inside to outside or from structure toward weather:
- structural framing and sheathing;
- WRB, coated sheathing, rigid insulation, or other water-control layer;
- taped or sealed seams and base or intermediate flashing;
- drainage mat, furring, strapping, or the cavity-forming feature;
- insect screen, ember-resistant screen, closure, or vent strip if specified;
- siding, panel, masonry, stucco, or other cladding;
- starter, base trim, drip edge, weep screed, or other visible termination.
Then draw one arrow downward and outward. If the arrow stops at a horizontal trim, a solid closure, an unsealed cut, a deck ledger, a roof return, or the foundation line, the detail needs a response. Do not assume that water can “find a way out” through a random gap. The exit must be intentional and compatible with the assembly.
Building America describes bottom-of-wall flashing as part of a continuous drainage plane and says the WRB is installed over the flashing in shingle fashion so water is directed out. Use that base-flashing guidance to ask for the actual layer sequence rather than judging a visible strip of metal in isolation. In a masonry veneer, the visible exit may be a weep hole over through-wall flashing. In stucco, it may be a weep screed. In a furring-based siding wall, it may be a screened opening at the bottom of a cavity. These conditions are not interchangeable.
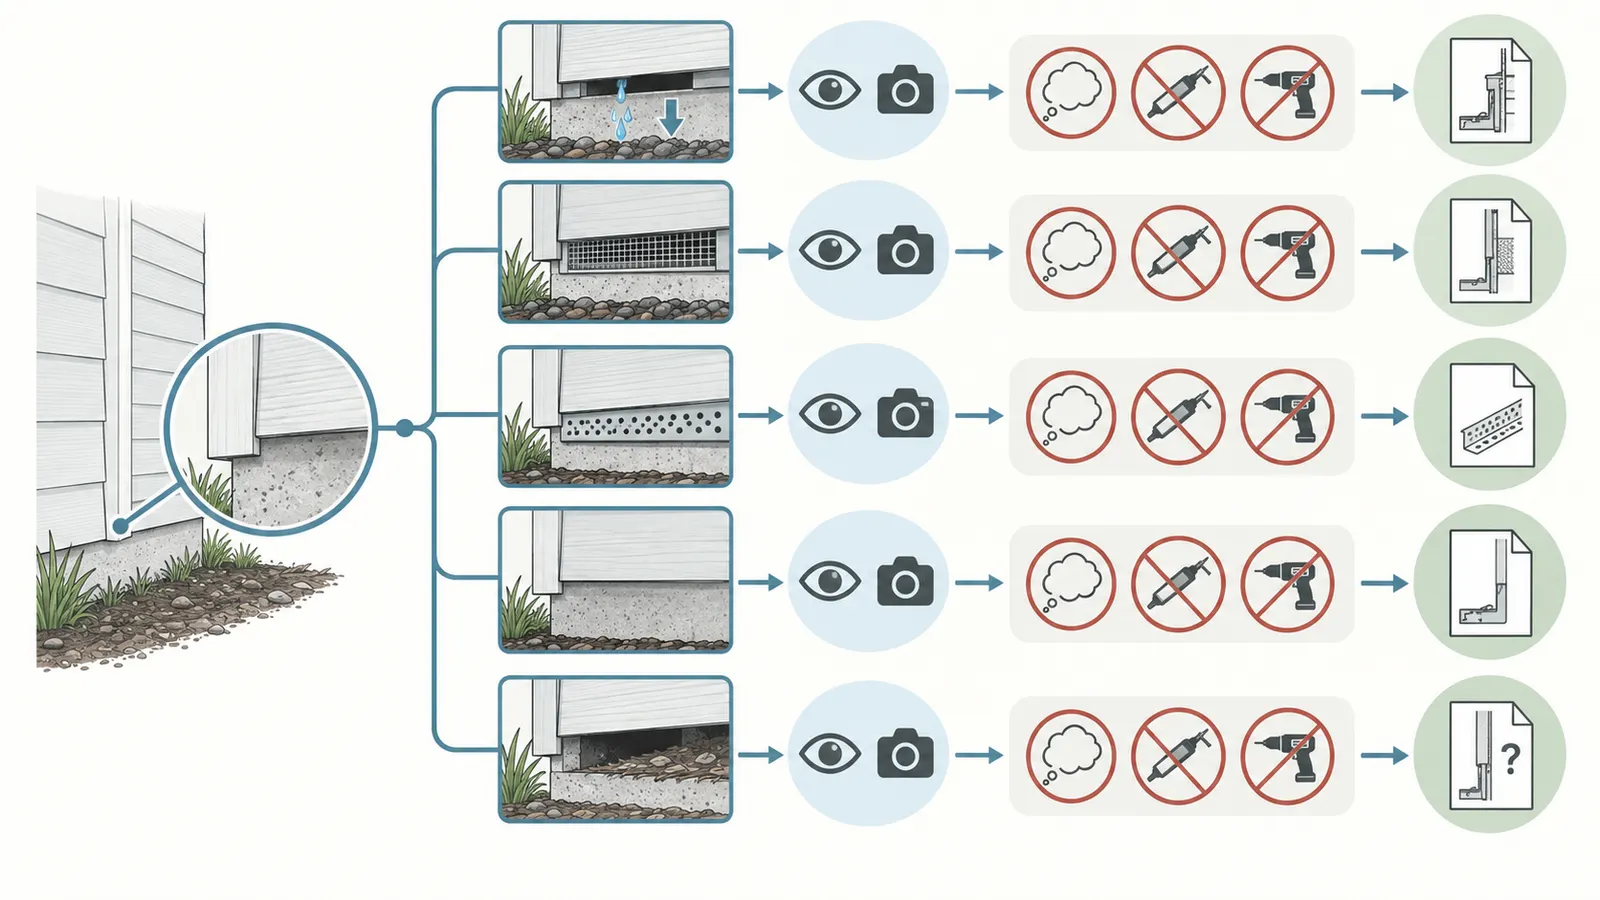
Identify the opening or closure by function
For each base segment, use one functional label:
| Label | What it is intended to do | What to observe safely | What not to infer | Next handoff |
|---|---|---|---|---|
| Drain opening or weep | Let incidental water leave the cladding or cavity | A deliberate, repeatable exit that is not visibly blocked | That every hole drains the whole wall | Builder or cladding trade confirms detail and spacing |
| Screened vent or cavity opening | Permit the specified drainage or air path while limiting insects or embers | Screen is present, seated, and not visibly sealed shut | That any mesh has the required pest, airflow, or ember performance | Product/detail owner confirms screen type and function |
| Weep screed or perforated base | Terminate a stucco or similar assembly and drain it | Base is installed at the detail location with visible openings where intended | That the code height or corrosion protection is satisfied by appearance | Stucco trade and AHJ/detail owner confirm |
| Solid closure | Stop water, pests, fire, or debris at a location designed to be closed | Closure matches the drawing and does not cover a required adjacent outlet | That “closed” is always better than “open” | Designer or manufacturer confirms the intended balance |
| Unknown gap | No documented function yet | Location, length, obstruction, and adjoining layers | That it is a defect or a vent | HOLD until the builder identifies it |
The Building America siding guidance explains that a cavity can be ventilated with top and bottom openings and that openings only at the bottom can provide drainage and some air exchange; it also says openings can be screened to keep out bugs and burning embers. Use the guidance as a functional question, not as a universal mesh or dimension specification. Building America separately recommends screening over furring at the bottom and top of exterior-wall ventilation gaps to limit insect entry. The exact screen, free area, corrosion resistance, fire or ember requirement, and opening size belong to the product and jurisdiction.
Look for blockage at the lowest point
At grade, check from a safe standing position for obvious blockage by:
- sealant smeared across a designed opening;
- a starter or J-channel resting against flashing where a gap is shown;
- paint, coating, mortar, foam, adhesive, or membrane covering perforations;
- insect screen folded into a solid plug rather than spanning the opening;
- a drainage mat or furring cavity that stops above the designated exit;
- soil, mulch, concrete, pavers, or landscaping covering the intended outlet;
- construction debris, sawdust, insects' nests, or mortar droppings;
- an adjacent transition that traps water behind a horizontal trim.
Do not scrape, cut, drill, or pull the material yourself. Photograph the condition and ask the builder whether it is a required opening, a required closure, or a correction. If the ground is too high to see the base safely, record “not observable” and request the builder's close-up photos taken before concealment or a qualified inspection.
Use dimensions only when the exact manual controls
The VSI manual is a useful illustration of why product identity matters. For particular vinyl siding J-channel and vertical-siding details, it calls for minimum 3/16-inch (4.8 mm) weep holes no more than 24 inches (610 mm) apart and warns that the starter or J-channel should not rest on head flashing because it can block the holes. Those dimensions apply to the specified VSI vinyl details, not to every cladding system.
If your home uses that exact product family and detail, record the manual revision and compare the installed condition with it. If your home uses fiber cement, wood, metal, stucco, brick, stone, or another vinyl product, do not copy the VSI number into the release decision. Ask for the controlling manual. A drainage opening can be larger, smaller, continuous, screened, slotted, integrated into a trim, or intentionally omitted where the approved tested assembly uses a different mechanism.
Do not confuse drainage with ventilation
Some walls are drained but not ventilated in the sense of having a designed air current. Building Science Corporation distinguishes a vented wall with openings at the bottom from a ventilated wall with openings at both top and bottom, and cautions that a drainage cavity alone does not guarantee ventilation because the locations and details matter. Use that distinction when a contractor says “the cavity breathes” without showing the actual top and bottom openings.
Your record should therefore have two separate fields: “drainage exit identified?” and “ventilation path required and identified?” Mark “not required by this assembly” only when the approved detail or product instructions support that answer. Do not invent a top vent at an eave, close a lower opening because it looks unfinished, or open a sealed cavity because you have read about rainscreens. The design owner must resolve that choice.
4. Check windows, doors, vents, and trim blocks as drainage interruptions #
Every opening and trim block is a potential interruption in the drainage plane, cavity, flashing, air-control layer, or cladding movement. Release the elevation only when each interruption has an identified detail, visible evidence where possible, and an assigned handoff for hidden work.
Make an opening register
Walk the elevation left to right and top to bottom. Give each opening a location ID, such as E2-W03, E2-D01, E2-HVAC02, or E2-LIGHT04. Include:
| Field | Record |
|---|---|
| Opening ID | Elevation, grid, room, or drawing location |
| Type | Window, door, exhaust, intake, hose bib, light, receptacle, line set, vent, trim block |
| Product and detail | Manufacturer, model if relevant, drawing or manual section |
| Water path | Head flashing, jamb flashing, sill or pan, WRB lap, drip, cavity exit |
| Air or service path | Air-seal, gasket, sleeve, movement allowance, fire or combustion boundary if relevant |
| Visible status | Open, screened, sealed, flashed, obscured, damaged, unknown |
| Photo and DOC IDs | Exact image and record references |
| Owner and next handoff | Trade, builder, design professional, AHJ, or qualified inspector |
| Decision | Release, release with documented exception, or HOLD |
This register prevents the common mistake of checking “windows” as one item. A window head may be complete while a nearby hose bib cuts through the WRB without a gasket. A trim block may be sealed at its perimeter while its lower edge blocks a cavity. A roof vent may be correctly flashed above the siding but the siding's termination may close the drainage route below it.
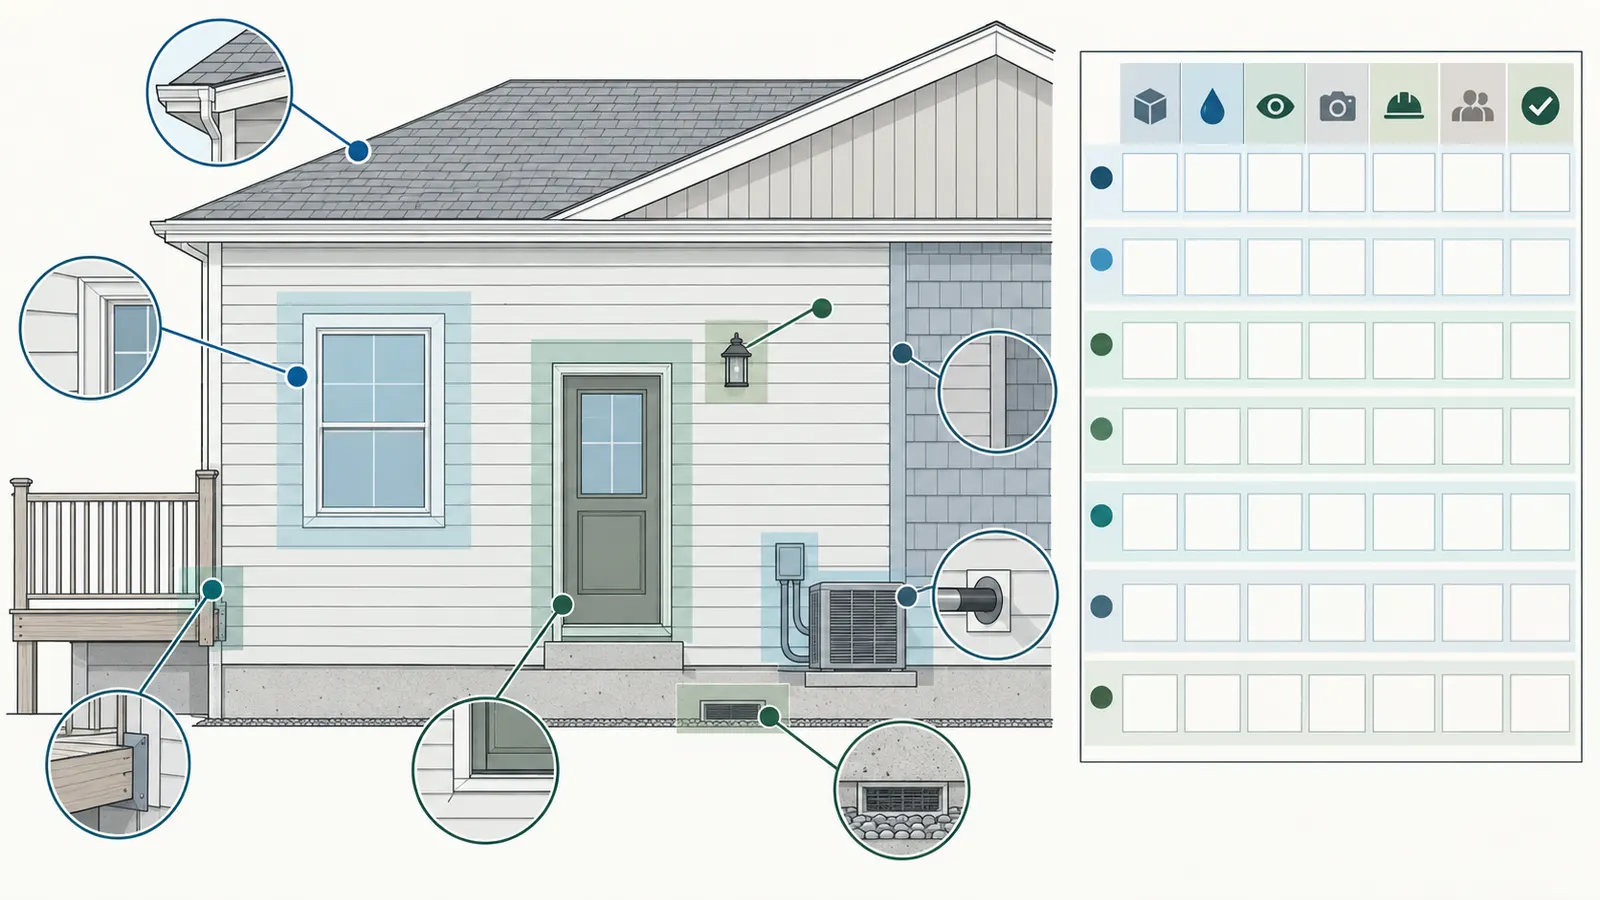
Follow water around the opening
For a flanged window or door, ask the builder to show the sequence rather than relying on the finished casing. The question is whether water reaching the WRB or flashing can move laterally or downward and then out without being directed into the rough opening. Building America describes a continuous drainage plane as one that is lapped over exterior wall flashings and carefully sealed or flashed at openings and penetrations. Use that source when requesting the opening detail and close-up record.
At a finished opening, safe observations may include whether head flashing projects or has an intentional end condition, whether siding or trim has an obvious gap where the detail calls for one, whether a lower channel has a visible drainage route, and whether sealant has been applied across a specified exit. These are observations, not proof of the concealed sill pan or jamb laps. Ask for pre-cladding photos if those layers are already hidden.
At a non-flanged opening or a trim-board installation, ask for the manufacturer's instructions, the rough-opening or blocking detail, the flashing sequence, and the water-control transition. A product manual may show a sealant joint, a metal head flashing, a membrane lap, backer rod, a cavity screen, or a deliberate uncaulked gap. Do not replace one with another because the visible finish looks cleaner.
The VSI manual, for example, contains specific window and door accessory steps and expressly points installers to local code variations and manufacturer-specific instructions where details vary. Use it as evidence that the sequence matters, not as a universal window-flashing rule.
Treat trim blocks as small wall sections
A mounting block for a light, hose bib, receptacle, or other service is not merely decorative trim. It can create a new plane, interrupt furring, require backing, receive a sleeve, and need a top or side flashing relationship. Ask:
- What is the trim block's product and installation detail?
- Does the block sit in front of, within, or behind the cladding plane?
- Is there a cavity behind it, and if so, where does that cavity drain?
- Is the top treated as a head flashing or weather-shedding edge?
- Is the bottom left open, screened, flashed, or sealed according to the detail?
- Does the utility penetration itself have a sleeve, gasket, or sealant compatible with the WRB and service?
- Does the block have structural backing for its load, and who verifies that backing?
- Is the detail different for a removable fixture versus a permanent fixture?
The point is not to demand a gap around every block. The point is to discover whether the block's perimeter changes a path that was continuous on the rest of the elevation. If the block is already covered, the builder should provide the approved detail and installation evidence. If the detail was changed in the field, request the change authorization and the responsible design or builder review.
Distinguish water sealing from air sealing
Air sealing and water management interact, but a bead of sealant does not automatically make a good drainage detail. DOE guidance identifies utility penetrations through the air barrier as locations that should be caulked, gasketed, or otherwise sealed while allowing for expansion, contraction, and vibration. Use the DOE guidance for the air-control question. Then ask the builder a separate water question: where does incidental water go if it reaches the exterior face of the WRB or the cavity?
A sealed perimeter can be correct at an air barrier and wrong if it blocks a designed drainage outlet. A deliberately open drainage gap can be correct at the cladding and wrong if it permits water or pests to bypass the WRB. The correct answer depends on the layer and detail. Record the function of each sealant joint: air, water, movement, fire, pest, or finish. If nobody can name the function, HOLD the row for clarification.
Check movement and material compatibility
Siding and trim expand, contract, flex, and move differently from windows, flashing, rigid insulation, masonry, decks, and service blocks. A product-specific gap may be required at a stop or opening; a sealant may need compatibility with the window, flashing, and WRB; a fastener may need a specified backing or embedment. The VSI manual, for example, tells installers to leave clearance at openings and to use compatible sealant around window and flashing materials in its specified system. Cite the manual at the point where the compatibility question is raised.
Do not turn a measured gap into a pass or fail without the manual. A gap that is too small can bind a moving panel; a gap that is too large can expose a drainage plane or create pest entry. A sealant that bridges a joint can prevent movement or cover a weep. A trim block that is proud of the wall can require an extended flashing or a built-out cavity. Ask the responsible trade to identify the required dimension and the measurement reference: face to face, edge to edge, opening centerline, or clearance from flashing.
5. Verify transitions, clearances, and the handoff across trades #
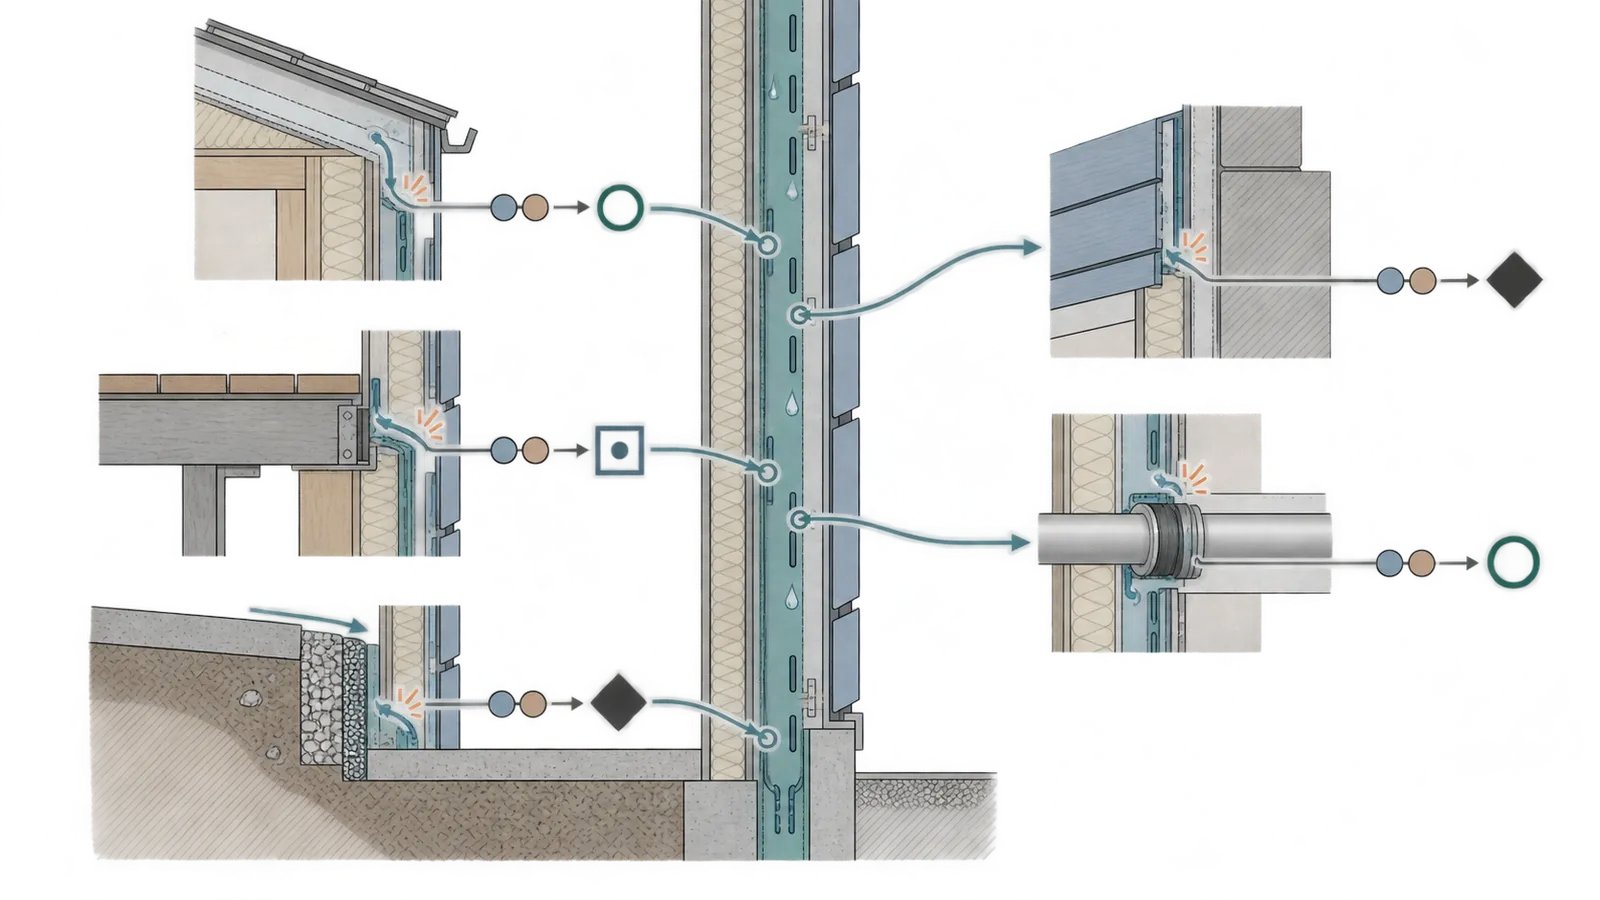
The highest-value review points are places where one wall condition changes into another: roof, deck, grade, masonry, a second cladding, a window head, a horizontal band, or an exterior service. A transition is ready only when the upper water-control layer hands off to the lower layer and the visible cladding or trim does not defeat that handoff.
Roof-to-wall
At roof-to-wall intersections, ask for the step-flashing, kickout, sidewall flashing, WRB lap, and cladding termination detail. From grade, you may be able to see whether the lower end of a roof-wall condition discharges into a gutter or away from the wall, whether siding is visibly packed against flashing, or whether a finish trim appears to cover the end. You cannot verify concealed step-flashing laps from a ground-level photo.
James Hardie's installation page uses kickout flashing and roof-to-wall clearance as product-specific best-practice examples and shows that some climate or product designations change the stated clearance. Use the manufacturer page to request the applicable detail for a James Hardie system, not to impose its values on another cladding. If the project uses another product, request its manual and the approved wall detail.
The handoff usually involves roofer, WRB/flashing installer, siding installer, and builder. The release owner should not close the row until one person confirms that the roof flashing, WRB lap, and siding termination were coordinated. A siding installer cannot repair a missing kickout by caulking the panel edge.
Deck, balcony, and porch-to-wall
Decks and balconies create a horizontal surface, concentrated splash, attachment penetrations, and often a future maintenance problem. Check the approved detail for ledger flashing, drainage behind the ledger, siding clearance above the deck surface, guard or rim conditions, and the path below the deck. Do not assume the deck board or ledger flashing substitutes for the wall's drainage plane.
From grade, record whether the siding appears to terminate at the clearance shown in the detail, whether a horizontal trim is sealed across an outlet, and whether water from the deck can run toward the wall. If the deck is incomplete, identify the future elevation or deck contractor handoff. If the deck is already attached and the wall is covered, request pre-deck and pre-cladding photos plus the approved detail. Never remove a deck board or ledger fastener to investigate.
For James Hardie work, the dealer installation page gives a deck-to-wall clearance example and identifies Z-flashing in the best-practice diagram. Treat the values as that manufacturer's guidance and verify the product, climate designation, and local requirements. For other cladding, the correct question is “What is the approved deck-to-wall detail?”
Grade, hardscape, and foundation
At the wall base, compare finished grade, mulch, soil, pavers, concrete, stoops, and foundation ledges with the approved detail and local requirement. The visible distance from siding to soil is not automatically the code measurement; the relevant reference may be the bottom of siding, the wall flashing, a weep screed, a cladding support, or a foundation projection. A sloped site can make one end of an elevation more vulnerable to splash than another.
Building America guidance describes base flashing, drainage exits, and protection from water at the bottom of the wall, but it also points to local code for conditions such as the height of a stucco weep screed. Use the base-flashing page to identify the question, then obtain the actual jurisdiction's adopted rule and the project detail. Do not quote a generic 6-inch, 8-inch, or other number as a nationwide rule without the cladding manual, wall type, and AHJ.
Record whether the final grade exists. If it does not, mark the row “future grade pending” and require a grade plan, finish elevation, drainage plan, and responsible site or landscape handoff before final release. If the homeowner's landscaping contractor will raise soil or install a paver edge later, the handoff should state the maximum finished surface and who verifies it. A currently visible opening can be blocked after closing if future grade is not controlled.
Cladding-to-cladding and masonry transitions
Transitions between vinyl and brick, fiber cement and stone, siding and stucco, or panels and a horizontal band often use head flashing, J-channel, Z-flashing, starter strips, weeps, or deliberate gaps. Review the transition from the upper cladding down to the lower cladding and ask where water from the upper system lands. The lower trim must not become a trough that drains behind the lower system.
The VSI manual illustrates that a vinyl transition to brick uses head flashing integrated or sealed to the water barrier, requires an appropriate starter or J-channel condition, and preserves specified weep openings and gaps in the example detail. Use the manual to understand the questions for vinyl-to-masonry transitions. For fiber cement, stone, stucco, or metal, obtain the different manual and wall detail. A visually similar trim line is not proof of equivalent drainage.
At a masonry veneer, look for evidence that the lower course has the specified weep or open head-joint condition and that the flashing leads water to the exterior. At stucco, ask for the weep screed and base-flashing detail. At adhered stone, ask how the drainage plane and cavity or mat terminate. Do not poke mortar joints or scrape stucco. Use records and a qualified inspection if the visible condition is too small or too high to interpret safely.
Services and exterior equipment
List every service that crosses the wall, including hose bibs, electrical boxes, conduit, heat-pump line sets, refrigerant sleeves, dryer or bath exhausts, range hoods, vents, cable, low-voltage wiring, and future equipment supports. The water-control layer should be continuous or intentionally treated around each crossing, and the cladding termination should not trap water behind the penetration.
Building America specifically lists spigots, exhaust outlets, HVAC line sets, lights, and receptacles as examples of penetrations that need careful sealing or gasketing in the wall water barrier. Use that source to expand the register beyond windows and doors. DOE separately notes that utility penetrations through an air barrier require an air-sealing treatment that accommodates movement and vibration. Keep the water and air questions in separate worksheet columns.
When exterior equipment is not yet installed, release the cladding only if the builder has a written sleeve, blocking, flashing, and future-equipment plan. A later installer who cuts through completed siding can damage the drainage plane or cover a screen. Link the future equipment route to the service-penetration record and state who owns the repair if the final equipment differs from the rough-in.
Maintainability is part of release
Ask how a homeowner will clean leaves, insects, paint, and sealant from an intended drain or screen without dismantling the cladding. A screen that is technically present but inaccessible may not be maintainable. A weep hidden behind a permanent fixture may require a service procedure. A cavity whose base is buried by later hardscape may be impossible to inspect.
This is not a request to add a removable hatch everywhere. It is a request to record the maintenance consequence. If the detail requires no homeowner maintenance, write that the manufacturer or builder has said so. If periodic inspection is expected, record the interval only when the product manual or builder documentation states it. Do not invent a maintenance schedule from general building-science advice.
6. Complete the elevation-by-elevation release worksheet #
The worksheet produces a release decision only when each row has a source, observation, owner, and next action; an attractive blank form is not evidence. Use one row per elevation zone and one additional row for every opening, transition, trim block, service, or unresolved exception that could change the path.
Worksheet fields
Copy this table into the project log or construction-management system. Keep the field names stable so that a later reviewer can compare elevations.
| Field | Required entry | Example of a useful entry |
|---|---|---|
| Elevation ID | Plan label and compass direction | E2 / south wall |
| Zone ID | Base, opening, transition, roof, deck, service, or grade zone | E2-B03 / south base between W02 and D01 |
| Cladding family | Material, profile, product, revision | Vinyl vertical panel, manufacturer manual rev. 2024-06 |
| WRB / drainage plane | Product or assembly layer | Housewrap over sheathing; base flashing detail A5 |
| Cavity feature | Furring, mat, textured wrap, direct-applied, or unknown | 3/8-inch furring shown on wall section; screen at base |
| Intended exit | Weep, screened opening, weep screed, drip, or no cavity exit required | Screened base opening to exterior; detail A5 |
| Product source | Exact manual section and page or drawing | VSI manual pp. 26–29; project detail E2-04 |
| Jurisdiction source | AHJ, code edition, amendment, inspection record | City of ___, permit ___, adopted ___; confirm with building official |
| Safe observation | What is visible from grade or approved platform | Screen visible for 32 in.; left 16 in. hidden behind trim |
| Photo / DOC IDs | Stable record names | PHOTO E2-B03-01; DOC A5-REV2 |
| Responsible trade | Trade that installed or owns the detail | Siding installer; roofer at upper transition |
| Release owner | Builder or construction manager | Builder PM, initials/date |
| Exception | Specific unresolved condition | Sealant appears to bridge base opening; function unknown |
| Decision | Release, release with documented exception, or HOLD | HOLD pending detail response |
| Next handoff | Person, action, and due stage | PM to siding lead; correct before final caulk and paint |
Use “unknown” only as a temporary state with a next action. “N/A” needs a reason, such as “direct-applied cladding; approved detail shows no cavity.” “Not visible” needs a record request. “Looks good” is not a decision criterion.
Decision matrix
Use the following matrix to keep the release language proportionate to the evidence.
| Condition | Evidence status | Homeowner decision | Builder handoff |
|---|---|---|---|
| Exact manual and detail identify the path; visible outlet is open or appropriately screened; photos and owner are recorded | DOC + OBS + PHOTO | Release that zone | Builder records date and proceeds to the next dependent trade |
| Path is specified but hidden behind completed work; pre-cover photos and trade record are complete | DOC + PHOTO, no current OBS | Release only as a documented concealed condition if the builder accepts responsibility and the AHJ/contract documents allow it | Builder retains records and warranty responsibility; no homeowner certification |
| Visible condition may block an exit, but product function is unknown | OBS + HOLD | Do not release the affected zone | Builder obtains manual/detail response from trade or design professional |
| A transition lacks a flashing, lap, screen, clearance, or responsible owner in the record | HOLD | Hold until corrected or formally resolved | Builder coordinates the trades and records correction or approved alternative |
| Condition is inaccessible because it requires a ladder, roof, scaffold, removal, or electrical contact | Not observable | Do not self-inspect; request qualified inspection or records | Builder schedules safe access and provides the result |
| Homeowner and builder disagree about a local rule | Jurisdiction unresolved | Do not label it code-compliant or code-violating | Builder or permit holder asks the named AHJ and records the answer |
The middle row is important. A homeowner may accept a builder's documented concealed-condition release under the contract, but should not rewrite it as “I verified the hidden WRB.” Keep the wording precise: “Builder accepted concealed work based on pre-cover record DOC-__.”
Illustrative spacing example, not a performance test
Suppose an exact vinyl detail requires weep holes at no more than 24 inches apart. The elevation segment is 48 feet long. Convert feet to inches:
48 ft × 12 in/ft = 576 in
If you are testing a proposed maximum spacing of 24 inches and the detail uses openings at both ends, an illustrative count is:
N = ceil(576 in ÷ 24 in) + 1 = 24 + 1 = 25 opening positions
This is a counting method for a drawing or visible installation; it is not a measured drainage-performance result and does not decide how the product must be laid out. If a product manual instead specifies 18 inches, the same simple sensitivity is:
N = ceil(576 ÷ 18) + 1 = 32 + 1 = 33 positions
At 36 inches, it would be:
N = ceil(576 ÷ 36) + 1 = 16 + 1 = 17 positions
The result changes with the controlling spacing, end conditions, corners, joints, openings, and the manufacturer's actual layout. Do not count holes in a fiber-cement base, stucco screed, brick veneer, or metal trim using this vinyl example. The VSI manual's 3/16-inch and 24-inch example is deliberately bounded to the specified vinyl details.
Illustrative record example
The following is modeled, not observed at a real home:
| Field | Modeled entry |
|---|---|
| Elevation / zone | E2 south / base B03, 48 ft between corner post and door |
| Cladding | Vinyl vertical siding; exact product manual pending confirmation |
| Intended path | WRB laps over base flashing; cavity or J-channel outlet drains to exterior |
| Screen | Nylon or product-specific screen shown in detail; installation not yet visible at right corner |
| Observation | Left 32 ft visible from grade; right 16 ft hidden by temporary protection |
| Photo IDs | E2-B03-wide-01, E2-B03-left-close-02 |
| Exception | Sealant appears at the base near D01; cannot tell if it is perimeter sealant or blocked weep |
| Owner | Builder PM to obtain siding lead's manual reference and pre-cover photo |
| Decision | HOLD for the right segment and sealant function; no elevation release yet |
The modeled decision does not say the sealant is wrong. It says the evidence cannot distinguish two possibilities that lead to opposite actions: preserve a drainage opening, or seal a joint that the detail intentionally seals. This is what a useful worksheet does: it preserves uncertainty until the right person resolves it.
Record sources without overstating them
For each row, link the source in the article or project record by function. PNNL/DOE guidance can support the general idea of a drainage plane, base flashing, screens, and penetration management. The ICC page can support a model-code question, with the AHJ limitation stated. A manufacturer manual can support its own product's gap, screen, trim, fastener, or clearance. A builder's response can document project responsibility, but it does not become independent technical evidence merely because it is written.
The rigid-board manual hosted by Lowe's provides one product-system example in which strapping is installed for siding and bug screens are provided at the top and bottom of strapping, while its opening details defer variations to the window or door manufacturer or applicable standard. Use that record only for the manual's system scope. The source is useful precisely because it shows why a screen may be part of a furring assembly and why a window variation needs its own controlling input.
7. Resolve exceptions, release the handoff, and decide what comes next #
An elevation is ready for release when every material uncertainty has either been corrected or explicitly accepted by the responsible builder under the project's records, and the next trade receives the evidence and remaining limits. A visual “pass” without an exception log is not a durable release.
Classify the exception
Use one of five classes so the response matches the risk:
- Blocked drainage: a required weep, screened opening, flashing outlet, or cavity path appears closed, filled, buried, or stopped.
- Broken continuity: the WRB, flashing, seam, or air-control layer has a visible gap, unsealed cut, wrong lap, puncture, or unassigned penetration.
- Wrong interface: the cladding meets a roof, deck, masonry, window, door, trim block, or service without a documented transition.
- Uncontrolled clearance: grade, hardscape, deck, roof, or adjacent material may reduce the product or approved-detail clearance.
- Evidence or authority gap: the condition may be correct, but the exact manual, permit requirement, pre-cover record, responsible trade, or AHJ answer is missing.
The fifth class is not administrative trivia. If the only proof is a generic photo, the builder may not be able to show what was behind the cladding later. If the only code answer is “that is what our last house used,” the project has not identified the actual jurisdiction. If the only product answer is a different profile, the dimension may be wrong for this cladding.
Ask for the smallest useful correction package
Do not ask the trade to “fix the siding” as a single instruction. Request a correction package containing:
- the exact issue location and photo or drawing ID;
- the approved detail or manual reference;
- the responsible trade and builder release owner;
- the proposed correction or written reason the condition is acceptable;
- any removal, replacement, or protection needed to avoid concealing the issue;
- new photos after correction, including a wide view and a close view;
- the effect on adjacent openings, screens, flashing, sealants, finish, or future maintenance;
- the next dependent trade and the date or construction stage at which it can proceed.
If the correction changes a detail, require the builder to decide whether a designer, engineer, manufacturer representative, or AHJ must review it. A homeowner should not approve a field change that affects structure, fire, water, air, or a permit condition merely because it looks cleaner.
Recheck after correction
Compare before and after records. Confirm that the correction did not solve one path by closing another. Examples:
- A new bead of sealant may stop water at a trim block but cover a required weep.
- A new screen may keep insects out but be folded into a solid plug or reduce the product's required free area.
- A new base trim may improve appearance but press against flashing or trap the cavity.
- Raising grade may improve drainage away from the house but bury the cladding termination.
- Removing a panel to repair flashing may damage the WRB, fasteners, or adjacent panels.
- Adding a future equipment sleeve may preserve the service route but require new flashing and air-sealing records.
Have the release owner update the row, not just the photo folder. The row should show the prior exception, the correction record, the new status, and the next handoff. A photo without a decision leaves the project team to rediscover the issue later.
Handoff language that stays accurate
Use one of these short statements in the project log:
- Release: “Builder releases E2-B03 for the next scheduled cladding stage based on DOC-A5, PHOTO-01 through PHOTO-04, and the named product manual. This record covers visible conditions and does not certify concealed work.”
- Release with concealed record: “Builder accepts the concealed base condition based on pre-cover photos PHOTO-, trade checklist DOC-, and detail __. Homeowner did not independently verify concealed continuity.”
- Hold: “E2-B03 remains on HOLD because the visible condition may block the drainage exit and the exact product detail has not resolved the function. No final release until the builder provides the responsible trade response and after-correction record.”
- Jurisdiction handoff: “The project team has not established whether the proposed clearance is required by the adopted code in [actual city/county/state]. Permit holder to ask [AHJ] and attach the response before release.”
This language avoids a common failure: converting a homeowner's request for evidence into an accusation of noncompliance, or converting a builder's visual confirmation into an unsupported warranty statement.
What to bring to a qualified professional
If the builder cannot resolve a material exception, give a qualified local professional a compact packet:
- the project address and actual jurisdiction;
- permit number, adopted code edition, and relevant amendment or approved alternative;
- wall section, elevation, and detail revision;
- cladding, WRB, flashing, screen, trim, window, and sealant product names;
- the exact zone and all before/after photos;
- the responsible trade's written answer and any proposed correction;
- the construction stage and what has already been concealed;
- the homeowner's specific decision: release, repair, test, open-up, or AHJ clarification.
Ask whether the professional is being engaged for a visual review, code inspection, manufacturer consultation, destructive investigation, water test, air test, or design opinion. These are different scopes. Do not describe a visual review as an engineering certification. Do not ask a remote consultant to certify a condition that cannot be seen or measured remotely.
Maintenance handoff after release
At closing or exterior-completion handoff, retain the final worksheet, source manuals, product records, permit and inspection records, transition details, photo index, unresolved exceptions, and any maintenance instructions. Note which screens, weeps, sealants, and clearances should remain visible and which conditions are intentionally concealed. Keep the record with the home, not only with a subcontractor.
After occupancy, look at the base and transitions from grade during routine exterior observations, especially after heavy rain, wind-driven rain, landscaping changes, deck work, or service additions. Look for staining, trapped debris, insect nests, damaged screens, displaced trim, failed sealant, or water emerging where the design did not anticipate it. Do not pressure-wash into openings or insert tools into weeps. If the observation suggests a concealed leak, stop changing the condition and call the builder, qualified cladding professional, or appropriate local expert.
The release decision is complete when the record tells the next person what was built, what was visible, what remained concealed, which source controlled each detail, who accepted the handoff, and what future work must not block the drainage or ventilation path. That is a stronger homeowner decision than “the siding looks finished,” and it remains useful when a future repair, service penetration, grade change, or warranty question reaches the wall years later.
Cite this guide
Brictale. “How to Verify Siding Drainage Openings Before Cladding Release.” Published 2026-10-06; updated 2026-10-06.
https://brictale.com/build/construction/verify-new-home-cladding-drainage-openings-before-release · Read the Markdown version
Original contribution: Elevation-by-Elevation Cladding Release Worksheet. A homeowner evidence register that follows each elevation from its water-resistive barrier and base drainage exit through openings, trim blocks, transitions, screens, clearances, exceptions, responsibility, and the next release decision.
Sources and scope
Evidence behind this page
- A drainage approach places a water-resistant layer behind cladding so incidental water can run down and out; typical cladding should not be treated as a perfectly sealed waterproof surface.
Building America Solution Center guidance from PNNL/DOE for above-grade residential wall moisture control; general building-science guidance, not a project-specific design or local code determination.
Accessed · Link to this claim - Bottom-of-wall flashing should be integrated with the continuous drainage plane, with the WRB installed shingle-fashion over the flashing so water is directed out; missing or poorly executed base, penetration, opening, roof, and cladding-transition flashing are common leak locations.
Flashing at Bottom of Exterior Walls
Building America Solution Center residential wall guidance; examples distinguish brick veneer, stucco, and other cladding systems and defer height or detail requirements to applicable local code and the assembly design.
Accessed · Link to this claim - A rainscreen cavity can provide drainage and some drying when it is detailed with openings; bottom and top vent openings may be screened to keep out insects and, in wildfire areas, burning embers.
Moisture-, Impact-, Fire-, and Pest-Resistant Exterior Siding
Building America Solution Center guidance for wood and fiber-cement siding and other cladding families; recommended gap sizes vary by cladding and location, and the article does not establish a universal opening dimension.
Accessed · Link to this claim - A continuous drainage plane behind exterior cladding must be integrated with base, roof, window, door, and other wall flashings, and penetrations such as spigots, exhaust outlets, HVAC lines, lights, and receptacles need careful sealing or gasketing.
Drainage Plane Behind Exterior Wall Cladding
Building America Solution Center new-construction and retrofit guidance; it describes a water-management principle and examples, not a substitute for the exact cladding, WRB, flashing, window, or local requirements.
Accessed · Link to this claim - Building America guidance recommends screening over furring at the bottom and top of exterior-wall ventilation gaps to restrict insect entry; hole-sealing methods depend on opening size and material.
Building America Solution Center residential pest-control guidance; screening is a design and installation detail, not proof that a particular mesh, ember rating, or local pest requirement applies to every wall.
Accessed · Link to this claim - The 2024 International Residential Code model text states that exterior wall envelopes are to prevent water accumulation by providing a WRB behind exterior cladding and a means of draining water that penetrates the cladding; it also describes continuity and accepted WRB paths.
2024 International Residential Code, Chapter 7 Wall Covering
International Code Council model-code text for the 2024 IRC; it is not automatically the law in every U.S. location and must be checked against the state, city, county, or other authority having jurisdiction and its adopted edition and amendments.
Accessed · Link to this claim - The Vinyl Siding Institute manual gives a product-family example in which certain J-channels use weep holes at least 3/16 inch (4.8 mm) in diameter no more than 24 inches (610 mm) apart, and the starter or J-channel is kept off head flashing so holes are not blocked.
Vinyl Siding Institute 2020 Installation Manual
VSI manual guidance for specified vinyl siding transitions and vertical-siding details; these dimensions must not be transferred to fiber cement, wood, metal, stucco, masonry, or a different manufacturer's system without the controlling manual.
Accessed · Link to this claim - The VSI manual describes flashing and J-channel sequencing around windows and doors and instructs installers to follow applicable local codes and the manufacturer's specific instructions where variations apply.
Vinyl Siding Institute 2020 Installation Manual
VSI manual accessory and opening details for vinyl siding; not a project-specific window installation standard, code approval, or substitute for the window, flashing, WRB, and cladding product instructions.
Accessed · Link to this claim - James Hardie's dealer installation guidance shows product-specific best-practice examples for kickout flashing, roof-to-wall, deck-to-wall, ground-to-siding, and blocked-penetration clearances, including locations where a gap is intentionally not caulked.
James Hardie Dealer Installation Best Practices
James Hardie siding and trim installation guidance; clearances and climate or product designations on the page are manufacturer-specific examples, not a national code rule or universal requirement for other cladding systems.
Accessed · Link to this claim - A rigid-board installation manual illustrates opening sequencing with flashing and strapping and says to provide bug screens at the top and bottom of strapping for the siding assembly; it also defers window and door variations to the applicable manufacturer or installation standard.
Rigid Board Installation Manual
Manual hosted by Lowe's for rigid insulation board installation, including siding, openings, strapping, and screens; the manual is a product/system document and does not establish a generic screen or flashing rule for all homes.
Accessed · Link to this claim - DOE guidance identifies utility penetrations through an air barrier as locations that should be caulked, gasketed, or otherwise sealed while allowing for material movement and vibration; it distinguishes air sealing from the separate need to manage water.
Energy-Efficient Home Improvement Credit Insulation and Air-Sealing Essentials
U.S. Department of Energy educational guidance referencing 2021 IECC air-sealing examples; it is not a project inspection, local code adoption record, or cladding-product installation instruction.
Accessed · Link to this claim - OSHA residential-construction guidance identifies exterior finishing activities such as windows, doors, siding, and gutters as tasks that can pose fall hazards and describes stable elevated platforms and fall-protection responsibilities for workers; the guidance itself is not a standard or regulation.
Fall Protection in Residential Construction - OSHA Guidance Document
U.S. Department of Labor OSHA guidance for employers and workers in residential construction; homeowners should not treat it as permission to climb or as a substitute for the site's competent person, employer controls, or applicable state plan.
Accessed · Link to this claim - Building Science Corporation describes a functional drained wall as including a cladding screen, drainage plane, drainage gap or cavity, flashing to direct water outward, and drain or weep openings.
RR-0905: Modeled and Measured Drainage, Storage and Drying Behind Cladding Systems
Building Science Corporation technical report describing drained-wall components and moisture storage/drying mechanisms; it is not a prescriptive code or a performance test of the reader's wall.
Accessed · Link to this claim - Building Science Corporation distinguishes a vented wall with openings at the bottom from a ventilated wall with openings at top and bottom, and cautions that a drainage cavity alone does not ensure ventilation because vent locations and details matter.
RR-0907: Ventilated Wall Claddings: Review, Field Performance, and Hygrothermal Modeling
Building Science Corporation review and modeling report; terminology and research findings inform verification questions but do not select a cavity, screen, or opening detail for a particular cladding product.
Accessed · Link to this claim