How to Manage a New-Home Radon Rough-In Before the Slab Pour
Use a foundation-specific, jurisdiction-aware checklist to verify a new-home radon rough-in before concrete hides it, then plan testing and activation.
The short answer
Before concrete is poured, compare the approved foundation detail with the actual gas-permeable layer or crawlspace collection path, sealed membrane, labeled vent pipe, penetrations, termination route, and fan-ready electrical provision. Have the builder coordinate required local inspections, photograph the concealed work, and name the post-occupancy testing owner. A rough-in or passed inspection is not proof of safe radon levels; test after move-in and activate or correct the system based on the result.How to Manage a New-Home Radon Rough-In Before the Slab Pour
Before concrete is poured, compare the approved foundation detail with the actual gas-permeable layer or crawlspace collection path, sealed membrane, labeled vent pipe, penetrations, termination route, and fan-ready electrical provision. Have the builder coordinate required local inspections, photograph the concealed work, and name the post-occupancy testing owner. A rough-in or passed inspection is not proof of safe radon levels; test after move-in and activate or correct the system based on the result.
The decision is whether the rough-in is complete enough to preserve, not whether the pipe looks finished #
The rough-in is ready to preserve only when the concealed collection path, soil-gas barrier, connections, penetrations, future vent route, and handoff records agree with the approved plans and the jurisdiction's requirements; a pipe rising beside the foundation by itself is not enough, and the rough-in is not a guarantee of a safe indoor radon level.
That distinction matters because the concrete pour changes the homeowner's evidence position. Before the pour, you can compare layers, seams, pipe connections, sleeves, labels, and clearances while they are visible. After the pour, you may still be able to inspect the exposed riser and the roof termination, but you may no longer be able to establish what happened below the slab without opening finished work. The objective of this checkpoint is therefore not to certify a radon result. It is to preserve a plausible, continuous path for later testing and activation, and to record enough evidence that a builder, code official, designer, or qualified radon professional can decide what must happen next.
EPA describes a passive radon-resistant system as a pressure-control and venting arrangement that can later be made active with a fan. EPA also says the only way to know whether a new home has a radon problem is to test it after construction, even when passive features were installed. Read EPA's new-home construction guidance as the performance sequence: design and install the features, preserve the system, occupy the home, test, then decide whether activation or correction is warranted. Do not invert that sequence by treating a visible pipe, a builder statement, or a passed inspection as a measured indoor result.
What the homeowner can decide at this stage
You can decide whether to release the foundation stage to the next handoff, whether to pause the pour for clarification, and what must be added to the project record. You can also decide who owns the later test and what test result will trigger a call to a qualified radon professional. You cannot safely decide, from a walk-through alone, that an underground collection system is balanced, that the foundation is structurally adequate, that a pipe route satisfies the adopted code, or that indoor radon will remain below a target.
Use four possible statuses for each item:
| Status | Meaning before the pour | Homeowner action |
|---|---|---|
| Verified | The item is visible, matches the approved detail or written direction, and has a dated record or responsible professional confirmation. | Record it and allow the responsible construction team to continue if all jurisdictional gates are also clear. |
| Documented exception | The detail differs from the plan, but the designer, builder, or authority having jurisdiction has issued a written resolution. | Save the resolution with the photos; do not rely on a verbal explanation. |
| Open | The item is not visible, not assigned, or not reconciled with the plan. | Ask the builder to resolve it before the concrete conceals it. |
| Not applicable | The foundation detail uses a different approved method, such as a crawlspace-specific collection arrangement. | Record why it is not applicable and identify the replacement item. |
“Not applicable” is not the same as “not needed.” A slab-on-grade, basement, sealed crawlspace, vented crawlspace, and mixed foundation may use different details. The record should say which condition exists and which source or approved detail controls it.
The answer depends on the actual jurisdiction
The default market for this guide is the United States, but the United States does not have one homeowner-facing pre-pour radon inspection workflow. The state, county, municipality, tribal authority, permit office, adopted code edition, and project program can all matter. EPA says jurisdictions in areas with high radon potential may require or recommend passive systems and directs builders to the state radon office for local information. Its radon-zone and state-contact resource is a starting point, not a permit approval.
Write the jurisdiction on the worksheet before anyone asks for an inspection. Use a full entry such as “City of Phoenix, Maricopa County, Arizona” or “City of Austin, Travis County, Texas,” not merely “Arizona” or “Texas.” If the property is outside city limits, identify the county or other permitting authority. If the home is in a development with a private inspection program, record that program separately from the public building department. If the home is being built under a voluntary label or builder standard, record the program name and the version used.
Originality brief: what this guide adds and how to check it
Current public answers explain radon-resistant components, foundation details, and post-occupancy testing in separate places. The missing decision is whether the homeowner has enough evidence to release the pre-pour handoff without confusing a rough-in with an active system or a test result. This guide's original contribution is the Radon-ready pre-pour handoff worksheet: a foundation-type and jurisdiction-aware mapping of the approved detail, concealed components, accountable people, inspection gates, photo record, test owner, and activation trigger. You can check it by tracing every row to the approved plan, a current local instruction, or a cited source claim, then asking the responsible professional to close every open row. Its method and limitations are set out in full in the worksheet section below; it is not a design, engineering opinion, inspection report, certification, measurement, or guarantee.
For adjacent decisions about planning and managing a home build, continue with Brictale's home-building blog. For the source, scope and originality standard used here, read Brictale's research and review method.
The next decision is simple: if the foundation type, local authority, approved detail, and responsible people are not yet written down, do that before reviewing the pipe. If they are written down, use them to inspect the right sequence rather than applying a generic checklist to the wrong foundation.
Before reviewing the pipe, lock the foundation, jurisdiction, and responsibility map #
Before the pre-pour walk-through, the homeowner should have a marked foundation plan, the applicable permit and inspection sequence, the state radon-office contact, and one named person responsible for closing each open item; without those inputs, a visual review can miss the part of the system that the concrete will conceal.
Input 1: identify every foundation condition that touches soil
Start with the structural and architectural plans, not with the pipe. Mark each area where conditioned or occupiable space is separated from soil: slab-on-grade areas, basement slabs, basement walls, crawlspace floors, interior footings, sumps, floor drains, utility penetrations, elevator or mechanical pits if applicable, and attached areas built on a different elevation. A home can contain more than one foundation condition. For example, a main slab-on-grade wing may connect to a lower basement, while a garage or porch uses a separate slab and the crawlspace under an addition uses a different barrier.
The question is not “Where is the radon pipe?” It is “What approved detail controls each soil-contacting area, and how do those areas communicate with the collection system?” A riser serving one slab may not automatically serve an isolated basement or a separated crawlspace. A design professional or qualified radon professional must resolve complicated or discontinuous layouts. The homeowner's role is to make the discontinuity visible in the meeting record.
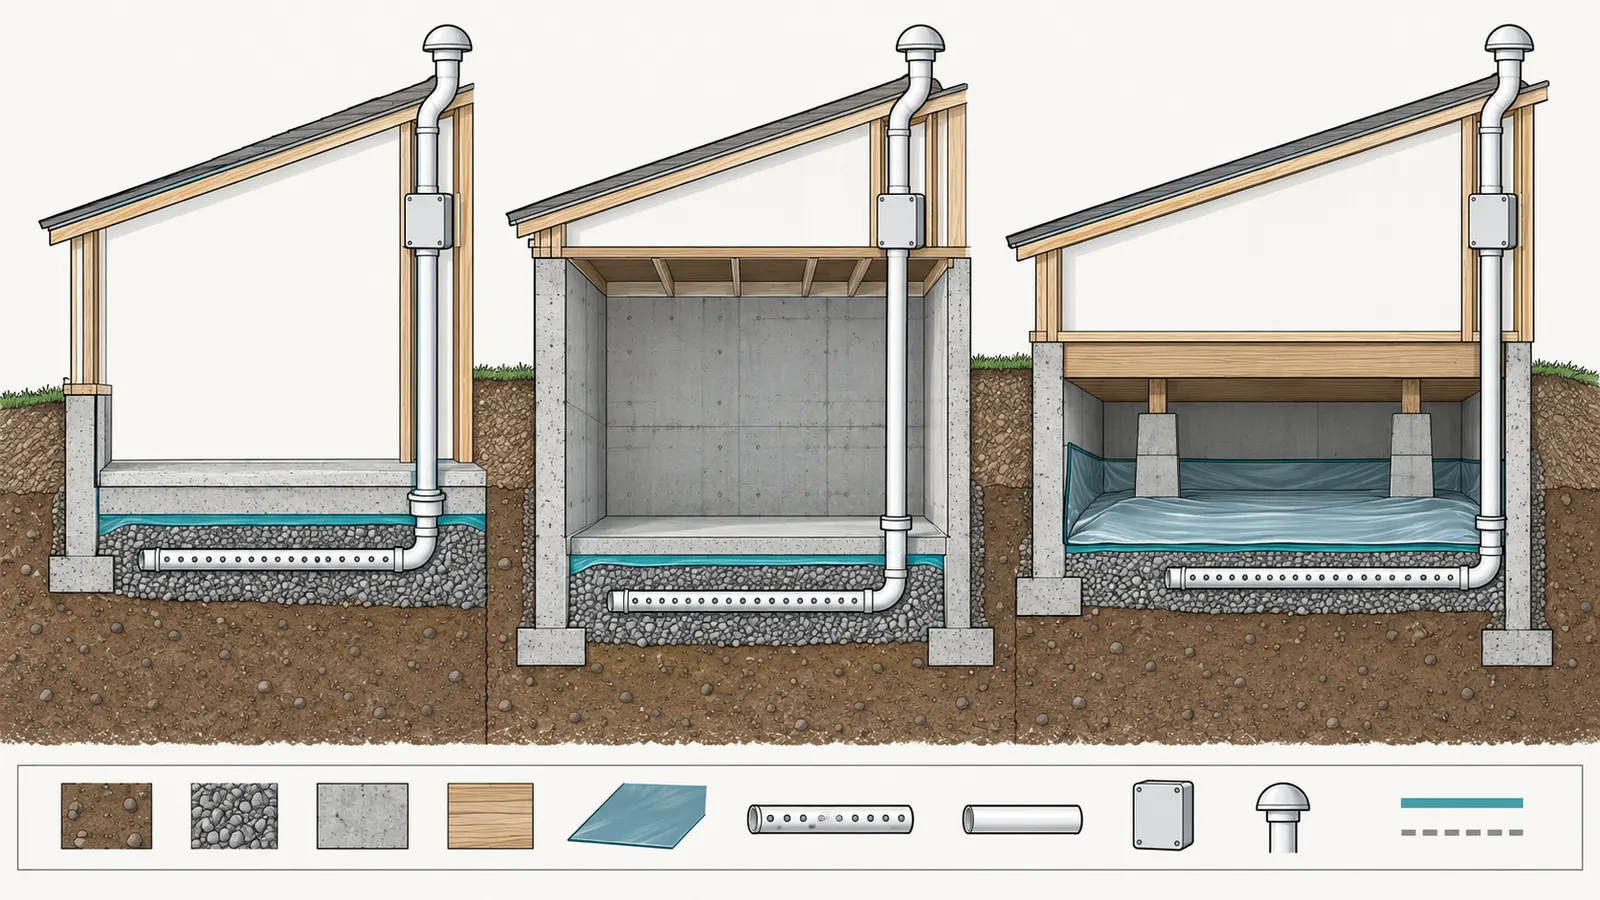
EPA's public overview describes the common slab sequence as a gas-permeable layer below the slab, a soil-gas barrier above that layer, a gas-tight vent path to the exterior, sealed foundation openings, and a fan-ready electrical provision. The DOE Building America Solution Center's radon-resistant construction detail likewise describes a sealed foundation, collection layer, perforated collection pipe, solid vent pipe, and fan-ready junction box. Both sources say techniques vary with foundation and site requirements. Use EPA's component overview to create questions, not to override the approved foundation detail.
Input 2: identify the actual authority having jurisdiction
Ask the builder or permit holder for the inspection schedule associated with the permit. Then independently verify the sequence with the permitting office or its current online instructions. Ask five specific questions:
- Which office is the authority having jurisdiction for this address?
- Is a radon-resistant feature required by the adopted code, a local amendment, a permit condition, an owner-selected program, or only recommended?
- Which inspection or third-party report must pass before the slab or foundation concrete is placed?
- May the radon rough-in be reviewed as part of another foundation, plumbing, electrical, or special inspection, or does it have its own inspection?
- What records must be uploaded, left on site, or included in the closeout package?
Do not ask “Is radon required here?” as if the answer must be yes or no. Ask which rule or program controls this permit and request the citation or checklist name. A state radon office can explain program guidance and contacts, but the building department or other authority having jurisdiction controls the permit inspection sequence. A private certification program may add requirements without replacing local code. A builder's standard detail may be more protective than the minimum rule, but it still needs to be described accurately.
The EPA map is useful for finding state contacts and communicating potential, but it is a county-level prediction. It does not measure the lot, the foundation, or the finished home's indoor air. A Zone 3 location is not a promise of low radon, and a Zone 1 label does not tell you which construction detail your permit requires. Capture the county zone as context and record the state-office answer and local permit direction separately.
Input 3: assign the people who own the handoffs
The homeowner may own the decision to request documentation, but the homeowner does not own every technical task. Make the following responsibilities explicit in writing:
| Task | Primary responsible person | What the homeowner receives |
|---|---|---|
| Confirm foundation-specific design | Architect, engineer, builder, or designated radon professional | Marked detail and written clarification for exceptions |
| Install sub-slab or crawlspace collection features | Foundation crew or assigned trade | Installation confirmation, product details if relevant, and photos |
| Install and protect vent pipe | Plumber, mechanical trade, builder, or other assigned installer | Route, labels, connection record, and later termination confirmation |
| Provide fan-ready power | Electrical contractor | Circuit or junction-box location and permit/inspection record where applicable |
| Schedule public or third-party inspection | Permit holder or general contractor, subject to the local rule | Inspection type, date, result, and correction record |
| Preserve the photographic record | Builder, owner, or designated inspector | Dated photos with location labels and plan reference |
| Arrange post-occupancy testing | Named homeowner or builder warranty contact | Test method, owner, timing, device or professional, and report destination |
| Decide on activation or correction | Homeowner with qualified radon professional and builder/design team as appropriate | Written response to the result and updated system documents |
As a local illustration, the City of Austin says the permit holder and owner-general contractor are responsible for the proper sequence of inspections, while anyone listed on the permit may schedule one. That is an Austin responsibility rule, not a national rule; it is useful because it shows why a homeowner should not assume that “the inspector” or “the plumber” owns the complete chain. Read Austin's current inspection-scheduling guidance and verify the equivalent instruction for the actual property.
Input 4: decide what evidence must survive the pour
The evidence package should let a person who was not present reconstruct the concealed work. Include the approved plan or detail with the foundation areas highlighted; a simple orientation sketch; the address and date; the foundation type; the jurisdiction; the relevant permit and inspection numbers; installer names; product or material descriptions when they affect compatibility; inspection results; and photos keyed to locations.
A useful photo is not a close-up of a pipe with no context. It shows the pipe in relation to a gridline, footing, wall, corner, penetration, or room. Take both wide and close views. Place a temporary ruler, tape measure, or labeled card in the frame only when it can be done safely and without disturbing the work. Do not walk across unsupported membrane, lean over an excavation, enter a confined or unstable space, or move a pipe or seal to improve a photo. Ask the responsible crew to expose or document the condition safely.
Record what a photo proves and what it does not prove. A photo of a taped seam may prove the seam was visibly treated at that moment; it does not prove the tape remains bonded after weather, traffic, or the pour. A photo of a riser may prove location and label; it does not prove a continuous connection beneath the barrier. A permit inspection result may prove the official observed a defined scope; it does not prove an indoor concentration. This distinction is central to the handoff.
What to bring to the pre-pour meeting
Bring the approved plan set, foundation detail, building permit, trade permits, current inspection list, local radon-office or building-department response, builder scope, and any chosen voluntary standard or certification requirements. Bring a blank copy of the worksheet below and a way to record written answers. If the foundation has changed since plan approval, bring the change order or revision. If a basement, crawlspace, or slab detail was substituted, ask for the revised detail before the inspection.
The next decision is whether the assigned team can show both the physical condition and the written authority for each departure. If not, keep the pour decision open.
Use the foundation-specific sequence to verify the concealed system #
The pre-pour sequence is complete only after the team has verified the soil-gas collection layer, barrier continuity, pipe connection and route, penetrations, future termination, electrical provision, local inspection gate, and record package in the order that the work will be concealed.
The sequence below is a coordination framework derived from the EPA construction components, PNNL building-science details, and the ANSI/AARST model-standard concepts. It is not a substitute for the approved plans or local inspection checklist. Where the documents differ, stop and ask the responsible design professional or authority having jurisdiction which document controls.
Step 1: confirm the subgrade and collection layer
For a slab-on-grade or basement slab, inspect the layer below the soil-gas barrier that is intended to allow soil gas to move toward the collection point. EPA's common example is 4 inches of clean, coarse gravel, while its page also notes that alternatives such as a perforated pipe or collection mat may be used in some regions. The homeowner should record the specified material, thickness or performance description, area covered, and the source of the requirement. Do not change aggregate size or substitute sand because a crew says it is “close enough.”
For a crawlspace, do not copy the slab checklist without checking the detail. EPA's new-home buyer guidance says a gas-permeable layer is commonly used under slab or flooring systems and is not used in the same way for crawlspace foundations. The PNNL crawlspace guidance describes a crawlspace example with a perforated collection pipe in gravel beneath the polyethylene ground cover. That is why the worksheet has a “foundation condition” column rather than a single gravel yes/no box.
The visual questions are:
- Does the collection layer cover the soil-contacting area identified on the plan?
- Is the collection point connected to the vertical vent path rather than merely located near it?
- Are interior footings, piers, thickened slabs, separate rooms, or grade changes likely to isolate part of the area?
- Are drains, sumps, sleeves, or other openings addressed in the approved detail?
- Has the crew protected the collection path from being clogged by fines, mud, concrete, or unapproved fill?
You are observing access and continuity, not performing a soil-gas flow test. If the crew cannot safely show the layer because it is already covered, mark the item open and request the installer confirmation, plan detail, inspection record, and photographs that existed before concealment. Do not ask an unqualified homeowner to excavate or reopen the work.
Step 2: verify the soil-gas barrier and its edges
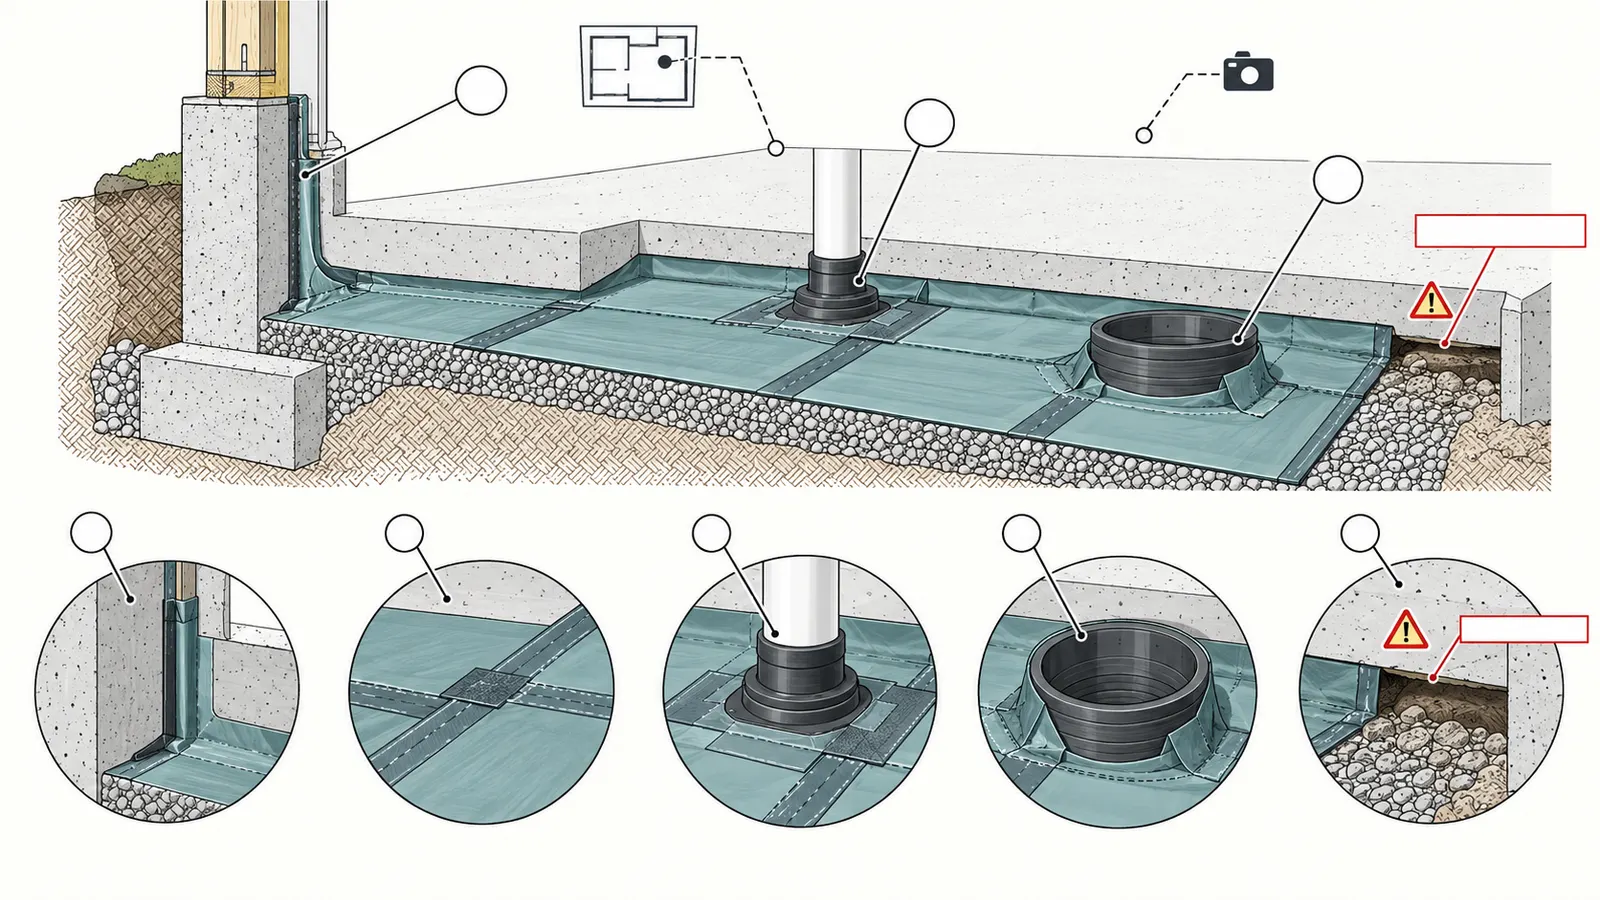
The barrier is intended to separate soil gas from indoor air. EPA's common example uses heavy-duty plastic sheeting or a vapor retarder over the collection layer, while PNNL's crawlspace guidance emphasizes complete coverage, sealed seams, and sealing around piping. Inspect the actual material and its stated use, not just the fact that plastic is present. A sheet used for a different moisture or curing purpose may not be the specified soil-gas retarder.
Check the field conditions without walking on or disturbing the membrane:
- Is the barrier continuous across the planned footprint?
- Are sheets overlapped and sealed in the way specified by the product, approved detail, or program?
- Are edges turned, sealed, or otherwise connected at walls, footings, piers, and other changes of plane as the detail requires?
- Are pipe penetrations, sleeves, drains, and sumps sealed with a compatible method?
- Are tears, punctures, wrinkles, exposed gravel, unsealed joints, and unprotected traffic paths recorded?
- Has another trade placed a conduit, rebar chair, form, or sharp object through the barrier?
The PNNL capillary-break guidance gives 6 to 12 inches as an overlap range for its polyethylene example and says seams should be taped or sealed, with visual inspection before the slab pour. It also warns that ordinary cloth-backed duct tape is not an appropriate lasting bond for that use. This is source-specific building-science guidance, not permission to dictate a product or tape to a crew. Ask what the approved detail and product instructions require, then check that the installation matches.
The barrier is not “done” because it is flat. A continuous membrane can still fail at a pipe, pier, wall, sump, or perimeter joint. These edges are often more important to record than an unobstructed middle field. If the plan calls for a slab perimeter joint seal, record its planned location and who will seal it after the concrete cures. The final joint may not yet be visible in the pre-pour view, so the handoff must create a later closeout task.
Step 3: verify the collection-to-riser connection
The horizontal collection path must connect to a solid vertical vent path in the manner shown by the approved detail; a vertical pipe embedded in concrete with no documented sub-slab connection is an unresolved pipe, not a verified system.
Look for the actual connection: a tee, coupling, sleeve, or other approved transition between the collection layer or perforated pipe and the solid riser. Ask the installer to identify it on the sketch and in a photograph. Check that the connection is supported, protected from displacement, and not blocked by aggregate or concrete. Record pipe material, nominal diameter, orientation, and label if visible. EPA's basic page describes a 3- or 4-inch solid PVC Schedule 40 vent pipe as a common example, but that description does not convert every project into a universal 3- or 4-inch code requirement.
The phrase “gas-tight” needs a practical handoff. Ask what joints, couplings, and sealants are specified and whether the pipe will be tested or inspected under the applicable detail. Do not invent a pressure-test threshold. If the installer or jurisdiction requires a test, record the actual test procedure and result. If no test is required, record the visual verification and the unresolved limit.
For a mixed foundation, ask whether each collection area has a route to the riser. A basement slab, crawlspace floor, and attached slab may have different sub-systems. A single riser can serve more than one area only if the approved design shows how. If a plumbing vent is nearby, do not assume it is the radon pipe. EPA says the radon vent is similar in appearance to a drain-waste vent but serves a different purpose; the system should be labeled “Radon System” or according to the adopted detail.
Step 4: trace the vertical route before framing hides it
The vent route should be traceable from the collection connection through the building and to the exterior termination, with the route labeled and protected from later trade conflicts. At pre-pour, you may only see the lower riser, but the builder should already show the planned upper route on the mechanical, architectural, or radon detail.
Ask the builder to mark:
- where the riser will pass through or beside conditioned space;
- which wall, chase, closet, attic, garage, or exterior enclosure contains it;
- how the pipe remains accessible for a future fan or service;
- whether the route could be confused with plumbing, combustion exhaust, dryer exhaust, or another vent;
- how roof and weather seals will be made; and
- where the discharge will be relative to windows, doors, skylights, mechanical intakes, and adjacent roofs.
The PNNL crawlspace example gives a roofline and opening-clearance example, and the AARST companion checklist separately calls for discharge clearances. Treat those as source-derived prompts, not a universal clearance table. Roof geometry and adopted rules can change the answer. A pipe that exits near an opening may be visible and straight yet still require relocation. Resolve the route before framing, insulation, roofing, or exterior finishes make the correction expensive.
Do not let the homeowner's desire for a hidden pipe erase the system label and service path. A concealed chase can look clean while making later troubleshooting or fan installation difficult. The record should show the access location, label location, and who will explain the system to the future occupants.
Step 5: verify penetrations and foundation openings
Every opening through the soil-gas boundary needs an identified treatment; a completed riser does not compensate for an unsealed sump lid, drain, sleeve, crack, utility penetration, or discontinuous wall-to-floor edge.
Use the foundation plan to make a penetration list. Include plumbing sleeves, electrical conduits, water and gas entries, floor drains, cleanouts, sump basins, structural posts, hold-downs, control joints, and any special systems. For each, record whether the item is above, below, or through the barrier; the specified seal; the responsible trade; and the inspection or photo needed after installation.
Some sealing work occurs before the pour, some during placement, and some after the slab or wall is complete. Separate “pre-pour visible” from “post-pour closeout.” For example, the membrane-to-pipe treatment may be visible now while a concrete crack or slab perimeter joint can only be sealed after the concrete cures. The handoff must not mark a future item complete merely because its pre-pour precursor was complete.
Ask the foundation or radon professional how the detail treats a sump. A sump may be part of drainage, but an unsealed opening can also be a soil-gas pathway. The AARST foundation checklist treats soil-contacting foundation areas, sealed sumps, and soil-exposed drains as separate items in its model inspection framework. You are not deciding whether a particular lid, gasket, sealant, or drain treatment is acceptable; you are making sure no opening is lost between trades.
Step 6: verify the fan-ready electrical provision
The fan-ready provision should be shown on the electrical plan, located where a future radon fan can be installed safely, and assigned to a qualified electrical professional; the presence of a junction box is evidence of preparation, not proof that the system is active or that the circuit is correct.
EPA's construction basics page describes an attic junction box or outlet for a future fan. EPA's homeowner page also describes a separate living-space provision for a fan alarm in its example. The exact circuit, disconnect, wiring method, location, weather exposure, and alarm arrangement are jurisdiction- and design-specific. Do not direct a homeowner to install, energize, or modify the wiring.
Ask the electrician and builder to identify:
- the planned fan location and whether it is outside occupiable space as the adopted detail requires;
- the junction box or outlet location and access path;
- the circuit or power source and whether it is dedicated or shared under the applicable electrical requirements;
- the disconnect or service method;
- the location of any monitor, alarm, or indicator; and
- the inspection record that covers the electrical work.
The AARST companion checklist treats electrical provision, fan location, fan clearance, and discharge as separate items. That supports a useful homeowner rule: do not collapse all electrical questions into “there is an outlet.” Capture where power is available, who verified it, and what future activation requires.
Step 7: close the local inspection gate
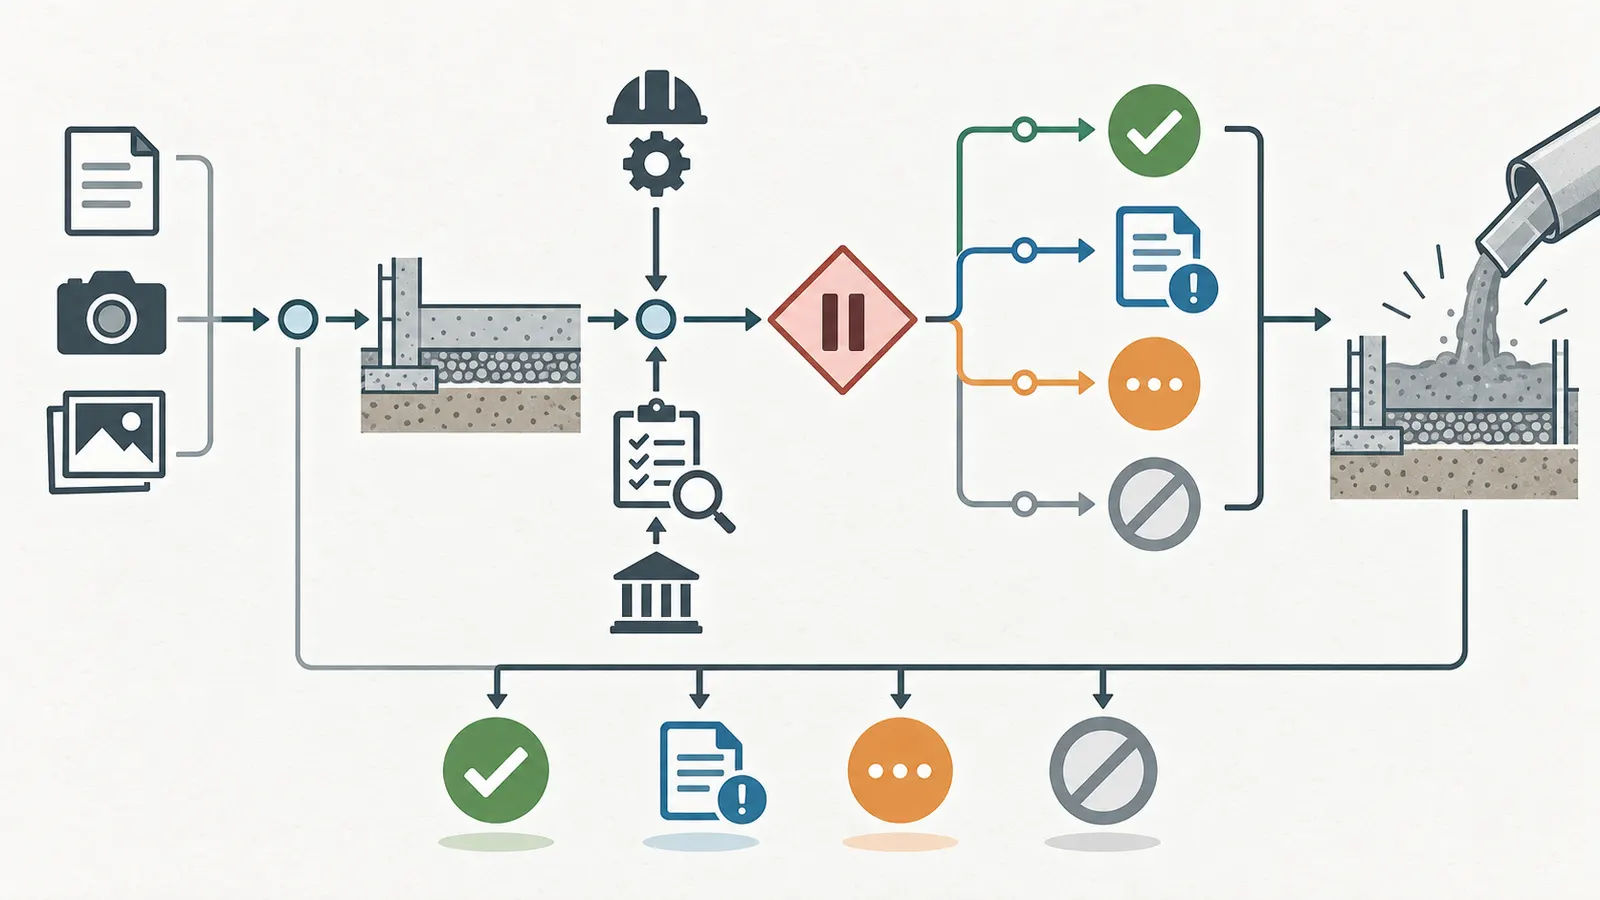
The concrete pour should wait for every required local inspection and any required third-party report, including inspections for work that is not labeled “radon” but controls the same concealed foundation stage.
Local workflows show why this matters. The City of Phoenix identifies underground plumbing and electrical, foundation reinforcing, structural hold-downs, footing dimensions, and electrical grounding as critical points before concrete is poured. This does not make Phoenix's list a national radon rule, but it demonstrates that a foundation pour is a coordinated inspection gate rather than a casual scheduling event. Read Phoenix's residential inspection page for that local example.
Austin Development Services currently lists residential building foundation, electrical slab, electrical grounding, and related checklists. The City's residential inspection flowchart dated July 10, 2019 identifies electrical slab and plumbing inspections before concrete for applicable work. Because that flowchart is dated and can be revised, use Austin's current building-inspections page as the live starting point and verify the exact permit requirements. The lesson is transferable: make the permit holder state which inspections are required, which have passed, and which must occur before the truck arrives.
When an inspector signs off, record the inspection type, date, result, corrections, permit number, and any limitation written on the report. If the inspection scope did not include the radon detail, do not describe it as a radon approval. If the inspector directs a correction, the builder owns the correction and the homeowner owns the request for a new record.
Step 8: release the pour only after a written handoff
The final pre-pour release should identify the system state as “passive rough-in,” “active system,” “alternative approved detail,” or “open/correct before concealment.” Most new-home pre-pour cases will be passive rough-in or alternative approved detail, not active system. Write the status plainly.
A one-line release message can say: “Foundation radon rough-in reviewed on [date] for [address], foundation condition [type], against [plan/detail and jurisdiction], with open items [list]. Concrete release approved by [responsible builder/design professional] after [inspection record], homeowner documentation received [yes/no]. Post-occupancy test owner: [name]. Activation/correction trigger: [written test rule and professional handoff].”
The homeowner should not sign a statement that says “radon safe” or “radon certified” unless the person and program authorized that statement and the supporting record exists. Use neutral language that preserves the difference between construction completeness and indoor performance.
The next decision is whether the record contains enough evidence to reconstruct what will be hidden. If yes, save it with the project closeout system. If no, keep the question open until the builder or qualified professional closes it.
Complete the Radon-ready pre-pour handoff worksheet #
The worksheet is complete when every foundation condition has a controlling detail, every concealed component has an owner and evidence record, every local gate is named, and the future test and activation decisions are assigned before the slab or crawlspace floor is concealed.
Contribution title and method
The original contribution is titled Radon-ready pre-pour handoff worksheet. It is a source-derived worksheet, not a field study. Its method is to map four layers of information into one record:
Method recorded for this contribution: Map the approved plan and actual foundation to the EPA component sequence, PNNL foundation details, current local inspection workflow, and ANSI/AARST rough-in and activation concepts; mark each item observed, documented, assigned, or unresolved.
- Project inputs: address, foundation condition, state and local jurisdiction, county radon-zone context, plan revision, permits, and selected program or standard.
- Construction inputs: collection layer or pipe, barrier, seams and edges, riser connection, vertical route, penetrations, termination, electrical provision, labels, and access.
- Accountability inputs: builder, foundation crew, plumber or mechanical installer, electrician, inspector, designer or engineer, testing owner, and future activation professional.
- Decision outputs: release before pour, correct before concealment, document an approved exception, test after move-in, activate after a qualifying result, retest, or investigate another pathway.
The worksheet uses a conservative status model. “Verified” means observed or supported by a named record; it does not mean the home has safe radon levels. “Open” means the handoff cannot yet be released. “Documented exception” means the deviation has a written resolution from the responsible authority or professional. “Not applicable” requires a reason and a replacement detail.
Contribution limitations
This worksheet does not calculate radon concentration, select a fan, size a pipe, approve a structural or electrical detail, interpret an unadopted code, certify a contractor, or replace an inspection. It does not establish that the EPA action level is a health threshold below which no risk exists. It does not prove that a passive system will work. It does not tell a homeowner to enter an excavation, crawlspace, attic, or confined area; hazardous access belongs to qualified workers using appropriate controls. It does not provide a local rule unless the actual jurisdiction is written into the record and the current authority confirms it.
Limitations recorded for this contribution: This is an illustrative homeowner coordination aid, not a design, engineering opinion, code interpretation, inspection report, certification, radon measurement, or guarantee of a safe indoor concentration.
The worksheet can be checked, however, by asking whether each row points to an approved drawing, a current jurisdiction instruction, a responsible person's confirmation, a dated photo, a permit record, or a test report. That is the point of the contribution: make the handoff inspectable without pretending it is an official document.
Worksheet: project and jurisdiction inputs
Fill this section before the pre-pour meeting.
| Field | Entry to complete | Why it affects the decision |
|---|---|---|
| Project address | Street, city, county, state, ZIP | Establishes the actual authority and state radon office. |
| Foundation conditions | Slab-on-grade, basement, crawlspace, mixed, other | Controls which collection and barrier detail applies. |
| Soil-contacting areas | Rooms, wings, levels, attached spaces | Prevents one riser from being assumed to serve every area. |
| Building department | Name and jurisdiction | Controls permits and inspection sequence. |
| State radon office | Contact, date checked, answer | Provides state program information and local contacts. |
| County radon-zone context | Zone or map entry, source date | Context only; not a lot test or indoor result. |
| Approved plan/detail | Sheet, detail, revision, date | The primary comparison document for the field condition. |
| Voluntary program or standard | Name, version, if any | May add requirements but does not automatically replace code. |
| Permit and trade permits | Numbers and responsible permit holder | Connects the physical work to the inspection record. |
| Pre-pour gate | Inspection names and required pass status | Determines whether concrete may legally or contractually proceed. |
| Post-occupancy test owner | Person, company, or warranty role | Prevents testing from disappearing after closing. |
| Activation trigger | Written result or professional recommendation | Defines the next decision without promising a result. |
The state radon-office line should say what was checked, not just “contacted.” For example: “On September 8, 2026, state office page reviewed; building department contacted by builder; no local radon requirement confirmed yet; builder's selected detail is [document]; open question assigned to [name].” If the office does not answer before the pour, record that uncertainty and ask the authority having jurisdiction or design professional how the permit should proceed.
Worksheet: concealed construction review
Use one block for each distinct foundation condition. Add rows rather than writing “entire house” when the project is mixed.
| Item | What to observe or ask | Evidence to save | Owner | Status / next action |
|---|---|---|---|---|
| Collection layer or approved alternative | Material, coverage, depth or performance description, and continuity match the detail. | Wide and close photos; marked plan; installer confirmation. | Foundation crew / builder | |
| Crawlspace collection arrangement | Perforated pipe, gravel trench, mat, or other approved detail is located beneath the barrier as specified. | Detail reference; connection photo; installer confirmation. | Foundation crew / radon professional | |
| Barrier material | Product or material matches approved specification and foundation use. | Product record or written description; photos. | Builder / foundation crew | |
| Barrier coverage | Soil-contacting area is covered without unrecorded gaps or isolated islands. | Plan with boundary marked; wide photos. | Foundation crew | |
| Seam treatment | Overlaps and tape/sealant follow the specified detail or product instructions. | Close photos with location labels; installer confirmation. | Foundation crew | |
| Edges and walls | Perimeter, piers, footings, grade changes, and transitions are treated as designed. | Edge photos; section detail; exception record. | Builder / designer | |
| Pipe penetrations | Barrier is sealed around riser and other pipes with compatible method. | Close photos; product or method record. | Foundation / plumbing trade | |
| Collection-to-riser connection | Horizontal collection path visibly or documentably connects to the solid riser. | Connection photo; sketch; installer statement. | Plumbing / mechanical trade | |
| Riser material and size | Matches approved detail; no unsupported universal size assumption. | Label photo; plan reference; material record. | Plumbing / mechanical trade | |
| Riser protection | Pipe is protected from displacement, crushing, concrete, and trade damage. | Photo before cover; builder confirmation. | Builder / foundation crew | |
| Pipe label | Marked as radon system or per applicable detail so it is not confused with plumbing. | Label photo; later route photo. | Builder / installer | |
| Vertical route | Route through building, chase, attic, garage, or exterior location is shown and serviceable. | Marked plan; route sketch; later framing photo. | Builder / designer | |
| Termination | Roof or exterior outlet route and clearances are checked against the adopted detail. | Roof plan; final photo; professional confirmation. | Builder / roofer / radon professional | |
| Sumps and drains | Each opening has a specified soil-gas treatment or documented exception. | Detail; photos; installer confirmation. | Foundation / plumbing trade | |
| Utilities and sleeves | Each soil-contacting penetration is listed and assigned a seal. | Penetration schedule; close photos. | Trade responsible | |
| Electrical provision | Future fan power, access, disconnect, and alarm/monitor path are designed and inspected. | Electrical plan; box photo; inspection record. | Electrical contractor | |
| Local inspection | Required pre-pour inspections passed; scope is accurately described. | Permit record; inspector report; correction closure. | Permit holder / builder | |
| Photo package | Photos are dated, oriented, labeled, and stored with plan references. | Folder or project record link. | Builder / homeowner | |
| Handoff status | Passive rough-in, active system, approved alternative, or open. | Signed or emailed handoff statement. | Builder / owner |
The worksheet is deliberately repetitive at the boundaries because boundaries fail in handoffs. A general contractor may know the pipe route but not the membrane seam treatment. An electrician may know the junction box but not the radon test owner. A public inspector may record a foundation or electrical pass without accepting responsibility for a future indoor air result. Separate rows keep those scopes visible.
How to resolve an open row
An open row should produce a specific question, a responsible person, a due date tied to the pour, and a closeout record. “Please check radon” is too vague. Better examples are:
- “Builder: identify on sheet S3.2 how the basement slab and crawlspace collection areas connect to the riser before the September 12 pour.”
- “Foundation crew: provide a photo of the riser-to-collection connection and the barrier seal at the west utility sleeve before concrete placement.”
- “Electrical contractor: identify the future fan power location and inspection record; homeowner will not energize or alter wiring.”
- “Permit holder: confirm with the City of [actual jurisdiction] whether the pre-pour foundation inspection includes the selected radon detail and save the response.”
- “Homeowner and builder: name the post-occupancy testing owner and place the test timing in the closeout calendar.”
If an answer changes the physical work, route it through the builder and design professional. If it changes the legal or inspection path, route it through the authority having jurisdiction. If it changes testing or activation, route it through a qualified radon measurement or mitigation professional as applicable.
The next decision is whether the open row can be closed with documentation or requires physical correction. Do not let a photo package hide an unresolved design question.
Preserve evidence without turning the homeowner into the inspector #
The homeowner should document the concealed work from safe, accessible locations and ask qualified professionals to perform technical inspection, electrical work, structural judgment, excavation, roof access, or confined-space access; documentation is useful only when its limits are stated.
A safe observation boundary
Safe homeowner activity usually consists of reviewing the plan, asking questions, photographing from a stable accessible location, checking that labels and records exist, and storing the inspection result. Stop when the requested observation would require entering an excavation, walking on unsupported membrane, climbing an unfinished structure or roof, entering a tight crawlspace, moving rebar or pipes, opening a panel, testing electrical circuits, altering a seal, or disturbing a foundation component.
Excavations can collapse. Rebar, formwork, wet concrete, and uneven subgrade create trip and impalement hazards. Attics and roof edges create fall hazards. Crawlspaces can have poor access, sharp materials, contamination, heat, or inadequate ventilation. Electrical work can involve shock, arc, or code hazards. Structural modifications and penetrations can weaken the foundation. These are reasons to assign the work to the builder's qualified crews, the permitted electrician, the design professional, the inspector, or a qualified radon professional—not reasons to skip the record.
If a builder says a homeowner cannot enter the site before the pour, accept the access restriction and request a scheduled walk-through, professional photo package, or video call with the responsible person. A homeowner does not need physical access to every component to make the handoff accountable.
What a useful photo package contains
Create a folder named for the project and stage, for example “Foundation—radon rough-in—before concrete—2026-09-08.” Keep the original files if possible. For each photo, record the camera date if reliable, the actual visit date, location, direction of view, and related plan sheet. Use a simple index:
| Photo ID | Location | Shows | Does not prove |
|---|---|---|---|
| R-01 | Main slab, looking north | Overall barrier coverage and riser location | Hidden continuity under obstructions or future performance |
| R-02 | West utility sleeve | Seal or planned treatment at one penetration | Treatment at every other penetration |
| R-03 | Riser connection | Connection to collection path if visible | Unseen joints or later damage |
| R-04 | Crawlspace trench | Perforated collection pipe and gravel arrangement | Whole-crawlspace coverage if frame is limited |
| R-05 | Electrical box location | Box and route location | Energized circuit correctness or future fan operation |
| R-06 | Plan markup | Relationship of photo locations to design | Actual installation unless paired with field photos |
The “does not prove” column is not bureaucratic. It prevents a later owner from reading a photo as a test result or certification. It also makes a professional review faster because the reviewer knows which questions remain.
Record changes as changes
If the riser moves, the membrane changes, a sleeve is added, the collection layer is substituted, or the route changes to avoid a beam, record the change before the pour. The record should include the reason, affected plan sheet, responsible professional, material or detail change, inspection consequence, and photo location. A verbal “we do this all the time” is not a design record.
Changes may be harmless, beneficial, or serious; the homeowner should not classify them without the responsible professional. A different aggregate may be acceptable as an approved alternative or may reduce the intended gas movement. A different barrier may be suitable or may be incompatible with the specified seal. A new penetration may be routine or may create a new soil-gas pathway. Ask the person accountable for the design and installation to classify it and preserve the answer.
What a passed inspection means
A passed local inspection means the inspector accepted the defined scope under the local process at that time. It does not necessarily mean the inspector evaluated every EPA or AARST item, performed a radon concentration test, verified future fan performance, or accepted responsibility for post-occupancy health protection. Phoenix's page and Austin's inspection materials are helpful because they show that pre-concrete inspection points and trade sequencing are defined locally. Neither is evidence that a visible radon rough-in guarantees safe indoor air.
Phrase the record narrowly: “City of [jurisdiction] foundation inspection passed on [date] for inspection type [name], with radon rough-in evidence reviewed by [person] under [detail/source], open items [none/list].” If the record does not mention the radon system, say so.
The next handoff after evidence capture
Send the package to the builder and design team before the pour, not weeks later. Ask for written acknowledgment of open items and a statement that the permit holder has coordinated the required inspection sequence. Then save the final pre-pour package with the homeowner's project records, not only in a builder portal that may be difficult to access after closing.
The next decision is whether the evidence is strong enough to support later activation or correction. If the pipe route, collection connection, barrier edges, and electrical provision cannot be reconstructed, request a professional review before closing the work or negotiate a documented corrective path while access is still available.
Plan the post-occupancy test before the rough-in disappears #
The post-occupancy test should be assigned before the pour and scheduled after the home is sufficiently complete for the chosen protocol, because construction features reduce future cost only if someone measures the finished home and acts on the result.
What the rough-in can and cannot tell you
A complete-looking passive system tells you that certain construction features were installed or planned. It does not tell you the home's radon concentration. Soil, weather, pressure differences, openings, foundation complexity, ventilation, occupancy, and installation quality can affect the result. ANSI/AARST CCAH-2020 is explicit that applying its requirements does not guarantee a specific indoor concentration. That limitation is important even when every row of the worksheet is marked verified.
EPA's new-home guidance calls testing the final word. It recommends testing immediately after move-in even if a passive system is present. Use EPA's new-home testing guidance as the homeowner-facing handoff, and use the state protocol or a qualified measurement professional when the jurisdiction requires one.
Choose the test owner and test location
The test owner can be the homeowner, builder warranty team, property manager, or qualified radon measurement professional, but the name and deliverable should be written before closing. The owner needs to know the lowest occupied level, the location of bedrooms or regularly used rooms, the presence of a basement or crawlspace, whether the passive system is complete, whether a fan is already active, and whether local rules specify who may test.
The test location should follow the applicable protocol and device instructions. Do not place a device in a closet, bathroom, crawlspace, direct sunlight, draft, or other unsuitable location merely because it is near the vent pipe. Do not place it next to a window, door, supply register, sump, or other feature that could distort the intended measurement unless the protocol directs it. If the home has multiple occupied levels or unusual foundation conditions, ask the qualified tester whether more than one location is needed.
Do not test an unfinished structure as if it were the occupied home unless a qualified protocol specifically allows it. Construction activities, open doors, missing HVAC controls, temporary ventilation, and unfinished air barriers can produce a result that does not answer the homeowner's occupancy question.
Short-term and long-term choices
The EPA Home Buyer's and Seller's Guide to Radon says short-term tests run from at least 48 hours to the device's specified maximum, while long-term tests last more than 90 days and are more likely to represent a year-round average. A short-term test can provide a faster decision; a long-term test can provide more seasonal information. The appropriate choice depends on the state protocol, device, occupancy timing, and risk tolerance. Record the chosen method and why.
For short-term testing, maintain closed-building conditions as the applicable guidance requires. EPA describes this as keeping windows closed, keeping exterior doors closed except for normal entry and exit, and not operating devices that bring in outdoor air, while operating the normal heating and cooling conditions specified by the guide. Do not assume a newly built home is ready for a valid short-term test because the certificate of occupancy has been issued; confirm completion and protocol conditions.
If the test is conducted by a professional, save the professional's credentials or certification information if the state or program requires it, the device identifier, start and stop times, location, conditions, laboratory, and report. If it is a homeowner test, use a qualified device and follow the laboratory instructions. A result without timing, location, device, or condition information is harder to interpret and may need to be repeated.
Define the result branches before you have a number
Write a simple branch table in the handoff:
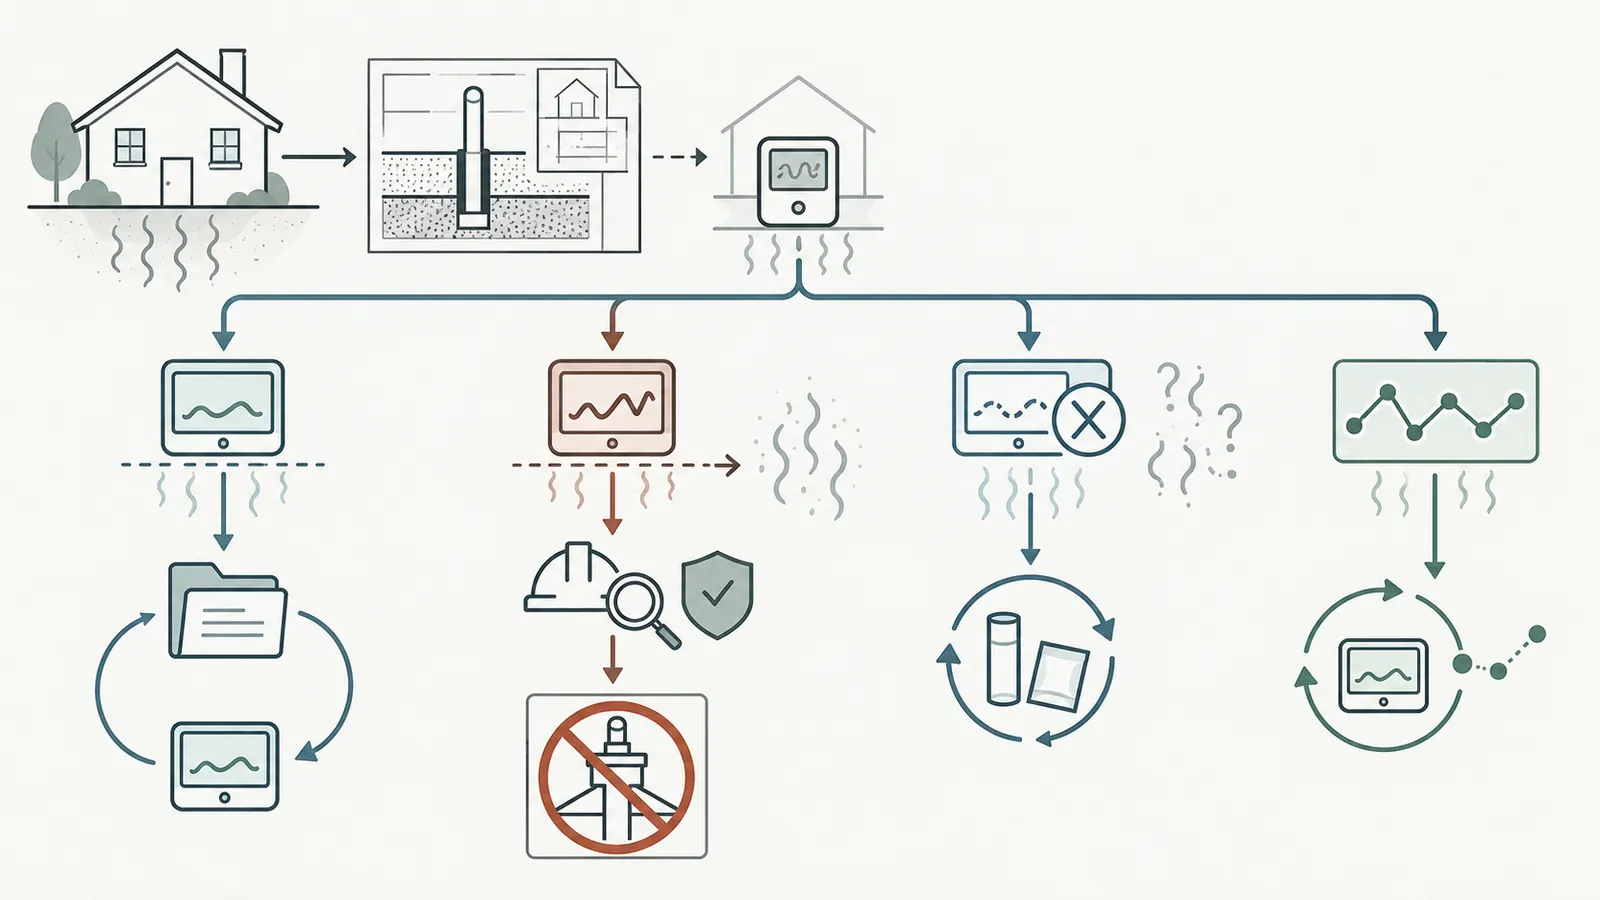
| Test outcome | What it means for the handoff | Next action |
|---|---|---|
| Result below 4 pCi/L | The result is below EPA's action level in the cited guidance; it is not proof of zero risk or permanent performance. | Save the report, keep the passive system documented, and follow state or program retesting guidance. |
| Result at or above 4 pCi/L | EPA recommends fixing the home at or above this action level; the passive rough-in has not produced the desired measured outcome. | Contact a qualified radon mitigation professional; ask whether activation, sealing, additional collection, or another correction is appropriate. |
| Result unclear or protocol invalid | The number may not support the decision because conditions, device, timing, or placement were not reliable. | Correct the testing conditions and repeat under the applicable protocol. |
| Result changes across tests or seasons | Radon varies over time and a single short test may not answer the year-round question. | Consult the state protocol or qualified professional about repeat or long-term testing and mitigation. |
| Passive system incomplete or damaged | The test may not be the only issue; construction documentation and physical correction are also open. | Notify the builder, preserve the record, and obtain a qualified system review before deciding on activation. |
The 4 pCi/L branch is not an instruction for the homeowner to install a fan. EPA says a fan can be added to make a passive system active, but fan selection, placement, wiring, discharge, monitoring, and system balancing belong to qualified professionals. The owner should request a written scope and post-activation test.
Make testing part of the closeout package
The final homeowner file should include the passive or active system description, route sketch, fan-ready or active electrical record, test reports, mitigation or activation invoices, professional credentials where relevant, warranties, service instructions, and a retest reminder based on applicable guidance. The AARST model documentation text includes operating information, test data, energy information for an active fan, and retesting advice. Use that as a completeness prompt while following the actual state or program requirements.
Do not wait until the test result to ask who will pay for activation if the passive result is elevated. The contract or warranty may assign responsibility differently from the health guidance. Record whether the builder promised a rough-in only, a passive system, a tested result, or a complete active system. Those are different deliverables. If the promise is unclear, ask for a written interpretation before closing.
The next decision is whether the future owner can understand the system without the original superintendent. If not, the handoff is incomplete even if the pipe and test report exist.
Diagnose common pre-pour failures and choose the safest correction path #
When a pre-pour review finds a missing, damaged, or ambiguous component, the safest response is to stop treating the rough-in as complete, identify whether the problem is design, installation, inspection, or documentation, and assign the correction to the qualified person who controls that scope.
Failure: the pipe is present but the collection path is unknown
This is the classic “visible pipe” failure. The riser is standing in the slab area, but no one can show the perforated pipe, gravel path, collection mat, or connection beneath the membrane. Possible explanations include a correct detail that has not been photographed, an alternative approved collection method, a pipe stub placed without a collection connection, or a route that serves only one portion of the foundation.
Do not accept a generic statement that the pipe “goes under the slab.” Request the approved detail, a marked location sketch, installer confirmation, and the pre-cover photo or professional inspection. If no record exists and the concrete has not been poured, ask the builder's design professional or qualified radon professional to verify the assembly. If the pour has already happened, do not authorize homeowner excavation; obtain a professional assessment and preserve the contractual record.
Failure: the membrane has tears, unsealed seams, or open penetrations
A tear may be repairable or may indicate widespread traffic damage. An unsealed pipe penetration may have a specified repair or may require a different installation. The homeowner should not choose the tape, caulk, patch, or sealant based on a hardware-store label. Ask the installer or design professional which compatible method the approved detail and product instructions require.
Photograph the issue, mark its location, and record whether the repair was made before or after the inspection. Request a follow-up photo and, if the local process requires it, a reinspection. PNNL's guidance makes visual inspection before the slab important because the membrane is about to become inaccessible. That is a reason to improve the record, not a reason to claim that a patch guarantees soil-gas control.
Failure: another trade moved or cut the riser
Pipe displacement can change the planned route, interfere with a footing or wall, reduce future access, or sever the below-barrier connection. A trade should not move the pipe casually because it is in the way. Ask the builder to compare the field condition with the approved detail and obtain a written resolution from the responsible professional. Photograph both the original issue and the corrected location if safe.
If the pipe was cut, capped, crushed, or filled with debris, treat it as an installation issue requiring the installer or qualified professional. Do not pour over it because the pipe is “easy to find later.” Later access is not the same as a continuous system.
Failure: the route conflicts with framing, ductwork, or roofing
Resolve route conflicts while the building is still open. A route that is forced into a narrow cavity may become inaccessible, acoustically noisy, exposed to damage, or too close to an opening or intake. A builder may propose a reroute; the owner should request the revised detail and responsibility for future fan installation.
Do not solve the conflict by silently terminating at an attic, garage, or wall cavity. The vent must discharge outdoors through the approved route, and any future fan must be located and powered according to the applicable design and electrical requirements. PNNL's example and the AARST checklist show that termination and fan location have their own verification questions.
Failure: the fan-ready box exists but nobody owns future activation
This is a handoff failure rather than a missing component. Write the activation trigger, test owner, professional contact, and documentation location into the closeout record. If the test is elevated, the homeowner should know whether to call the builder warranty department, a certified radon mitigation professional, the state office for qualified-provider information, or another designated contact.
A junction box is not an active system. Do not energize an unknown fan, install a fan in an occupiable space, or modify an electrical circuit yourself. A qualified electrical professional and qualified radon professional should coordinate the activation and verification.
Failure: the local inspection passed but the radon detail was never reviewed
The correction is a scope clarification. Obtain the inspection type and report, then ask the permit holder or authority having jurisdiction whether the radon feature was within that inspection's scope. If it was not, have the builder or design professional provide a separate source-derived or program-required verification. Do not relabel a general foundation or plumbing pass as radon approval.
This distinction is especially important in jurisdictions where a pre-pour inspection focuses on underground plumbing, electrical, structural reinforcement, or foundation dimensions. Phoenix's public page is an example of a local list of critical points. Austin's pages show a local schedule with multiple trade and foundation resources. Neither page authorizes a homeowner to infer a national radon rule.
Failure: the builder says testing is unnecessary because the home is radon resistant
This is a performance misunderstanding. EPA says every new home with a passive system should be tested after move-in, and AARST's model-standard language does not guarantee a particular indoor concentration. Ask the builder to put the claim in writing and compare it with the EPA and local guidance. Preserve the rough-in record and schedule the test anyway unless a qualified authority gives a different applicable instruction.
Failure: the first test is below 4 pCi/L and the file is closed permanently
A single result below EPA's action level is useful but not a lifetime guarantee. Radon changes with season, weather, pressure, building use, and alterations. EPA's retesting guidance says a homeowner may want to test again in the future, especially if living patterns change or a lower level becomes occupied. Follow the applicable state or program retesting advice, and retest after significant foundation, ventilation, or occupancy changes when advised.
Failure: the test is at or above 4 pCi/L and the homeowner installs a fan from a video
Do not make this a homeowner repair. Activation may require a correctly selected fan, location outside occupiable space, electrical work, discharge clearances, monitoring, labeling, and post-activation testing. Contact a qualified radon mitigation professional. If the house is under a builder warranty, notify the builder in writing before authorizing work, while still treating the health concern seriously and following the applicable professional advice.
The next decision is whether the issue can be closed before concealment, needs a written approved exception, or should be transferred to a qualified post-occupancy professional. Record that branch explicitly.
Finish the handoff with a measured result and a maintenance decision #
The handoff is finished only when the homeowner has a construction record, a named test owner, a post-occupancy result or scheduled test, and a written response to that result; the next decision after the slab is not “forget about radon,” but “what does the measured condition require now?”
The four records to keep together
Keep four related records in one project folder:
- Design record: approved foundation and radon detail, plan revision, foundation conditions, jurisdiction, state-office response, and any written exception.
- Construction record: photos, installer confirmations, material or product records, route sketch, labels, penetrations, electrical provision, and correction log.
- Inspection record: permit number, inspection names, dates, reports, correction closures, and any third-party foundation or radon review.
- Performance record: test device or professional, dates, closed-building conditions, location, result, activation or mitigation scope, post-activation test, and future retest reminder.
A record should be legible to a future owner. Explain abbreviations such as passive, active, ASD, pCi/L, and Bq/m³. Include the exact address and foundation type. Store photos with the plan sheet and location, not as an unlabelled camera roll. Save the builder warranty contact and the professional who can service the active system if one is installed.
Set the maintenance and retest trigger
Passive systems do not have a fan to observe, but the vent route, labels, termination, seals, foundation openings, and indoor concentration still matter. Active systems add fan operation, monitor or alarm status, electrical service, sound, energy use, and discharge condition. The AARST model documentation text includes system operation, test data, fan energy information, and retesting advice; use those fields as a handoff prompt.
Do not invent a universal inspection interval. Follow the applicable state, local, program, professional, and manufacturer instructions. EPA's general testing guidance says homeowners may want to test again in the future even after a lower result, and its model-standard materials reference retesting at least every two years or as required or recommended by state or federal agencies for certain active-system documentation. Treat that as guidance to verify, not a blanket legal rule for every home.
Add triggers to the homeowner record:
- a lower level becomes a bedroom, office, playroom, or regularly occupied space;
- a basement, crawlspace, or slab is remodeled;
- the foundation, floor drain, sump, or utility penetrations change;
- the building envelope or ventilation system changes significantly;
- the fan, alarm, monitor, or vent pipe is repaired or replaced;
- the home is sold and the last test is no longer recent or the tested area differs; or
- a state or local rule or program requires a new test.
The correct response to a trigger may be retest, professional review, fan service, sealing, activation, or no immediate action after qualified evaluation. The point is to make the branch visible.
A final homeowner handoff script
Ask the builder or closeout manager to answer these questions in writing:
- What foundation conditions does the radon system serve?
- Is the system passive rough-in, active, or an approved alternative?
- Where is the collection connection, and what record proves it?
- Where does the riser travel, and where does it terminate?
- Which penetrations and sumps were sealed, and by whom?
- Where is the fan-ready electrical provision, and which inspection covers it?
- Which local inspections passed before the concrete pour?
- Which parts were outside the public inspection scope?
- Who owns the first post-occupancy test, by what date or occupancy event?
- Which result leads to a professional activation or correction review?
- Where are the plans, photos, inspection records, test reports, and warranty documents stored?
If the answer to any question is “we do not know,” write that as an open item rather than filling the gap with a general assumption. A premium home-intelligence record is valuable precisely because it keeps uncertainty visible until the right person resolves it.
What to hand to a qualified professional
If the rough-in is incomplete, the result is elevated, or the foundation is mixed or unusual, provide the professional with the address, foundation plan, soil-contacting areas, photos, barrier and pipe details, local inspection records, test report, occupancy conditions, HVAC and ventilation context, sump and drain information, and any changes made after the original construction. Do not ask the professional to rely on a pipe location alone.
For an active-system review, include fan model and location, power and disconnect information, monitor or alarm details, discharge route, any pressure or operational record, and post-activation test. The AARST testing section places the occupancy test and any above-action-level diagnostic, mitigation, and continued-testing response with certified or licensed radon professionals. The AARST monitoring section calls for a negative-pressure meter and fan-failure notification for an active system. Keep the operating description, available test data, energy information, and retesting advisory in the AARST documentation package. Use the actual state protocol and professional scope where they differ.
The decision surface in one page
The entire process can be reduced to this sequence:
Foundation identified → jurisdiction confirmed → approved detail marked → collection path verified → barrier and edges verified → riser connection verified → route and penetrations assigned → electrical provision assigned → local inspection passed → photos and exceptions saved → passive rough-in handed over → home occupied → test performed → result interpreted → activation, correction, retest, or documented maintenance decision.
Every arrow is a handoff. If an arrow has no responsible person, it is not a process. If it has no record, it is not verifiable. If it has no next decision, it is easy to forget. That is the reason to manage the rough-in before the slab pour: not to promise a radon-free home, but to preserve options, reduce concealed-work ambiguity, and make the eventual measured result actionable.
The final next decision for the homeowner is therefore not whether to worry about radon in the abstract. It is whether the project record clearly answers three questions: what was built, who will test it, and what will happen if the result calls for action. If those answers are written, assigned, and supported by evidence, the construction handoff is ready to move forward within the limits of the approved plans and local authority. If they are not, keep the handoff open before concrete removes the easiest opportunity to inspect and correct the work.
Cite this guide
Brictale. “How to Manage a New-Home Radon Rough-In Before the Slab Pour.” Published 2026-09-28; updated 2026-09-28.
https://brictale.com/build/construction/manage-new-home-radon-rough-in-before-slab-pour · Read the Markdown version
Original contribution: Radon-ready pre-pour handoff worksheet. A foundation-type and jurisdiction-aware worksheet that connects the concealed rough-in, local inspection record, photo evidence, responsible person, and post-occupancy test result to the next action.
Sources and scope
Evidence behind this page
- The U.S. Environmental Protection Agency says a new home should use radon-resistant features where appropriate, should be tested immediately after move-in even when a passive system is present, and should use a fan or other mitigation response when the result is at or above 4.0 pCi/L (150 Bq/m³) in the applicable guidance.
How to Address Radon When Building a New Home
U.S. EPA homeowner and builder guidance for new homes; 4.0 pCi/L is an EPA action level and not a statement that lower levels have no risk or that a passive system guarantees a result.
Accessed · Link to this claim - EPA's guidance for buying a newly built home says to test for radon after moving in even when radon-resistant features or a passive system are present, because only a test can show the home's indoor radon concentration.
How to Protect Your Family from Radon When Buying a Newly Built Home
U.S. EPA homeowner guidance for newly built homes; testing method, timing, certification and any required response remain subject to the applicable state protocol, local jurisdiction and professional scope.
Accessed · Link to this claim - EPA's radon-resistant construction basics describe five core features: a gas-permeable layer or approved alternative, plastic sheeting or vapor retarder, a gas-tight vent pipe, sealing and caulking of foundation openings, and a fan-ready attic junction box.
Radon-Resistant Construction Basics and Techniques
U.S. EPA overview; dimensions, materials, foundation adaptations, and local requirements must be checked against the approved project detail and applicable jurisdiction.
Accessed · Link to this claim - EPA's illustrative basics page describes a 4-inch layer of clean coarse gravel, 6-mil polyethylene or vapor retarder, a 3- or 4-inch solid PVC Schedule 40 vent pipe, and a fan-ready electrical junction box; it also notes alternatives and foundation/site variation.
Radon-Resistant Construction Basics and Techniques
U.S. EPA example specifications for common new-construction techniques, not a universal code requirement or a substitute for the adopted local detail.
Accessed · Link to this claim - The DOE Building America Solution Center describes radon-resistant construction as a sealed foundation and soil-gas barrier over a collection layer, with a perforated collection pipe connected to a solid vent pipe and a junction box for possible fan activation.
Educational building-science guidance from Pacific Northwest National Laboratory; it is not formal training, certification, an inspection, or a jurisdiction-specific design approval.
Accessed · Link to this claim - PNNL's capillary-break guidance says polyethylene should cover the ground surface, have seams overlapped by 6 to 12 inches and taped or sealed, be sealed around pipes, and be visually inspected before a slab is poured; it cautions that ordinary cloth-backed duct tape is not appropriate for lasting bonding.
Capillary Break at Crawlspace Floor - Polyethylene Sheeting under Concrete Slab
PNNL/Building America guidance for moisture and soil-gas control details; the exact membrane product, seam treatment, and foundation detail remain project and jurisdiction specific.
Accessed · Link to this claim - For a crawlspace radon-control detail, PNNL describes a perforated pipe in gravel beneath the polyethylene, connected to a vent pipe through the roof; its example calls for the outlet at least 1 foot above the roofline and at least 10 feet from building openings, with post-enclosure monitoring and fan activation if passive flow is insufficient.
Capillary Break at Crawlspace Floor - Polyethylene Sheeting under Concrete Slab
PNNL example crawlspace guidance, not a universal national code; the approved plans, adopted code, roof geometry, and local official control the final route and clearances.
Accessed · Link to this claim - ANSI/AARST CCAH-2020 is described as providing minimum requirements for rough-in, verification against the national action level, and activation when required, while expressly stating that applying the standard does not guarantee a particular indoor radon concentration.
CCAH-2020: Reducing Radon in New Construction of One & Two Family Dwellings and Townhouses
ANSI/AARST model standard scope for newly constructed one- and two-family dwellings and townhouses; adoption and enforcement depend on the state and local jurisdiction.
Accessed · Link to this claim - The CCAH-2020 online text requires an occupant documentation package for an active soil-depressurization system, including a system-operation description, available pre-activation and post-activation radon test data, estimated or actual fan energy use and projected cost, and a retesting advisory.
CCAH-2020: Startup Marking, Documentation and Post-Activation Evaluations
ANSI/AARST CCAH model-standard documentation and labeling text; use the applicable state protocol, certification requirements, and adopted local provisions where they differ.
Accessed · Link to this claim - The CCAH-2020 testing section requires a short-term radon test to begin within 60 days of occupancy and to be performed by a certified or licensed measurement professional; when results exceed the national action level, it requires certified or licensed mitigation, diagnostic testing, and continued radon testing until concentrations are below that level.
CCAH-2020: Radon Testing and Fan Activation
ANSI/AARST CCAH model-standard text for newly constructed one- and two-family dwellings and townhouses; state protocols, certification rules, adopted codes, and local enforcement may differ.
Accessed · Link to this claim - The CCAH-2020 monitoring section requires an active soil-depressurization system to have a readily observable indoor system monitor that includes a negative-pressure meter and fan-failure notification, with electrical monitor power on a separate non-switched circuit when applicable.
CCAH-2020: Active Soil Depressurization System Monitoring
ANSI/AARST CCAH model-standard monitoring text; it is not a universal electrical or local code requirement, and the applicable state, jurisdiction, design, and equipment instructions control.
Accessed · Link to this claim - The CCAH-2020 companion inspection checklist separately identifies system pressure, system labeling and documentation, pipe size, pipe labeling and slope, the fan junction box and disconnect, fan location and clearance, radon discharge clearances, a long-term test kit, and a certified test result below the national action level.
CCAH-2020 Companion Guidance Section D: Sample Construction Inspection Checklist
Sample checklist accompanying an ANSI/AARST model standard; it is a source-derived completeness framework, not an official inspection form for every jurisdiction.
Accessed · Link to this claim - The CCAH-2020 companion inspection checklist separately asks the reviewer to verify that all foundation areas in contact with soil are treated, that a floor-sump lid is sealed, and that soil-exposed floor drains receive radon-resistant treatment; its notes distinguish rough-in-only and active-system inspection items.
CCAH-2020 Companion Guidance Section D: Sample Construction Inspection Checklist
Sample checklist accompanying an ANSI/AARST model standard; it is a source-derived completeness framework, not an official inspection form for every jurisdiction.
Accessed · Link to this claim - EPA's current radon testing guidance says short-term home tests should run at least 48 hours, long-term tests run more than 90 days, short-term tests use closed-building conditions, and EPA recommends fixing a home when the applicable test result is 4 pCi/L or higher.
Home Buyer's and Seller's Guide to Radon
U.S. EPA homeowner testing guidance; device instructions, state requirements, test placement, and professional measurement protocols still apply.
Accessed · Link to this claim - EPA's radon-zone resource describes Zone 1 as the highest-potential category and provides links to state radon contacts, including Arizona and Texas contacts; a county zone is not a lot-specific indoor measurement.
EPA Map of Radon Zones and Supplemental Information
U.S. county-level potential map and state-contact directory; use the actual state office and building department for project-specific rules.
Accessed · Link to this claim - The City of Phoenix says permitted residential jobs require inspections and identifies pre-concrete inspection points including underground plumbing and electrical, foundation rebar, required hold-downs, footing dimensions, and electrical grounding; this illustrates a local pre-pour control point, not a national radon requirement.
City of Phoenix, Arizona residential inspection workflow; applicable only to permitted work under Phoenix jurisdiction and subject to the current permit and inspector direction.
Accessed · Link to this claim - Austin Development Services currently lists residential inspection resources including building foundation, electrical slab, and electrical grounding checklists; the exact inspection set depends on the permit and current City requirements.
Building Inspections and Residential Inspection Resources
City of Austin, Texas building-inspection workflow and listed resources; the exact inspection set depends on the permit and current City requirements.
Accessed · Link to this claim - The City of Austin, Texas residential inspection flowchart dated July 10, 2019 identifies electrical slab and plumbing inspections before concrete for applicable residential work.
Residential Inspections Flowchart
Dated City of Austin, Texas residential inspection flowchart; it is a local example and may not be current, so the permit holder must verify the inspection sequence against the City's current requirements for the actual permit.
Accessed · Link to this claim - Austin's inspection scheduling guidance says the permit holder and owner-general contractor are responsible for ensuring the proper sequence of inspections, while anyone listed on the permit may schedule an inspection; this is a local example of assigning the handoff rather than a national rule.
Schedule a Building Inspection
City of Austin, Texas; use only as an example of local responsibility and verify the actual building department for the project.
Accessed · Link to this claim