How to Maintain a Foundation Release Register During New Home Construction
A homeowner-facing foundation release register for tracking prerequisites, evidence, local inspections, exceptions and safe handoffs from excavation through first-floor framing.
The short answer
Maintain one versioned register row for every foundation hold point. Record the drawing revision, prerequisite, responsible person, evidence, local inspection request and result, recheck trigger, open exception, release authority and next handoff. Keep work exposed until the authority who owns that decision closes the row. A homeowner can coordinate and preserve records; the builder, inspector, competent person or design professional must make the approval they are qualified and authorized to make.How to Maintain a Foundation Release Register During New Home Construction
Maintain one versioned register row for every foundation hold point. Record the drawing revision, prerequisite, responsible person, evidence, local inspection request and result, recheck trigger, open exception, release authority and next handoff. Keep work exposed until the authority who owns that decision closes the row. A homeowner can coordinate and preserve records; the builder, inspector, competent person or design professional must make the approval they are qualified and authorized to make.
What a foundation release register decides #
A foundation release register decides whether a defined piece of work is ready to be inspected, released, covered or handed to the next party; it does not decide whether the foundation is structurally adequate or whether a permit inspection will pass. The homeowner's decision is therefore a coordination decision: is the row complete enough for the named authority to act, or must the work remain exposed while someone resolves an exception?
That distinction matters because the same physical area can have several different gates. A footing may be ready for a municipal inspection, not yet ready for concrete placement because a reinforcing detail is unresolved, and unsafe for a homeowner to enter or measure. A waterproofing installer may have completed an installation, while the builder still owes photo records and the local building official still requires a backfill inspection. A framing crew may be waiting for a foundation release even though the permit inspection is marked approved, because the builder's quality-control checklist, survey confirmation or engineer's observation is not complete.
The register makes those states visible. It should not turn a phone message that says “looks good” into an approval. It should not treat a photograph as proof that a hidden condition meets the approved plan. It should not use the homeowner's observation to make a structural, soil, excavation-safety or waterproofing warranty. Its job is to preserve the sequence, identify the decision owner and stop the next handoff from happening by assumption.
For this article, a release is a recorded decision by the person or organization named in the row. “Released” can mean different things depending on the authority: the authority having jurisdiction (AHJ) accepted a permit inspection; the builder completed its contractual quality-control step; a waterproofing installer documented installation to the selected product's instructions; a licensed design professional accepted a field change or provided direction; or a competent person determined that worker-protection conditions were addressed. These are separate decisions even when they occur on the same day.
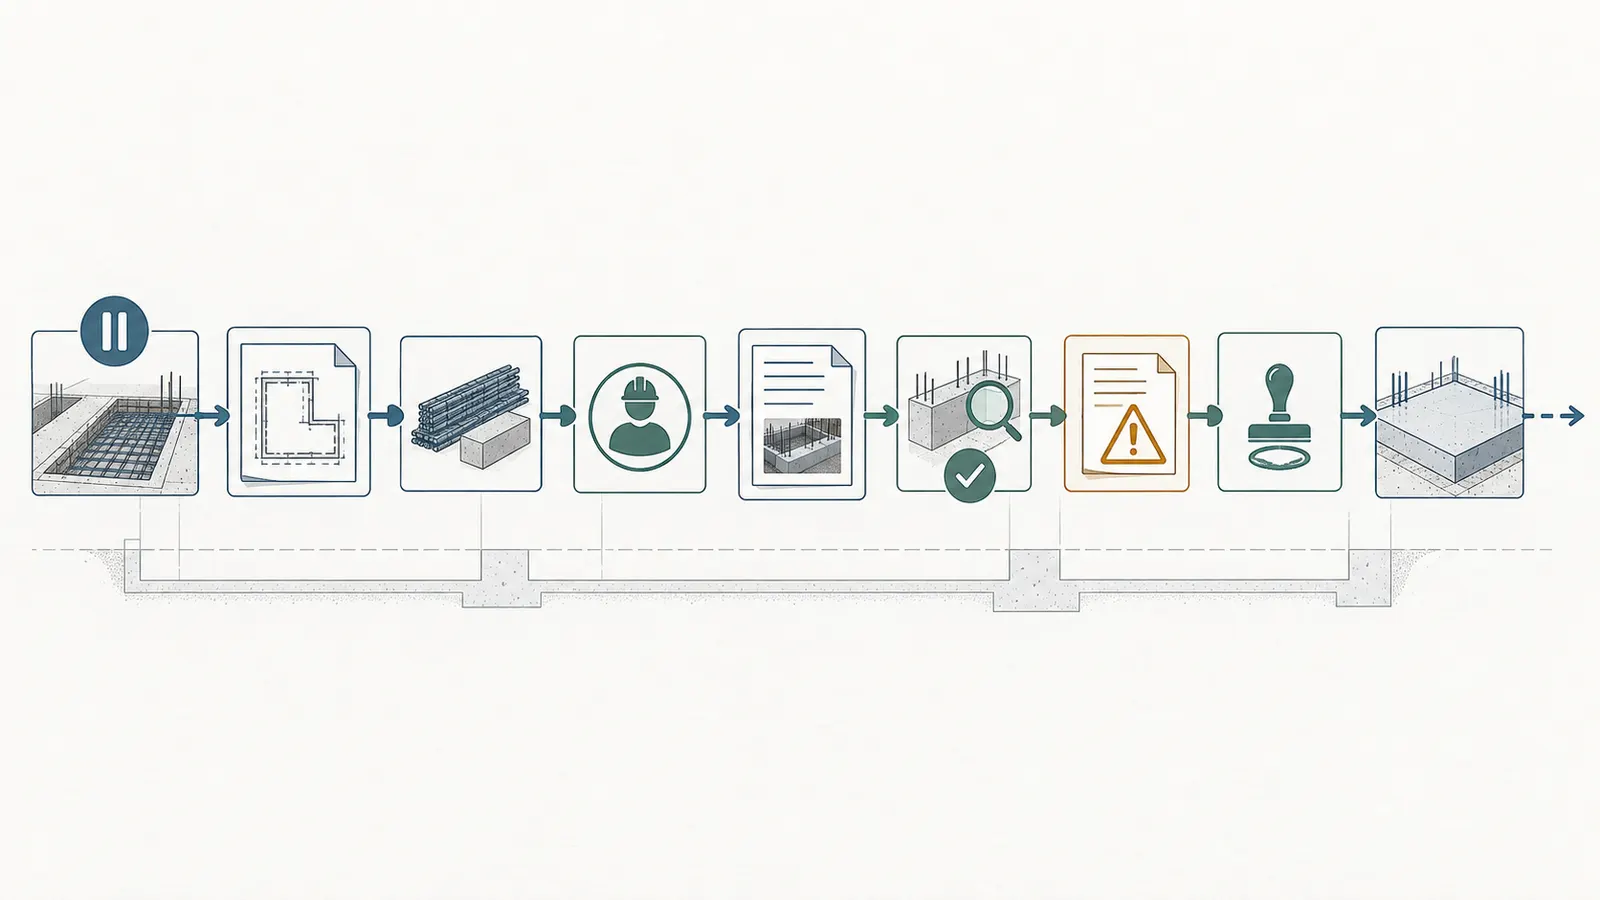
The register should answer five questions in order:
- What exactly is the hold point, and what will soon hide or change it?
- Which approved drawing, specification, product instruction or permit condition controls?
- Who must perform or verify the work, and who has authority to release it?
- What evidence and inspection result are attached, and what remains uncertain?
- What is the next handoff, and what event would reopen the row?
The smallest useful unit is a row, not a folder
Create a row for each irreversible transition, not only for each trade. “Foundation” is too broad. Better rows include “excavation bottom accepted for footing layout,” “footing reinforcement ready before concrete,” “foundation-wall forms and embeds ready before concrete,” “drainage and waterproofing ready before backfill,” and “foundation released for sill plates and first-floor framing.” If a change, weather event or failed inspection affects only one wall or one detail, the row can identify that location instead of reopening the entire project without reason.
Give each row a stable identifier such as FND-01, FND-02 and FND-03. Keep the identifier when the row is revised. Add a revision field to the row rather than deleting the old entry. A simple history—“Rev 0 opened,” “Rev 1 drainage detail added,” “Rev 2 reopened after membrane repair”—is more useful than a clean-looking sheet that hides the earlier decision.
Originality brief
Current answers are fragmented. Howard County, Maryland publishes inspection requirements for footing, draintile, framing and other residential work. St. Mary's County, Maryland publishes a residential inspection guide with footing, foundation-wall, backfill and framing-stage requirements. OSHA publishes excavation safety requirements and a competent-person boundary. DOE Building Science Education explains the role of drainage and final grade, and manufacturers publish product-specific waterproofing instructions. Each source answers its own inspection, safety, sequence or product question; none is a homeowner's live coordination register.
The missing decision is whether a foundation-stage handoff is genuinely ready for the named party, or whether work must stay exposed and an exception must remain open. The original contribution is the Foundation release-register worksheet and illustrative handoff set: a reusable row structure that connects prerequisites, evidence, local inspection status, responsible people, exceptions, recheck triggers and the next handoff.
The method is to build one versioned row per hold point, copy the approved drawing or detail revision into the row, attach observable evidence and inspection records, then allow the responsible release authority—not the homeowner—to close the exception and authorize the next handoff. The limitations are important: this is an illustrative coordination worksheet, not an inspection form, engineering review, code interpretation, excavation-safety plan or remote approval; the authority, sequence and required records must be confirmed with the project team and the actual authority having jurisdiction.
You can check the contribution by taking one real project milestone and asking whether another person could identify the controlling revision, the person responsible, the evidence, the unresolved issue, the authority who must decide and the next handoff without searching through text messages. If not, the row is incomplete even if a permit portal shows an inspection as approved. Brictale's research and review method explains the broader source and scope practice behind this guide.
What “released” must not imply
Use specific status words. “Ready for AHJ inspection” means the builder believes prerequisites are complete and has requested the inspection; it is not approval. “AHJ approved” means the official record says that portion was approved, subject to the record's scope and local process; it is not a structural warranty. “Builder QC complete” means the builder's own process is recorded; ask what that process covers. “Design professional direction received” means a licensed professional gave project-specific direction in the form recorded; it is not permission to reinterpret the design yourself. “Worker-safety inspection recorded” means the competent person performed the relevant safety function; it does not make the homeowner qualified to enter.
If your project team uses “release” differently, add a definition at the top of the register. Avoid one green checkmark that collapses these meanings. The next trade needs to know whether it may proceed, what conditions apply and who bears responsibility for a remaining item.
How to set up the register before excavation #
Set up the register before excavation by copying the project-specific sequence from the permit, approved drawings, specifications, geotechnical information, builder scope and product instructions into separate hold points, then naming one responsible party and one release authority for each row. The homeowner should own the register's completeness and version history, not the technical approval.
Start with a short project header. Record the property address, permit number, AHJ name and contact, project participants, emergency contact process, drawing-set date, current revision, builder contract or scope reference, and the date the register was opened. If the project is in a flood hazard area, on a constrained lot, near an adjacent structure or using a proprietary waterproofing assembly, flag that condition in the header so it cannot disappear inside a generic checklist.
Next, create a source index. The index is not a detached evidence list; it is a map to the controlling documents used by the rows. Include the approved foundation plan sheet, structural details, sections, wall schedules, footing schedule, geotechnical report or soil direction if one exists, site-grading and stormwater documents, permit conditions, manufacturer data sheets, installation details, change orders and professional directives. Record title, revision, date received and who supplied each item. If the builder says “the latest plan,” ask for the sheet number and revision rather than copying that phrase.
Required row fields
Use the following fields in every row. A spreadsheet, project-management record or printed binder can work; the medium matters less than the discipline of updating one authoritative version. If the builder maintains a separate site log, link the records and identify which system controls the status.
| Field | What to record | Why the next decision depends on it |
|---|---|---|
| Row ID and revision | Stable ID, row revision, date and editor | Prevents an old approval from being mistaken for the current state |
| Stage and location | For example, west footing, full perimeter wall or crawl-space drain | Limits the decision to the area actually checked |
| Controlling document | Sheet, detail, specification, permit condition or product instruction and revision | Gives the verifier a reference instead of a memory-based standard |
| Prerequisite | The condition that must exist before the hold point | Shows what must be complete before requesting inspection or proceeding |
| Responsible person | Builder, excavation contractor, concrete contractor, waterproofing installer, surveyor or other named party | Assigns the action to someone able to perform it |
| Evidence file | Photos with location, delivery tickets, survey, report, installer record or inspection record | Makes the claim inspectable and preserves a record before concealment |
| Local inspection request and result | Request date/time, inspection type, result, comments and permit record | Separates a requested inspection from an approval or correction notice |
| Weather or change trigger | Rain, standing water, freeze, soil change, excavation disturbance, damaged membrane or drawing revision | Tells you when a prior observation is no longer enough |
| Open exception | Exact gap, location, date found and effect on proceeding | Prevents the exception from vanishing into a general “follow-up” note |
| Release authority | AHJ inspector, builder, competent person, waterproofing authority or design professional, as applicable | Identifies who may close the decision |
| Release status and date | Not ready, ready for inspection, rejected, conditionally released, released or reopened | Represents state rather than a binary personal opinion |
| Next handoff | Person or trade, work package and earliest permitted action | Converts a record into an ordered next step |
The responsible person and release authority may be different. A concrete subcontractor can install reinforcement; the builder can coordinate the request; an AHJ inspector can perform a required permit inspection; and a design professional may need to resolve a deviation. Do not populate all three roles with the homeowner simply because the homeowner is paying for the work.
Set decision rules before the first row is tested
Write four rules at the top of the register:
- No row is “released” solely because the scheduled date arrived.
- A request, an inspection result, a builder check and a professional direction are different records.
- A material change or hazard-increasing event reopens the affected row until the responsible authority evaluates it.
- If the release authority is unknown, the next handoff is on hold.
These rules protect against schedule pressure. They also reduce a common argument: a person says the work was “approved,” while the record shows only that someone asked for an inspection. The register does not need to win an argument; it needs to expose the missing record early enough for the project team to act.
Local setup: do not copy Maryland examples into another permit
Use the AHJ's current requirements for the project. The following examples show why the register must be jurisdiction-aware, not why every U.S. home follows the same sequence.
Howard County, Maryland's residential-footing checklist includes soil bearing capacity, soil consistency, weather suitability, dimensions compared with approved drawings, frost-line depth, grounding where applicable, reinforcement and approved dowels where required. Its residential draintile checklist addresses drain-pipe location, approved discharge, gravel cover and protection with filter material before backfill. Its residential framing checklist says approved plans, truss drawings, manufacturers' specifications and necessary certifications must be in place before requesting the frame inspection. Those are useful row prompts for a Howard County project, but they are not national rules. Record the actual AHJ and permit references in your own register, then use the local page only as the named local example. See Howard County's residential footing requirements, Howard County's draintile requirements and Howard County's framing requirements.
St. Mary's County, Maryland's guide is another local example, not a nationwide template. It identifies Stage One footing, concrete foundation-wall and foundation-backfill inspections, and states that work must remain accessible and exposed for inspection until approved. It also says the permit applicant must cause the work to remain accessible and exposed. On a St. Mary's County project, that language supports a firm register rule: do not record “covered” as the next handoff while the local inspection or correction record is open. Confirm the current guide and adopted code for the actual permit. Read St. Mary's County's residential inspection guide for that jurisdictional example.
How to release excavation and footing work #
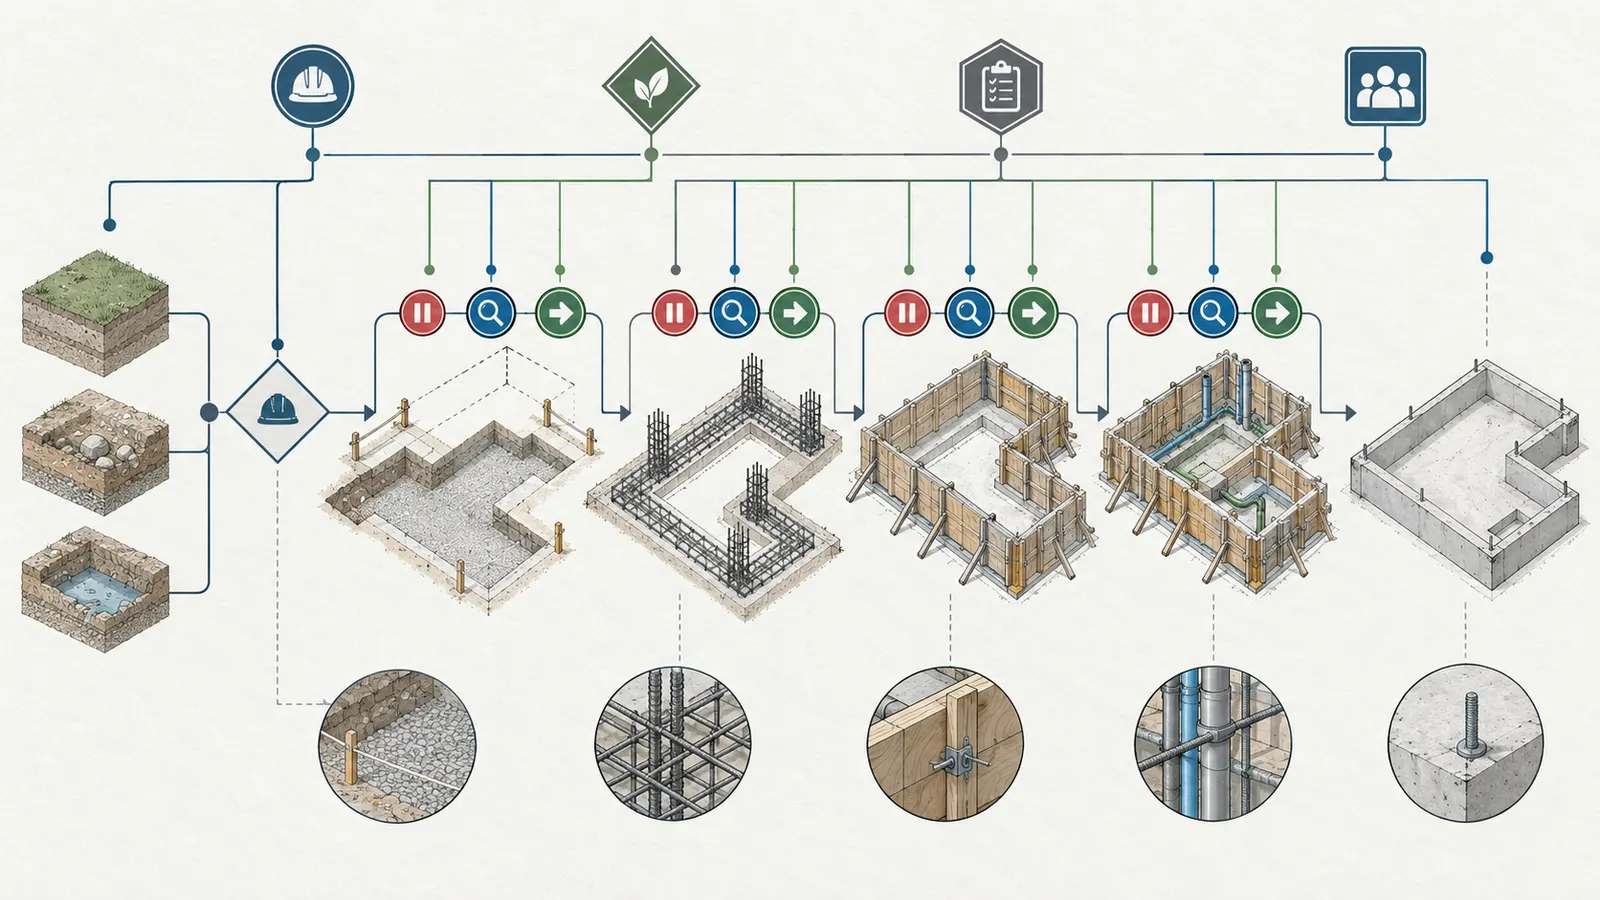
Release excavation and footing work in separate stages: first establish a safe, project-appropriate excavation and an agreed layout; then document the exposed footing condition; then request the applicable local inspection; only the authorized party may release the work to concrete placement. A homeowner may compare documents, observe from a safe location and keep the record, but must not enter an unsafe excavation or make the competent-person, soil, structural or inspection decision.
The first row should not ask, “Is the hole ready?” It should ask a narrower question such as, “For the north and east perimeter shown on foundation plan S1.1 Rev C, have the excavation limits, bearing surface and layout been checked by the responsible parties, with no unresolved soil or water condition blocking footing work?” That question gives the team a location, revision, prerequisite and blocking condition.
Excavation safety is a separate release track
Construction excavation has hazards that a homeowner register cannot neutralize. OSHA's trenching and excavation eTool says excavations should be inspected by a competent person before construction, daily before each shift, as needed during the shift and after rainstorms or other hazard-increasing events. It also emphasizes that excavation conditions can change. Record the competent person's name, date, time, weather or event, scope of inspection and any corrective action; do not ask the homeowner to repeat that inspection. Review OSHA's trenching and excavation safety guidance.
OSHA defines a competent person as someone capable of identifying existing and predictable hazards and authorized to take prompt corrective measures. OSHA's examples include soil classification, monitoring water removal, inspecting after runoff from heavy rain, evaluating damaged protective-system material and deciding when employees must be removed from a hazardous area. This is an authority and capability boundary, not a title the homeowner can assign casually. Record the name and employer supplied by the builder, but confirm that the employer is responsible for the worker-safety program. See OSHA's competent-person explanation.
OSHA 29 CFR 1926.652 generally requires employees in an excavation to be protected from cave-ins by an adequate protective system, subject to the standard's exceptions, including an excavation less than 5 feet deep when a competent person finds no indication of a cave-in hazard. The rule is about employee protection, not about permitting a homeowner to descend into the footing trench to take measurements. A release row can state “worker entry decision owned by competent person,” then leave measurements and photographs to workers who can safely make them. Read the OSHA protective-systems standard.
If you see standing water, sloughing soil, cracking or fissures, a bulging or heaving bottom, displaced shoring, spoils or equipment near an edge, an undermined adjacent structure, an unprotected access path or a damaged protective system, do not enter or direct a worker. Notify the builder or site supervisor and keep the row at “hold.” OSHA's excavation requirements address precautions for water accumulation, monitoring water-removal equipment, runoff from heavy rain and inspections after every rainstorm or other hazard-increasing occurrence. Use OSHA 29 CFR 1926.651, Specific Excavation Requirements as a worker-safety reference for the qualified person, not as a homeowner inspection credential.
Footing layout and bearing condition
The footing row should contain the approved plan revision, foundation dimensions, reference points or survey record, footing width and depth as shown on the approved design, soil or geotechnical direction, reinforcement detail and any required grounding or dowels. Do not make up a universal depth, width, bearing capacity or frost-line value. Those inputs depend on the adopted code, design, site conditions and permit.
For a project in Howard County, Maryland, the local residential-footing checklist includes a minimum bearing-capacity prompt of 2,000 pounds per square foot or an engineering-designed footing, and it asks the inspector to check consistent soil without soft spots, color changes, exposed strata, debris or water. The same page includes weather suitability, approved drawing dimensions, frost-line depth, grounding where applicable, reinforcement and dowels where required. Capture those as AHJ-specific check fields only if the Howard County permit applies. A project in a different jurisdiction must use its own checklist and approved design. See the Howard County residential-footing checklist.
The homeowner's safe contribution is record collection: ask the builder for the current sheet and detail, request the survey or layout record the team relies on, photograph the exposed condition only when the site supervisor says it is safe, and log the weather and date. The homeowner should not scrape, probe, compact, classify or alter soil. If the observed soil differs from the geotechnical assumption, or if water appears where the design did not anticipate it, the next action is a hold and a builder-to-design-professional or geotechnical consultation, not an informal substitution.
Footing reinforcement before concrete
The concrete-placement handoff should remain open until the approved reinforcement, dowels, embeds, location and formwork prerequisites are checked by the responsible builder or concrete team and the applicable local inspection is requested and resolved. The register should store the inspection result, not just a picture with no location.
Create a photo pattern that helps later review without pretending to prove everything. Take an overall photo showing the footing run and orientation; a location photo showing the corner or grid reference; detail photos of laps, corners, dowels and penetrations where relevant; and a photo of the plan sheet or a written location code near the record, if the site procedure allows it. Add the image date, photographer, location and drawing revision. The exact image protocol belongs to the builder's quality system; the homeowner should not walk into an open trench for a better angle.
If an inspector rejects or conditions the row, copy the exact correction into the exception field. Do not overwrite “not approved” with “fixed.” Add the correction date, responsible person, new evidence, reinspection request and final result. If a bar was moved, a footing dimension changed or a condition was not as designed, identify whether the design professional must issue direction. A release register is strongest when it keeps an uncomfortable state visible.
The next decision after footing release is concrete placement, not foundation-wall release. Concrete placement creates a new hold point: mix or delivery documentation, weather precautions, placement records and any required observation or testing belong to the concrete and project records. Do not assume that a footing inspection approval covers later wall forms, wall reinforcement, embeds or penetrations.
How to release foundation walls and embedded work #
Release foundation walls only after the current wall layout, forms, reinforcing steel, straps, embeds, openings and penetrations have been checked against the approved documents, the applicable inspection has occurred or been formally addressed, and the release authority is identified. A wall-form photo cannot substitute for a design decision, a permit result or a correction record.
Foundation-wall work contains several conditions that disappear when concrete is placed. Make each one visible in the register. The row can cover a single pour if the builder sequences the work that way, but use subfields for wall location, top-of-wall elevation, opening location, reinforcement, hold-downs or straps, sleeves, anchor-bolt or embed requirements and any special detail at corners, joints and steps. For a complex home, separate rows by pour or by distinct design condition; a single “walls complete” row invites gaps.
The local inspection example and its limits
St. Mary's County, Maryland's residential guide says a concrete foundation-wall inspection is made when forms are placed on the footing, reinforcing steel, structural straps and embeds are in place, and before concrete is placed. It lists verification of form location, reinforcement placement and security, wall height and thickness, and the size and location of openings, including flood-equalization vents when required. The guide also lists foundation-backfill inspection before backfilling to verify drainage and waterproofing systems, grounding and applicable plumbing rough-in. Those are local Stage One examples in St. Mary's County, Maryland, not a universal U.S. sequence. Use the St. Mary's County Stage One inspection language, then confirm the actual project's permit.
The practical register consequence is to create at least two separate rows: “wall ready before concrete” and “wall ready before backfill.” The first protects items that become inaccessible inside the concrete. The second protects drainage, waterproofing and rough-ins that may be hidden by soil. If the AHJ combines, adds or renames an inspection, keep the row names understandable but mirror the official inspection name in the local-inspection field.
Embeds, openings and penetrations
Ask the builder to identify every item that crosses, bears on or attaches to the wall before the pour. Depending on the design, that may include sleeves, plumbing penetrations, electrical conduits, grounding connections, straps, anchor devices, window or door openings, sump or drainage details, hold-downs and specialty embeds. Do not assume that the most visible items are the only ones that matter. The approved structural and architectural details control.
For each item, record the location reference, required size or type as shown in the document, responsible installer, evidence and whether a field change occurred. A field change is not automatically wrong, but it is not automatically accepted. If a sleeve moves to avoid reinforcement or an opening changes size, record who directed the change, which revision captures it and whether the design professional or AHJ must review it. A text message without a drawing mark or project record may be useful background but should not be treated as the controlling release.
The safest homeowner verification is document-based. Compare the builder's marked-up plan, the visible installation and the inspection result from a safe location. If you cannot tell whether a sleeve is in the correct location, record “not verified” and send the question to the builder. Do not use a tape measure near unguarded forms, climb formwork, move reinforcement or remove covers.
Concrete placement and curing records
The wall-pour handoff needs a status for the pre-pour inspection, a separate status for placement and a separate record for any post-pour issue. Record delivery tickets, concrete mix designation, placement date and weather when the project team provides them. If the project specifications call for testing, special curing, cold-weather or hot-weather precautions, record the required document and who owns it. Do not infer strength, curing quality or structural adequacy from appearance, a delivery ticket or the absence of cracks in one photograph.
If forms are stripped and a honeycomb, void, displaced opening, damaged corner or unexpected crack is reported, reopen the wall row or create a linked defect row. Record the location and the builder's proposed evaluation. A repair compound or patch is not a release authority. The builder should obtain the required direction from the design professional, inspector or other responsible party and preserve the accepted repair record before waterproofing or backfill hides the condition.
The next handoff is not “waterproofing because the concrete truck left.” It is “wall accepted for the next specified surface preparation and waterproofing sequence.” The builder should confirm surface readiness, moisture or cure requirements, compatible materials, corner and joint details, penetrations and any protection board or drainage assembly. The selected waterproofing system's instructions control its own preparation and exposure limits.
How to maintain the drainage and waterproofing release #
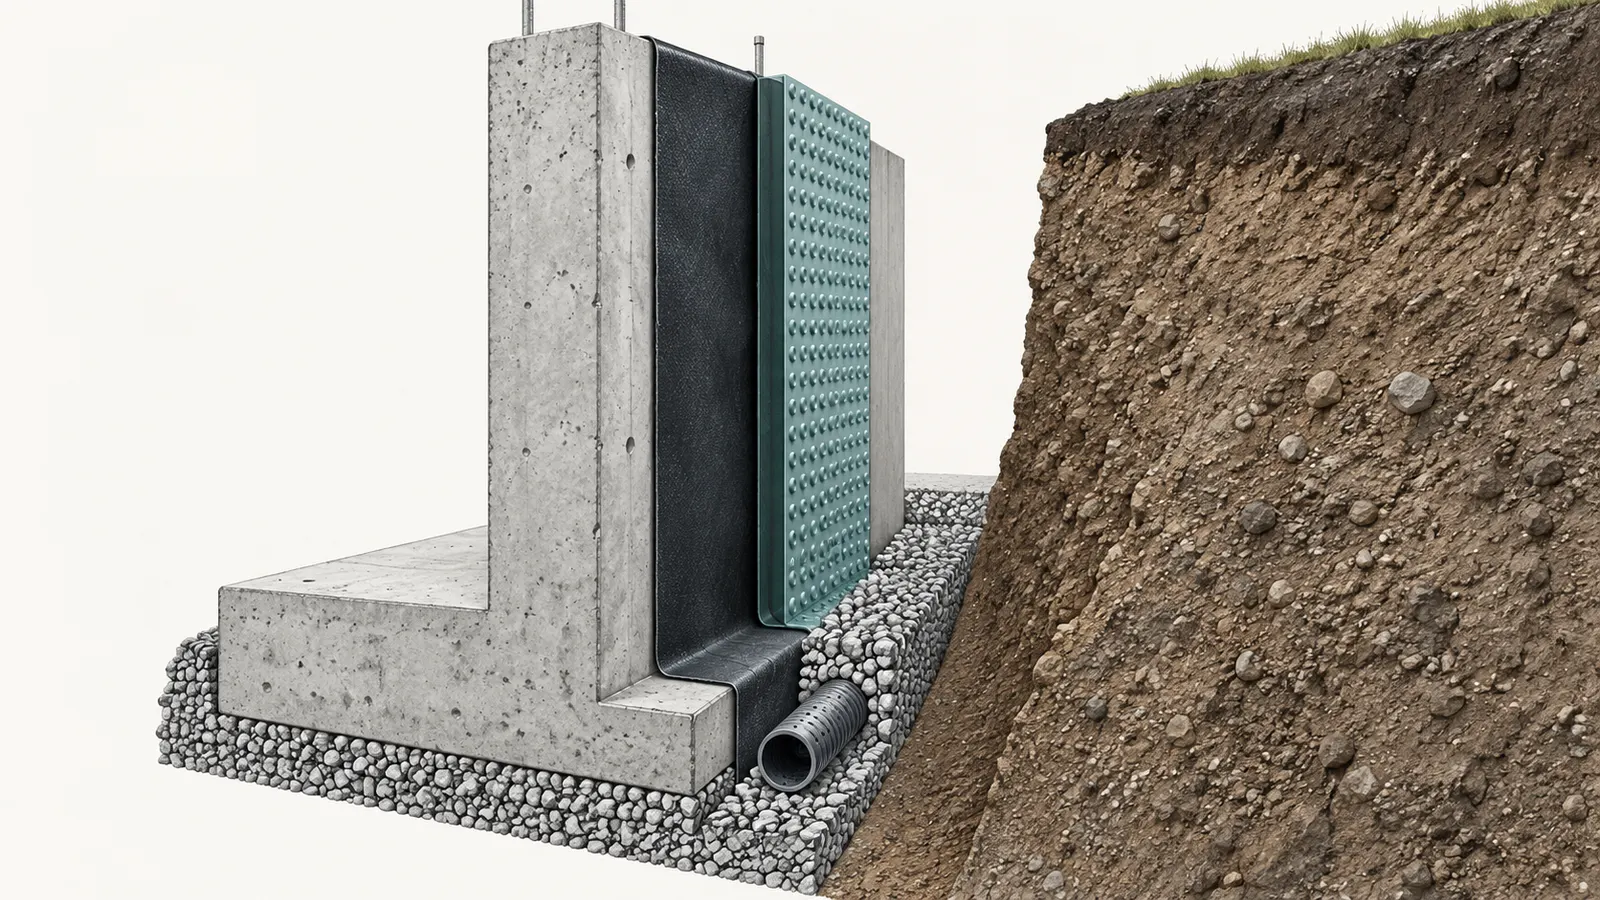
Maintain drainage and waterproofing as a distinct, product-specific hold point before backfill: record the selected system and revision, substrate preparation, joints and penetrations, drain-pipe and discharge arrangement, protection layer, weather or damage events, installer evidence and the local backfill-inspection result. Do not release backfill because the wall looks dry on one day.
Water management is a system and a sequence, not a coating name. The register should connect the below-grade wall, footing drain or other approved drainage, discharge or sump route, waterproofing or dampproofing, protection from backfill damage, surface grading and later roof-water management. The actual design may use a different assembly, and the permit or engineer may require details not listed here. The point is to keep the dependencies together until the handoff is complete.
Drainage prerequisites
Record where the drainage line sits relative to the area to be protected, how it discharges, what filter or gravel layer is specified, how cleanouts or access are handled and whether the system is tied to a sump, daylight outlet or another approved arrangement. The builder or designer owns the technical selection; the homeowner owns the question “where is the record that this selected arrangement matches the approved design?”
Howard County, Maryland's residential draintile checklist says the inspector checks that drain tiles or pipes are installed at or below the area to be protected, discharge into an approved drainage system such as a sump pit or daylight, are covered by at least six inches of gravel, and that exterior drain tile and gravel are protected with filter material before backfill. These are Howard County examples. They should become register prompts only for that jurisdiction and project; they do not define every U.S. foundation drainage system. See Howard County's residential draintile requirements.
If the drainage route is changed, the outlet is blocked, the pump or sump detail changes, the excavation fills with water or soil covers the line before the inspection, reopen the row. A photograph of pipe placement cannot establish that an outlet is approved, that a slope is correct or that the pipe is undamaged along its full run. Ask the builder for the as-built or inspection record the project uses. If the answer depends on an engineering or permit interpretation, route it to the design professional or AHJ.
Waterproofing is not interchangeable across products
Record the exact manufacturer, product family, product variant, data-sheet revision and installer instructions. “Waterproofing complete” is too vague. The row should name the membrane, coating, drainage composite, sealant, primer, tape, waterstop, protection board and repair method that the selected system actually permits. Compatibility is a product question, not a homeowner visual judgment.
GCP's current PREPRUFE 300R/160R Plus data sheet is a useful sequencing example because it describes a pre-applied membrane intended below slabs or behind basement walls, identifies product components and states that approved uses are limited to those detailed in the data sheet and related current data sheets. It also gives a product-specific exposure statement: up to 56 days of UV protection in most climatic conditions, with a shorter concrete-placement window when ambient temperatures exceed 100°F for more than seven days. That timing is not a generic rule for all membranes. If the project selects this product family, the installer and builder must use the current applicable data sheet and details; if it selects another product, use that product's instructions. Read the GCP PREPRUFE product data sheet.
The register should capture exposure as an input with units and a start event. For a product with a stated exposure window, record “installation date/time,” “ambient-temperature condition if relevant,” “required concrete or covering deadline,” and “actual covering or placement date/time.” The formula is simple: exposure duration = covering date/time − installation date/time. This is a tracking calculation, not evidence that the product remained undamaged or that the installation complied. If the sheet says the period changes under a specified temperature condition, record the condition and ask the installer to decide which window applies.
Damage and weather triggers
Treat rain, standing water, freeze-thaw, mud contamination, punctures, torn laps, unsealed penetrations, displaced protection, vehicle contact and unplanned exposure as recheck triggers. The exact response belongs to the product instructions and installer. A row should say “reopened—installer evaluation required,” not “probably fine.”
Use a damage record with four parts: location, visible condition, event or discovery date, and action owner. Photograph from a safe position and identify the wall elevation or grid. Do not scrub, patch, tape or cover the damage unless the authorized installer directs the method. For a product with manufacturer-approved repair materials, record the product and detail used, installer, completion date and evidence. For an improvised repair, record the row as unresolved until the authorized party accepts it.
The local inspection and product release are parallel. A municipal inspector may verify that a code or permit condition is met; the product installer or manufacturer representative may determine whether a membrane repair follows the product system; a design professional may address a changed detail. Do not write “inspector approved waterproofing” if the inspection record only addressed backfill readiness, and do not write “manufacturer approved foundation” when the manufacturer only discussed its product installation.
Do not confuse wet weather with a diagnosis
Water at an open excavation is a reason to reassess safety and sequence, not proof of a leak or proof that the drainage design failed. Water inside a basement after a storm may have several causes, including temporary exposure, incomplete roof-water control, groundwater, surface runoff or a damaged assembly. The register can record the observation, weather, location and immediate hold; qualified parties must diagnose and direct corrective work.
How to hold backfill until the handoff is real
Hold backfill until the required exposed-work inspection, drainage and waterproofing release, protection measures, rough-ins and open exceptions are resolved for the actual jurisdiction and approved design. Backfill is a one-way information loss: it hides the wall surface, pipe position and protection layer, so the row must be complete before soil covers them.
St. Mary's County, Maryland's guide provides a clear local example: a foundation backfill inspection is made before backfilling with acceptable soil to verify drainage and waterproofing systems on walls serving habitable or usable space, flood-area requirements where applicable, grounding and rough-in plumbing where applicable. It also says work remains accessible and exposed until approved. Use St. Mary's County's foundation-backfill language as a jurisdiction-specific reference, not a national checklist.
The pre-backfill release checklist
Before the builder asks for or records the backfill release, the register should show the following status. Mark “not applicable” only with a reason; blank is not the same as not applicable.
- Current foundation plan, wall section, grading detail and change documents are identified.
- Wall concrete or masonry issues have been evaluated and any required repair is documented.
- Drain pipe, discharge, gravel, filter fabric, cleanouts or other designed components have an evidence record.
- Waterproofing or dampproofing product and details are identified, including approved repairs and protection.
- Penetrations, sleeves, grounding, plumbing rough-in and other concealed items have been addressed as required by the project.
- The local inspection request, inspection type, result, comments and reinspection status are recorded.
- The builder has confirmed the acceptable backfill material, placement and compaction requirements for the project.
- A weather, soil, water or damage event has not occurred after the last verification without a recheck.
- The release authority is named and has actually released the row, with date and conditions.
- The next handoff names the backfill crew, surveyor, grading lead or framing coordinator and the prerequisite they receive.
The homeowner can request a register review meeting before the truck or excavator returns. The meeting should end with one of three decisions: ready for the local inspection request; not ready, with a named correction owner; or released with explicit conditions and a next check. “Proceed but keep an eye on it” is not a usable status for a concealed assembly.
Backfill material and placement are not just schedule items
The register should not prescribe a soil type, lift thickness, compaction method or moisture condition unless those inputs come from the approved design, geotechnical direction, permit or project specification. Record the controlling source and the party responsible for verifying it. The homeowner should not approve a load of soil by color or touch.
If the builder's plan calls for staged backfill, keep the row open until the relevant stage is complete or create a linked row for each stage. If heavy equipment approaches the wall, if the excavation edge changes, if a drain outlet is buried or if protection is damaged during placement, reopen the affected row. The backfill operation can change conditions that were correct at the moment of inspection.
The next action after backfill may be rough grading, final grading, slab preparation, utility work or framing. Do not let the next trade infer that a backfill release also released grading or structural bearing. State the exact handoff: “foundation perimeter backfilled per builder's recorded method; ready for rough grading review,” or “west side remains open pending drainage correction; framing handoff not released.”
Grading is a later water-management handoff
The U.S. Department of Energy Building Science Education page describes final grade away from the house as part of a complete foundation water-barrier system and gives a guidance example of at least 0.5 inch per foot for 10 feet, with swales or drains when there is less space. It places excavation, footings, stem wall and slab, footing drain pipe, waterproofing, exterior insulation, backfill and grading in a sequence, and describes capping and mechanically compacting soil to reduce settling. This is building-science guidance, not a universal code number. The project's grading, stormwater, erosion-control and accessibility requirements control. Read DOE Building Science Education's foundation grading sequence.
Record the stated slope as a source-backed design input only if the project uses it. Do not use a homeowner's phone level or a single measurement to certify final grade. A modeled measurement can help identify a question. For example, if an illustrative project has 10 feet of horizontal run and uses the DOE guidance example, the vertical difference calculated from 0.5 inch/foot × 10 feet is 5 inches. That calculation does not prove the local grading requirement, the site's drainage performance or the final elevation. It simply tells the homeowner what the referenced guidance example would mean in units.
If the available side yard is 6 feet rather than 10 feet, do not scale the number into a new code rule. The DOE page says to use swales or drains when space is less than 10 feet; the designer, civil engineer, builder and AHJ must determine what the project requires. That is a good sensitivity test for the register: change one input—available run—and the next decision changes from “verify the 10-foot grading example” to “obtain the designed alternate drainage path.”
How to release the first-floor framing handoff #
Release the foundation to first-floor framing only after the builder confirms the foundation is ready for the specific framing scope, the local inspection and professional records required by the project are complete, unresolved foundation exceptions are closed or expressly accepted by the proper authority, and the framing team receives the current plans and constraints. A passed footing or backfill inspection is not automatically a framing release.
The framing handoff is where several document streams meet. The crew needs the current foundation and framing plans, sill or bearing details, anchor and hold-down information, elevations, openings, stair or porch interfaces, utility penetrations and any accepted field changes. The permit record may require a frame inspection after other work. The builder's schedule may impose its own quality gate. The register should show each stream separately.
Local framing examples
Howard County, Maryland's residential framing requirements say necessary certifications and new-home wall-check drawings must be received before requesting a frame inspection, and approved plans, roof and floor truss drawings and manufacturers' specifications must be on site. The page also lists comparisons of joist, header, girder, bearing, blocking, notching, boring and connection conditions. Use the Howard County residential framing requirements only for a Howard County project and only with the current permit process.
St. Mary's County, Maryland's guide says rough plumbing, mechanical, gas and electrical inspections occur before covering or concealment and before or simultaneously with framing inspection, while frame and masonry inspection occurs after roof, masonry, framing, firestopping, draftstopping and bracing are in place and after the rough inspections are approved. That is an example of why the register should preserve handoffs among foundation, rough trades and framing rather than declaring the foundation “done.” See St. Mary's County's Stage Two inspection sequence.
The two local examples differ in presentation and scope. Neither authorizes a homeowner to decide that a framing inspection is unnecessary. For another state, county or city, ask the AHJ for the current inspection sequence and record the answer with the permit file.
The framing-release row
Use a final foundation row with these prompts:
- Is the foundation location and elevation record available, and does the responsible party say it matches the current approved layout?
- Are sill, bearing, anchor, hold-down, strap, bolt and connection requirements identified from the current plans and details?
- Are openings, steps, offsets, ledges and penetrations accounted for in the framing plan?
- Are foundation, backfill, grading or waterproofing exceptions still open?
- Are the required local inspection results and professional directions attached?
- Have weather or construction events changed the exposed condition since the last check?
- Has the builder identified the framing crew, the documents issued to it and the conditions of the handoff?
- Who may reopen the row if a framing measurement or delivery exposes a conflict?
The responsible builder or framing coordinator should make the handoff. The homeowner can ask for a copy of the issued plan set, the foundation survey or layout record and the open-issue list. If a sill plate does not align with the foundation, an anchor conflicts with a stud layout or the floor system bears differently than shown, stop the affected work and route the conflict to the builder and design professional. Do not ask a carpenter to solve a structural discrepancy by cutting, drilling or moving a connection without authorized direction.
Preserve the handoff after release
A release is not the end of the register. Archive the row's evidence, then create the next row for the first-floor framing inspection or structural-stage coordination. Note conditions such as “release applies to north foundation perimeter only,” “west wall repair accepted by the named professional,” or “framing may begin after the listed documents are issued.” Conditional language is valuable when it is explicit, bounded and owned.
If the builder's project software has a “complete” button but no field for conditions, keep the register as the more detailed coordination record or attach a supplemental note. The point is not to create duplicate paperwork; it is to prevent a status label from losing the reason, scope and next action.
How to manage exceptions, rechecks and version history #
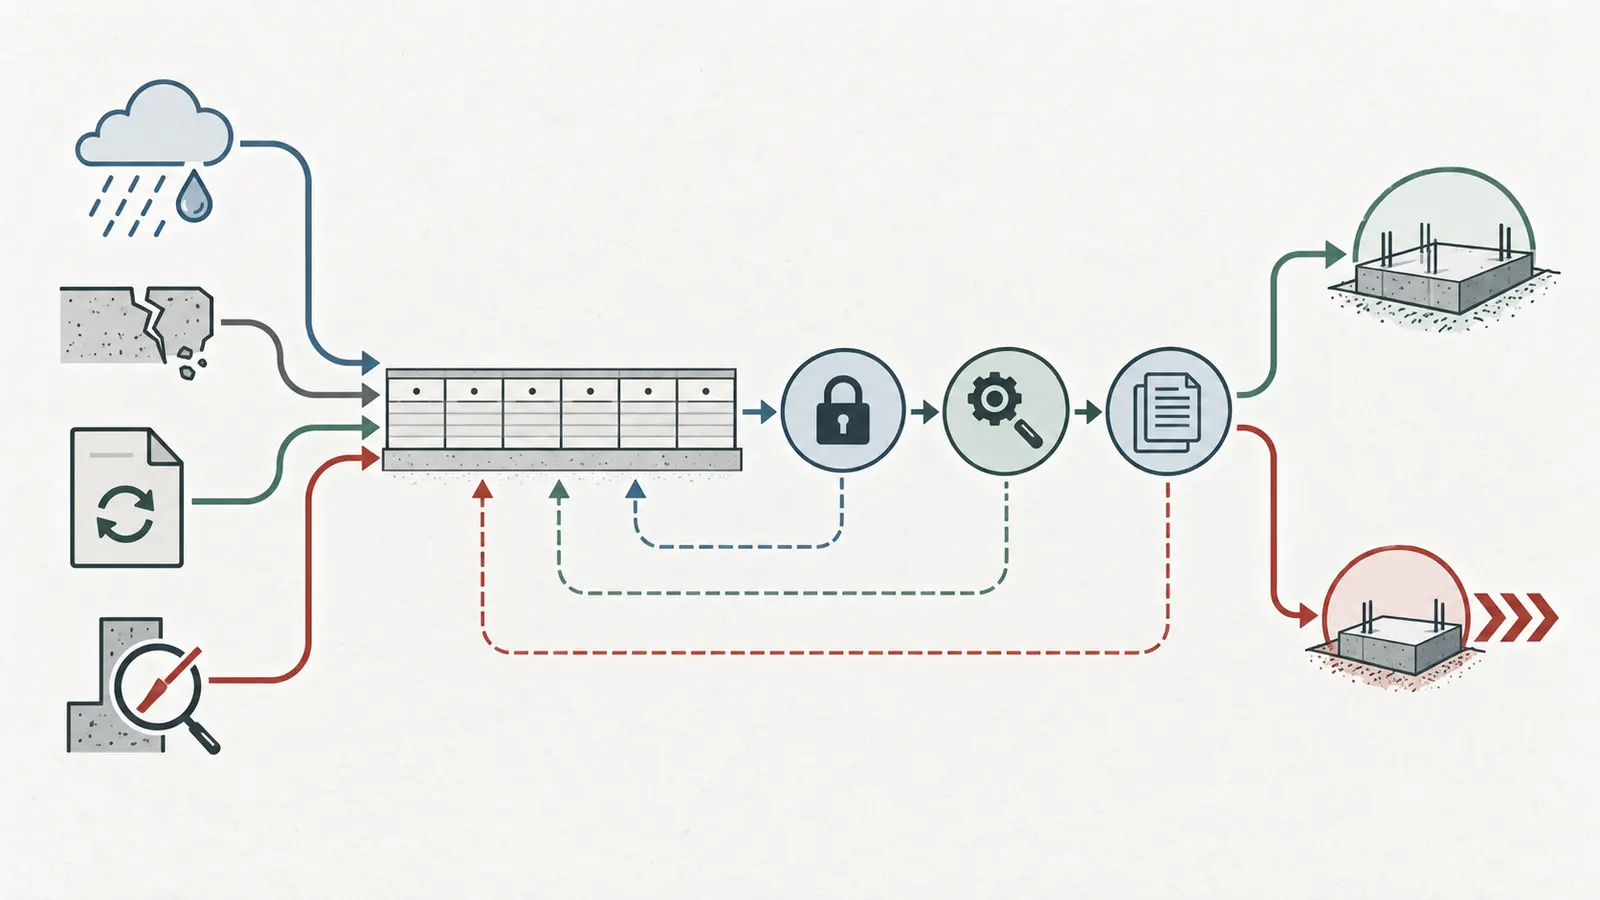
Manage an exception as an open decision with an owner, due action, evidence requirement and release authority; never close it because time passed, a different inspection passed or the next trade needs the area. Reopen a prior release when the physical condition, controlling document, hazard or product exposure changes.
Use an exception ID linked to the affected row, such as EX-FND-07. Record:
- discovery date, person and exact location;
- observation stated without a diagnosis;
- controlling document or requirement that may be affected;
- immediate safe action, including stop, protect, isolate or notify;
- owner responsible for evaluation or correction;
- required authority, such as builder, AHJ, competent person, waterproofing installer or design professional;
- evidence needed to close it;
- recheck date or event trigger;
- final direction, correction and acceptance record;
- effect on the next handoff.
A recheck matrix
| Trigger | What the homeowner can record safely | Who must evaluate | Register result until evaluated | Next decision |
|---|---|---|---|---|
| Rain, runoff or standing water in an open excavation | Date, weather, visible water location from a safe position, builder notification | Competent person for worker safety; builder and design team for construction effect | Hold excavation-related entry and affected release | Can workers proceed, and does the work need drainage or design review? |
| Soil color, strata, soft spot, sloughing or unexpected bearing condition | Location and description without probing or entering | Builder, geotechnical professional or design professional, plus AHJ if required | Footing layout or concrete row remains open | Does the approved design still apply, or is direction required? |
| Damaged shoring, edge movement or equipment near excavation edge | Photograph only if safe; time, location and activity | Competent person | Worker-safety hold | What corrective protection is required before anyone enters? |
| Membrane puncture, torn lap, displaced protection or mud contamination | Location, event, product name and image from safe location | Waterproofing installer or manufacturer-authorized technical contact, and builder | Waterproofing and backfill rows reopened | What repair is approved, and what evidence closes it? |
| Drawing, detail, permit or product revision | Old and new revision identifiers and affected rows | Builder, design professional, AHJ or installer according to the change | Affected rows revert to document review | Which version controls and who must be re-notified? |
| Unexpected opening, sleeve, anchor or embed conflict | Location, plan reference and work status | Builder and design professional; AHJ if the permit requires | Wall, framing or rough-in handoff held | Is the conflict corrected, documented or redesigned? |
| Inspection result marked failed, partial, conditional or correction required | Exact official wording and inspection ID | Builder and named inspection authority | No release until stated correction path is closed | Is reinspection, revised documentation or professional direction needed? |
| Backfill or framing begins without a closed row | Date, crew, work area and missing record; do not confront an unsafe operation | Builder, AHJ and safety authority as appropriate | Escalate and preserve evidence; do not self-inspect | Can work pause safely, and what authority must decide? |
This matrix is a coordination aid, not a substitute for the actual safety program or permit process. It deliberately uses “what to record” rather than “what to fix,” because the correct fix depends on site conditions, design, jurisdiction and authority.
Versioning without administrative theater
Version the register when a row changes state or the controlling information changes. A useful revision note is specific: “Rev 1: wall penetration at south elevation changed from 4-inch sleeve to 6-inch sleeve per detail S3.2 Rev D; builder requested design confirmation; backfill handoff remains open.” A weak note is “updated.”
Retain the old revision. If a row is reopened, do not delete the earlier release; record the trigger and create the new state. This matters when a later issue appears. You need to know what was observed, what documents were in force and what event occurred afterward. The register is not trying to prove that earlier people were wrong. It is trying to show the chain of decisions.
Store evidence using predictable names: FND-03_rev2_2026-09-14_south-wall-waterproofing.jpg, FND-03_inspection_request_2026-09-15.pdf, EX-FND-07_direction_S3-2-revD.pdf. Do not put sensitive personal information, access codes or unnecessary financial records in a public or shared location. Give the builder, inspector and design professional the access needed for the decision, and keep a homeowner copy of the final record.
Escalation when people disagree
If the builder says “proceed,” the inspector's record says “correction required,” and the design professional has not addressed the difference, the register status is not released. Record the disagreement and ask the builder to identify the authority whose decision controls that specific issue. If the disagreement involves imminent worker danger, the competent person controls worker removal and corrective action under the safety program. If it involves a permit question, contact the AHJ through its stated process. If it involves structural adequacy or a changed detail, obtain the required design-professional direction.
The homeowner should avoid acting as a mediator who chooses the most convenient technical answer. Ask concise questions: “Which document controls?” “Who is authorized to close this?” “What work must remain exposed?” “What record will show the correction?” “What exact handoff is permitted while the exception remains open?” These questions keep the conversation attached to decisions.
Worked illustrative register and the next decision #
The illustrative register below shows how a homeowner can connect foundation rows without pretending to approve the work. Every number, date, drawing identifier and status in the example is modeled for explanation; none describes a real site, measured result, interview or inspection. Replace it with the actual project's inputs and records.
Inputs and method for the illustrative example
Assume an illustrative custom home with a basement, a perimeter footing and cast-in-place foundation walls. The assumed document set is foundation plan S1.1 Rev C, wall detail S3.2 Rev B, grading sheet C2.1 Rev A, and a selected waterproofing data sheet received by the builder on June 3. The assumed jurisdiction is intentionally not treated as Maryland; the example uses a notional AHJ so that no local rule is invented. The builder's schedule proposes footing concrete on June 10, wall concrete on June 15, waterproofing on June 20 and backfill on June 25.
The worksheet method is:
row readiness = prerequisite complete + evidence attached + required inspection result + release authority decision − open blocking exception
Each positive field is recorded as 1 only when the row contains a supporting record; an open blocking exception is 1 when any issue prevents the named handoff. A release candidate is 4 with no blocking exception. This is a workflow indicator, not a code score, safety rating, inspection result or probability of success. If the project has a conditional release process, add a condition field rather than changing the formula.
Sensitivity is simple. If FND-02 has its evidence attached, inspection result, and builder check but the design professional has not resolved a changed sleeve, the inputs are 1 + 1 + 1 + 0 − 1 = 2, not 4; the row stays open. If the condition is later accepted with a documented direction and the authority closes it, the inputs become 1 + 1 + 1 + 1 − 0 = 4. If a heavy rain event occurs after the earlier excavation observation, the event reopens the affected row and changes the blocking-exception input back to 1 until the competent person and project team evaluate it.
Illustrative footing-to-framing entry set
| ID / revision | Stage and controlling input | Prerequisite and responsible party | Evidence and inspection record | Trigger or exception | Release authority / next handoff |
|---|---|---|---|---|---|
| FND-01 Rev 0 | Excavation and footing layout; S1.1 Rev C | Builder confirms layout process; competent person owns worker-safety inspection; concrete team has not entered | Layout record requested; excavation safety record requested; no permit result yet | June 8 rain recorded; water visible at southeast low point from safe observation | Not released; competent person and builder evaluate before footing work; next handoff is footing preparation |
| FND-01 Rev 1 | Same location after evaluation | Builder documents water-control action; design team confirms footing detail still applies | New safe-condition record, updated site note and AHJ request attached | No open exception after recorded evaluation | Named safety and project authorities close their respective decisions; handoff to footing reinforcement |
| FND-02 Rev 0 | Footing reinforcement before concrete; S1.1 Rev C | Reinforcement and dowels installed by concrete team; builder compares visible work to plan | Overall, corner and location photos; footing inspection requested June 9 | One dowel location unclear in photo; no release authority decision | Hold concrete placement in affected run; builder obtains recheck and local result |
| FND-02 Rev 1 | Footing reinforcement before concrete | Dowel location marked and checked by responsible party | Corrected location record and inspection result attached | None recorded | AHJ or other required authority releases; next handoff to concrete placement |
| FND-03 Rev 0 | Wall forms, reinforcement, straps, embeds and openings; S3.2 Rev B | Wall crew completes forms and embeds; builder checks current details | Pre-pour record and local inspection request | South sleeve conflicts with revised mechanical route | Hold affected wall pour; builder routes change to design professional; no homeowner approval |
| FND-03 Rev 1 | Foundation-wall pre-pour | Design direction received as S3.2 Rev C; builder updates issued set | Direction, revised drawing and pre-pour record attached | None for listed locations | Named local or project authority releases wall concrete; next handoff is placement |
| FND-04 Rev 0 | Drainage, waterproofing and protection before backfill; product sheet revision recorded | Installer completes system; builder records drain route and protection | Product record, location photos, repair notes if any, backfill inspection request | June 23 forklift contact at west protection board; membrane condition unknown | Reopened; waterproofing installer evaluates and documents repair; backfill cannot proceed |
| FND-04 Rev 1 | Same wall after repair | Installer applies an approved repair method and builder rechecks protection | Repair evidence, updated product record and local result attached | None after evaluation | Installer and required AHJ release their scopes; next handoff to backfill |
| FND-05 Rev 0 | Backfill and foundation-to-framing handoff; S1.1 Rev C, C2.1 Rev A | Acceptable backfill method and current framing documents issued | Backfill record, survey/elevation record if required, inspection result, framing document receipt | Open grading question on six-foot side yard | Conditional or hold; builder/design team resolves alternate drainage or grading direction; no framing release on assumption |
| FND-05 Rev 1 | Foundation released to first-floor framing | Exceptions closed or accepted by named authority; current plans issued to framing crew | Final row history, inspection records, accepted directions and handoff acknowledgement | None recorded | Builder/framing coordinator releases defined scope; next row is framing-stage inspection |
The example demonstrates why a release register should not have one row called “foundation complete.” FND-01 deals with excavation safety and changing site conditions. FND-02 protects footing reinforcement before concrete. FND-03 protects embedded wall work. FND-04 protects a product-specific water-management assembly before it is covered. FND-05 joins backfill records to the structural handoff but does not let a grading question disappear.
How a homeowner checks each entry
For FND-01, the homeowner checks that the event was recorded and that the responsible parties are named. The homeowner does not inspect the trench. The next question is whether the competent person recorded the worker-safety condition and whether the builder or design team addressed any construction effect.
For FND-02, the homeowner checks that the plan revision is identified, the evidence has a location and the inspection result is attached. The homeowner does not decide whether a dowel is structurally acceptable. The next question is whether the named inspection authority released the concrete-placement step.
For FND-03, the homeowner checks that the changed sleeve did not get buried in a message thread. The homeowner asks for the revised drawing or professional direction and ensures the old row remains in the history. The next question is whether the wall pour is released for the affected location.
For FND-04, the homeowner checks that the product is named, the damage event has an owner and the repair record comes from the responsible installer or other authorized source. The homeowner does not apply a patch. The next question is whether the product and local backfill decisions are both closed.
For FND-05, the homeowner checks that the current framing documents and any survey or elevation records required by the project are in the handoff. The homeowner does not declare a six-foot side yard compliant because a generic slope example was calculated. The next question is whether the design and AHJ have resolved the actual grading path and whether the builder can give the framing crew a bounded release.
What to bring to a professional
When a row is unclear, send a compact packet rather than a long narrative. Include the row ID and revision; property and permit number; affected location; controlling drawing or product revision; dated photographs; weather or change event; inspection request and result; exact question; work currently waiting; and the decision deadline created by the schedule. Say what you are not asking the recipient to do remotely. For example: “Please confirm which current detail controls the south wall sleeve and whether an on-site review or revised drawing is required before the wall pour.”
Do not send only “Is this okay?” A professional needs the condition, location, document revision and requested decision. Do not ask a municipal inspector to certify product performance, ask a manufacturer to approve structural changes, or ask a design professional to make a worker-safety determination outside their role. Route each question to the authority whose decision the row requires.
The final next decision
After the foundation-to-framing row is released, open a new structural-stage row for the first-floor framing sequence. Carry forward the foundation exceptions that affect bearing, connections, openings, elevations or utilities. File the final release record with the permit documents, drawings, change history, inspection results, product records and photographs. A register that ends at “released” is incomplete if it does not state what was released, to whom, under which revision and what must be checked next.
If the row cannot be closed, the correct next decision is not whether to make the spreadsheet green. It is whether the work must remain exposed, whether a qualified person must evaluate a safety or technical condition, whether an inspection must be requested or repeated, and which handoff must wait. That is the value of a release register: it makes the missing decision visible while the affected work can still be inspected, corrected or documented.
Scope and safety boundary
This guide covers United States custom-home construction from excavation through the first-floor framing handoff. The local examples are explicitly Howard County, Maryland and St. Mary's County, Maryland. Confirm the actual authority having jurisdiction, permit, adopted code edition, approved plans, geotechnical direction, selected waterproofing product and builder scope before using any row. Never enter an excavation, climb unstable forms, work around machinery, alter reinforcement, repair waterproofing or decide a structural field change based on this article or a remote photograph. OSHA's excavation rules and the employer's safety program govern worker protection; a competent person must make the applicable excavation-safety determinations. A building inspector, builder, waterproofing installer, design professional or other qualified authority must make the decision assigned to that role.
Cite this guide
Brictale. “How to Maintain a Foundation Release Register During New Home Construction.” Published 2026-10-05; updated 2026-10-05.
https://brictale.com/build/construction/maintain-new-home-foundation-release-register · Read the Markdown version
Original contribution: Foundation release-register worksheet and illustrative handoff set. A reusable row structure connects each foundation hold point to prerequisites, evidence, local inspection status, responsible people, exceptions, recheck triggers and the next handoff.
Sources and scope
Evidence behind this page
- Howard County, Maryland's residential-footing inspection checklist says the inspector checks soil bearing capacity, consistent soil conditions, weather suitability, dimensions against approved drawings, frost-line depth, grounding where applicable, reinforcement and approved dowels where required.
Howard County, Maryland: Inspection Requirements — Residential Building: Footings
Local example for residential building-footing inspections in Howard County, Maryland; it is not a national rule and does not replace the project's permit, approved plans, adopted code or inspector instructions.
Accessed · Link to this claim - Howard County, Maryland's residential draintile inspection checklist addresses drain-pipe location, approved discharge, gravel cover, filter-material protection before backfill and related crawl-space or egress items.
Howard County, Maryland: Inspection Requirements — Residential Building: Draintile
Local example for Howard County, Maryland; the page's checklist is not a universal drainage design or a substitute for the approved site and foundation details.
Accessed · Link to this claim - Howard County, Maryland says approved plans, floor and roof truss drawings, manufacturers' specifications and necessary certifications must be in place before requesting its residential frame inspection.
Howard County, Maryland: Inspection Requirements — Residential Building: Framing
Local example for Howard County, Maryland's residential framing inspection process; do not generalize it to another authority having jurisdiction.
Accessed · Link to this claim - St. Mary's County, Maryland's residential inspection guide says construction or work must remain accessible and exposed for inspection until approved, and assigns the permit applicant the duty to keep it accessible and exposed.
Local guide revised June 27, 2023, identifying International Residential Code 2018 and St. Mary's County, Maryland inspection language; confirm the current local guide and adopted code for the project.
Accessed · Link to this claim - St. Mary's County, Maryland lists footing inspection before concrete for depth, width, soil bearing capacity, reinforcement and location; concrete foundation-wall inspection before concrete for forms, reinforcement, straps, embeds, wall dimensions and openings; and foundation-backfill inspection before backfilling for drainage, waterproofing, grounding and applicable plumbing rough-in.
Local Stage One examples in St. Mary's County, Maryland; they do not establish the inspection sequence in another county, state or municipality.
Accessed · Link to this claim - St. Mary's County, Maryland's guide places rough plumbing, mechanical, gas and electrical inspections before covering or concealment and before or simultaneously with framing inspection, and places frame and masonry inspection after framing-related work and approved rough inspections.
Local Stage Two examples in St. Mary's County, Maryland; exact permit sequencing and inspection names vary by authority having jurisdiction and project.
Accessed · Link to this claim - OSHA's trenching and excavation eTool says excavations should be inspected by a competent person before construction, daily before each shift, as needed during the shift and following rainstorms or other hazard-increasing events.
Occupational Safety and Health Administration: Trenching and Excavation
Federal OSHA construction-safety guidance for worker exposure to trenches and excavations; it does not authorize a homeowner to enter or inspect a hazardous excavation and state-plan requirements may also apply.
Accessed · Link to this claim - 29 CFR 1926.651 requires precautions for employees exposed to accumulated or accumulating water, competent-person monitoring of water-removal equipment, protection from surface-water runoff after heavy rains, and inspections before work, as needed during the shift and after every rainstorm or other hazard-increasing occurrence when employee exposure can be reasonably anticipated.
Occupational Safety and Health Administration: 29 CFR 1926.651 — Specific Excavation Requirements
Federal OSHA construction standard for employee exposure to excavation hazards, especially water accumulation and changing conditions; it does not make a homeowner an excavation inspector or replace a state-plan requirement, employer safety program, local permit rule or project-specific professional decision.
Accessed · Link to this claim - OSHA describes a competent person for excavation work as someone capable of identifying existing and predictable hazards and authorized to take prompt corrective measures; the eTool identifies soil classification, water removal, rain runoff and protective-system decisions as competent-person activities.
Occupational Safety and Health Administration: Trenching and Excavation — Competent Person
Federal OSHA construction-safety definition and examples; the homeowner register records the competent person's name and result but does not substitute for that person's authority, training or inspection.
Accessed · Link to this claim - OSHA 29 CFR 1926.652 generally requires employees in an excavation to be protected from cave-ins by an adequate protective system, subject to the standard's stated exceptions, including an excavation less than 5 feet deep when a competent person finds no indication of a cave-in hazard.
Occupational Safety and Health Administration: 29 CFR 1926.652 — Requirements for Protective Systems
Federal OSHA construction standard for employee protection in excavations; it is not a homeowner entry permission, foundation design rule or local building-permit checklist.
Accessed · Link to this claim - The U.S. Department of Energy Building Science Education page describes a complete foundation water-barrier system as including final grading away from the house, gives a guidance example of at least 0.5 inch per foot for 10 feet, and places footing drain pipe, waterproofing, exterior insulation, backfill and grading in a sequence.
Building Science Education guidance and sequence example; the stated slope is not asserted here as a universal code requirement, and the project's grading, stormwater, accessibility and erosion-control requirements control.
Accessed · Link to this claim - GCP's PREPRUFE 300R/160R Plus data sheet describes a specific pre-applied membrane system for below slabs or behind basement walls, identifies product-specific components and limitations, and says the Plus formulation allows up to 56 days of UV protection in most climatic conditions, with a shorter concrete-placement window in specified high-temperature conditions.
GCP Applied Technologies: PREPRUFE 300R/160R Plus & PREPRUFE 300R/160R Plus LT Data Sheet
One manufacturer's current product data sheet for one membrane family; it is a sequencing example only and must not be applied to another product or detail without that product's current instructions and project-specific design.
Accessed · Link to this claim