Foundation-to-Framing As-Built Record: A Homeowner Handoff Checklist
Maintain a measured, inspection-backed foundation record before framing, with jurisdiction-specific gates, discrepancy routing, safety limits, and a reusable handoff worksheet.
The short answer
Before framing, keep one dated record that ties the approved plan revision and survey control to measured foundation geometry, elevations, openings, interfaces, inspection results, product instructions and unresolved discrepancies. A homeowner can coordinate documents and safe observations, but the AHJ controls approval, a surveyor controls sealed positional work, and qualified design professionals resolve structural questions. If any required record, inspection, or responsibility is missing, pause the handoff and route the discrepancy before framing covers the evidence.How to maintain a new home foundation as-built record before framing
A foundation-to-framing handoff is ready only when one dated record ties the approved plan revision and survey control to measured foundation geometry, elevations, openings, interfaces, inspection results, product instructions, photos and unresolved discrepancies. The homeowner can coordinate documents and safe observations. The authority having jurisdiction controls approval, a surveyor controls sealed positional work, and qualified design professionals resolve structural questions. Missing evidence means pause the handoff and route the issue before framing conceals it.
This guide applies to a United States new-home build after foundation work and before framing. It is written for a homeowner who may have hired a general contractor, architect, engineer, surveyor, specialty trades and an independent inspector. It does not tell a homeowner to enter an excavation, diagnose a structural defect, approve a deviation, promise an inspection result or direct a repair. The actual permit, approved plan set, foundation type, datum, product instructions and authority having jurisdiction (AHJ) always control.
1. Decide whether the foundation-to-framing handoff is actually ready #
A foundation-to-framing handoff is ready when the record proves identity, location, geometry, elevation, inspection status, visible interfaces, responsibility and the next authorized action; a photograph or a passed inspection by itself does not prove all of those things.
The decision is not “does the concrete look finished?” It is “can the next responsible person proceed without guessing about what was built, what was approved, what was measured, what is still hidden, or who must resolve a discrepancy?” Framing converts a comparatively observable foundation into a connected structural system. Once sill plates, floor framing, sheathing, backfill, insulation, finishes or other work cover an interface, a later reviewer may be unable to tell whether a condition was present before framing, introduced during framing, or simply never documented.
The seven evidence lanes
Keep the record organized into seven lanes. Each lane has a different owner and a different kind of proof.
| Evidence lane | What it must answer | Usual responsible person | What the homeowner may safely do | What it does not prove |
|---|---|---|---|---|
| Identity and scope | Which property, permit, plan revision, foundation type and phase are being recorded? | Builder or permit holder, coordinated with homeowner | Copy the permit number, plan title, revision date and current sheet index | That the current work matches the plan |
| Survey control | Which property corners, benchmark, coordinate system and vertical datum anchor the measurements? | Land surveyor | Request the survey, benchmark description and datum in writing | That a tape measure is a survey or that a setback is legal |
| Installed geometry | Where are the foundation lines, corners, openings, anchor locations and elevations relative to the approved documents? | Surveyor, builder and framer, with design professional input as needed | Photograph visible conditions and transcribe measurements supplied by qualified people | That a measured difference is structurally acceptable |
| AHJ inspection | Which required inspection occurred, when, under which permit, with what result and corrections? | Builder or permit holder and AHJ | Download the permit record and ask for the inspection result and correction list | That a passed inspection is a survey, engineering certification or warranty |
| Materials and interfaces | What concrete, reinforcement, waterproofing, drainage, anchors, penetrations and products were specified and installed? | Builder and trade installers; design professional for design changes | Collect delivery tickets, product names, instructions and accessible photos | That a product photo proves correct installation everywhere |
| Condition and protection | How were curing, cold weather, water management, temporary protection and access handled? | Builder and competent person for worker safety | Keep dated weather and photo records supplied by the team | That a weather note establishes concrete strength |
| Discrepancy and handoff | What is unresolved, who owns it, what is the due date and what cannot proceed? | Builder as coordinator; qualified party for the substance | Keep the log current and request a written disposition | That silence, schedule pressure or a verbal assurance is approval |
The strongest record links each entry to a source, date, person and next action. For example, “north wall looks about 8 inches from the stake” is a weak observation. “On September 8, the builder identified plan A3.2 revision 4, the surveyor identified benchmark BM-2 and the vertical datum, the survey record measured the north wall at the stated location, and the surveyor’s signed deliverable is pending” is a useful status record. It still does not answer whether framing may start until the required deliverable and AHJ process are complete.
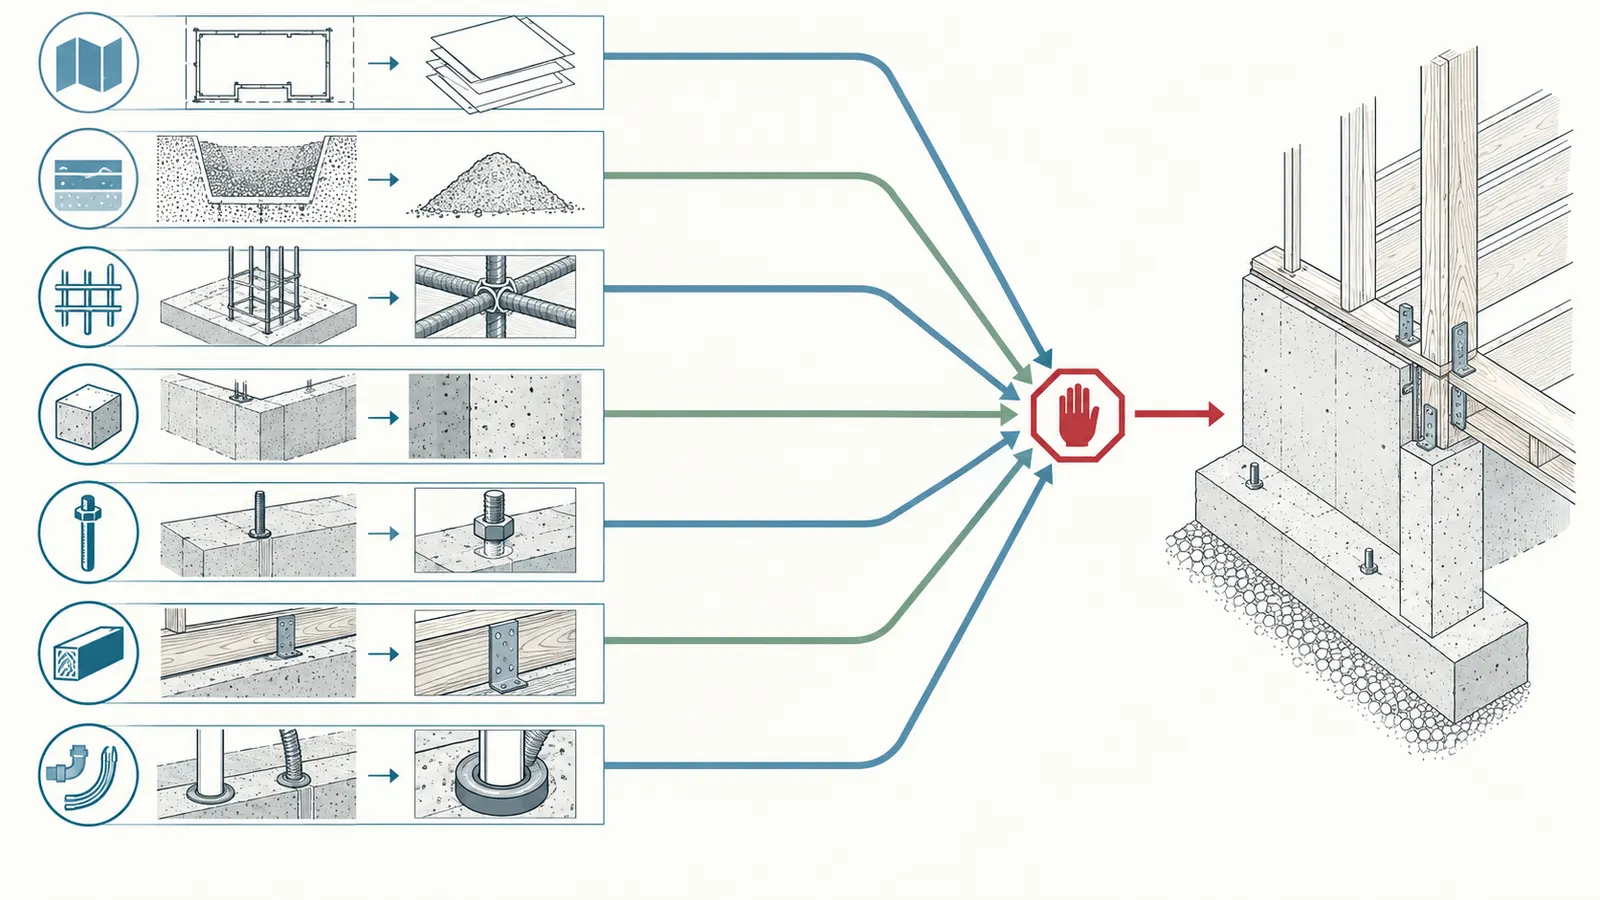
Four statuses prevent premature optimism
Use four statuses consistently:
- Verified means the record exists, is attributable, is tied to the correct plan or permit and has been checked by the person responsible for that kind of evidence.
- Not applicable means someone responsible explicitly confirmed that the field does not apply to this foundation or jurisdiction. It does not mean the homeowner skipped the field.
- Pending means the record is expected but has not arrived, such as a survey deliverable, permit result or product submittal.
- Discrepancy means two records or an observation do not agree, or the record lacks enough information to decide. A discrepancy stays open until the responsible party documents the disposition.
Do not use “looks good,” “probably within tolerance,” “the inspector was here,” or “the framer knows” as substitutes for those statuses. They may be notes, but they are not decision evidence.
The stop/go rule
Proceed to the builder’s next authorized step only when all of these are true:
- The record names the actual property, permit and approved plan revision.
- The measurement record identifies its survey control or clearly labels an observation as non-survey information.
- Required local inspections are shown as passed or otherwise explicitly released by the AHJ for that permit.
- The builder and framer have reviewed the foundation-to-framing interfaces, including sill, anchor, opening, elevation and load-path questions relevant to the plan.
- Product-dependent work is matched to the actual product instructions and visible installation condition.
- Every discrepancy has a named owner, a next action and a rule for whether framing must wait.
- The site can be approached safely by the people who are authorized to perform the remaining work.
If one of these is missing, the correct next decision is not automatically “stop all construction.” It is “identify the smallest safe and authorized hold point.” A survey discrepancy may hold layout and sill work while unrelated site administration continues. A missing footing inspection may hold concrete or concealment. A structural question may hold framing at one interface while the builder and design professional determine whether other work can proceed. The builder and AHJ must define the actual hold point; the homeowner should not invent one.
2. Set the plan, permit, survey and jurisdiction control before measuring #
Before any measurement is interpreted, freeze the identity of the documents and the reference system: actual AHJ, permit number, approved plan revision, foundation type, survey control, benchmark and vertical datum.
This is the prerequisite that prevents a precise measurement from being compared with the wrong drawing. Home construction projects commonly have architectural sheets, structural sheets, civil or site sheets, manufacturer details, permit comments, change orders, field sketches and later revisions. A dimension on one revision can be correct and still be wrong for the work now authorized.
Record the actual jurisdiction, not a nearby example
The local examples in this guide are intentionally separated:
- Cary, North Carolina: Cary says a sealed as-built foundation survey by a North Carolina-registered land surveyor is generally required for residential structures and accessory buildings, with stated exceptions. The Town says the survey should be available at the foundation inspection for permanent foundations and show the structures under construction and existing structures, property lines, setbacks, buffers and easements. Read the Town of Cary as-built foundation survey page for the actual Cary rule and exceptions.
- Cedar Key, Florida: Cedar Key’s inspection page states that required work must not be concealed before inspection and approval, approved permitted construction documents must be on site, and changes to approved plans must be submitted for review and approval before the changed work is performed. Read the City of Cedar Key inspection and certificate page for that Florida jurisdiction’s process.
- Philadelphia, Pennsylvania: Philadelphia’s inspection descriptions identify footing, foundation-wall, and damp-proofing/backfill inspection points and state what the inspector checks for the listed permit types. Read the Philadelphia inspections-by-permit-type page for Philadelphia’s sequence and scope.
- Phoenix, Arizona: Phoenix identifies critical points before concrete placement and describes a rough-framing inspection. Read the City of Phoenix residential inspections page for Phoenix’s requirements.
- Portland, Oregon: Portland lists a full new-construction sequence and says rough trade inspections must be approved before its 270 Framing inspection. Read the Portland residential inspections guide for Portland’s sequence.
Those pages show why “foundation inspection passed” is not a national phrase with one universal meaning. A local requirement may demand a sealed survey, a particular inspection code, an accessible exposed condition, a permit record, a sequence gate or a specific document. A city example cannot be used to answer what the reader’s AHJ requires in another city or county.
This decision belongs inside the wider build journey: use Brictale’s managing-the-build route for sequence and inspection coordination, land and feasibility route for site control, design and layout route for plan decisions, choosing your team route for responsibility gaps, and handover and ownership route for preserving the final record.
Build the document register
Create a document register before reviewing the concrete. Give every file a short ID. A useful register might contain:
| ID | Document or record | Revision/date | Owner | Used to verify | Status |
|---|---|---|---|---|---|
| P-01 | Approved permit and plan set | Permit date; revision 4 | Builder/permit holder | Legal scope and plan comparison | Verified / pending |
| S-01 | Boundary, stakeout or foundation survey | Survey date and signer | Surveyor | Position, setbacks, benchmark and datum | Verified / pending |
| D-01 | Structural foundation detail | Sheet and revision | Designer or engineer | Footing, wall, reinforcement, anchors and interfaces | Verified |
| C-01 | Concrete placement and curing record | Pour date | Concrete contractor/builder | Mix, placement conditions and protection | Verified / pending |
| W-01 | Waterproofing or damp-proofing guide | Product and revision | Installer/builder | Product-specific installation | Verified |
| I-01 | AHJ inspection result | Inspection date and code | AHJ/permit holder | Approval, corrections and next permitted phase | Verified / pending |
| H-01 | Framer’s pre-start review | Review date | Framer/builder | Constructability and handoff questions | Verified / pending |
The register is not a substitute for the originals. It is an index that lets a future reviewer find the originals. Store the approved plan PDF, survey deliverable, permit portal printout, correction notices, change approvals, delivery tickets, product manuals, photographs and correspondence in a folder with a backup. If the permit portal uses an inspection code rather than words such as “foundation passed,” record the code and copy the portal result instead of translating it loosely.
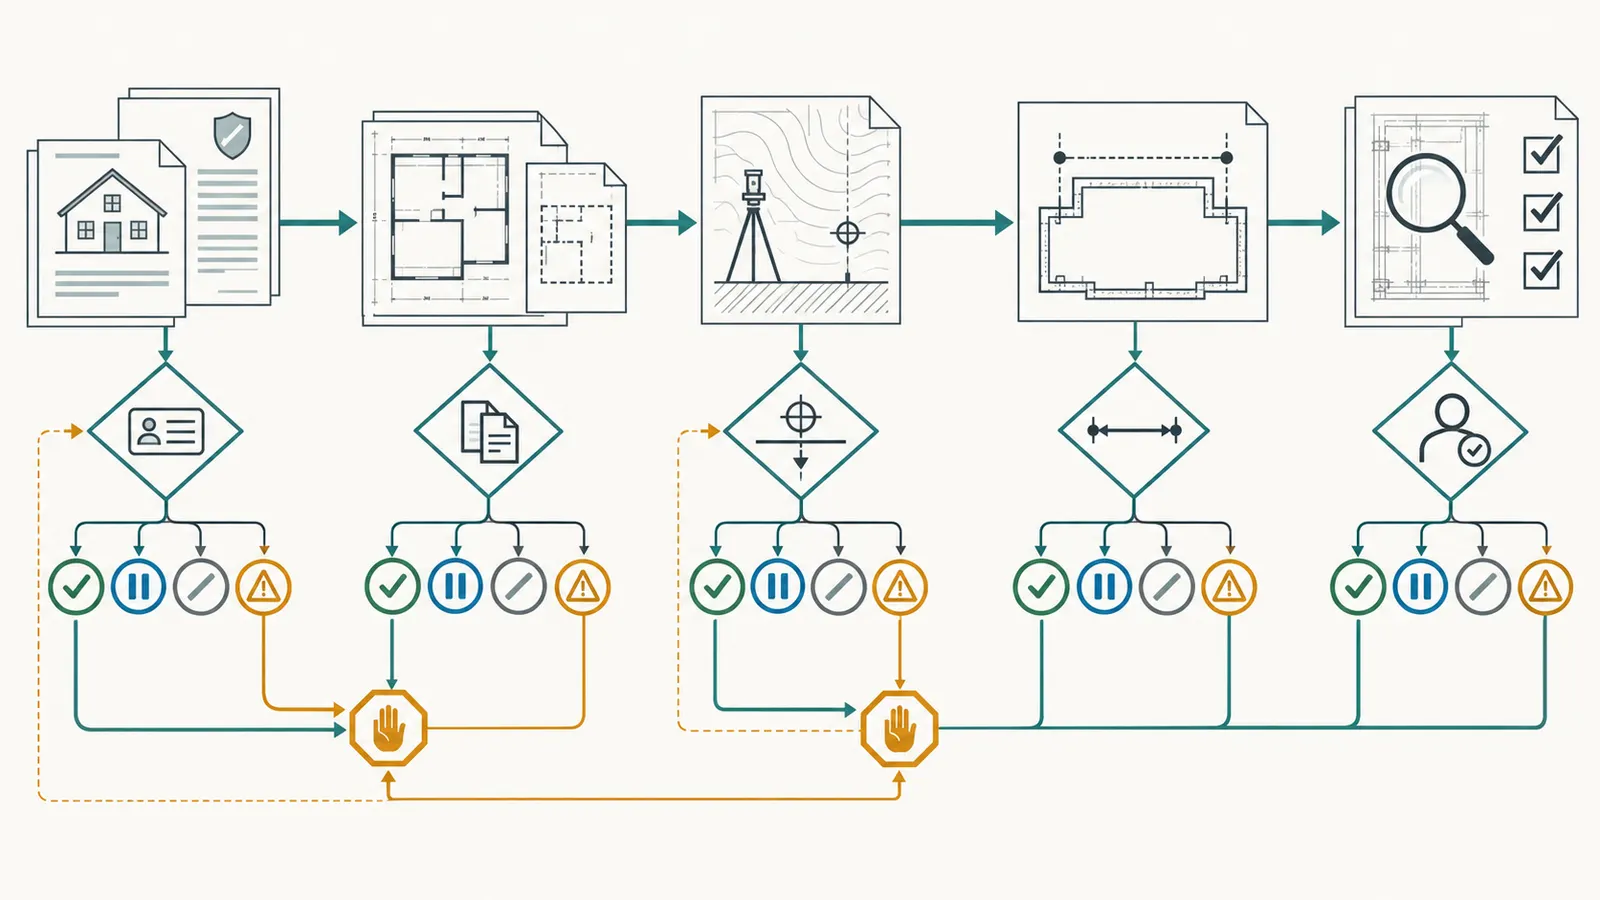
Identify the vertical reference
An elevation is meaningless without a reference. Write down the benchmark identifier, location, units, vertical datum, survey date, instrument or deliverable source and who is responsible for the elevation. If the plan gives a finished-floor elevation, top-of-wall elevation, slab elevation or flood-related elevation, record the exact label and not just a number.
Do not combine elevations from a site survey, a foundation survey, a laser level, a flood certificate and a builder’s tape note without confirming that the same datum and units apply. A difference of 0.20 feet can be a real field difference, a unit or datum mismatch, a rounding effect, or a transcription error. The record should first test identity and units; only then should anyone interpret the difference.
Clarify who may answer which question
The homeowner’s role is coordination. The homeowner can ask for the current documents, observe from a safe location, photograph exposed work with permission, keep dates and route questions. The homeowner should not sign a survey, certify rebar, approve a structural change, enter a trench, direct excavation support, or tell a framer that an out-of-square condition is acceptable.
The builder or permit holder usually coordinates sequencing, schedules inspections, maintains the site and communicates with the trades. The AHJ determines whether a required inspection passed, failed, is incomplete or needs correction under its process. A land surveyor performs and seals survey work when the jurisdiction or project requires it. The architect, structural engineer or other qualified design professional interprets design changes and structural discrepancies within their scope. The framer confirms whether the documented foundation can receive the intended sill, floor or wall assembly and identifies constructability conflicts. These roles can overlap on a small project, but the record should still name the person acting in each capacity.
3. Maintain the record through the foundation sequence instead of reconstructing it later #
The record should be updated at each observable or inspected handoff—layout, footing, wall, slab or underfloor work, moisture protection, backfill and pre-framing—because a late summary cannot reliably restore conditions that have been covered.
There is no single national sequence that replaces the permit. The sequence below is a coordination model. Mark each row only after the responsible party supplies the project-specific record.
| Phase | Record to request or create | Verification question | Handoff or hold point |
|---|---|---|---|
| Layout and excavation | Current plan, stakeout or location record, survey control, excavation photos from safe areas | Is the planned footprint identified relative to the correct property and control? | Builder and surveyor resolve location uncertainty before concrete work proceeds |
| Footing preparation | Footing dimensions, reinforcement or anchor detail, underground items, inspection request/result, date | Does the AHJ record correspond to this permit and plan revision? | Do not assume concrete may be placed until the actual AHJ releases it |
| Footing placement | Delivery ticket, placement date/time, weather, protection and any test records supplied by the team | Is the record tied to the correct pour and location? | Builder keeps curing and protection record; design professional handles strength questions |
| Foundation wall or piers | Form/rebar/anchor record, wall dimensions, openings, hold-downs, embeds and inspection result | Are visible interfaces documented before placement or concealment? | Resolve missing anchors, openings or plan deviations before the next cover step |
| Slab, crawlspace or underfloor | Slab elevation or survey record where required, under-slab utilities, vapor/capillary details, penetrations and inspection result | Are the datum and installed interfaces identified? | Builder coordinates underfloor and framing review |
| Damp-proofing or waterproofing | Actual product, current instructions, substrate condition, corners, joints, penetrations, photos and inspection result | Does the installed product record match the product on the wall? | Keep required work exposed until local inspection and product sequence are complete |
| Drainage and backfill | Drainage layout, cleanouts or outlets, backfill material/sequence, protection from damage and inspection result | Can later work still verify the concealed drainage path? | Do not use a generic product photo to close a project-specific field |
| Pre-framing | As-built geometry/elevations, inspection status, framer review, open discrepancy log and next authorization | Is every unresolved item assigned and are no required gates missing? | Builder, framer, surveyor, AHJ or design professional closes the appropriate issue |
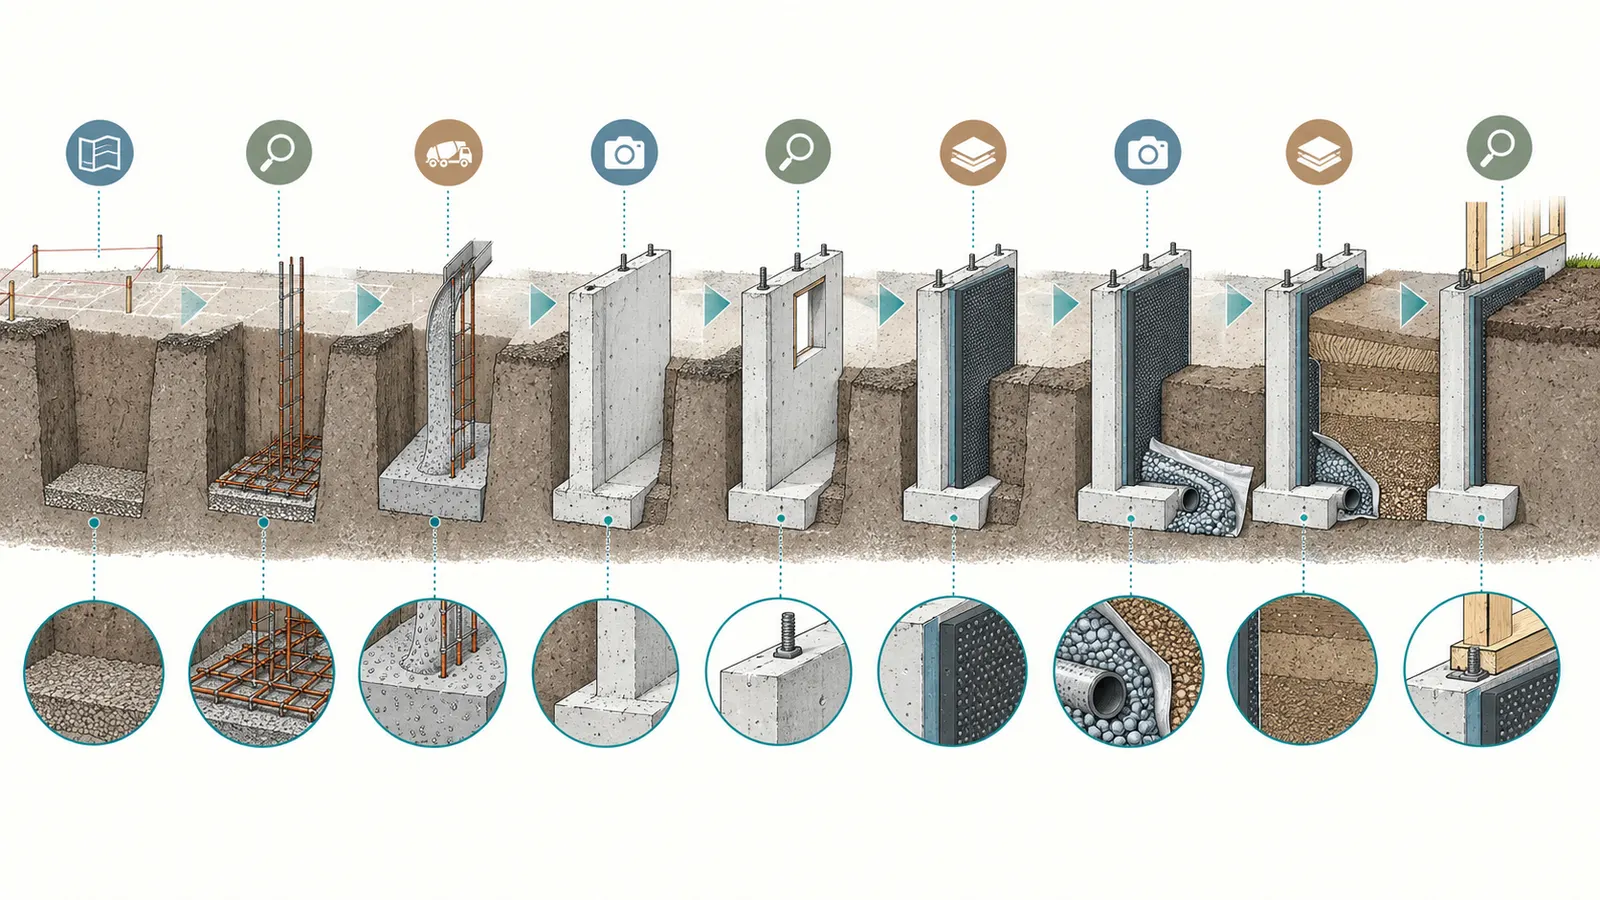
Before concrete: preserve the pre-pour evidence
The highest-value time to record foundation conditions is before concrete covers reinforcement, footing dimensions, sleeves, hold-downs, anchor bolts and underground work. Philadelphia’s foundation footing guidance says its inspector checks location, depth, width, height, steel, crushed stone, bedding, anchor bolts and reinforcement against approved plans and says concrete should not be poured until the inspection passes. Its foundation-wall guidance likewise addresses form location, wall height and thickness, reinforcement and structural tie-ins before the pour. That is a Philadelphia description, not a rule for every jurisdiction, but it explains why a homeowner should ask the builder what evidence is captured at the actual pre-pour hold point. See the Philadelphia foundation footing and foundation-wall descriptions.
Phoenix gives a different local example with the same coordination lesson: its residential inspections page identifies underground plumbing and electrical, foundation rebar, required hold-downs, footing depth and width and UFER grounding as critical points requiring inspection before concrete is poured, and says stamped plans should be available on site. See the City of Phoenix critical-point guidance. The record should preserve the actual Phoenix inspection result if the project is in Phoenix; it should not copy Phoenix’s list into another jurisdiction without checking that AHJ.
A homeowner can ask for the pre-pour photo set and inspection result, but should not treat photos as a substitute for the AHJ inspection or a structural professional’s verification. Useful photo captions identify the plan sheet, location, date, direction of view, visible measurement reference and what the photo is intended to show. “North footing before pour, looking east, sheet S2.1 detail 3, tape reference visible” is more useful than “foundation photo.” If a photo cannot show the relevant dimension or the condition is not visible, record “not verified by photo” and route the question.
After placement: document protection rather than infer strength
Concrete protection is a project responsibility. A temperature note can preserve useful history, but it does not prove that a foundation achieved a specified strength. ACI 306R-16’s preview describes cold-weather guidance when air temperature falls to or is expected below 40°F during the protection period, says concrete temperature should remain at or above recommended values for the relevant period, and explains that surface-temperature monitoring and records of date, time, outside air temperature, concrete temperature and weather help evaluate protection. See the ACI 306R-16 preview.
For a winter or shoulder-season pour, ask the builder for the project’s specified protection plan and the record the responsible team actually kept. Record whether blankets, tarps, enclosures, heaters or other measures were used only as reported by the builder. Do not turn an outside temperature from a weather app into an in-place concrete temperature. Do not infer strength from a calendar date. If the builder, inspector or design professional identifies a strength concern, preserve the question and obtain the project-specific response from the qualified person responsible.
Before backfill or cover: record the interfaces that will disappear
Before backfill, the record should identify the foundation wall, damp-proofing or waterproofing product, footing drain or perimeter drainage, penetrations, corners, joints, protection board or drainage mat, finished-grade intent and any required inspection. PNNL’s Building America Solution Center explains that below-grade moisture management is a system involving damp-proofing or waterproofing plus vertical and horizontal drainage, grading and footing drainage, and it says to follow manufacturer instructions. Read the Building America Solution Center guide to damp-proofing below-grade walls.
The homeowner’s record should not say “waterproofed” without naming the actual product or system and the installed areas. “North and west walls, product label photographed, penetrations photographed, installer says complete, backfill inspection pending” is a status. It does not say every wall is correct. A photo of a roll on a pallet proves that a roll was present, not that laps, corners, transitions and penetrations were installed according to the guide.
4. Measure footprint, elevations, openings and squareness without pretending to be a survey #
Use homeowner measurements to identify questions and preserve context; use the surveyor’s signed work and the project professionals’ review for positional, elevation, structural and acceptance decisions.
Start with the least hazardous observation
The homeowner should begin from a stable, permitted observation area outside excavations, away from operating equipment, suspended loads, unstable edges, exposed utilities, unprotected drops and active work. Ask the builder where the homeowner may stand and whether the site is open to visitors. A homeowner can photograph the visible top of a foundation wall from a safe location, compare a document label, record an accessible dimension supplied by the builder or surveyor and note a visible opening. The homeowner should not climb forms, walk a wall, move materials, remove protection, cross a trench, use a ladder supplied for workers, or dig to “check” a footing.
OSHA’s excavation standard requires safe egress for employees in trench excavations 4 feet or more deep, limits lateral travel to 25 feet for that egress, addresses falling or rolling material and generally requires materials and equipment to be kept at least 2 feet from the edge unless retaining measures provide protection. OSHA’s eTool also emphasizes that a competent person must inspect excavations and that the competent person is capable of identifying hazards and authorized to take prompt corrective measures. Read 29 CFR 1926.651 and the OSHA trenching and excavation eTool. These are worker-safety requirements, not a homeowner entry checklist. If access is not clearly safe and authorized, observe from outside and ask the builder for the record.
Use a measurement record with units and references
For every value, record:
- the date and time;
- the person or source that supplied it;
- the exact point or feature measured;
- the units, such as feet, inches or decimal feet;
- the reference line, corner, benchmark or plan detail;
- the instrument or deliverable type if known;
- whether it is a homeowner observation, builder measurement, surveyor measurement, or AHJ record; and
- the plan value and the measured or reported value in adjacent fields.
Do not silently convert decimal feet to feet-and-inches. If the plan says 100.25 feet, preserve that value and show the conversion only as a note: 0.25 foot × 12 inches per foot = 3 inches, so 100.25 feet equals 100 feet 3 inches. Round only after the original value is preserved. If the source provides only rounded inches, label it rounded.
Record the footprint and diagonals
For a rectangular footprint, a plan comparison can use the Pythagorean relationship:
Expected diagonal = √(length² + width²)
This is a geometry check, not a structural tolerance. It helps identify whether a reported footprint and corner-to-corner measurement are internally consistent. It does not establish property location, wall straightness, anchor adequacy, load path, foundation capacity or permission to correct the condition with sill overhang.
Illustrative worked example: do not treat the values as a field result
Suppose the approved plan labels a simple rectangle as 48 feet 0 inches by 32 feet 0 inches. Convert the dimensions to decimal feet:
- length = 48.00 feet;
- width = 32.00 feet;
- expected diagonal = √(48.00² + 32.00²);
- expected diagonal = √(2,304 + 1,024) = √3,328;
- expected diagonal ≈ 57.6888 feet;
- 0.6888 foot × 12 inches per foot ≈ 8.27 inches;
- expected diagonal ≈ 57 feet 8.27 inches, or about 57 feet 8 1/4 inches when rounded to the nearest quarter inch.
Assume, purely illustratively, that two accessible diagonal measurements supplied by the builder are 57 feet 8 1/4 inches and 57 feet 9 1/2 inches. The difference between those reported diagonals is 1 1/4 inches. That difference is a discrepancy to route, not a pass/fail threshold. The record should ask: Were the same corner points used? Was the tape held level and clear? Are the walls actually rectangular? Is the plan dimension measured to the outside face, inside face or structural line? Are the measurements survey-grade or rough coordination measurements? Does the framer’s assembly tolerate the condition under the approved design? Does the local code or approved detail control the correction?
The sensitivity is useful. If the width were 31 feet 11 inches rather than 32 feet, the expected diagonal would change only slightly; a short diagonal difference can therefore arise from dimension definition, measurement technique or a real skew. Conversely, a one-inch error in a corner point can materially change the diagonal comparison on a long tape. The equation makes the inputs inspectable, but it does not decide which input or tolerance is authoritative.
ICC-hosted sample guidance from the DEWALT Carpentry and Framing Complete Handbook says the carpenter should check foundation dimensions and squareness before building and that an out-of-square foundation should be addressed before proceeding, while also noting limits on sill overhang and the need to check local codes. Read the ICC-hosted handbook sample. Treat that as coordination guidance. Do not tell a framer to “square it with the sill” based on a homeowner calculation.
Check corners and openings against the correct lines
Foundation dimensions often have multiple legitimate lines: outside face of concrete, inside face of concrete, centerline, finished face, bearing line, stem-wall line, slab edge, opening edge or an offset shown in a detail. The record should name the line. “East wall = 48 feet” is incomplete if the plan dimension is between structural centerlines and the field note was taken across outside corners.
For doors, windows, stair openings, garage openings, crawlspace access, sleeves and mechanical penetrations, record the plan detail and the field condition separately. Capture width, height, sill or threshold elevation when specified, offset to the reference corner, and any visible embed or header interface. Do not infer structural adequacy from an opening that appears the right size. A qualified professional must resolve reinforcement, lintel, hold-down, shear-wall and load-path questions.
Check elevations against a named datum
Use a table that keeps plan, measured and status values next to each other:
| Feature | Plan label and value | Reference datum/benchmark | Field value source | Status and next question |
|---|---|---|---|---|
| Finished floor | FFE = [value] | BM-[ID], datum [name] | Surveyor deliverable | Does the signed record confirm it? |
| Top of foundation wall | TOW = [value] | Same datum | Builder or surveyor | Is the wall uniform or are points listed? |
| Garage slab | Elevation/detail [value] | Same or explicitly different datum | Surveyor/builder | Does drainage and step detail match? |
| Window/door opening | Sill or head [value] | Plan reference | Framer/builder measurement | Does the approved opening detail govern? |
| Flood or grade control | Required elevation [value] | AHJ/flood datum if applicable | Qualified survey record | Which local certificate or inspection is required? |
In Cary, the named as-built survey requirement demonstrates why a sealed survey can be a prerequisite rather than a nice-to-have; in Portland, the listed setbacks/location-on-lot inspection may require a survey when property corner pins are not visible. Those are separate local examples, not interchangeable rules. Ask the actual AHJ whether your project needs a foundation survey, elevation certificate, location survey, or another record, and ask the surveyor which deliverable answers which question.
5. Match moisture, product, concrete and framing interfaces to records #
The record is complete only when the installed foundation interfaces are identified well enough for the next trade to know what it may touch, cover, protect or question.
Moisture control is a system, not a label
Below-grade moisture evidence should connect the foundation wall to drainage, grading, footing drains, penetrations, transitions and the actual coating, membrane or drainage mat. PNNL’s Building America guidance says damp-proofing below-grade walls is one part of a whole-house water-management strategy and identifies grading, foundation drainage, gutters and downspouts, vertical drainage and horizontal footing drainage as related measures. Read the PNNL guide at the point where you decide which interfaces must remain in the record.
Use separate fields for:
- wall type: poured concrete, concrete masonry, insulated concrete form or another system;
- below-grade area and exposed area;
- damp-proofing versus waterproofing name as shown in the approved scope;
- manufacturer and product name;
- substrate preparation and visible condition;
- footing-wall joint and construction-joint details;
- pipe, conduit, tie-rod, sleeve and other penetrations;
- corner, termination and transition details;
- drainage mat, protection board, filter fabric or free-draining backfill where specified;
- footing drain route, discharge or cleanout information where applicable;
- inspection date and result; and
- what was covered, when and by whom.
This list is not a universal installation specification. It is a way to keep the record from collapsing many different claims into “waterproofing complete.” The builder, installer, designer, AHJ and product manual control the actual work.
Follow the actual product instructions
A product-specific instruction can be valuable evidence and a dangerous source of overgeneralization. W. R. Meadows’ CLAY-TITE backfilled-wall guide, for example, addresses substrate condition, the wall-footing joint, corners, penetrations, construction joints, membrane orientation, seam laps and fastening for that product. It says the product can be installed over damp surfaces or green concrete within that guide’s scope. Read the CLAY-TITE backfilled-wall installation guide.
If the project uses that product, record the guide revision, the product name, the installer’s scope and the visible details that the guide addresses. If the project uses a different membrane, coating, drainage board or sealant, obtain that product’s current instructions instead. Never transfer CLAY-TITE’s lap, fastening, corner or substrate details to another product. Never use a manufacturer’s generic installation guide to override the approved detail, an AHJ correction or a design professional’s instruction.
Treat anchors and penetrations as handoff points
Before framing, the framer needs the location and type of sill interface, anchor bolts, straps, hold-downs, embeds, sleeves and openings that the framing plans assume. The foundation record should connect each visible item to a sheet, detail or approved change. If an anchor is missing, shifted, covered, cut, corroded, damaged or not identifiable, record its location and stop short of proposing a fix. The builder routes it to the structural designer or other qualified professional and the AHJ when the change affects approval.
An anchor count is not enough. Record the plan spacing or schedule reference, field location, edge distance when the responsible professional supplies it, hardware identification, visible condition and whether the sill or framing member can actually engage it. Do not invent a universal anchor tolerance. A local code, approved structural detail, engineered design and hardware evaluation may govern different aspects of the same interface.
Keep an interface photo index
Create an index rather than a photo dump:
| Photo ID | View and location | Intended evidence | Related plan/detail | Covered afterward? | Follow-up |
|---|---|---|---|---|---|
| F-001 | South-west corner, exterior, looking north | Wall corner and waterproofing termination | S4.1 detail 2 | Yes/no/date | Verify product record |
| F-002 | Garage opening, interior, looking east | Opening width and visible reinforcement/anchor | S3.2 detail 5 | Yes/no/date | Framer review |
| F-003 | North wall penetration | Sleeve and membrane transition | W-01 detail | Yes/no/date | Installer confirmation |
| F-004 | Benchmark or control marker | Reference identification only | Survey S-01 | No | Surveyor deliverable |
A photo index makes absence visible. If the intended evidence cannot be seen in F-002, mark it “not verified by photo” rather than relying on someone’s memory.
6. Apply the actual local inspection and cover gate #
A passed local inspection means the AHJ recorded the result for the applicable permit and inspection type; it does not automatically mean the foundation has been surveyed, is square for the framing plan, has no future moisture risk, or has received a structural opinion.
Keep four records separate
The record should have separate rows for:
- AHJ inspection result: the authority’s record for the permit and inspection type, including pass, fail, incomplete, corrections or reinspection.
- Survey deliverable: the surveyor’s signed or sealed positional/elevation work, if required or commissioned, with control and datum.
- Builder and framer handoff: the trade coordination review of dimensions, openings, anchors, sill conditions, levels, access, materials and sequence.
- Design professional response: a written structural or design disposition when a condition departs from the approved detail or raises a load-path, foundation, reinforcement or material question.
The records can refer to each other, but one must not be renamed as another. Portland’s inspection guide explicitly says consultations do not count as approved inspections and says approved plans should be kept on site. That distinction is useful for any project’s filing system: a helpful conversation is not the same as a passed inspection. Read the Portland consultation and inspection distinction.
Compare the local examples without merging them
The following comparison is a research aid, not a national code table:
| Jurisdiction | What the named source contributes | What a homeowner should ask on the actual project |
|---|---|---|
| Cary, North Carolina | Sealed as-built foundation survey requirement and listed content/exceptions | Is the Cary exception applicable, who is the North Carolina-registered surveyor, and is the survey in the permit file? |
| Cedar Key, Florida | No concealment before required approval; approved plans on site; sequential inspections and approved plan changes | Which required inspection is next, what result is in the permit portal, and what work must remain visible? |
| Philadelphia, Pennsylvania | Footing, wall and damp-proof/backfill inspection descriptions with pre-pour and visible-work points | Which inspection codes apply to this permit, and have corrections or reinspection requirements been closed? |
| Phoenix, Arizona | Critical pre-pour items and rough-framing inspection subjects | Which critical points were inspected, and is the rough-framing inspection scheduled only after its prerequisites? |
| Portland, Oregon | Full foundation-to-rough-in sequence and rough-trade approval before 270 Framing | Does the permit require a survey for location, and have all listed rough trades passed before the framing gate? |
For the actual home, replace the example with a jurisdiction sheet:
- AHJ name, department and permit portal;
- permit number and inspection codes;
- local code edition named by the AHJ;
- required surveys, certificates, elevations or third-party reports;
- inspection order and cover restrictions;
- correction and reinspection process;
- contact or portal record for questions; and
- date checked and person who checked it.
If the AHJ’s web page is silent or conflicts with the permit notes, the builder or permit holder should ask the AHJ. A homeowner should not select the most convenient page from another city.
Do not confuse “before framing” with “before all future inspections”
The handoff in this article is a decision about whether the foundation evidence is sufficient for the next framing action. It is not a claim that all framing, rough-in, waterproofing, insulation, drywall or final inspections are complete. Cedar Key describes sequential inspections and says work should not proceed to the next phase until the preceding required inspection passes; Portland lists foundation, underfloor, rough-in and framing phases; Phoenix separately identifies rough-framing and pre-drywall points. Read the Cedar Key sequential inspection guidance, Portland sequence and Phoenix residential inspection stages for the local examples.
The next authorized handoff might be setting sill plates, laying out floor framing, installing a slab-on-grade framing interface, correcting a survey, completing a waterproofing inspection or waiting for a design response. Record which one it is. “Ready for framing” should name the exact scope released, not imply that every later inspection is waived.
7. Route discrepancies by type, responsibility and hold point #
When a foundation record contains a discrepancy, preserve the facts, stop the affected handoff, assign the responsible professional and define the evidence needed to close the issue; never solve a structural or legal question with an improvised field adjustment.
Use a discrepancy matrix
| Observed or reported condition | First owner to investigate | Evidence to attach | Immediate handoff rule | What the homeowner must not infer |
|---|---|---|---|---|
| Footprint or setback differs from plan | Builder and surveyor; AHJ for approval effect | Plan revision, control, survey or location record, photo | Hold layout or framing at the affected area until responsible party responds | That a small-looking difference is legal or harmless |
| Diagonals do not agree | Builder and framer; design professional if structural geometry is affected | Corner definitions, units, repeated measurements, plan dimensions | Hold squaring, sill or wall layout that relies on the geometry | That any numeric difference is acceptable or fixable with overhang |
| Elevation differs or datum is unclear | Surveyor and builder; AHJ/design professional as applicable | Benchmark, datum, signed survey, plan elevation, flood requirement | Hold grade, sill, slab or opening decisions affected by elevation | That a laser reading without datum is an elevation certificate |
| Missing or shifted anchor/hold-down | Builder and structural design professional; AHJ if required | Detail, hardware, location, photos and change record | Hold the connected framing/load path | That drilling or adding hardware is a routine homeowner repair |
| Opening size or location differs | Builder, framer and design professional | Plan detail, field dimensions, photos, structural schedule | Hold framing around the opening | That a trim or sill adjustment fixes a structural opening |
| Waterproofing or damp-proofing not documented | Builder/installer; AHJ if inspection was required | Product, guide, substrate, corners, penetrations, inspection result | Hold backfill or cover where the work must remain visible | That a dry wall today proves future water performance |
| Pre-pour inspection missing | Permit holder and AHJ | Permit, inspection request/result, correction notice | Do not represent the work as approved | That concrete or later work cures the documentation gap |
| Cold-weather protection record missing | Builder and concrete/design professional | Pour date, weather, protection, temperature record, any specified testing | Route strength/protection question before relying on the concrete | That calendar age proves strength |
| Excavation access or edge is unsafe | Builder/employer competent person | Site safety direction and inspection record | Do not enter; keep homeowner outside the work area | That the homeowner can inspect more closely for documentation |
The matrix intentionally says “first owner to investigate,” not “person who must fix.” A homeowner can identify an inconsistency, but the remedy may require a survey, an engineered detail, AHJ approval, a product representative, a concrete professional or a competent person responsible for excavation safety.
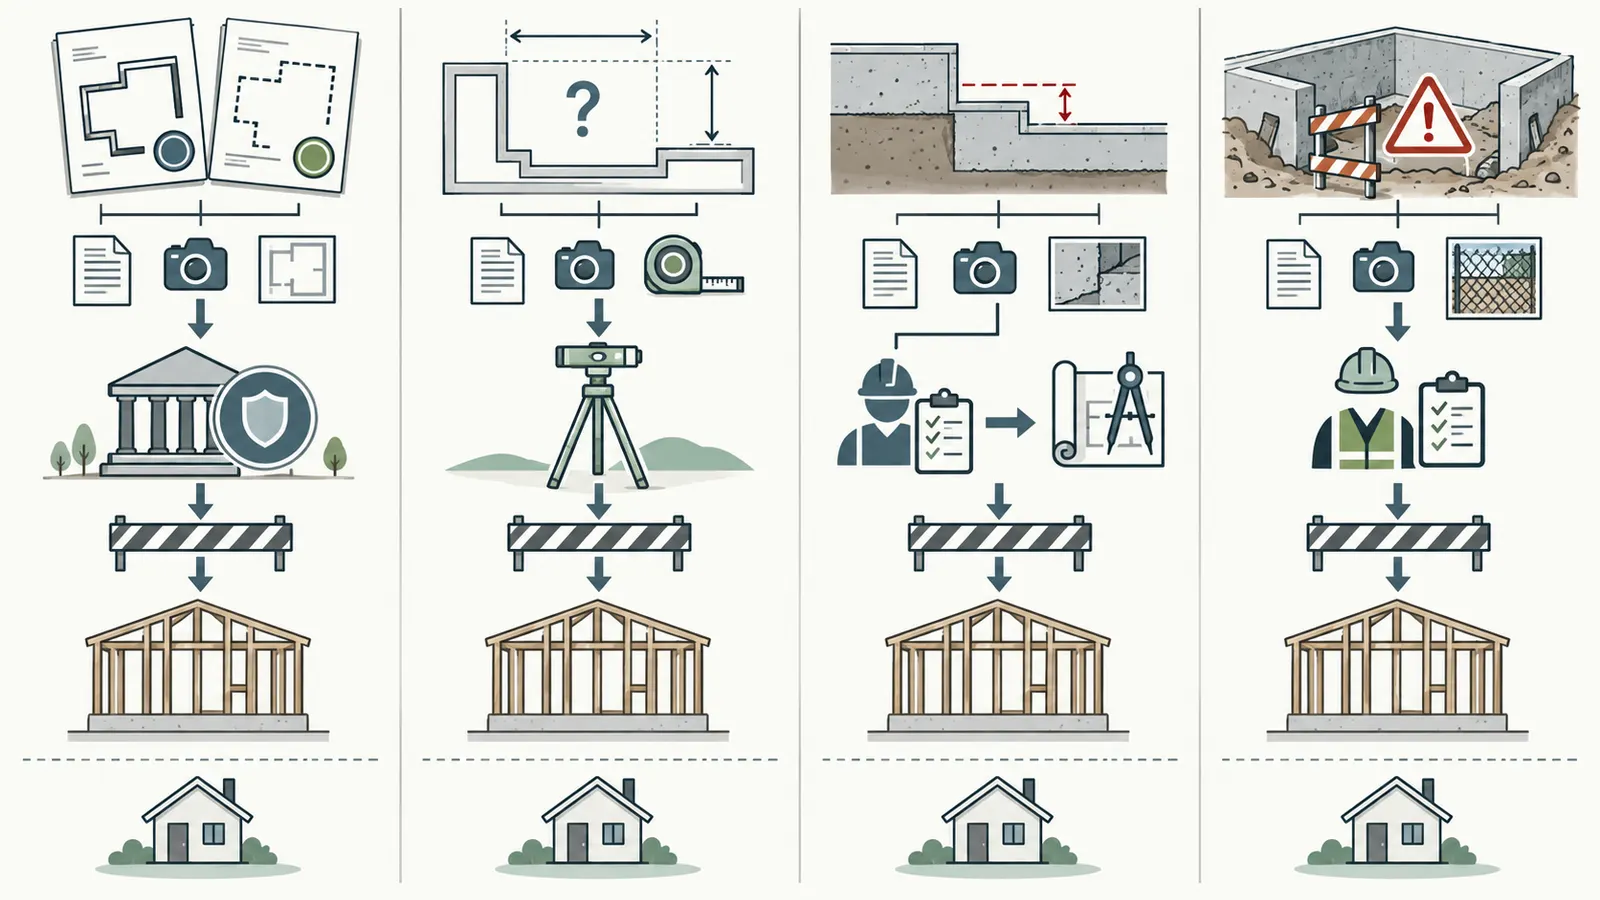
No remote review, phone call or photo exchange can certify a foundation’s structural capacity, boundary position, elevation compliance, concrete strength, safe excavation condition or local approval. It also cannot determine electrical safety or code status—including underground electrical work or a UFER grounding connection—confirm a pressure-test result, identify contaminated soil or a hazardous atmosphere, or establish that a confined-space or other entry condition is safe. Remote evidence can help a qualified person decide what to inspect next, but the responsible qualified trade must address electrical, plumbing or pressure-test questions, the site’s competent person must control excavation, atmosphere and entry hazards, and the AHJ must decide code status and approval. Keep the homeowner out of hazardous areas and route each question to the person with the relevant authority and scope at the site or in the official record. Treat the worksheet as a handoff aid, not a remote inspection.
Classify the discrepancy before escalating
Use three questions:
- Is this an identity problem? Wrong plan revision, missing permit number, mismatched address, unclear product or unknown datum. Resolve the records first.
- Is this a measurement problem? Unclear reference line, inconsistent units, one unrepeatable observation or a measurement taken from an unsafe location. Repeat only from a safe, authorized position or request the qualified measurement.
- Is this a substantive condition problem? The correct documents and measurements agree that the installed work differs from the approved design, a required inspection was not passed, an interface is damaged or a product detail is incomplete. Route it to the party qualified to decide the substance and to the AHJ if approval is affected.
This classification prevents a homeowner from paying for an expensive structural review when the first problem is that two people used different plan revisions. It also prevents the opposite error: treating a real shifted anchor as a document mismatch.
Build a written resolution request
A useful resolution request contains:
- property address and permit number;
- current approved plan revision and affected sheet/detail;
- date and location of the observation;
- exact measurement with units and reference line;
- source of the measurement and whether it is a homeowner observation or professional record;
- photos with IDs and captions;
- what two records disagree;
- work that is scheduled next;
- proposed hold point, stated as a question rather than an order;
- person asked to decide; and
- date by which the builder needs the response.
Example wording: “The builder’s 9/8/2026 pre-framing note places the east outside wall 4 inches west of the location shown on plan C2.1, but the survey deliverable S-01 is not yet in the file. Please have the surveyor confirm the actual location relative to the stated boundary/control and have the permit holder confirm whether the AHJ requires a revised submittal. Until that response, please identify whether sill layout at the east wall is held.” This preserves facts without declaring the condition acceptable or requiring a fix.
Know when the safe next step is to leave the work area
The foundation-to-framing moment can expose a homeowner to excavation edges, falling objects, moving equipment, formwork, ladders, wet surfaces, open penetrations, temporary supports and uneven grade. OSHA’s rules about competent-person inspections, access, egress, falling material and changing conditions are directed to employee safety and the employer’s site controls. See OSHA’s current excavation requirements and OSHA’s competent-person eTool guidance.
The safe homeowner action is to ask the builder when and where observation is permitted, use the designated route, stay outside barriers, keep clear of equipment and let the site’s competent person make safety decisions. Do not enter an excavation to take a better diagonal, dig around the wall, remove soil from an edge, test an anchor, climb a form or operate a machine. If an unsafe condition is visible, report it to the builder or site supervisor and do not turn the reporting act into a personal inspection.
8. Complete the foundation-to-framing evidence handoff worksheet #
Complete the Foundation-to-framing evidence handoff worksheet before authorizing the next handoff, with every field marked verified, not applicable, pending or discrepancy and with an owner and next decision attached to every unresolved item.
Foundation-to-framing evidence handoff worksheet
Copy the following headings into the project record. The worksheet is intentionally plain because it should remain usable when the homeowner, builder, surveyor, framer, AHJ and designer each have different document systems.
A. Project identity and jurisdiction
- Property address:
- Parcel or lot identifier, if used by the AHJ:
- Actual city/county and state:
- Authority having jurisdiction:
- Permit number and permit type:
- Permit portal or record location:
- Foundation type: slab-on-grade / crawlspace / basement / piers / other:
- Builder or permit holder:
- Homeowner:
- Planned framing start or next handoff date:
- Record owner and last updated date:
B. Approved documents
| Field | Entry |
|---|---|
| Approved plan set title/date | |
| Revision number and approval date | |
| Architectural foundation sheet | |
| Structural foundation sheet/detail | |
| Civil/site/setback sheet | |
| Approved change orders or revised drawings | |
| Permit comments or conditions affecting foundation/framing | |
| Framing plan and sill/anchor schedule | |
| Current status | Verified / pending / discrepancy |
Do not attach a superseded plan without labeling it superseded. If a field crew has a paper set and the homeowner has a PDF, compare revision labels rather than assuming they match.
C. Survey control and elevation
- Surveyor name and registration jurisdiction:
- Survey deliverable title, date and seal/signature status:
- Benchmark ID and physical description:
- Vertical datum:
- Horizontal control or coordinate reference, if applicable:
- Units and rounding convention:
- Property corners or pins visible, recovered or not visible:
- Required as-built survey, elevation certificate or location survey:
- AHJ-specific prerequisite and source:
- Who is responsible for delivering or verifying it:
- Status: Verified / not applicable / pending / discrepancy:
If the project is in Cary, compare the field to Cary’s stated sealed as-built foundation survey requirement and exceptions rather than assuming a generic contractor sketch will satisfy it. If the project is in Portland, ask whether the location-on-lot inspection requires a survey because the original property corner pins are not visible. Use the Cary source and Portland source only for those jurisdiction-specific examples.
D. Geometry and elevation register
| Feature | Plan value and line | Field value | Source/person/date | Units and datum | Status/next action |
|---|---|---|---|---|---|
| Overall length | |||||
| Overall width | |||||
| Diagonal A | |||||
| Diagonal B | |||||
| North wall location | |||||
| South wall location | |||||
| East wall location | |||||
| West wall location | |||||
| Top of wall | |||||
| Finished-floor or slab elevation | |||||
| Garage or porch transition | |||||
| Openings and offsets |
Add rows for irregular corners, stepped footings, retaining interfaces, piers, grade beams, control joints and any feature the framing or drainage plan relies on. If a value is not measured, write “not measured” rather than leaving a blank cell that could later be mistaken for zero.
E. Visible interfaces and materials
- Sill plate line and bearing surface:
- Anchor bolts, straps, hold-downs or embeds: type, plan detail, visible location and condition:
- Door, window, garage and crawlspace openings:
- Beam pockets, girder supports or post bases:
- Sleeves, drains, conduits and plumbing penetrations:
- Reinforcement or dowels visible before cover, if recorded by the responsible team:
- Concrete mix or delivery record supplied:
- Pour date and protection record:
- Waterproofing/damp-proofing product and revision:
- Substrate, corner, joint, termination and penetration records:
- Footing drain, drainage mat or protection board records:
- Backfill material and inspection record:
- Product-specific exceptions or unresolved installer questions:
The purpose of this section is traceability. It is not an instruction for a homeowner to inspect or approve reinforcement, concrete, anchors, waterproofing or drainage.
F. Inspection register
| Inspection or approval | AHJ/permit code | Requested | Date performed | Result/corrections | Record link | Next phase allowed? |
|---|---|---|---|---|---|---|
| Setback/location | ||||||
| Footing/pre-pour | ||||||
| Foundation wall/pre-pour | ||||||
| Slab or underfloor | ||||||
| Underground utilities | ||||||
| Damp-proofing/waterproofing | ||||||
| Backfill | ||||||
| Framing prerequisite |
Use the exact result text from the AHJ where possible. In Cedar Key, the city says inspection results may be pass, fail with corrections required or incomplete because work is not ready, and it says work should not be covered before the required inspection is completed and approved. In Philadelphia, the local descriptions say certain footing and wall work must not be poured before a successful inspection. In Phoenix, critical pre-pour points and rough framing have their own inspection moments. These are not interchangeable national labels; they illustrate why the worksheet preserves the actual code, result and jurisdiction. See the Cedar Key inspection page, Philadelphia inspection page and Phoenix inspection page.
G. Photo and source index
For every photo or external file, record:
- file name or ID;
- date and time;
- photographer or source;
- safe observation location;
- direction and feature shown;
- related plan/detail or worksheet row;
- whether the condition was later covered;
- whether the image is sufficient for the intended claim; and
- any restriction on relying on it.
Add the survey, permit, inspection, product, delivery and correspondence file IDs. A source index turns a folder into an auditable handoff. It also makes the limits visible: a photo may document appearance but not a concealed dimension; a delivery ticket may identify a batch but not placement quality; a plan may show intent but not installed condition.
H. Discrepancy and responsibility log
| ID | Fact or conflict | Affected work | Responsible decision-maker | Evidence requested | Hold point | Due date | Status |
|---|---|---|---|---|---|---|---|
| D-01 | |||||||
| D-02 | |||||||
| D-03 |
Write facts, not conclusions. “Diagonal A differs from diagonal B by 1 1/4 inches using the illustrative calculation format” is a fact if the measurements are real and attributable. “Foundation is acceptable” is a conclusion that belongs to the responsible professional or AHJ, not to the worksheet owner.
I. Handoff decision
- Next handoff requested: survey / builder / framer / AHJ / designer / inspector / other:
- Scope released, if any:
- Open discrepancies:
- Required records still pending:
- Work that must remain visible:
- Safe homeowner observation boundary:
- Person authorized to release the next step:
- Date and written record of release:
- Next decision after this handoff:
Use one of these outcomes:
- Ready for the specified handoff: the listed evidence is complete for that narrow scope, and the responsible party has released it.
- Ready with named nonblocking follow-up: the responsible party has documented that the open item does not block this specific scope; the open item remains in the log.
- Hold affected work: the missing or conflicting evidence affects the planned handoff, so the builder routes it before proceeding.
- Not enough information: the project team must first identify the plan, datum, inspection, product or responsible person.
Do not use “ready” without naming the scope. “Ready for framing” can mean ready for a framer to review layout, ready to set sill plates, or ready to begin all framing. The worksheet forces the project team to say which one.
Originality brief: what current answers miss and how to check this artifact
Current answers. Local authorities explain particular sealed surveys, elevation or inspection prerequisites. City pages describe foundation and pre-pour sequences. OSHA explains excavation safety. Building-science and manufacturer sources describe moisture and product context. Carpentry guidance says the carpenter should check foundation dimensions and squareness. These answers are useful but jurisdictional, technical or trade-facing.
Missing decision. A homeowner still needs one decision path for whether the foundation-to-framing handoff has enough measured, approved-plan, local-inspection, product and responsibility evidence to proceed, while keeping an AHJ inspection separate from a surveyor’s positional record, a builder’s coordination record and a structural professional’s opinion.
Original contribution. The Foundation-to-framing evidence handoff worksheet provides a source-linked record with fields for address and jurisdiction, permit and plan revision, surveyor and benchmark/datum, measured footprint and setbacks, elevations, diagonals and squareness, openings and visible interfaces, inspection status, product instructions, photos, unresolved discrepancies, responsible party, due date and next handoff. The worked diagonal example makes inputs, units, formula, rounding and sensitivity inspectable, but its modeled values are illustrative rather than field measurements.
How it can be checked. A reviewer can take a real project’s approved plan and permit record, confirm the named AHJ rules, compare each worksheet source to the original survey or inspection record, reproduce the geometry calculation, verify that every open discrepancy has an owner and test whether the next handoff is stated narrowly enough. The reviewer should also check that every local claim remains labeled with its actual jurisdiction and that product-specific details are not generalized to another product.
Foundation-to-framing evidence handoff worksheet — method. Compare the approved plan set and permit record with survey control, measured foundation observations, inspection results, product instructions and the builder's framing requirements; mark each field verified, not applicable or unresolved, then route unresolved items to the responsible qualified party.
Foundation-to-framing evidence handoff worksheet — limitations. This is a coordination and evidence tool, not a boundary or elevation survey, tolerance table, structural evaluation, inspection approval, engineering instruction or substitute for the actual authority having jurisdiction or licensed professionals.
Final pre-framing review
Before the homeowner treats the handoff as complete, ask the builder to walk the record with the framer and answer these questions in writing or in the project’s normal documented system:
- Are we all using the same approved plan revision?
- What is the actual AHJ and what inspection or survey gate applies next?
- Does the survey or location record identify its benchmark, datum, units and signer?
- Are the foundation lines, corners, diagonals, openings and elevations measured from named reference points?
- Which values are professional records and which are homeowner or builder observations?
- Does the framer know the plan references for sill, anchor, hold-down, opening and bearing interfaces?
- Are moisture, drainage, penetrations, joints, corners and product instructions recorded before they are covered?
- Are required inspections passed, and are their results attached to the correct permit?
- Is any consultation, verbal comment or photograph being mistaken for an approved inspection or sealed survey?
- Does every discrepancy have a responsible person, requested evidence, due date and hold-point decision?
- What precisely is the next authorized handoff, and who may release it?
If the answers are complete, attributable and scoped to the next action, the record can support a controlled handoff. If one answer is missing, the next action is to obtain that evidence or route the question—not to invent a tolerance, enter an unsafe excavation, cover the work or promise that the AHJ will approve it.
After the specified handoff is released, freeze the record instead of overwriting it. Save the released plan revision, survey or measurement deliverable, inspection result, framer review, discrepancy dispositions, and the date, scope, and person that authorized the next step as a clearly labeled snapshot. If work changes after release, create a new entry that states what changed, why, who approved it, which earlier evidence it supersedes, and whether a new inspection or design response is required. This preserves the answer to a later question—what did the team know and authorize before framing began?—without pretending the earlier record proves conditions that were not measured. Continue the same chain through framing and handover; an as-built record becomes valuable because it remains attributable as the home changes.
The practical end point is a clean chain: approved intent → controlled measurement → visible installed condition → local inspection result → trade review → discrepancy disposition → narrow release to the next phase. Maintaining that chain is the homeowner’s most useful contribution at the foundation-to-framing boundary.
Cite this guide
Brictale. “Foundation-to-Framing As-Built Record: A Homeowner Handoff Checklist.” Published 2026-09-27; updated 2026-09-27.
https://brictale.com/build/construction/maintain-new-home-foundation-as-built-record-before-framing · Read the Markdown version
Original contribution: Foundation-to-framing evidence handoff worksheet. A source-linked worksheet that helps a homeowner keep one record of plan revision, survey control, measured geometry and elevations, local inspection status, product interfaces, discrepancies, responsibility and the next authorized handoff.
Sources and scope
Evidence behind this page
- In Cary, North Carolina, residential structures and accessory buildings generally require a sealed as-built foundation survey by a North Carolina-registered land surveyor; Cary says it should be available to the inspector at foundation inspection for permanent foundations and show structures, property lines, setbacks, buffers and easements, subject to the page's listed exceptions.
"As-Built" Foundation Surveys | Town of Cary
Cary, North Carolina municipal requirement and exceptions; not a national rule and not a substitute for the reader's AHJ or surveyor.
Accessed · Link to this claim - Cedar Key, Florida states that required work may not be concealed before inspection and approval, that approved permitted construction documents must be available on site, and that work must be visible, unobstructed and accessible for inspection; its page also says changes to approved plans must be submitted for review and approval before changed work is performed.
Inspections & Certificates of Occupancy / Completion | City of Cedar Key, Florida
Cedar Key, Florida inspection guidance and cited Florida Building Code context; do not generalize it to another AHJ.
Accessed · Link to this claim - Philadelphia's footing and foundation-wall inspection guidance says inspectors compare the work with approved plans, including location, footing dimensions, reinforcement, forms, wall height and thickness, and structural tie-ins; it says concrete should not be poured until the applicable inspection passes.
Inspections by permit type | Department of Licenses and Inspections, City of Philadelphia
Philadelphia, Pennsylvania municipal inspection descriptions for listed permit types; the reader must confirm the actual Philadelphia permit and current inspection type.
Accessed · Link to this claim - Philadelphia describes a damp-proofing and backfill inspection that verifies the damp-proofing application and backfill material against approved requirements while the work remains visible and accessible for inspection.
Inspections by permit type | Department of Licenses and Inspections, City of Philadelphia
Philadelphia, Pennsylvania municipal inspection description; it does not establish a universal waterproofing sequence or product specification.
Accessed · Link to this claim - Phoenix says permitted residential jobs require inspections, stamped plans should be available on site, and critical points before concrete placement include underground plumbing and electrical, foundation rebar, structural hold-downs, footing depth and width, and UFER grounding; Phoenix separately describes a rough-framing inspection for member size and spacing, ties and clips, headers and lintels, and shear-wall location and size.
Residential Inspections | City of Phoenix
Phoenix, Arizona residential inspection page; exact permit type, approved plans and current city requirements control.
Accessed · Link to this claim - Portland's new-construction sequence lists location/setbacks, footings, foundation walls, slab-on-grade and underground plumbing in its foundation phase, and says rough electrical, plumbing and mechanical inspections must be approved before its 270 Framing inspection can occur.
Residential Inspections: The Start-to-Finish Guide | Portland.gov
Portland, Oregon full inspection sequence for new construction; not a national sequence and subject to the approved plan and permit.
Accessed · Link to this claim - Portland says consultations do not count as approved inspections and that approved plans should be kept on site; this supports keeping a consultation note separate from a passed inspection record.
Residential Inspections: The Start-to-Finish Guide | Portland.gov
Portland, Oregon municipal inspection guidance; the distinction is useful as a recordkeeping model, not as a rule for every jurisdiction.
Accessed · Link to this claim - OSHA 29 CFR 1926.651 requires a stairway, ladder, ramp or other safe egress in trench excavations 4 feet or more deep so employees need no more than 25 feet of lateral travel; it also addresses falling materials and keeping materials or equipment at least 2 feet from the excavation edge unless retaining measures provide equivalent protection.
1926.651 - Specific Excavation Requirements | Occupational Safety and Health Administration
Federal OSHA construction requirements for employee exposure; state-plan rules, site conditions and the employer's safety program may also apply. This is not permission for a homeowner to enter an excavation.
Accessed · Link to this claim - OSHA describes a competent person as someone capable of identifying existing and predictable hazards and authorized to take prompt corrective measures; its excavation guidance calls for competent-person inspections before work, daily before each shift, as needed during a shift and after rain or other hazard-increasing events.
eTool: Construction - Trenching and Excavation | Occupational Safety and Health Administration
OSHA construction excavation safety guidance; it assigns safety functions to the employer's competent person, not to the homeowner's visual checklist.
Accessed · Link to this claim - The Building America Solution Center describes below-grade foundation moisture control as a system that includes appropriate damp-proofing or waterproofing plus vertical and horizontal drainage, grading, footing drainage and manufacturer instructions; it warns that damp-proofing alone is only one part of whole-house water management.
Damp-Proof Exterior Surface of Below-Grade Walls | Building America Solution Center
U.S. Department of Energy Building America Solution Center guidance for below-grade walls; applicability varies by foundation type, climate, site drainage, code and product.
Accessed · Link to this claim - ACI 306R-16 defines cold weather for its guidance as air temperature falling to or expected below 40°F during the protection period and recommends maintaining concrete temperature at or above recommended values; it says surface temperature monitoring and records of date, time, air temperature, concrete temperature and weather help evaluate protection.
306R-16: Guide to Cold Weather Concreting | American Concrete Institute
Preview of ACI 306R-16 guidance, not the complete standard and not a project-specific curing or strength decision.
Accessed · Link to this claim - W. R. Meadows' CLAY-TITE backfilled-wall installation guide gives product-specific conditions and sequence details, including clean, dry and smooth concrete substrate guidance, corner and wall-footing joint detailing, penetration treatment, seam laps and fastening; it also states the product can be installed over damp surfaces or green concrete within its guide's scope.
CLAY-TITE Install Guide - Backfilled Walls | W. R. Meadows
One W. R. Meadows product guide for CLAY-TITE backfilled walls; never apply its dimensions or sequence to another product without that product's current instructions and project approval.
Accessed · Link to this claim - An ICC-published sample excerpt from the DEWALT Carpentry and Framing Complete Handbook says the carpenter should check foundation dimensions and squareness before building and address an out-of-square foundation before proceeding, while noting limits on sill overhang and the need to check local codes.
DEWALT Carpentry and Framing Complete Handbook sample | ICC Safe
Sample carpentry guidance hosted by ICC; it is coordination guidance, not a structural tolerance, code approval or permission to conceal a discrepancy.
Accessed · Link to this claim