How to Compare Slab-Edge Insulation Before a New Concrete Pour
Compare three slab-edge insulation details against climate, termite, moisture, finish, handoff, and pre-pour inspection constraints in the United States.
The short answer
Before the pour, compare the approved slab/foundation relationship—not insulation labels alone. Confirm the project’s jurisdiction, adopted energy and residential codes, climate zone, termite pathway, ground-contact limits, vapor and capillary layers, finish elevations, penetrations, and inspection sequence. Then use the worksheet to reject any detail with an unresolved mandatory gate and hand the selected section to the designer, foundation crew, concrete crew, and AHJ.How to Compare Slab-Edge Insulation Options Before a New Concrete Pour
Before the pour, compare the approved slab/foundation relationship—not insulation labels alone. Confirm the project’s jurisdiction, adopted energy and residential codes, climate zone, termite pathway, ground-contact limits, vapor and capillary layers, finish elevations, penetrations, and inspection sequence. Then reject any detail with an unresolved mandatory gate and hand the selected section to the designer, foundation crew, concrete crew, and AHJ.
This guide is for a new United States slab-on-grade home at the design-to-foundation handoff. It does not select insulation thickness, size the structural slab, prescribe termite treatment, or approve a product. “AHJ” means the authority having jurisdiction for the permit: usually the city or county building department, although the responsible authority can differ by location. Sacramento, California, and Portland, Oregon, appear only as labeled inspection examples. Your permit, approved drawings, adopted code edition, and local officials control.
Start with the slab/foundation relationship, not the product label #
The first decision is whether the selected insulation detail preserves the intended structural relationship, moisture control, and finish geometry on the approved section; the product and thickness come after that decision. DOE Building Science Education explains that foundation insulation levels depend on climate zone and that common high-R strategies place rigid insulation around a concrete slab perimeter and sometimes beneath it, while Building Science Corporation separates details according to whether the slab is monolithic with a grade beam or independent of the perimeter foundation wall (DOE on high-R foundations; BSC on slab-edge assembly types).
That distinction matters because “slab-edge insulation” can describe several assemblies that do not hand off the same way. In one assembly, the slab and grade beam are poured as a monolithic structural unit and insulation is installed outside the slab edge. In another, a slab supported on prepared grade is thermally and structurally separated from a perimeter wall by a vertical insulation or isolation layer, with insulation extending horizontally at the perimeter or under the slab. A third proposal may leave the slab structurally tied to a grade beam but add insulation horizontally under the perimeter. Those proposals are not interchangeable just because their sales sheets use the same R-value vocabulary.
The reader decision at this stage is narrow but consequential: which detail can be drawn, priced, installed, inspected, protected, and finished without creating an unanswered question at the concrete pour? The correct output is not “Option B has the most insulation.” The output is a signed section with named responsibilities and evidence that the layers visible before the pour match that section.
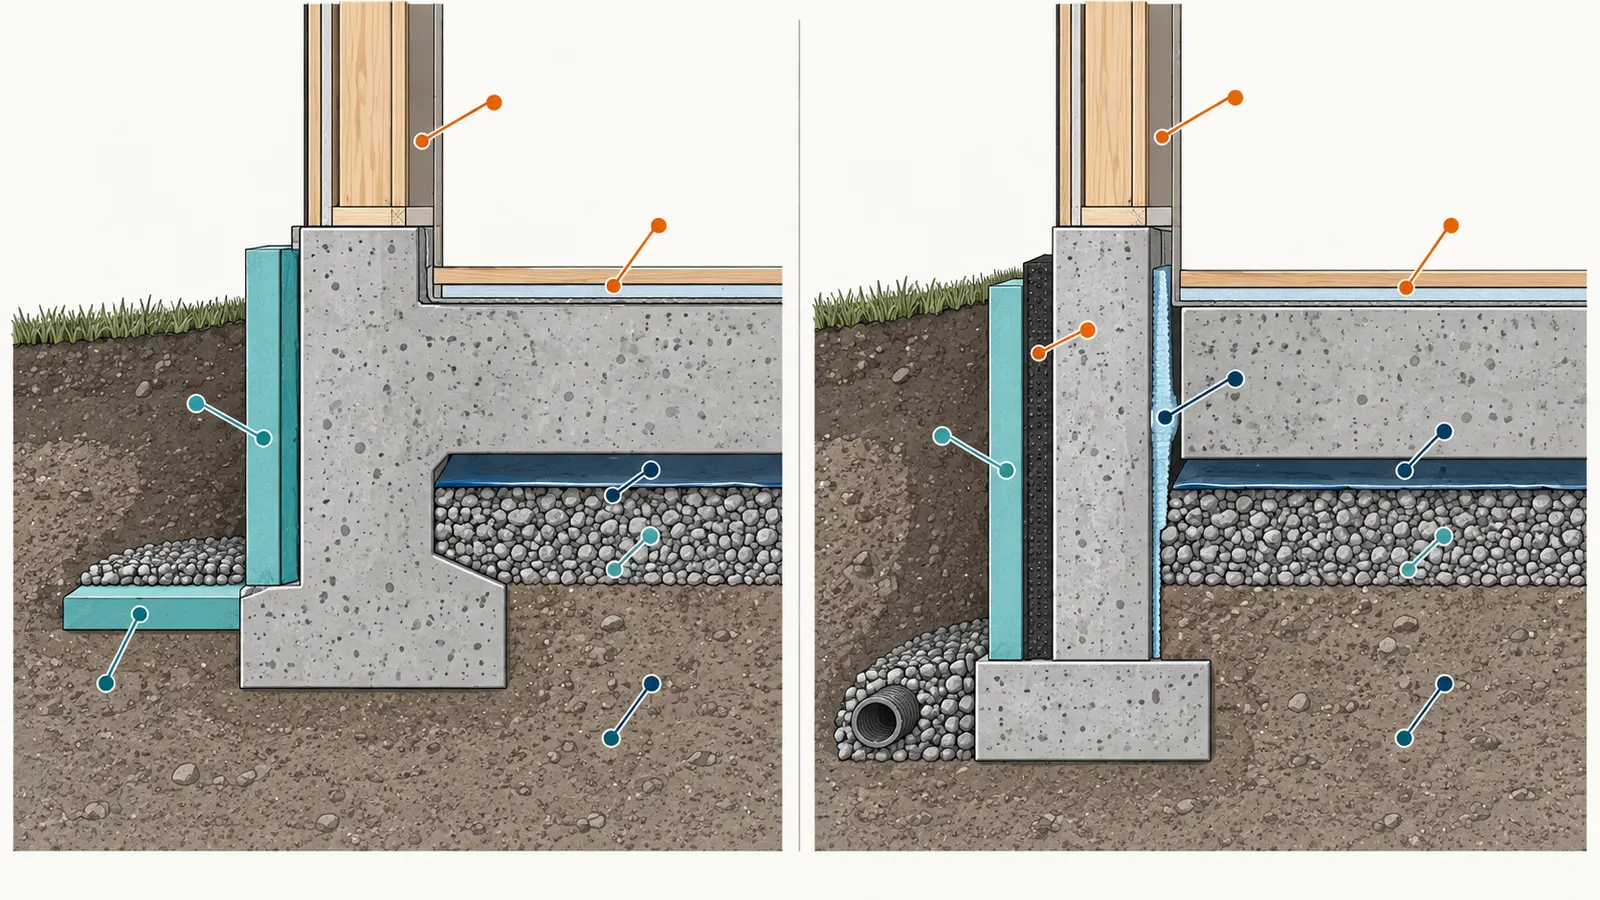
What each party must bring to the comparison
The homeowner can assemble the decision packet, but should not independently redesign a foundation. Ask the project designer, architect, structural engineer where retained, energy-code preparer, foundation contractor, concrete contractor, insulation installer, finish contractor, pest-control professional where applicable, and AHJ to resolve the items within their authority.
Bring these inputs to one coordination review:
| Input | Unit or record | Why it changes the comparison | Owner of the confirmation |
|---|---|---|---|
| Project address and permit jurisdiction | Street address; city, county, state | Identifies the AHJ and the local inspection process | Homeowner and permit holder |
| Adopted energy and residential code | Code name, edition, amendments, compliance path | Determines which prescriptive or performance requirements actually apply | Designer or code professional; AHJ confirms enforcement |
| Assigned climate zone | Climate-zone designation from the project’s code documents | Changes insulation and foundation questions; do not infer it from a nearby city | Energy-code preparer or designer |
| Foundation type | Approved plan callout and section | Tells you whether the slab is monolithic, stem-wall supported, isolated, post-tensioned, or another design | Structural designer or engineer |
| Slab and wall elevations | Inches or millimeters relative to a stated datum | Controls wall bearing, doors, finished floors, drainage, and insulation room | Designer and surveyor as applicable |
| Soil, grade, drainage, and water conditions | Geotechnical report, site plan, drainage design | Affects foundation design and whether wet conditions threaten the assembly | Geotechnical and structural professionals |
| Insulation product documents | Exact manufacturer, product, thickness, compressive data, water exposure, installation limits | Verifies the proposed board is permitted for the proposed location and loads | Designer and installer; manufacturer documents |
| Termite and insect path | Local code question, inspection detail, treatment or shield design where required | Near-ground insulation can obstruct inspection or create a concealed path | AHJ and qualified pest professional where applicable |
| Vapor, capillary, drainage, and radon layers | Section callouts and seam/penetration details | Prevents the insulation comparison from weakening moisture or soil-gas control | Designer, foundation crew, AHJ where applicable |
| Floor and exterior finish package | Finish thicknesses, tolerances, base details, exterior grade | Prevents doors, cladding, flooring, and transitions from losing their intended elevation | Designer and finish trades |
| Penetration register | Pipe, conduit, sleeve, anchor, post-tension, and drain locations | Every penetration can interrupt insulation, membranes, or inspection visibility | Plumbing, electrical, structural, and concrete teams |
| Inspection sequence | Inspection names, codes, required evidence, lead time | A detail cannot be released if required work will be covered before approval | Permit holder and contractor; AHJ controls |
Do not let a bid substitute for these inputs. A contractor may be very experienced and still be pricing a different slab/foundation relationship. Ask each bidder to mark the same plan section, show the same elevations, identify the same protection and termination materials, and list what happens before the concrete crew arrives. If a bid says only “R-10 perimeter foam,” it has not yet answered where the board sits, what it bears against, whether it touches ground, how the wall loads are carried, how the finish is supported, or how it remains inspectable.
What “compare” means here
This guide compares coordination exposure. It does not calculate annual energy use, predict floor temperatures, determine structural adequacy, or declare code compliance. The scientific sources explain why insulation location, gaps, moisture, and insects matter, but a source drawing is not a permit drawing for your lot. BSC says its slab-edge strategies depend on the assembly and that width can be limited by floor-finish attachment and the foundation wall width needed to support the wall structure (BSC slab-edge detail).
The practical test is therefore: can the team answer every handoff question before the pour, in the same language and on the same section? If not, the detail is not ready to be compared on price or convenience. Resolve the missing input first.
Freeze jurisdiction, climate, and approval inputs before choosing a detail #
You should not choose among slab-edge details until the project’s actual AHJ, adopted code editions, climate-zone assignment, permit drawings, and inspection path are recorded. A model code, a federal guide, and a neighboring city’s checklist can inform questions, but none automatically becomes your project’s local rule. The 2024 International Residential Code Chapter 4 model text directs foam plastic use in areas of very heavy termite infestation to a separate code provision (2024 IRC Chapter 4). Its Appendix NF separately publishes F-factor tables for alternative slab-on-grade insulation configurations, including horizontal insulation under the slab at the perimeter and vertical insulation on the exterior face at the slab edge, with adjustment notes and other conditions for the tabulated values (2024 IRC Appendix NF). The adopted code, project climate zone, and compliance path determine whether and how those options apply; neither model-code page proves adoption by a particular city, county, or state or replaces the project’s actual compliance review.
This is the first gate because the same physical detail can have different review consequences in different jurisdictions. Even within one state, a city building department, county building department, special district, or state program may administer the permit. The local authority can require a particular inspection, accept a performance compliance path, ask for a deferred submittal, or require access to inspect a concealed condition. The homeowner’s job is not to recite a national rule; it is to make the project-specific question visible early enough that the section can change without demolishing work.
The jurisdiction record
Create a one-page record in the project file with these fields:
- Site address, parcel if useful, and the city/county/state named on the permit.
- AHJ name, permit number if issued, contact page, and the date the inspection sequence was checked.
- Adopted residential code edition and local amendments.
- Adopted energy code edition or alternative compliance path.
- Assigned climate zone and the document that assigns it.
- Any local termite, radon, flood, wildfire, frost, or special-inspection condition shown on the permit or approved plans.
- The drawing number and revision of the slab/foundation section being priced.
- The person responsible for asking the AHJ a question and the answer date.
The assignment brief uses Sacramento and Portland as examples because their public inspection guidance makes the pre-pour handoff concrete. The City of Sacramento’s checklist for residential one- and two-family slab-on-grade projects identifies a “Concrete Slab #12” inspection before pouring to verify gravel, moisture barrier, and slab wire mesh or rebar, while warning that the checklist may not include every inspection for a specific permit (City of Sacramento residential slab-on-grade checklist). That is a Sacramento example, not a California-wide instruction.
Portland, Oregon, gives a different example of how a local sequence may be written. Its residential inspection guide places the concrete floor slab inspection after under-floor plumbing, electrical, mechanical, and gas work has been installed and approved; after the ground is prepared and leveled; and after forms, reinforcing or mesh, and under-slab insulation when required are in place. Portland also recommends allowing 24 hours between inspection and pour for corrections and reinspection (City of Portland residential inspections). That timing is a Portland example, not a national waiting period.
Climate zone is an input, not a guess
Climate zone should be taken from the project’s code documents or verified by the responsible code professional. “It is a warm place” does not establish the code climate zone, and an online map does not settle the adopted compliance path. DOE explains the general relationship—code insulation levels for foundations are based on climate zone—but the actual requirement may depend on the code edition, prescriptive table, tradeoff path, and local amendment (DOE high-R foundations).
Record the climate-zone designation as an input to each row of the worksheet, not as an automatic score. For example, if the code professional has not yet confirmed whether the project is using a prescriptive slab F-factor, a perimeter R-value path, or an energy-model tradeoff, mark “climate/code path unresolved.” Do not compensate for that unresolved gate by assuming a thicker board or a more expensive product will pass.
The distinction between R-value and F-factor is also important. An R-value describes resistance to heat flow through a material under stated conditions; an F-factor is used in certain code calculations for slab-on-grade heat transfer and is tied to the assembly. The 2024 IRC Appendix NF publishes F-factor tables for configurations such as horizontal insulation under the slab at the perimeter and vertical insulation on the exterior face at the slab edge, and its notes provide adjustment factors and conditions for the tabulated values (2024 IRC Appendix NF alternative insulation options). The appendix itself is not a climate-zone table or a universal selection chart: confirm the adopted code, the project’s climate zone, whether Appendix NF is adopted or approved for use, and the project’s compliance path before relying on an option.
The freeze point
Set a decision freeze before excavation or formwork reaches the point where a change would move walls, doors, plumbing, or the pour date. A useful freeze record says:
- “This is the current approved section,” with drawing number and revision.
- “This is the structural relationship,” such as monolithic grade beam, stem wall with independent slab, or another engineered condition.
- “This is the code path and climate input,” with the responsible reviewer.
- “These are the insulation location, termination, protection, and product-document requirements.”
- “These are the termite, moisture, finish, and inspection questions that are closed or still open.”
- “No trade may substitute a different location or product without a documented revision and re-review.”
If the foundation contractor proposes a different detail after this freeze, classify it as a design change. Ask the designer or engineer to revise or approve the section, ask the code professional whether the compliance path remains valid, and ask the AHJ whether a revision or additional inspection is needed. A field substitution is not a harmless procurement change when it moves the structural or moisture boundary.
Compare the three detail families on the same section #
The three useful comparison families are exterior slab-edge insulation, perimeter-under-slab insulation, and a foundation-isolated slab detail; each can be valid only when it matches the approved structural design, climate/code path, moisture strategy, termite path, and finish geometry. Building Science Corporation says a monolithic slab/grade beam detail places insulation on the exterior of the slab edge/grade beam and extends it to the bottom of the grade beam, whereas an independent slab can use a bond break at the wall/slab interface with vertical and horizontal insulation (BSC slab-edge detail).
Use the table as a screening comparison. “Lower” and “higher” refer to coordination burden in the typical arrangement described, not to energy performance or code likelihood. A structural designer may reverse the practical ranking for a particular soil, foundation, finish, or schedule.
| Detail family | Structural question | Main insulation location | Ground and moisture question | Finish/elevation question | Pre-pour handoff risk |
|---|---|---|---|---|---|
| Exterior slab-edge | Is the slab monolithic with a grade beam or stem wall, and can the exterior layer avoid changing structural formwork or anchors? | Vertical outside face of slab edge or grade beam, commonly continuing down to the bottom of that beam when the approved detail calls for it | Can the exact board tolerate the proposed ground exposure, and how will the exposed board be protected from water, impact, UV, insects, and rodents? | Does protection board, flashing, cladding, and grade leave the right finished elevation and drainage slope? | High if the exterior protection and termination are left for a later trade or if a post-tension sequence is not shown |
| Perimeter-under-slab | Is horizontal insulation only at the perimeter, or under the entire slab, and does the slab need a bond break from the foundation? | Horizontal strip at the slab perimeter, sometimes paired with a vertical edge strip; exact width and thickness belong to the approved design | Can the subgrade, aggregate, vapor retarder, and insulation remain continuous and undamaged under concrete? Does the assembly drain and dry as intended? | Does the perimeter strip reduce bearing or leave enough width for wall loads, floor finishes, thickened edges, and transitions? | High if the strip is not dimensioned, is cut by penetrations, or is placed after the inspectionable under-slab layers are covered |
| Foundation-isolated slab | Is the perimeter wall carrying the exterior wall loads while the slab bears separately on grade, and is the interface intentionally separated? | Vertical insulation or isolation at the wall/slab joint, often combined with horizontal perimeter or full under-slab insulation | Does the joint preserve the capillary, vapor, air, and drainage control layers without bridging or leakage? | Does the wall bearing seat, slab elevation, flooring build-up, and door threshold remain coordinated? | High if a trade treats the isolation strip as disposable form filler or if finish loads are assumed to bear on the wrong element |
Family 1: exterior slab-edge insulation
An exterior slab-edge detail is most recognizable when the slab and grade beam are a monolithic assembly and the insulation is outside the concrete edge. BSC’s information sheet says the insulation in that condition should be appropriate for ground contact and should continue vertically to the bottom of the grade beam in the illustrated approach; it also says the above-grade part needs protection from UV and impact (BSC slab-edge detail).
Its attraction is continuity at the exposed edge. The insulation can keep the exterior-to-interior edge from becoming a direct concrete bridge, while the interior floor surface remains where the section places it. Its difficulty is that the board becomes part of a vulnerable exterior transition. Backfill, scaffolding, ladders, siding, stucco, landscaping, irrigation, insects, rodents, and later repairs can damage a board that was treated as finished work too early.
Ask for a drawn termination at the top and bottom. The top must show how the wall air, water, and thermal layers meet the slab edge; the bottom must show what happens at grade, footing, drainage, and any horizontal return. Ask who installs the protection board, flashing, drainage plane, sealants, and finish, and when each is installed. A line reading “protect foam” is not a protection detail.
For post-tensioned or specially sequenced monolithic foundations, timing deserves its own gate. BSC describes a two-step approach in which some exterior insulation is placed before concrete while the upper portion is installed after post-tensioning, showing why the approved sequence matters (BSC concrete solutions). Do not direct a crew to cover or drill around tendons based on a generic diagram; the structural team and installer must identify the safe sequence.
Family 2: perimeter-under-slab insulation
Perimeter-under-slab insulation places the thermal layer horizontally beneath a defined strip at the slab perimeter, sometimes with a vertical edge strip. The important questions are the strip’s dimension, its bearing implications, the continuity of the vapor/capillary layers, and whether the slab is intended to move independently from the perimeter foundation. It is not enough to say “insulate under the slab.”
If the slab is supported on grade and independent from a perimeter wall, BSC describes the need for a bond break between slab and wall and identifies insulation at the vertical slab edge and under the slab perimeter as a way to provide that separation (BSC slab-edge detail). The approved drawing must say where the slab bears and where the wall bears. A horizontal strip that is accidentally narrowed, displaced, crushed, or omitted can change that relationship even if the concrete thickness appears unchanged.
The under-slab sequence is also unforgiving because the evidence disappears under concrete. Before the pour, someone must be able to see the prepared grade, aggregate or capillary break, vapor retarder, insulation, reinforcement, sleeves, and edge conditions. DOE Building Science Education recommends a capillary break beneath slab foundations and describes sealing the barrier at joints, foundation walls, posts, and pipes to maintain continuity (DOE capillary break guidance). The exact material, lap, sealant, and inspection requirement still comes from the approved project documents and AHJ.
Ask the installer to mark the perimeter strip’s inside and outside edges with a dimension in inches or millimeters and to provide a photo plan before the next layer covers it. A photo with no scale, no room labels, and no penetration references proves very little. The useful record shows the slab outline, strip width, corners, thickened areas, sleeves, posts, drains, and any repair patches.
Family 3: foundation-isolated slab details
A foundation-isolated slab is a relationship, not a brand of insulation. The exterior wall foundation carries the wall loads, while the slab bears on prepared grade and is separated from the wall by an intentional bond break or isolation layer. The section must show the separation, the wall bearing, the floor build-up, and the finish transition together.
This family can provide a clean thermal break at the wall/slab joint, but it moves coordination into the narrow space where several trades want to work. The strip can be mistaken for a temporary form, cut to pass a pipe, crushed by concrete placement, or bridged by a hard patch. The slab can also be poured to the wrong elevation if the crew measures from the wall seat rather than the actual finished-floor datum.
BSC notes that the width of slab-edge insulation in an independent arrangement is limited by floor-finish attachment and by the foundation wall width needed to support the wall structure (BSC slab-edge detail). That is why the flooring contractor belongs in the pre-pour review. A tile underlayment, wood floor, polished-concrete finish, thick carpet pad, or transition at a garage may change how much room the detail has without changing the nominal slab thickness.
Ask the designer to draw a vertical line through the exterior wall, slab edge, finish, door threshold, and exterior grade. Then ask the team to identify which element bears load, which element stops liquid water, which element controls vapor or soil gas, which element provides the thermal break, and which element is removable or inspectable. If the answers point to different layers, the section needs revision before concrete.
Do not merge the families into a fictional fourth option
A bid may combine “exterior foam,” “under-slab foam,” and “isolated slab” as if adding all three automatically improves the project. It may, but only if the structural, moisture, finish, and code documents were designed for that combination. More layers can reduce coordination clarity, consume elevation, interfere with anchors, create a water trap, or leave no route for inspection.
Ask each proposed option to answer the same six questions:
- What concrete element carries the exterior wall load?
- Where does the slab bear, and where is it intentionally separated?
- What insulation surface is in ground contact, near ground, or exposed above grade?
- How do the vapor, capillary, drainage, and soil-gas control layers close at corners and penetrations?
- How are finishes, doors, cladding, grade, and exterior drainage held to the section’s elevations?
- What can the inspector, homeowner, and next trade verify before it is covered?
An option that cannot answer all six is not ready for a cost comparison.
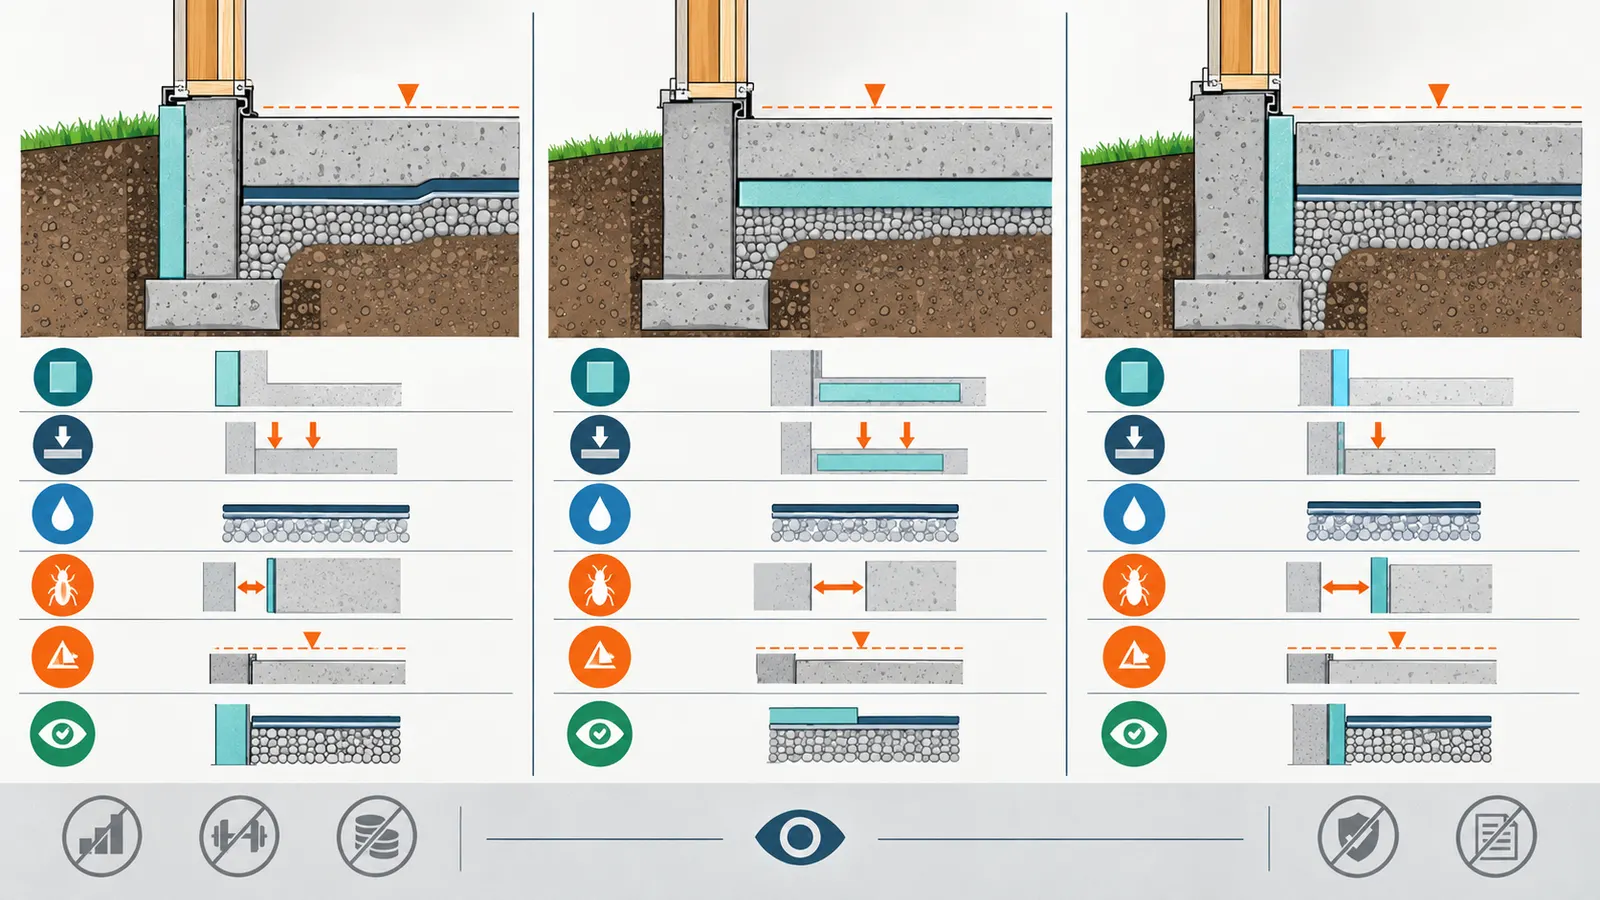
Use the coordination-risk matrix to reject weak options #
The worksheet below compares unresolved coordination burden, not predicted savings, thermal comfort, or compliance. A detail may score well and still fail if a mandatory structural, code, termite, product, moisture, or inspection gate is open. A detail may score poorly because the drawings are incomplete even though the final assembly could be excellent; the correct response is to close the missing evidence, not to declare the material bad.
The matrix method
For every proposed detail, copy the same ten rows into the project decision record. Score each row from 0 to 3:
- 0 — closed: the approved document, responsible person, and pre-pour evidence are identified.
- 1 — low exposure: the requirement is understood and one minor coordination note remains.
- 2 — material exposure: the detail is plausible, but a handoff, dimension, document, or sequence is incomplete.
- 3 — unresolved gate: no responsible confirmation exists, or the proposal conflicts with an approved requirement.
The illustrative unresolved-burden formula is:
U = C + R + G + T + M + F + P + I + H + X
where:
C= climate and code path,R= slab/foundation relationship,G= ground-contact and product documentation,T= termite or insect inspection path,M= moisture, capillary, vapor, drainage, and soil-gas continuity,F= finish elevation and attachment,P= penetrations and special structural items,I= inspection and release timing,H= handoff responsibility and evidence record, andX= exterior protection, grade, and long-term exposure.
The score ranges from 0 to 30. It is a coordination signal only. Do not call the lowest score “the most energy efficient,” “the cheapest,” or “code compliant.” First apply the mandatory gates: structural designer/engineer approval, code-path confirmation, exact product-document review, termite/insect resolution where relevant, moisture-layer continuity, finish elevation confirmation, and AHJ inspection release. If any mandatory gate is scored 3, the option is hold, whatever its total.
Blank worksheet
| Row | Question to answer | Responsible confirmer | Evidence to attach | Exterior edge | Perimeter-under-slab | Foundation-isolated slab |
|---|---|---|---|---|---|---|
| C | Does the assigned climate zone and adopted energy-code path support this location/configuration? | Designer or energy-code professional; AHJ for enforcement | Code worksheet, approved detail, written AHJ answer if needed | |||
| R | Does the insulation location preserve the approved bearing, grade beam, wall, slab, and isolation relationship? | Structural designer or engineer | Signed/revised section and structural notes | |||
| G | Is the exact product documented for the proposed ground, moisture, load, and temperature exposure? | Designer and installer; manufacturer document | Product data sheet and installation limits | |||
| T | Can termites or other insects be addressed and inspected under the actual local path? | AHJ and qualified pest professional where applicable | Local requirement, detail, treatment/shield/inspection note | |||
| M | Do aggregate, vapor/capillary, drainage, air, and soil-gas layers remain continuous at edges and penetrations? | Designer and foundation/concrete crew | Section, penetration detail, photos before cover | |||
| F | Do wall bearing, finished floor, thresholds, cladding, grade, and drainage fit the selected thickness and protection? | Designer and finish trades | Elevation section, finish schedule, dimensioned detail | |||
| P | Are pipes, conduits, sleeves, anchors, reinforcing, tendons, and drains located without cutting the system? | Structural, plumbing, electrical, concrete teams | Coordinated penetration plan and field mark-up | |||
| I | Is every required local inspection scheduled after visible work is complete and before the pour? | Permit holder and contractor; AHJ | Inspection request, checklist, approval record | |||
| H | Does one named person own each handoff and the record of acceptance? | Homeowner, builder, or construction manager | Responsibility matrix, dated sign-off, photo log | |||
| X | Is above-grade and near-grade insulation protected from impact, water, UV, insects, rodents, landscaping, and later work? | Designer, foundation, cladding, and landscape trades | Protection detail, material specification, sequencing note | |||
| Illustrative total U | 0–30; not energy or code score |
Use “N/A” only when the responsible professional documents why a row does not apply. A blank is not zero. If a row is not discussed, score it 3 until someone owns the answer. This prevents the common failure in which the most familiar detail wins simply because nobody recorded its missing assumptions.
Worked illustrative example with units and sensitivity
The following is a modeled example, not a measurement, quote, test, or recommendation. Assume a 2,000-square-foot (185.8-square-meter) new slab-on-grade home with a 180-linear-foot (54.9-meter) conditioned perimeter, an exterior wall on a concrete grade beam, a polished-concrete interior finish, a separate garage slab, and a pour date that has not yet been released. The project team is comparing three concept sections. The climate-zone designation, code edition, product, and local inspection path are deliberately shown as inputs to be confirmed rather than invented facts.
For the illustrative first pass, the team records these inputs:
| Input | Modeled value | Status |
|---|---|---|
| Conditioned slab area | 2,000 ft² (185.8 m²) | Plan input, not a measured site result |
| Conditioned perimeter | 180 linear ft (54.9 m) | Plan input |
| Slab/foundation type | Monolithic grade-beam concept | Structural confirmation required |
| Interior finish | Polished concrete | Finish confirmation required |
| Exterior exposure | Near-grade edge with protection board | Detail confirmation required |
| Climate zone | Not assigned in this illustration | Mandatory open input |
| Adopted code path | Not assigned in this illustration | Mandatory open input |
| Local termite path | Not assigned in this illustration | Mandatory open input |
| Inspection | Not assigned in this illustration | Mandatory open input |
The team then scores the concepts as a snapshot after a coordination meeting. These numbers are illustrative judgments about missing coordination evidence, not field observations:
| Row | Exterior edge | Perimeter-under-slab | Foundation-isolated slab |
|---|---|---|---|
| C | 2 | 2 | 2 |
| R | 1 | 3 | 2 |
| G | 1 | 2 | 2 |
| T | 2 | 1 | 2 |
| M | 1 | 2 | 2 |
| F | 2 | 2 | 3 |
| P | 1 | 2 | 2 |
| I | 2 | 2 | 2 |
| H | 1 | 2 | 2 |
| X | 3 | 1 | 1 |
| U | 16 | 19 | 20 |
The exterior-edge concept has the lowest illustrative total but cannot be released: X = 3 means protection and near-grade exposure are unresolved, and T = 2 means the local inspection path is still material. The perimeter-under-slab concept has R = 3, so the structural relationship is a hold even though its exterior protection row is low. The foundation-isolated concept has F = 3, so the flooring, wall seat, and threshold geometry must be redrawn. The matrix has done its job by exposing different reasons to stop; it has not selected insulation.
The team can show sensitivity without pretending to predict performance. Suppose the exterior-edge proposal receives a local termite detail and protection-board drawing, moving T from 2 to 0 and X from 3 to 1. The total changes by:
U₂ = 16 - 2 - 2 = 12
That four-point change does not prove the detail is better. It shows that two missing handoffs dominated the initial coordination burden. If the code path later changes C from 2 to 3 because the proposed configuration is not accepted under the selected compliance path, then:
U₃ = 12 + 1 = 13, and the option returns to hold because a mandatory gate is open.
For a second sensitivity, suppose the polished-concrete finish is replaced with a floor finish requiring a different build-up. If the designer changes F for the exterior edge from 2 to 3, then U becomes 14; if the finish detail is fully redrawn and F becomes 0, then U becomes 12. The matrix records why the score moved. It does not say that one finish saves energy or that one insulation type causes a defect.
How to interpret the result
Use the total to decide where the next meeting goes, not which product goes on the purchase order.
- 0–8 with no mandatory 3: the concept may be ready for final document review, subject to professionals and the AHJ.
- 9–16 with no mandatory 3: the concept needs targeted coordination before release.
- 17–30, or any mandatory row at 3: hold the pour decision and close the named gaps.
Those bands are Brictale’s illustrative editorial thresholds, not a code or engineering standard. A small project with one unusual penetration can deserve more review than a large project with a familiar detail. A low total cannot overcome a structural conflict. A high total can fall quickly when the team supplies the missing drawing and responsibility record.
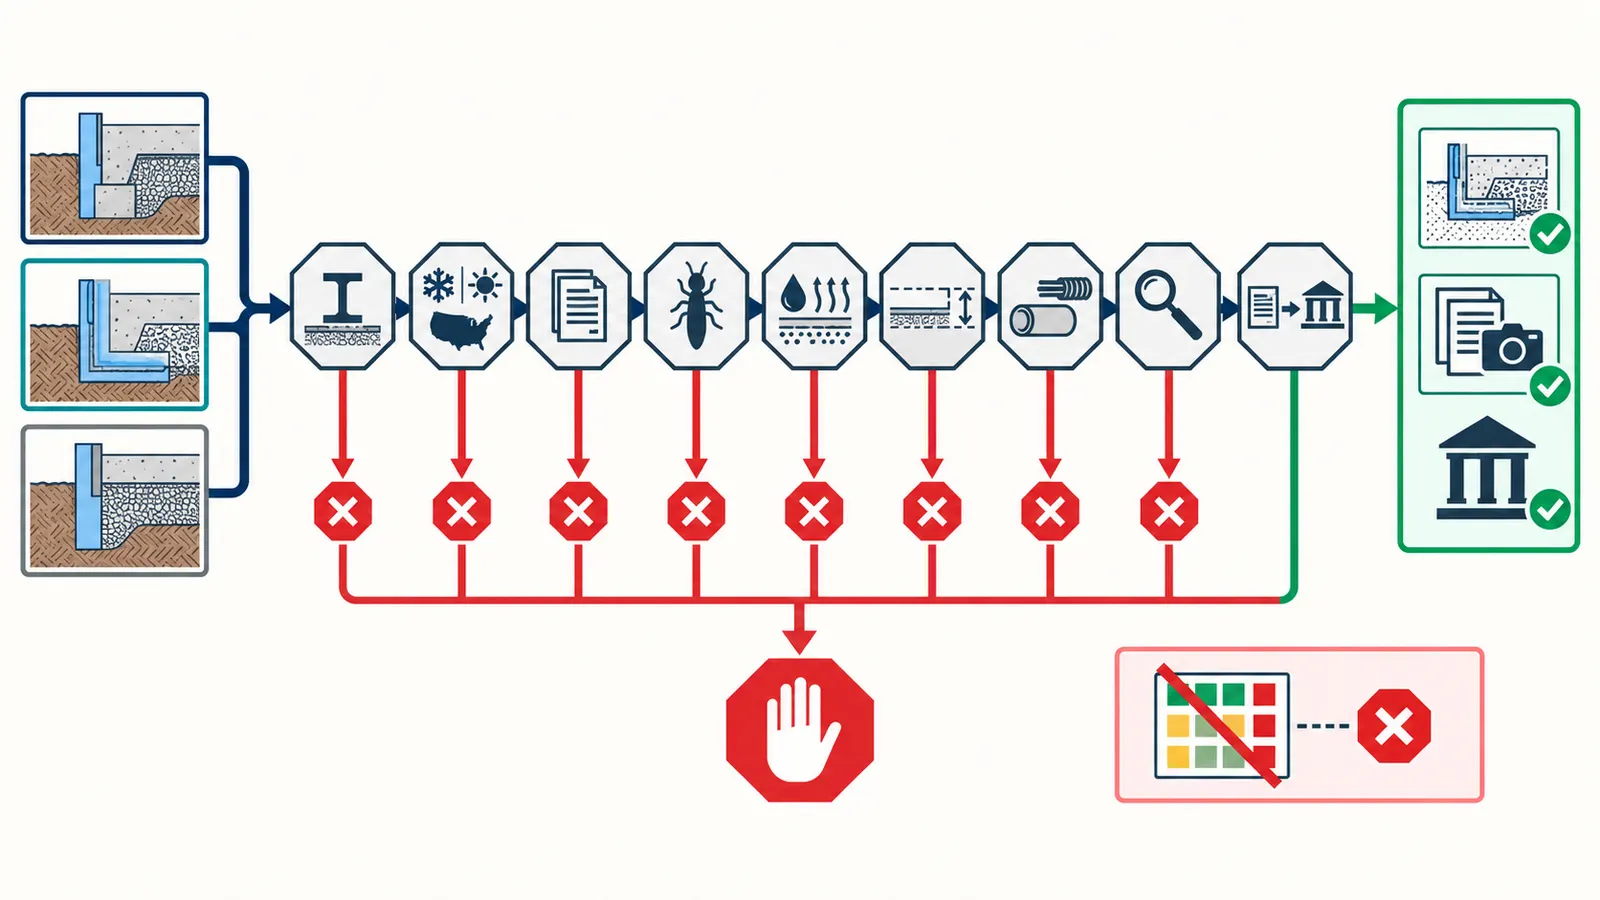
Close moisture, termite, finish, and penetration handoffs together #
An insulation location is acceptable only when the neighboring control layers and trades remain coordinated; the thermal board cannot be reviewed as an isolated rectangle. DOE describes the slab moisture assembly as a capillary break and vapor barrier with sealed joints and transitions, while BSC emphasizes that exterior insulation needs protection and that near-ground insect measures vary by location (DOE capillary break guidance; BSC slab-edge detail).
Moisture and capillary control
Separate four questions that are often compressed into “vapor barrier”:
- What stops liquid water or capillary wicking from entering the slab and wall?
- What limits vapor diffusion from the ground into the building?
- What drains bulk water away from the foundation and slab edge?
- What seals soil gas or air at the slab perimeter and penetrations, if that is part of the project’s design?
The insulation may support one or more of these functions in a specific design, but it does not automatically replace every layer. DOE Building Science Education describes a layer of aggregate beneath the slab and a vapor barrier above it, with the barrier sealed at joints and around foundation walls, posts, and pipes (DOE capillary break guidance). The source provides general guidance; the project drawing must identify the actual membrane, thickness, laps, tapes or sealants, terminations, and repair method.
At the meeting, place a highlighter on the section and trace each control layer around the entire footprint. Stop at every corner, thickened edge, interior bearing line, plumbing cluster, electrical sleeve, radon pipe, post-tension pocket, drain, and garage joint. If the line disappears, ask whether it terminates intentionally or is simply not drawn. A membrane patch around a pipe is evidence only if the drawing or approved installation method explains how it restores continuity.
Do not allow a sand layer or loose fill to be treated as an automatic moisture solution. BSC’s concrete guidance describes polyethylene in direct contact with concrete for the shown rigid-board floor assemblies and warns against placing a sand layer between polyethylene and concrete in those details (BSC Concrete Solutions). The exact section for your house may differ, which is precisely why the team should coordinate the layer names and sequence rather than copy a generic practice.
Ground contact and manufacturer documents
“Rigid foam” is not a complete specification. The responsible designer and installer should review the exact product data sheet for the proposed application, including ground contact or below-grade use, moisture exposure, compressive strength, water absorption, dimensional limits, fastening or adhesive compatibility, and any restrictions on exposed or protected use. One manufacturer example, Owens Corning’s FOAMULAR 250 data sheet, lists perimeter/foundation and directly beneath-concrete-slab applications and publishes product-specific moisture, compressive-strength, and water-absorption data (FOAMULAR 250 product data sheet). That document supports a review method; it does not approve that product for your project or generalize to EPS, mineral wool, fiberglass, XPS, or another board.
Ask the installer to put the exact product name and thickness on the submittal, not merely “XPS” or “foam board.” Ask which face is exposed to soil, whether the board is in a drained or wet location, what bears on it, how it is restrained, and what protection covers it. A product can be suitable for one ground-contact arrangement and unsuitable for another loading, drainage, temperature, or finish condition.
Keep the product question separate from the thickness question. This guide intentionally excludes insulation thickness design. The energy-code professional may use a prescriptive table, assembly U/F-factor, tradeoff calculation, or another approved compliance path. The structural professional may need compressive or bearing information for a particular arrangement. Do not choose thickness by copying a neighboring house or by treating a manufacturer’s listed R-value as the project’s code result.
Termites and inspection visibility
Near-ground insulation can hide the very edge a pest professional or inspector needs to see. BSC states that appropriate insect-control measures are required when insulation is in contact with or near ground and that the measures vary by location (BSC slab-edge detail). BSC’s concrete discussion also describes a removable strip in some jurisdictions to allow termite inspection and describes a flashing concept that acts as a moisture and pest barrier in its example detail (BSC Concrete Solutions). Neither source identifies the rule for your AHJ.
Ask the AHJ and, where applicable, a qualified pest professional these precise questions:
- Does the adopted code or local practice require a visible inspection gap, removable insulation/protection strip, shield, clearance, treatment, or another detail?
- Is the requirement triggered by foam, any exterior insulation, the climate/termite designation, the foundation type, or the concealment condition?
- Who must inspect or document it, and at what stage?
- Can the proposed protection board or flashing be removed without damaging the water and air control layers?
- What happens at porches, steps, garages, utility penetrations, and changes in grade?
Record the answer and the jurisdiction. “Termite-safe” is not a transferable product label, and “the builder has always done it this way” is not an inspection record.
Finish elevations and protection
Finish elevation is a hard input, not a cosmetic detail. Every added or relocated layer can affect the top of slab, wall seat, finished floor, threshold, cladding, exterior grade, drainage slope, stair rise, garage transition, and base trim. The exterior-edge option usually makes protection and cladding depth visible outside the concrete. The perimeter-under-slab option consumes room below the slab and may affect bearing or the width available for finishes. The foundation-isolated option concentrates risk at the wall/slab joint and floor build-up.
Ask for a dimensioned section in one consistent datum. Identify:
- top of structural slab,
- top of finished floor,
- top and bottom of the wall bearing element,
- top and bottom of insulation,
- protection-board and flashing elevations,
- finished exterior grade,
- door thresholds and accessible routes,
- garage and porch transitions,
- drainage slope and any required clearance, and
- the finish material thickness and tolerance.
The section should show who owns the final measurement. The concrete crew owns placement within its contract and approved tolerances; the designer owns the design datum; the finish trade confirms its build-up; the homeowner verifies that the record exists. A homeowner should not measure or alter structural forms to make a threshold work.
For exterior boards, protection is part of the detail’s service life. BSC says exterior slab-edge insulation must be protected from construction damage and that above-grade portions need protection from UV and impact (BSC slab-edge detail). BSC’s concrete guidance lists protection-board options in its example and discusses rodents, flashing, and removable inspection strips (BSC Concrete Solutions). Treat these as prompts to specify an approved protection assembly, not as permission to substitute a sheet of unknown material.
Penetrations and special concrete work
Build a penetration register before the final pre-pour meeting. Include every pipe, conduit, sleeve, floor drain, radon riser, water service, sewer connection, electrical grounding item, hold-down, anchor, reinforcing bar, post-tension tendon path, and thickened slab or grade beam. For each item, note its plan location, elevation, diameter or dimensions, trade owner, and the detail that restores insulation and membrane continuity.
The register prevents three distinct mistakes. First, a pipe may puncture the vapor or soil-gas layer without a designed seal. Second, a crew may cut a perimeter strip to create space for a sleeve and thereby remove an intended bond break. Third, a later trade may drill through the protected slab edge or flashing because the record was not handed over.
The homeowner can safely compare the marked plan, visible labels, and photographs from outside the work area. Do not open electrical equipment, enter an excavation, walk on unsupported forms, disturb reinforcement or tendons, or ask a worker to move a structural item for a photograph. Qualified trades own the installation and verification of these conditions.
Release the detail through a jurisdiction-specific pre-pour sequence #
The pour should be released only after the responsible contractor has scheduled the AHJ inspection, all inspectionable work is visible and approved, the final section is on site, and the team has a dated evidence record; the exact sequence belongs to the project’s permit jurisdiction. Portland’s public guide and Sacramento’s checklist show why a generic “pour after rebar” rule is inadequate: each local example names a different set of inspection inputs and caveats (Portland inspection sequence; Sacramento slab-on-grade checklist).
Gate 1: approved section and responsibility map
Before mobilization, the homeowner or permit holder should have one current drawing set. The section must identify the slab/foundation relationship, insulation location, protection, membranes, grade, finish elevation, and penetrations. The responsibility map should name who confirms each row of the decision matrix.
Ask the builder to identify the “last responsible moment” for each decision. The code path may be closed during design, the product may be accepted during submittal, the under-slab layer may be verified immediately before cover, and the exterior protection may be verified after backfill or cladding. A single early approval cannot stand in for all later evidence.
If the drawing and field layout differ, stop the affected work and issue a question to the designer or engineer. The safest next step is a documented answer or revised drawing. Do not use a homeowner photograph as a substitute for structural review.
Gate 2: site and formwork
Confirm that the foundation location, excavation, subgrade, forms, grade beam, stem wall, anchors, reinforcement, and any special structural items match the approved plan. Ask the responsible professional to verify dimensions and elevations. A homeowner can compare form locations with the plan and photograph the site from safe ground, but should not enter an excavation or climb on forms.
For an exterior-edge detail, confirm whether insulation is installed before or after the pour and whether any section of the edge must remain accessible for post-tensioning, inspection, flashing, or protection. For a perimeter-under-slab or isolated detail, confirm the seat, strip width, slab outline, and temporary restraints. If the board is being used as formwork, ask for the approved method; never infer that a board can carry fresh concrete simply because it looks thick.
Gate 3: under-slab layers and penetrations
Complete plumbing, electrical, mechanical, gas, radon, and other under-slab work that the permit requires before cover. Portland’s inspection guide explicitly places its concrete floor slab inspection after under-floor systems are installed and approved and after under-slab insulation is in place when required (Portland residential inspections).
Walk the register, not just the room. Check each penetration against the plan, confirm the vapor/capillary/soil-gas seal detail, and photograph the condition before it is covered. Mark the photograph with room, view direction, scale, date, and drawing revision. If the field condition requires a patch, record who approved the repair method and whether the inspector needs to see it.
Radon is a separate health and code question, but slab preparation is a useful example of why early coordination matters. EPA describes clean aggregate beneath the slab, polyethylene sheeting above the aggregate, a gas-tight vent pipe to the roof, and thorough foundation sealing as radon-resistant new-construction features. It also says adding a radon-control system during construction costs less than adding one after the house is built (EPA new-home radon guidance). Do not add or omit a radon system based on this article alone; ask the project’s code professional and state or local radon authority what applies.
Gate 4: insulation and reinforcement
Verify the exact product, dimensions, orientation, joints, edge returns, protection, reinforcement, and repairs against the approved section and submittal. A tape measure can document a visible dimension for the project record; it cannot approve structural bearing or product suitability. If a board is wet, crushed, displaced, cut, or unsupported, ask the installer and designer how it is corrected before the inspection.
DOE warns that gaps, voids, compression, and misalignment with air barriers can affect the installed result even when a material has a stated R-value (DOE heat-flow guidance). That is why the release record should capture continuity, not only a label. For an exterior edge, photograph the full run, corners, transitions, and protection termination. For under-slab insulation, photograph a dimensioned plan view before reinforcement or concrete hides it. For an isolated slab, photograph the wall/slab joint and any temporary restraint before placement.
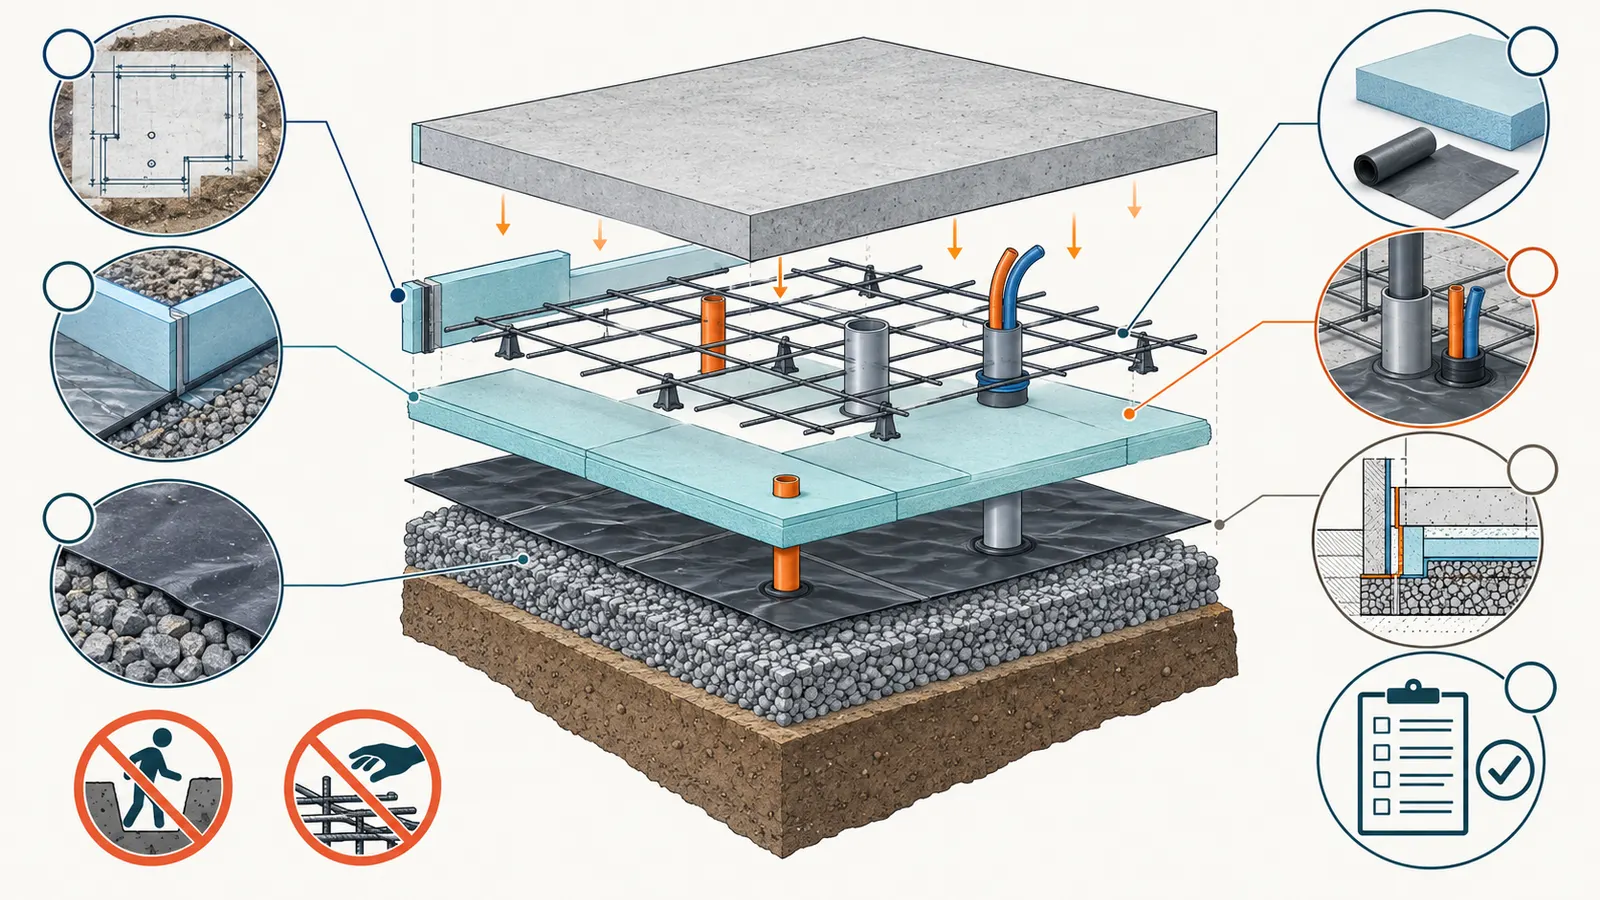
Gate 5: AHJ inspection and release
Follow the actual inspection name and timing issued by the AHJ. In Sacramento’s example, the slab inspection verifies gravel, moisture barrier, and wire mesh or rebar before the slab pour, but the city cautions that the checklist may not cover every permit’s requirements (Sacramento residential slab-on-grade checklist). In Portland’s example, the city recommends allowing 24 hours after inspection before pouring so corrections and reinspection can occur (Portland residential inspections).
Do not treat a scheduled inspection as an approval. The record should show the inspection requested, date, inspector or official record if provided, result, corrections, and release to pour. If the inspector requires a correction, return the matrix row to 3 until the correction is documented and accepted.
Gate 6: concrete placement and next handoff
The concrete crew should receive the current section, approved revision, placement notes, penetration register, and a list of conditions that may not be moved. Assign one person to photograph the visible edge and embedded conditions before, during, and immediately after placement without entering a hazardous area or interrupting the crew.
The pour is not the end of the decision. The next handoff may be post-tensioning, curing, exterior waterproofing or protection, framing, flooring, cladding, or final grade. State which evidence the next trade needs. For example, the flooring trade may need the finished-floor datum and the agreed slab moisture/curing requirements; the cladding trade may need the protection-board and flashing detail; the landscape trade may need the final grade and clearance; the framing crew may need the wall-bearing and anchor record.
Diagnose failure cases before they become change orders #
The most useful pre-pour comparison names the observable failure branch, the unsafe inference to avoid, and the next qualified review. A symptom at the site is not proof of the cause. Use this matrix to route questions.
| Observed condition before pour | What it may mean | What not to infer | Safest next step | Evidence to bring |
|---|---|---|---|---|
| Bid says “perimeter insulation” but no section is attached | Location, width, relationship, or protection is undefined | Do not assume exterior edge or under-slab | Request a dimensioned section and responsibility list | Bid, plan revision, marked questions |
| Board is shown outside a monolithic grade beam with no protection | Near-grade exposure is unresolved | Do not assume siding or soil will protect it | Hold exterior-edge release; ask for protection, grade, flashing, and insect details | Product data, elevation section, local question |
| Under-slab strip is narrower in the field than on plan | Thermal break, bearing, or bond-break geometry may have changed | Do not accept “the concrete will cover it” | Stop cover in the affected area; obtain designer/engineer disposition | Scaled photo, measurement, drawing revision |
| Isolation strip is cut around a pipe | Slab/wall separation or membrane continuity may be bridged | Do not infer that a small cut is harmless | Ask structural and building-science/design reviewer for an approved repair | Penetration register, photo, pipe size/location |
| Vapor barrier is torn or not sealed at a penetration | Moisture or soil-gas control may be discontinuous | Do not bury it and hope concrete seals it | Have installer repair per approved method before inspection | Repair photo, product instructions, inspector question |
| Product name changed after bid | Ground-contact, moisture, load, fire, or installation limits may differ | Do not treat same nominal R-value as equivalent | Require a substitution review and updated submittal | Original and substitute data sheets |
| Termite inspection path is not on the drawings | Local concealment or access question remains open | Do not assume national code text settles it | Ask actual AHJ and qualified pest professional where applicable | Address, adopted code, detail, written answer |
| Finish floor will be higher than section | Thresholds, doors, stairs, and wall base may no longer work | Do not grind or lower structural concrete casually | Reconcile finish schedule and datum before pour | Finish samples/spec, elevations, section |
| Inspector says additional inspection is needed | Permit-specific requirement is not captured in generic checklist | Do not pour because the scheduled inspection passed | Follow AHJ direction and update the release record | Permit notes, inspection request, revised schedule |
| Rain, standing water, or damaged subgrade appears | Prepared condition may no longer match the approved assembly | Do not cover wet or disturbed work without review | Ask foundation/concrete professional to inspect and document correction | Site photos, weather note, correction plan |
| Reinforcement, anchor, or tendon conflicts with insulation | Structural and thermal goals are competing at one location | Do not drill, cut, or relocate it in the field | Hold the area for structural direction | Structural plan, field mark-up, photo |
| Crew wants to pour before the inspection window | Schedule pressure is overriding the release gate | Do not treat a missed inspection as paperwork | Reschedule or obtain the AHJ’s lawful direction; preserve evidence | Inspection rules, pour schedule, permit record |
The “same day” trap
Concrete placement creates schedule pressure, and a homeowner may be asked to approve a field change verbally. The problem is not that every field change is wrong; it is that the change can move the load path, control layers, inspection visibility, or finished elevation faster than the drawing set can be updated.
If a change is proposed, record the exact location, dimension, reason, trade, and affected rows. Ask the responsible designer or engineer whether the change is within the approved design. Ask the code professional or AHJ whether the permit record or inspection changes. Ask the builder to identify the cost and schedule impact separately from the technical answer. The homeowner should not accept “we will fix it after the pour” when the condition will be concealed or structurally embedded.
When a source drawing and the project disagree
Federal and building-science sources are valuable for understanding mechanisms. They are not automatically project specifications. BSC’s information sheet gives separate examples for monolithic and independent slabs, while DOE’s guidance explains general capillary and thermal principles. If your approved plan contradicts a general source, bring the source to the designer and ask for a project-specific response; do not direct the crew from an internet illustration.
The same limit applies to code snippets. The IRC is a model code, and an online code page may show an edition that your jurisdiction did not adopt. Use it to form a question, then identify the actual adopted text and AHJ. Local pages such as Sacramento’s and Portland’s are useful because they show how inspection sequences are published, but neither page controls a different jurisdiction.
Make the next decision after the slab section is released #
After the slab/foundation detail passes the mandatory gates and the AHJ inspection is complete, the next decision is which trade receives which verified condition and what must remain protected until the next cover or finish stage. The handoff should preserve the selected section, not reopen the insulation comparison casually. For the broader sequence of decisions, continue with Brictale’s Managing the build journey, the canonical construction-topic route.
Release packet contents
Give the builder and next trades a compact release packet containing:
- Current approved plan and slab/foundation section, with revision date.
- Jurisdiction, AHJ, permit number, adopted code path, and climate-zone source.
- Insulation submittal for the exact product and location.
- Termite/insect resolution and any inspection-access detail.
- Vapor, capillary, drainage, and soil-gas layer details.
- Penetration register with field changes and repair records.
- Finish elevation and threshold section.
- Inspection request and result, including corrections and reinspection.
- Photo index with room/edge location, view direction, scale, date, and drawing revision.
- Named owner for the next handoff and the date the next inspection or cover is allowed.
The packet is not an official inspection certificate and does not replace the AHJ’s record. It is a project coordination record so the next trade does not rely on memory.
What to verify after placement
The post-pour review is limited by what can be safely and legitimately observed. The concrete contractor and structural professional own structural checks, curing requirements, form removal, tendon work, anchors, and concrete quality records. The homeowner can ask for records and observe accessible conditions from safe locations.
For the exterior-edge family, verify that the agreed protection, flashing, drainage plane, cladding interface, and grade sequence remains possible. For perimeter-under-slab and isolated-slab families, verify that no later trade is instructed to bridge or remove the edge isolation and that floor finish dimensions still use the agreed datum. For all families, preserve the before-cover photographs and any inspector approval.
Do not use a visible warm or cool floor, a room comfort impression, or a single infrared image after occupancy to conclude that a slab-edge detail is code compliant or energy efficient. DOE notes that installed performance can be affected by gaps, compression, and misalignment, and a remote article cannot measure the actual assembly (DOE heat-flow guidance). If a later comfort or moisture problem appears, bring the full section, product record, installation photos, finish history, drainage record, and indoor conditions to a qualified building professional.
The original contribution: Slab-edge coordination risk matrix and pre-pour release worksheet
This guide’s original contribution is the Slab-edge coordination risk matrix and pre-pour release worksheet. It is a synthesis for homeowner decision-making, not collected field data. Method: Use the approved foundation section and adopted-code inputs, score each unresolved coordination item from 0 (closed) to 3 (unresolved), and compare the resulting coordination burden only after mandatory gates are passed. The worked examples show inputs, units, formulas, and sensitivity; they do not model energy savings or establish code compliance. The matrix is grounded in DOE’s climate and thermal guidance, DOE’s capillary-break guidance, BSC’s assembly-dependent slab-edge and moisture details, manufacturer-document review, ICC model-code questions, EPA’s pre-slab radon coordination example, and the two labeled local inspection examples (DOE high-R foundations; DOE capillary break; BSC slab-edge detail; BSC Concrete Solutions; EPA new-home radon guidance).
Limitations: The matrix is an editorial planning aid, not structural engineering, an energy model, a termite-treatment instruction, a product approval, or a substitute for the AHJ, designer, engineer, pest professional, or manufacturer. Climate zone, code edition, finish tolerances, material limits, and inspection requirements must be confirmed for the actual site. The homeowner can check the contribution by tracing every score to a named document, responsible person, and pre-pour record; qualified professionals and the AHJ must still make the decisions within their authority.
Compact originality brief
Current answers commonly explain that slab edges can bridge heat and show exterior or under-slab diagrams; government and local pages separately discuss insulation, moisture layers, reinforcing, and inspections. The missing decision is how a homeowner compares the entire foundation package before the concrete and finish elevations are fixed: relationship, climate/code input, ground contact, termite visibility, moisture continuity, penetrations, responsibility, inspection, and next handoff.
The original contribution is the matrix and release worksheet above, plus the illustrative sensitivity example showing why a low total cannot override a mandatory open gate. It can be checked by asking whether each row has a project-specific drawing or source record, a named confirmer, and a dated pre-pour evidence item. If a row has only a generic label, verbal assurance, or assumed local rule, it is not closed.
Final homeowner release checklist
Use this final checklist with the permit holder and project team. Check a box only when the named person and evidence exist.
- The address, AHJ, permit number, and local inspection page or instruction are recorded.
- The adopted residential and energy code editions, amendments, compliance path, and assigned climate zone are documented.
- The current drawing identifies whether the slab is monolithic, independent, isolated, post-tensioned, or another engineered relationship.
- The structural designer or engineer has approved the selected insulation location, bond break, bearing, anchors, reinforcement, and special concrete items.
- The exact product data sheet has been reviewed for the proposed ground, moisture, load, and protection conditions.
- Termite or insect inspection, treatment, shield, clearance, or access questions are answered for the actual jurisdiction where applicable.
- Vapor, capillary, drainage, air, and soil-gas layers are drawn continuously at the perimeter, corners, joints, and penetrations.
- Finished floor, wall seat, thresholds, garage/porch transitions, exterior grade, cladding, and protection elevations are dimensioned from one datum.
- The penetration register is complete and field-marked, including sleeves, drains, radon features, anchors, reinforcement, and tendons.
- The required inspection is scheduled after visible work is complete and before concrete placement.
- Corrections and reinspection, if any, are documented; “scheduled” has not been mistaken for “approved.”
- Pre-cover photographs show location, scale, date, and drawing revision for the insulation and control layers.
- The concrete crew has the current section and a written list of conditions that cannot be moved or cut.
- The next trade has received its handoff packet and knows what must remain protected or visible.
If any mandatory box is unchecked, the next decision is not which insulation product to buy. The next decision is who must close the open gate, what document will prove it, and whether the pour date must move. That is the point of comparing slab-edge options before concrete: preserve the ability to correct the assembly while the layers, people, and approvals are still visible.
Cite this guide
Brictale. “How to Compare Slab-Edge Insulation Before a New Concrete Pour.” Published 2026-09-14; updated 2026-09-14.
https://brictale.com/build/construction/compare-slab-edge-insulation-options-before-concrete-pour · Read the Markdown version
Original contribution: Slab-edge coordination risk matrix and pre-pour release worksheet. An illustrative comparison of exterior slab-edge, perimeter-under-slab, and foundation-isolated details that turns climate, jurisdiction, ground contact, termite access, moisture control, finish elevation, penetrations, responsibilities, and inspection evidence into a release decision.
Sources and scope
Evidence behind this page
- The U.S. Department of Energy Building Science Education says foundation insulation levels are based on climate zone and describes rigid insulation around a slab perimeter and sometimes beneath the slab as common high-R foundation strategies.
Federal Building Science Education guidance; general foundation strategy, not the adopted code or required R-value for a specific project.
Accessed · Link to this claim - Building Science Corporation distinguishes slab-edge strategies by whether the slab is monolithic with a grade beam or supported on grade and independent of the perimeter foundation wall; for a monolithic assembly, it places insulation outside the slab edge/grade beam to the bottom of the grade beam and calls for ground-contact-appropriate material.
Info-513: Slab Edge Insulation
Building Science Corporation information sheet; assembly logic and moisture/thermal considerations, not a project-specific design or approval.
Accessed · Link to this claim - For a slab independent of a perimeter foundation wall, Building Science Corporation describes a bond break between the slab and wall; vertical edge insulation and perimeter or under-slab insulation can provide that separation, while finish attachment and wall-support width limit the detail.
Info-513: Slab Edge Insulation
Building Science Corporation information sheet; conceptual slab/foundation relationship and coordination limits.
Accessed · Link to this claim - Building Science Corporation states that insulation in contact with or near ground requires appropriate insect-control measures and that the measures vary by location.
Info-513: Slab Edge Insulation
Building Science Corporation general guidance; does not identify the termite rule, treatment, or inspection path for a particular AHJ.
Accessed · Link to this claim - DOE Building Science Education describes a slab capillary break as a granular layer under the slab plus a vapor barrier, with joints and transitions sealed around foundation walls, posts, and pipes to maintain continuity.
Federal Building Science Education general foundation-moisture guidance; exact materials and inspection requirements remain project and jurisdiction specific.
Accessed · Link to this claim - Building Science Corporation describes protecting exterior slab-edge insulation from construction and service damage and notes that some jurisdictions may need a removable strip or other provision for termite inspection; it also describes flashing over the insulation as a moisture and pest barrier in its detail.
Building Science Corporation detail discussion; an example of coordination, not a national termite or flashing mandate.
Accessed · Link to this claim - DOE Building Science Education explains that heat-flow calculations based on R-value can be affected by gaps, voids, compression, and misalignment with air barriers; the label value alone therefore does not verify installed assembly performance.
Building Envelope Building Science Intro Heat Flow
Federal Building Science Education general envelope guidance; not a prediction of this home’s energy use.
Accessed · Link to this claim - The City of Sacramento’s residential slab-on-grade checklist identifies a Concrete Slab inspection before the pour to verify gravel, moisture barrier, and slab wire mesh or rebar, and warns the checklist may not include every inspection for a specific permit.
Required Inspections for Residential Slab-on-Grade Foundations
City of Sacramento, California example for one- and two-family slab-on-grade projects; not a rule for other California jurisdictions or other states.
Accessed · Link to this claim - The City of Portland, Oregon places its concrete floor slab inspection after under-floor systems are installed and approved, the ground is prepared, forms are secured, reinforcing or mesh is in place, and under-slab insulation is in place when required; it recommends allowing 24 hours for corrections and reinspection before pouring.
Residential Inspections: The Start-to-Finish Guide
City of Portland, Oregon example for residential permitting and inspections; not a national sequence or substitute for the project’s approved plans.
Accessed · Link to this claim - The 2024 International Residential Code model-code text directs foam plastic use in areas of very heavy termite infestation to a separate code provision; the model text is not proof of adoption by a specific AHJ.
2024 International Residential Code, Chapter 4 Foundations
ICC model-code text; use only to identify questions for the actual adopted code and code official, not as a national legal rule.
Accessed · Link to this claim - The 2024 International Residential Code model-code Appendix NF publishes F-factor tables for alternative slab-on-grade insulation configurations, including horizontal insulation under the slab at the perimeter and vertical insulation on the exterior face at the slab edge, along with adjustment notes and conditions for the tabulated values. Appendix NF does not itself assign those options by climate zone or establish whether the appendix is mandatory; the adopted code, project climate zone, and compliance path determine whether and how the options apply, and the model-code text does not establish adoption for a specific project.
ICC model-code Appendix NF; use only to identify questions for the actual adopted code and code professional, not as a project-specific compliance result.
Accessed · Link to this claim - Owens Corning’s FOAMULAR 250 product data sheet lists perimeter/foundation and beneath-concrete-slab applications and publishes product-specific moisture, compressive-strength, and water-absorption data; those statements apply to that product and its stated conditions, not to every insulation board.
FOAMULAR 250 Rigid Foam Insulation Product Data Sheet
Manufacturer product data for FOAMULAR 250; an example of the product-document review required, not product approval or a universal specification.
Accessed · Link to this claim - The U.S. Environmental Protection Agency describes clean aggregate beneath the slab, polyethylene sheeting above the aggregate, a gas-tight vent pipe to the roof, and thorough foundation sealing as radon-resistant new-construction features, and says adding a radon-control system during construction costs less than adding one after the house is built.
How to Address Radon When Building a New Home
Federal EPA radon-resistant construction guidance; whether a radon feature is required or which standard applies depends on the project location and adopted rules.
Accessed · Link to this claim